I couldn't find a forum group for the Primera, but I see the Almera uses the same clutch master pump partnumber, so I post this issue with the Primera clutch here in the Almera group.
I've got a Primera P12 2005 with F9Q engine. It has a problem that I need to bleed the clutch very often. I can't figure out if air is getting in while driving, or is stuck from a repair.
The story is that the clutch pedal stopped working. As I had replaced the clutch slave cylinder about 80.000km ago I was hoping problem was the master cylinder this time (slave cylinder replacement requires gearbox to come out and is a lot more work to access than the master). I replaced the clutch master cylinder, and it did not help.
Then I replaced the clutch slave cylinder, bleed the system and problem seemed to be fixed for the first 1000km.
Then the clutch pedal started to get soft. I bleed the clutch again, and problem was fixed for about 150km. Then the same problem repeated it self. Ever since it has repeated itself every time I drive to or from work (150km on the highway.) Every time I bleed, I get some tiny bubbles of air at the first stroke of the pedal. Repeating strokes does not get any more air out. After bleeding the pedal feels perfect. Then, once I go for about 150km on the highway, the problem returns. When getting of the highway, the clutch does not disengage on first pedal stroke. I have to press the pedal 3-4 times fast in order to bring the pedal back to life. Sometimes the pedal does not return after the first stroke and I have to put my toe under to pull it up. After the 3-4 strokes the clutch works, but feels soft. While driving in city the clutch keeps working, but as soon as I drive a few minutes without using the pedal, it stops working again, and I have to do 3-4 strokes in order to bring it back to life.
Once I stop and bleed the clutch, it will work perfectly again, until I get on the highway. The 150km seems pretty consistent. I've tried to drive 150km on local main roads (roads where clutch is used once in a while), and the pedal does slowly get softer, and after about 150km it does no longer disengage. Again the workaround is 3-4 fast strokes on the pedal.
There is no sign of clutch fluid leaking out. The level in the reservoir does not move (except for when I'm bleeding).
After bleeding, the car can be left parked for 4 days and the clutch still feels perfect afterwards. This indicates that the problem does not develop over time, but over distance - probably related vibrations.
If parked for 4 days without bleeding before parking, the pedal is just as soft after 4 days as it was before parking.
I've tried to bleed, then put a stick to hold the pedal pressed in at 3/4 position for 3 days. The clutch felt perfect when removing the stick. No signs of any leak.
I've tried using the 3-4 fast stroke workaround for 500km. Then, once parked I bled and still there was just tiny bit of air coming out only on the first stroke. For the next 20ish strokes, no air came out.
How can I figure if new air is getting in or if there is air trapped in the system from the repair?
The fact that clutch worked perfectly for 1000km after the repair indicates that I managed to get all air out on the initial bleed after repair.
The fact that there is no sign of leaks indicates air being trapped.
That the problem seems to develop only after driving long distance indicates that trapped air is getting warm and expanding. But as the problem does not go away after cold night indicates the problem is not expanding air.
I did fill the master cylinder with fluid before installing. But I'm not sure if there was air left in it. It does have a circular thing under it. There is a tiny hole from the cylinder down into this circular thing.
See picture of the master cylinder here:
https://www.eurodel.no/hovedsylinder-cl ... 0s1007-jpn
In the picture the circular thing at the bottom looks like a hexagon, but it was circular both on the original part and the new part that I got shipped.
If there is air trapped in the system, I think this is the most likely place. Whats the secret way to get air out of there?
If the problem is air getting in, I suspect the problem must be where the tubing connects to the slave cylinder. This is a clips connector, where opening the bleeder is done by pulling the connector half way out. Is there any way to check if air is getting in here, even though no fluid is getting out?
Clutch bleeding frequently needed
-
VStar650CL

- Technical Expert
- Posts: 12095
- Joined: Thu Nov 12, 2020 1:25 pm
- Car: 2013 Nissan Altima 2.5 SL
2004 Nissan Altima 2.5 S
Re: Clutch bleeding frequently needed
If you're only getting a tiny bit of air then the leak may only be a tiny bit of fluid. It may be emerging underneath the boot on the slave cylinder, in which case it may not be visible on the outside for a long time. Ditto if it's coming from a bad seal on the back of the master, generally the firewall pad will catch it and you'll probably smell it before you can even see it. The surest way to find any tiny leak is a few drops of UV dye. In your case, bleed the system until the flashlight shows dye at the slave bleeder, then clean up the area and drive it till the pedal quits. Then inspect again with the flashlight, peeling up the boots where possible. Even the tiniest leaks can't hide from the dye.
Re: Clutch bleeding frequently needed
Where do I get such dye?
Is there a product name I should search for?
Is there a product name I should search for?
-
VStar650CL
- Technical Expert
- Posts: 12095
- Joined: Thu Nov 12, 2020 1:25 pm
- Car: 2013 Nissan Altima 2.5 SL
2004 Nissan Altima 2.5 S
Re: Clutch bleeding frequently needed
It's all over eBay and Amazon, and I'm sure your local parts store will have it (albeit more expensively). You need a kit which consists of yellow glasses, a UV flashlight, and a bottle of universal UV dye. It will only require a few drops in a small hydraulic system like a clutch. The flashlight and glasses make leaks visible as a bright yellow stain. The universal dyes are compatible with coolant, mineral-based brake and transmission fluids, motor oil, and most types of refrigerant, so you can use it for leaks in every system on most vehicles.
Re: Clutch bleeding frequently needed
Thanks. I'll order some dye.
I have a UV flashlight. I guess the dye needs to match the wavelength of the flashlight...
I have a UV flashlight. I guess the dye needs to match the wavelength of the flashlight...
-
VStar650CL
- Technical Expert
- Posts: 12095
- Joined: Thu Nov 12, 2020 1:25 pm
- Car: 2013 Nissan Altima 2.5 SL
2004 Nissan Altima 2.5 S
Re: Clutch bleeding frequently needed
I don't think the UV wavelength matters much, but you will need the yellow glasses. Without a yellow filter the dye doesn't show up well.
Re: Clutch bleeding frequently needed
While waiting for the dye to arrive (expected two weeks for delivery), there is one more thing I've noticed when bleeding, that may indicate a fault. The process I follow when bleeding is like this:
1. Open bleeder valve
2. Press pedal all the way in, slowly. (It will not return on it's own)
3. Close bleeder valve
4. Pull the pedal up, slowly
Now, if I press the pedal again, there is no resistance until the pedal is half way down. If I press pedal all the way down there is not enough fluid in the tube to disengage the clutch. But there is enough fluid to make the pedal return to normal position when I take my foot of. Now, when I press the pedal one more time, it works perfectly, and reminds that way until I drive the 150km to work.
I'm wondering if the behavior described above indicates that there is an issue with new fluid not getting into the master cylinder. What could be causing such behavior?
Could this explain the pedal getting soft after driving longer distance?
Could the problem be that there is some debris in the pipeline?
I'm wondering if I should take the master cylinder out of the car, blow through both the high pressure pipe, the supply pipe and the master cylinder with air compressor, then put it all back together. What is the best way to make sure air is not trapped in the circular thing hanging under the master cylinder before refitting?
-
VStar650CL
- Technical Expert
- Posts: 12095
- Joined: Thu Nov 12, 2020 1:25 pm
- Car: 2013 Nissan Altima 2.5 SL
2004 Nissan Altima 2.5 S
Re: Clutch bleeding frequently needed
When you replaced the master, did you bench-bleed it first before installing it? That's super-important with clutches, they're designed differently than brake masters and you can get pretty giant air bubbles trapped inside if you don't bench them correctly before bolting them in. You need to bleed with the outlet fitting facing upward so the bubbles eject, then install it and bleed in situ.
Re: Clutch bleeding frequently needed
I did fill the master up with fluid before fitting. But I suspect I didn't do it the proper way. I did fill with the outlet facing up. But I suspect I did not manage to fill that circular thing at the bottom. I took apart the old master and found that there is just at tiny hole going down into that circular thing at the bottom. I can't think of any proper way to get the fluid down there other than fill it up, pump, shake it, tap it on the side, leave it over night, redo the shake, tap and pump, mount it and hope for the best.
Here is a picture of the master.
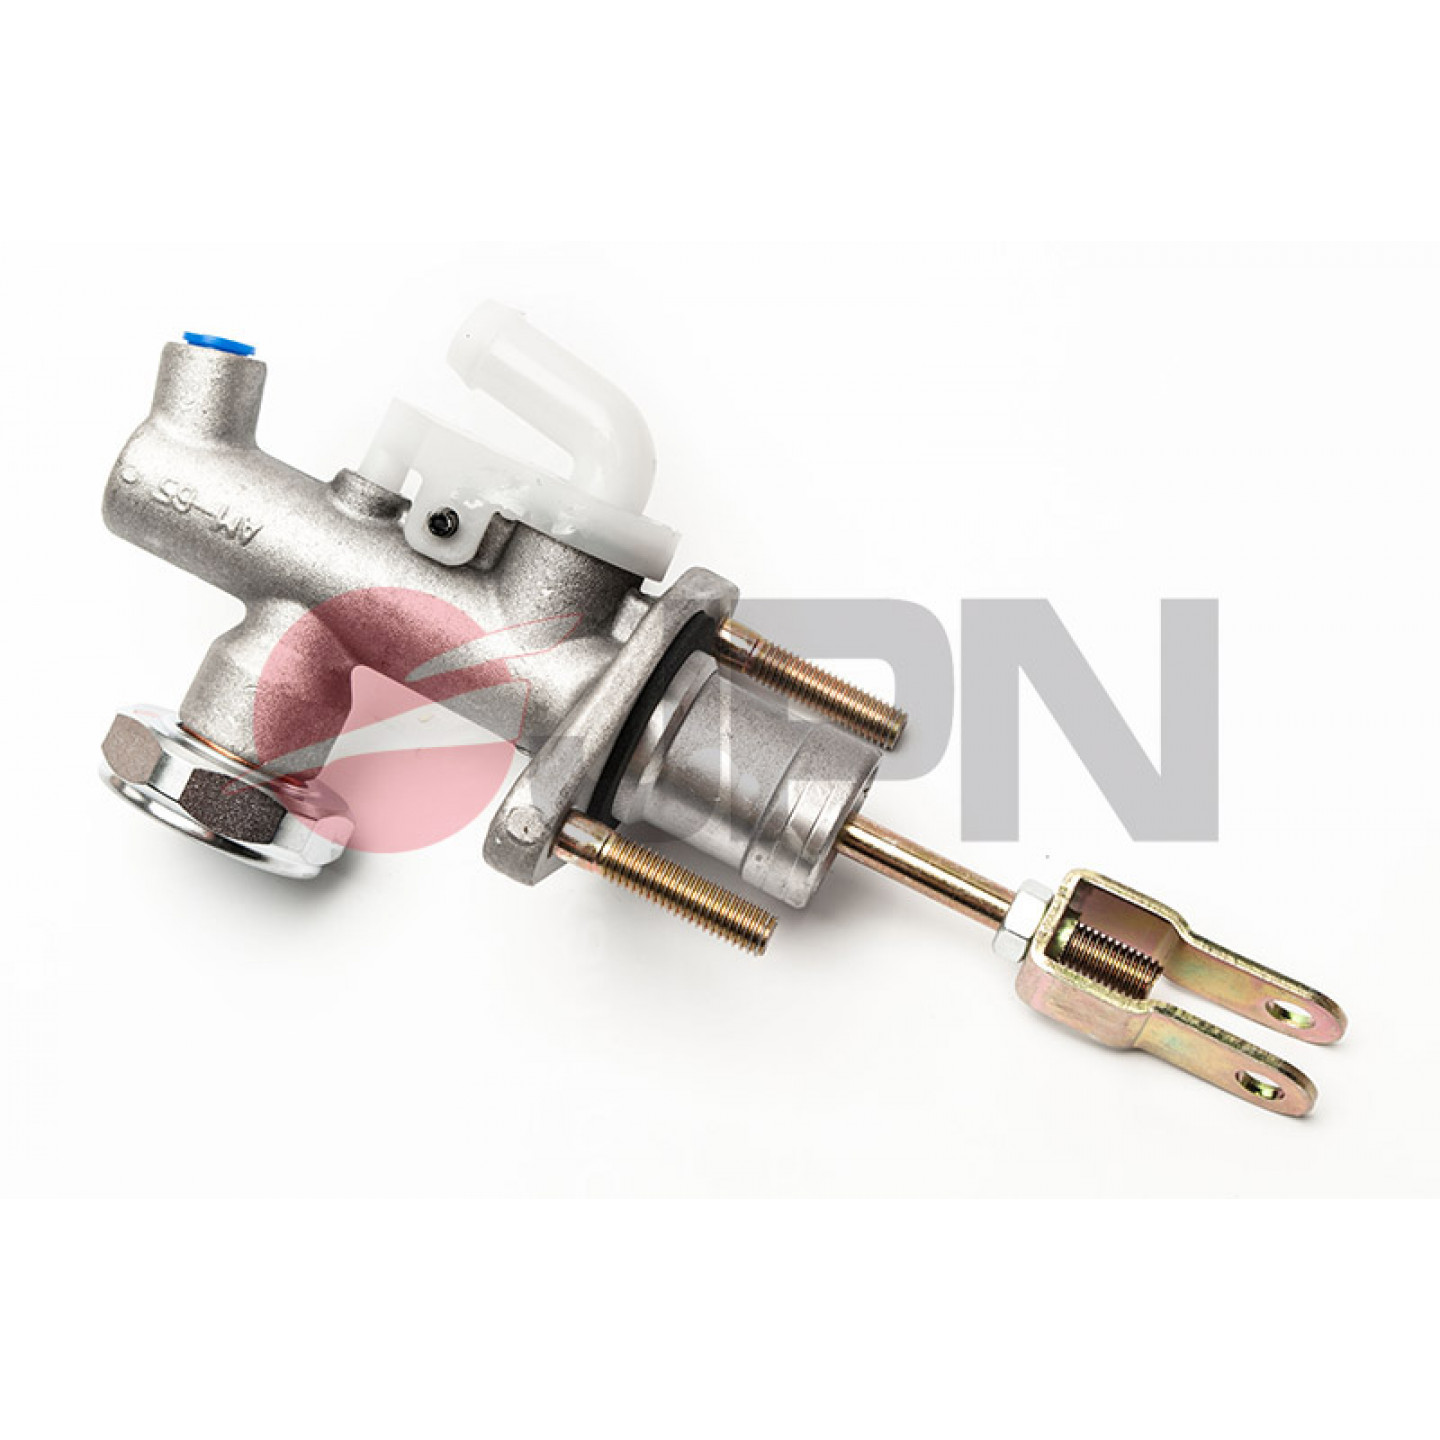
Any suggestions what is the proper way to get the air out of the circular thing (that looks hexagonal in the picture) at the bottom right side in the picture?
And besides that, there is also the white plastic bridge at the top that looks like a place to air to get trapped.
Could it be a idea to put the circular part over a gas burner to heat the air up while it is filled to make the trapped air to expand out of the circular part, then put it into ice to cool it off so that fluid is pulled down into it?
BTW: What is the purpose of this circular part? Wouldn't the master work just as good if this part was not there? (Looking at masters for other cars, they don't have this thing)
Here is a picture of the master.
Any suggestions what is the proper way to get the air out of the circular thing (that looks hexagonal in the picture) at the bottom right side in the picture?
And besides that, there is also the white plastic bridge at the top that looks like a place to air to get trapped.
Could it be a idea to put the circular part over a gas burner to heat the air up while it is filled to make the trapped air to expand out of the circular part, then put it into ice to cool it off so that fluid is pulled down into it?
BTW: What is the purpose of this circular part? Wouldn't the master work just as good if this part was not there? (Looking at masters for other cars, they don't have this thing)
-
VStar650CL
- Technical Expert
- Posts: 12095
- Joined: Thu Nov 12, 2020 1:25 pm
- Car: 2013 Nissan Altima 2.5 SL
2004 Nissan Altima 2.5 S
Re: Clutch bleeding frequently needed
My guess would be that the hex thing is a hydraulic damper. On some rides like the old 240SX's they were a separate part, but on other cars they're integral. Its purpose is to prevent chatter and vibration from the pressure plate from reaching your foot. It's basically just a stiff diaphragm and I think you'd be seeing fluid if it was letting air in, but the clutch should work fine without it if you want to plug the hole experimentally.
Re: Clutch bleeding frequently needed
That makes sense. But how is the fluid supposed to replace air in this damper through that super tiny hole?
-
VStar650CL
- Technical Expert
- Posts: 12095
- Joined: Thu Nov 12, 2020 1:25 pm
- Car: 2013 Nissan Altima 2.5 SL
2004 Nissan Altima 2.5 S
Re: Clutch bleeding frequently needed
The damper shouldn't be able to hold any air, it's just a diaphragm with an orifice that faces up. Bubbles should automatically migrate out of it. But like I said, if you think it might be responsible for your issue, there shouldn't be any harm in removing it and plugging the port.
Re: Clutch bleeding frequently needed
Guess I'll take the master out and try this all over. Does it need to be held perfectly vertical (with outlet on top) while filling? Does it need to be held in that angle during installation?
Do the piping need to be connected before the rod is put through to the cabin side? (I suspect this will be near impossible due to the stiffness of the pipe.)
Does it matter which of the two pipes are fitted first?
Should the car be parked in a stiff uphill before fitting? (The clutch bleeder is located forward and lower than the master. Parking the car with the front uphill may make the bleeder come higher than the master.)
Should the reservoir be filled before connecting to the master? (It was empty the last time I did this. This may have been a mistake as air from the tubing between reservoir and master probably got pushed into the master once I started bleeding.)
Thinking about the above questions I think the way I should try to do this is:
1. Park in the stiffest hill I can find. (I know about a grassy slope with nearly 30 degree rise accessible with car both from top and bottom. With the help of some straps and a car to pull from the top I should be able to pull the front up there. At lest part of the way.)
2. Disconnect pipe from master to slave.
3. Unscrew master from mounts
4. Wiggle the master out of its mounting hole while pipe to the reservoir is still connected
5. Rotate the master to vertical position with the outlet up
6. Pump the rod a few times (reservoir is still connected)
7. Put something into the outlet hole to avoid fluid getting out while mounting.
8. Mount master pump
9. connect pipe to clutch slave
10. bleed clutch
Does this sound like a doable plan? The part I'm most in doubt of can be done is if the master can be moved around enough while pipe to the reservoir is connected.
Any suggestions for improving the plan?
-
VStar650CL
- Technical Expert
- Posts: 12095
- Joined: Thu Nov 12, 2020 1:25 pm
- Car: 2013 Nissan Altima 2.5 SL
2004 Nissan Altima 2.5 S
Re: Clutch bleeding frequently needed
That should do it. I doubt a 30 deg incline is necessary. The way your master is constructed, pretty much any incline should send the bubbles toward the outlet.petterg wrote: ↑Tue Dec 17, 2024 5:08 amThinking about the above questions I think the way I should try to do this is:
1. Park in the stiffest hill I can find. (I know about a grassy slope with nearly 30 degree rise accessible with car both from top and bottom. With the help of some straps and a car to pull from the top I should be able to pull the front up there. At lest part of the way.)
2. Disconnect pipe from master to slave.
3. Unscrew master from mounts
4. Wiggle the master out of its mounting hole while pipe to the reservoir is still connected
5. Rotate the master to vertical position with the outlet up
6. Pump the rod a few times (reservoir is still connected)
7. Put something into the outlet hole to avoid fluid getting out while mounting.
8. Mount master pump
9. connect pipe to clutch slave
10. bleed clutch
Does this sound like a doable plan? The part I'm most in doubt of can be done is if the master can be moved around enough while pipe to the reservoir is connected.
Any suggestions for improving the plan?
Re: Clutch bleeding frequently needed
What I forgot in that plan was the potential debris stuck in there. I need to disconnect for a blow through.
What is the purpose of that white plastic going from the inlet towards the outlet, that stops and goes into the cylinder half way? Is this the path fluid uses for refilling master after a stroke when bleeding? Is the area any stuck debris will cause the behavior with master not refilling properly at stroke return?
I'm trying to think of what else could be causing the refill issue.... The only other cause that comes to my mind is if air is being sucked into the pipe during the first half of the master return stroke. But if that was the case, the same thing should happen on second return stroke.... Besides, if there were a leak big enough to fill half the cylinder with air, wouldn't that leak be big enough to result in fluid level dropping during 500km driving?
-
VStar650CL
- Technical Expert
- Posts: 12095
- Joined: Thu Nov 12, 2020 1:25 pm
- Car: 2013 Nissan Altima 2.5 SL
2004 Nissan Altima 2.5 S
Re: Clutch bleeding frequently needed
Yes on most counts. I don't think debris could be causing the problem, but a leak at the plastic fitting certainly could. The air is displacing fluid so you probably won't see a meaningful drop at the reservoir, but you get the spongy pedal because the air is compressible, unlike hydraulic fluid.
Re: Clutch bleeding frequently needed
Dye has still not arrived, but I did the master pump remount following this procedure:
Unmount the master
blow trough all piping with compressed air for the bottom up (the fluid that came out of the high pressure pipe looked dirty)
hold the master vertical with outlet upward and connect tank to master
bleed master including blocking the outlet when retracting the piston to ensure not air is pulled in through the outlet
fix the master back in position (I had the car facing uphill so the fluid stayed in the grove around the outlet and kept it flooded during mounting)
push fluid in through the bleed valve until fluid starts comming out of the end not yet connected to master outlet
connect pipe to master outlet loosly
push more fluid in through the bleed valve and let it leak out of the master outlet connector while tightening at the outlet
bleed clutch the normal way - I did not get a single bubble of air out - thinking the process of pushing fluid in the bleed valve during mounting must have been a very good way to avoid air.
This made the clutch work for about 400km, then the same problem returned. One change though - when bleeding now, the master fills with fluid at once when pedal is retracted during bleeding. (Before I had to do an extra push-release to get the master refilled.)
So, I'm back to start: Air must get into the system somehow, on the high pressure side. I wonder if this can be something that just happens when engine bay is above a certain temperature - cause it does only happen after long drives - it has never happened when going to/from town (30 min drives), and the only place I can imagine this happening is where the pressure tube connects to the slave cylinder. It is very strange that there is no signs of fluid leaking out while clutch is held pressed in for days. And if it is so that air is sucked in when pedal is released - it does not make sense that the workaround for make the pedal temporary work for a few minutes at a time is to press/release the pedal 3-4 times. If problem is air being sucked in at pedal release, I'd expect more air to get sucked in when pumping the pedal.
Wondering if the solution could be to add and extra rubber gasket at the slave cylinder connector. But I don't understand where this gasket should be - the connector has a lot of groves. If I put the gasket in the wrong place I'll probably block the bleeding functionality. Is there a drawing available for how this connector looks on the inside?