Whats up guys? I've never done a "build thread" so after several years of tearing down and rebuilding... I guess its time.
Things that have to be done:1. Reassemble the engine. I was going to go w/ all forged internals but since I've taken the car back apart, I've decided to go a different route so the KAt will be temporary; but still solid.
2. Fix the transmission.The front shaft cover(?) broke and made a hell of a ringing sound at high RPM, So I have to replace that and while I'm at it, I'll replace the front bearing.
3. Paint. My cousin who owns Scott's Custom Paint in wayx has decided to "hook a brotha up" with one of his fire-a** flame jobs; so my car will FINALLY look good as well as be fun as hell to drive.
4. Install z32 rear uprights.
5. Tune, beat-on, and repeat.
What to expect from this build thread:Just a regular guy with a job and a family that wants the most out of car ("bang vs. $$") and loves to drive the s*** out of it... Pics will all be taken with my phone so... ya know...
My youngest son digging the head-room
Couple pics of it's first drift event in cordele
Stuff that had to go...
I wish its was as easy as it looked to remove all that crap! Shaved probably ~175lbs, top and all :thumb:
Just got the car back from Connor Motor Sports in wayx. He did a great job on the cage and a really fair price.
Thats all for now... Thanks. :
Modified by caspers_240 at 7:47 AM 10/4/2009
Caspers_240 [re]-Build, KA-t VERT
-
caspers_240

- Posts: 161
- Joined: Sun Jan 08, 2006 5:14 pm
- Car: 91 s13 fastback
- Contact:

Re: Caspers_240 [re]-Build, KA-t VERT (caspers_240)
Do you have high res pic of this???? Man, this is definitely calendar worthy.caspers_240 wrote:Couple pics of it's first drift event in cordele
-
caspers_240
- Posts: 161
- Joined: Sun Jan 08, 2006 5:14 pm
- Car: 91 s13 fastback
- Contact:
Re: Caspers_240 [re]-Build, KA-t VERT (94_240sx)
thanks... Yes I do have a high res shot of it, but with my plans and goals I'd rather wait until next year to show her off. It will be a completely different beast.
If I could show off the rebirth again next year then just lmk and I'll send you the pic from the super rainy drift event.
If I could show off the rebirth again next year then just lmk and I'll send you the pic from the super rainy drift event.
-
caspers_240
- Posts: 161
- Joined: Sun Jan 08, 2006 5:14 pm
- Car: 91 s13 fastback
- Contact:
Re: Caspers_240 [re]-Build, KA-t VERT (caspers_240)
not much of an update today... My wife had class tonight so I chilled with my two sons for the most part.
I did get all the metal shavings out of the car (from grinding and cutting the back seat and chassis supports out) and kinda got the inside ready for paint.
I also hacked up my dash and got it back in the car. I called a friend of mine (turbo FC guy) that does high-end fab work with fiberglass and other "show car" stuff for a living. He said that he couldn't come over tonight but if I screwed it up we could glass it and paint it... So... ahh... yea. I'm glad he offered! :bigrin:
Anyway, pics!The dash is back in...
Looks kinda HACKED right now, but we'll,,, well Tony will fix it right! :?
This is a truck my cousin painted today... Kinda the same scheme I think we're going to go with on my car but instead of the "Candy Cobalt Blue Ghost True Flames" here, my candy brandy-wine (for the graphics) should be in this week... 8-)
The pics doesn't do it justice AT-ALL! You can't see the true flames unless its right in the sun... Looks bad-a**. Yes I suck at taking pics.
I KRYLON'ed my old hatch flat black and he got pissed... So now he wants to paint the vert for some "advertisement!" Works for me!!!
-
krash
- Posts: 4836
- Joined: Mon Apr 11, 2005 10:43 am
- Car: 1993 Nissan 240sx Convertible
- Location: Memphis, TN
- Contact:
Re: Caspers_240 [re]-Build, KA-t VERT (caspers_240)
hmmm, I dunno how flames would look on the vert, but that truck looks amazing! Your vert is looking pretty good so far too, I really like your wheels
-
DeXteR
- Posts: 2702
- Joined: Sun Sep 25, 2005 9:01 pm
- Car: '14 Nissan Titan Pro4X
'05 Nissan Xterra OR
'92 Nissan 300ZX Slicktop
'94 Nissan Sentra RS Rally Car - Location: Beulah, MI
- Contact:
Re: Caspers_240 [re]-Build, KA-t VERT (krash)
This thread makes me happy.
-
caspers_240
- Posts: 161
- Joined: Sun Jan 08, 2006 5:14 pm
- Car: 91 s13 fastback
- Contact:
Re: Caspers_240 [re]-Build, KA-t VERT (krash)
Yea, I was kinda iffy about the flames too... But, they'll be ghost, free, and my cousin is the GOD of flame jobs... He promised me that they wouldn't be ricey at all and I fully trust his work.krash wrote:hmmm, I dunno how flames would look on the vert, but that truck looks amazing! Your vert is looking pretty good so far too, I really like your wheels
Those wheels are FS too... Going with some 17x9 +18 F and 17x9.5 or 10 +?? in the back for some ~275 NT01's
DeXteR wrote:This thread makes me happy.
-
caspers_240
- Posts: 161
- Joined: Sun Jan 08, 2006 5:14 pm
- Car: 91 s13 fastback
- Contact:
Re: Caspers_240 [re]-Build, KA-t VERT (caspers_240)
just so no one thinks I'm slacking...
My car won't be as flashy as this but it will be painted by the same guy (good news, NO FLAMES)... He's pretty good. This shot was taken by the owner at some sport truck mag photo-shoot...
I'll start re-assembly of the motor tomorrow so more pics will be on the way.
My car won't be as flashy as this but it will be painted by the same guy (good news, NO FLAMES)... He's pretty good. This shot was taken by the owner at some sport truck mag photo-shoot...
I'll start re-assembly of the motor tomorrow so more pics will be on the way.
-
caspers_240
- Posts: 161
- Joined: Sun Jan 08, 2006 5:14 pm
- Car: 91 s13 fastback
- Contact:
Re: (the vert)
Short answer = yes... But think about what your removing and the purpose of it b4 u cut it out. There is a LOT of chassis reinforcement in that area but the [rear seat bracket] shouldn't effect it very much at all. GL; and get plenty cutoff wheels
-
caspers_240
- Posts: 161
- Joined: Sun Jan 08, 2006 5:14 pm
- Car: 91 s13 fastback
- Contact:
Re: (caspers_240)
For the rear cover:
Some body brought me an old high school sign that has two thin gauge sheets of aluminum with a .125" sheet of lexan in the middle (FOUND OUT THAT THIS IS ALUMINITE). It should be easy to work with and still be strong w/ minimal weight gains.
More pics on this tomorrow. The first test fit looked great tho!
-
caspers_240
- Posts: 161
- Joined: Sun Jan 08, 2006 5:14 pm
- Car: 91 s13 fastback
- Contact:
Re: Caspers_240 [re]-Build, KA-t VERT (caspers_240)
So the motor build hasn't gone as smooth as I had hoped for... While installing rings and checking everything, I noticed that the top of the pistons on 3 and 4 were about to lift.... There should be AT THE MOST (according to FSM) 0.004" between the top of the ring and the ring land. #4 had about .044". :o This is why too much fuel is also bad...
I had some stock pistons that were in pretty good shape so a couple days later I cleaned them up and put them on my current rods. No biggie... Then as I was installing the pistons, the top compression ring wouldn't go in. (wtf right??) The freaking ring was too big for the depth of the ring land. (stupid sealed power rings). I took those back and got a different brand (B&A) and they seem to be fine. Now MAYBE I can get my motor back together this weekend. :x But whatever, it happens I guess... :arrow:
Some random pics:Freshly honed (very nice job btw; thanks Stephen!) and super clean block.
Main bolts cleaned up on the wire wheel, then in the parts vat, then inspected and oiled.
Perfect ka crank. (Cleaned again after this shot b4 installation)
Slightly P&P'ed head done by myself
New(er) pistons ready for rods and rings (Bud Light sux... just so you know :thumb: )
Thanks for watching... more stuff soon!
-
Azrial

- Posts: 284
- Joined: Mon Sep 15, 2008 12:07 pm
- Car: 93 240sx vert, 1990 pignose hatchback roller
Re: Caspers_240 [re]-Build, KA-t VERT (caspers_240)
you should do the thing I decided to do with my build and just cut a hole in the floor so I can fred flinstone it a little bit.
But no seriously. It will be cool to see someone building a Ka turbo from the ground up. Keep us updated with pictures. Looks like a fun project.
But no seriously. It will be cool to see someone building a Ka turbo from the ground up. Keep us updated with pictures. Looks like a fun project.
-
caspers_240
- Posts: 161
- Joined: Sun Jan 08, 2006 5:14 pm
- Car: 91 s13 fastback
- Contact:
Re: Caspers_240 [re]-Build, KA-t VERT (Azrial)
Will do... I'll probably be selling this engine / trans and all my turbo stuff soon so this will also show what I've put into this package...Azrial wrote:But no seriously. It will be cool to see someone building a Ka turbo from the ground up. Keep us updated with pictures. Looks like a fun project.
-
caspers_240
- Posts: 161
- Joined: Sun Jan 08, 2006 5:14 pm
- Car: 91 s13 fastback
- Contact:
Re: Caspers_240 [re]-Build, KA-t VERT (caspers_240)
Guess its time for an update...
Hope you like pics!
I had a different set of pistons (than the ones that the top was coming off) out of another KA that saved my a**. So, I dug them out, cleaned and deburred them and they were like new. Lucky for me huh?
The "BFOH" was there just incase they sent me the wrong rings again... Everything went in smoothly this time tho.
I was concerned about the Clevite bearings from stories I've heard but they were smooth out of the box and all the rod bearings were .0015". Can't really ask for better than that.
Very handy cheat sheet:
After everything has been nicely lubed with a mixture of oil and moly lube, torqued, and checked twice... The bottom end is done. ARP head studs and Felpro head gasket FTW.
For the installation of the studs, just hand tighten the studs with moly lube on both ends of the threads, moly lube or oil the washers and put them in the head (I like to mix moly and oil myself...). You won't be able to get them in if you put the head on first (duh :oops: ). Put on the head and follow the FSM.
Be sure to install the studs with the 5mm allen head end up. You want to be sure that it is bottoming out, but with out being tight... Know what I mean??
I like to go ahead and put some Permatex at the junction point to prevent leakage here.
I also like to lube up my socket when TQ'ing the head. May not make a difference at all, but it is gaining friction and resistance from rubbing on the side of the head.
-
caspers_240
- Posts: 161
- Joined: Sun Jan 08, 2006 5:14 pm
- Car: 91 s13 fastback
- Contact:
Re: Caspers_240 [re]-Build, KA-t VERT (caspers_240)
Next up is the timing chain assembly:
I lube everything. The first KA I built, I listened to a guy that told me not to use Moly that engine oil was enough. Well, he was wrong. It gaulded the s*** out of everything on the head... May work for SBC's, but not the KA.
I try not to get carried away with it b/c it WILL clog up your oil filter if you don't change it after the car has run its first 15 min or so. Wipe off any excess too. I like to mix oil and Moly so I don't have to use so much of the thick stuff.
Back to the build:I just built the motor about a year ago. When I did it the first time, I had the head decked and I lapped the valves in good, so that's taken car of. I also re shimmed everything to spec. I took everything apart for cleaning and re-oiling b4 reinstallation.
I like to put a little molly on top of the valves, and oil the springs really good b4 I put the buckets and shims back in.
Cams are cleaned, checked, lubed and installed...Yes, they're stock... I fail.
These chains, guides, and tensioners are OEM Nissan and only about 1 year old, so they just get cleaned up and put back into action. The way I did this is against FSM, BUT; this is the way I like to do it so I can be sure that something doesn't happen and the bottom chain gets off by 1 tooth. Set the #1 to TDC of course...
I like to put everything together at this point and then go back and TQ the cams and timing stuff last and at one time so I KNOW I didn't miss anything.===================================================================================================
Next is the front cover and oil pump. Gotta take it apart, clean and inspect the pump gears or whatever you want to call them. Most people put Petrolum Jelly in here by the gobs but I feel like that will clog up the oil filter. So I pack it with moly, (I did my own test and the Moly is thick enough to prime the system, but will go thru the paper filter better than the jelly) it may not be the best way, but its what I feel is best.
And this is the current state of the motor.
-
caspers_240
- Posts: 161
- Joined: Sun Jan 08, 2006 5:14 pm
- Car: 91 s13 fastback
- Contact:
Re: Caspers_240 [re]-Build, KA-t VERT (caspers_240)
Little update on the chassis part of the car too...
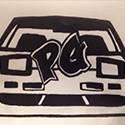
The rear cover turned out pretty good I think. It defiantly looks better than the raggity-a** rag-top I had on there with the missing back window. I guess I can't really call this a vert any more... "Project 240 T Roadster??" :shock:
===================================================================================================
A co-worker of mine happens to be one of the best welders in the area. He looked at my cage and decided that he didn't trust some of the welds... So, being the super nice guy he is, he volunteered to spend his Friday night going over suspect welds with a TIG welder. I've gotta say, I trust this cage a LOT more now!! :thumb: :thumb: :thumb: VS.
VS.
Homie is THURO!
Hope this isn't too many pictures...
The rear cover turned out pretty good I think. It defiantly looks better than the raggity-a** rag-top I had on there with the missing back window. I guess I can't really call this a vert any more... "Project 240 T Roadster??" :shock:
===================================================================================================
A co-worker of mine happens to be one of the best welders in the area. He looked at my cage and decided that he didn't trust some of the welds... So, being the super nice guy he is, he volunteered to spend his Friday night going over suspect welds with a TIG welder. I've gotta say, I trust this cage a LOT more now!! :thumb: :thumb: :thumb:
Homie is THURO!
Hope this isn't too many pictures...

Re: Caspers_240 [re]-Build, KA-t VERT (caspers_240)
thats a nice friend you got there, and he did make the welds beefier
-
caspers_240
- Posts: 161
- Joined: Sun Jan 08, 2006 5:14 pm
- Car: 91 s13 fastback
- Contact:
Re: (the vert)
Thanks for the commits on the build!the vert wrote:Yea welds do look a lot better. glad the car is coming along. What is with the hinges on the cover?
The hinges are pretty cool (for hinges anyway). They enable me to get to my circuit breaker (for the relocated battery), and my rear shocks if I want to make a quick adjustment. I'll also store my removable top back there when I get to that point.
The cool part (about the hinges) is that I can pull the latches in and completely remove the rear section.
Yea, Stephen is a super cool guy... the "give you the shirt off his back" kind of guy... I was going to re-do them myself, but he is a MUCH better welder than me.S13k wrote:thats a nice friend you got there, and he did make the welds beefier
Re: (caspers_240)
Removable top??? More info on that please.caspers_240 wrote: I'll also store my removable top back there when I get to that point.
The cool part (about the hinges) is that I can pull the latches in and completely remove the rear section.
It would be killer if you could some how incorporate the stock rag top in and use the factory front mounting locations and button the back down like the top cover does that some of us have.
-
caspers_240
- Posts: 161
- Joined: Sun Jan 08, 2006 5:14 pm
- Car: 91 s13 fastback
- Contact:
Re: (the vert)
Yea, the top will be a custom deal. Probably something jeep-like.the vert wrote:
Removable top??? More info on that please.
It would be killer if you could some how incorporate the stock rag top in and use the factory front mounting locations and button the back down like the top cover does that some of us have.
Time for another update!
BRK7e plugs lubed in all the right places
The dizzy timing on the ka has always kicked my a**! So, I thought I'd post my sugestions up here and when its time to bust this engine off, I'll let you guys know how it went. I left off the VC this time and looked at it from the inside.
-
caspers_240
- Posts: 161
- Joined: Sun Jan 08, 2006 5:14 pm
- Car: 91 s13 fastback
- Contact:
Re: (caspers_240)
Back to the updates!
I bought one of those UHMW (Circuit Sports) thermal intake gaskets, then, port matched the plenum, and gasket to the ported head.
Next I had to make a new gasket for the oil thingy... (I removed it so I could clean the block)
I used the lighter to get rid of the little fibers left on the gasket so it didn't contaminate the oil.
Everything that isn't absolutely needed has been removed and blocked off, including the PCV system.
The turbo is a GTI-r T28 w/ a T04B compressor housing and a HKS actuator. The manifold is a limited run of a Megen Racing version of a bottom mount. Not my favorite brand, but, its been good so far... This leads to a Circuit Sports dump pipe, to a CS down pipe, to a Fugitsubo (or however u spell it) exhaust. 3" from turbo back.
I'm using SR 370cc injectors for now. 8.5mm Magnacore wires, NGK BRK7E plugs. VC is still not sealed at this point.
This is a good shot of the straight fitting I used to replace the PCV system, the oil supply line, oil psi adapter, and the relocation adapter.
I drilled and tapped for the Autometer water temp sensor instead of using the stock one.
-
caspers_240
- Posts: 161
- Joined: Sun Jan 08, 2006 5:14 pm
- Car: 91 s13 fastback
- Contact:
Re: (caspers_240)
With the engine complete, it was time to attack the issues I had with the transmission.The nose of the front cover broke off and caused some really strange noises that stumped all of my car buddies. This is why you shouldn't clutch kick the crap out of the car when the clutch pedal isn't adjusted completely. :oops:
I had a spare trans with a good front cover so I ganked that one and cleaned it up real good... I was concerned about the front bearings but a couple of people that are more familiar with transmissions said that it was good. I changed the front gasket and seals.
New OEM Nissan TO bearing with a [very] little high temp grease.
I packed the stock mounts with polyurethane bought from Lowes. I thought is was black... I painted it later.
I used red schotch brite to scuff the pucks on the clutch and the pressure plate contact surface. I used the drill to clean the flywheel insert. brake cleaner on everything last.
TQ + blue loctite=Installed
Super dirty ACT HD clutch kit still holds strong!
Trans attached to the engine. I even replaced the cracked vent tube to help keep dirt and crap out of the Royal Purple gear oil.
-
caspers_240
- Posts: 161
- Joined: Sun Jan 08, 2006 5:14 pm
- Car: 91 s13 fastback
- Contact:
Re: (caspers_240)
I like to use straps instead of chains. I also like to keep the weight off the tubular mani. I made "strap keepers" using scrap aluminum.
The big homie Vato, helpin' a brotha out!
The last thing I did to the engine is pour oil all over the valvetrain b4 I seal the engine off.
Radiator finally came in. I was PISSED bc I didn't know Mishimoto was made in China. I HATE chinees crap.
I'm ashamed about how mush time I spent on these simple mounts running them through the milling machine to get this finish. I feel like such a ricer...
I don't really like the clamps that hold the fans to the radiator... I'll change them later.
-
caspers_240
- Posts: 161
- Joined: Sun Jan 08, 2006 5:14 pm
- Car: 91 s13 fastback
- Contact:
Re: Caspers_240 [re]-Build, KA-t VERT (caspers_240)
The next thing I had to build was an adapter for the z32 maf.
The first thing I did was bore the center out. I left a lip so the cold pipe would stay flush when welding. I wanted a smooth as possible for proper airflow.
Nice and tight... just the way I like it!
LMK what you guys think about my build!!!
Modified by caspers_240 at 12:45 PM 12/6/2009
The first thing I did was bore the center out. I left a lip so the cold pipe would stay flush when welding. I wanted a smooth as possible for proper airflow.
Nice and tight... just the way I like it!
LMK what you guys think about my build!!!
Modified by caspers_240 at 12:45 PM 12/6/2009
-
caspers_240
- Posts: 161
- Joined: Sun Jan 08, 2006 5:14 pm
- Car: 91 s13 fastback
- Contact:
Re: (the vert)
^^^Thanks Vert. The rest of u guys suck for not posting in my thread! 8P