Beginner 1993 240SX S13 Drift/AutoX Build

General discussion forum about the 240sx, and a great place to introduce yourself to the board!
KurumaBaka
Posts: 13
Joined: Tue Mar 24, 2015 7:46 am
Car: 2002 Nissan S15 Silvia, 1993 S13 Nissan 240SX

Post

Hey everyone, my name is Alex. I've been viewing the NICO Club forum for several years and it's been a great resource to help me learn more about the S-Chassis. So now I've decided to finally make an account and share my build with you. So this will be my intro post and I'll update with my build progress.

So to start off, I have what I would call beginner-intermediate mechanical knowledge and am very eager to learn as much as I can. I always like my jobs to be executed with quality, and the same goes for this build. I'm 23 years old and about to finish college this May, so I'll have plenty more time to work on my car after I graduate!

So for my cars:

2002 Nissan S15 Silvia Spec S which I purchased during my semester abroad in Akita, Japan in 2014. I took a road trip across Japan and back, and went drifting with it at events in Akita and at Ebisu Circuit for their Summer Drift Matsuri. I absolutely love this car, and it is a shame I cannot bring it back with me in any legal manner for a very long time. I know there are options to get it into the country, but I know that those options are not completely legal, whether it has a title or not.

Image

Image


1993 Nissan S13 240SX which I purchased in the summer of 2011. I haven't really done much to this car except enjoy daily driving it in the summer and taking it to one track for a drift event. I'm looking to make this a more track-oriented / weekend car and I'm excited to show you what I have in store!

Image

Moderators, I believe this is the right place to post this thread. If I'm mistaken, just let me know please. Thanks!


User avatar
2_Liter_Turbo
Posts: 2674
Joined: Sat Jan 24, 2004 10:41 am
Car: _________________
'96 S14 Coupe: SR20VET
'90 R32 TH1 GTR: RB26DETT
'92 S13 Fastback: SR20DET
'11 V36 Sedan: VQ25HR
'06 GMT800 2500HD: LBZ Duramax
Location: DFW, Texas
Contact:

Post

Welcome to NICO! That's a nice pair of cars! This is the correct spot to post this thread, so no worries there. What do you have done to the 240SX?

KurumaBaka
Posts: 13
Joined: Tue Mar 24, 2015 7:46 am
Car: 2002 Nissan S15 Silvia, 1993 S13 Nissan 240SX

Post

So, I'm starting off this build with a bad KA24DE engine with 170,000 miles. It might even have more miles since I found some odometer swap paperwork in the glove box which was never submitted to the DMV when the previous owner had it in Georgia :bs:

Symptoms:

Running on 3 cylinders (I unplug injector # 2, no drop in revs. Very low on power, wants to shut off)
Gasoline in the crankcase mixed in with the oil (changed oil twice with same result, very strong smell of gasoline)
Oil shooting out of the tip of the exhaust
Possible blown head gasket (white smoke)

So I've pulled the engine and transmission out.
Image

Image

Image

And then all I could think of was........
Image
Future plans are to swap in a 2JZ when I have a big enough budget :naughty:

Being a student = Being broke!

It was quite simple thanks to this awesome pulley lift! It was my first time pulling an engine of my own in my garage.
Image

So then I did a compression test on the engine. I'm not sure why I didn't do the test before I pulled the engine out of the car so that it can at least get up to operating temp for a more accurate reading.

Here are the results:

DRY
Cylinder 1: 127 psi
Cylinder 2: 140 psi
Cylinder 3: 130 psi
Cylinder 4: 122 psi

WET
Cylinder 1: 137 psi
Cylinder 2: 140psi
Cylinder 3: 146 psi
Cylinder 4: 140 psi

So before the test, my original guess was that it's possible that my #2 cylinder piston ring could be worn out since there is gasoline in the crankcase, that cylinder does not seem to have compression, and the shooting oil might be caused by the oil getting past the rings into the combustion chamber. I also thought there might be other issues but I'm not sure.

I've not yet ruled out the possibility that my wiring for injector #2 might be bad. And the gasoline in the oil could be caused by bad injector rings. I am led to believe that the problem is more severe though, and that this engine just needs to be replaced. Is it possible that I have a bad cylinder head as well?

I am more curious than anything about what is wrong with this engine. I don't plan on rebuilding my bad engine anytime soon, if I ever will even rebuild it. I just bought a used KA24DE with 125,000 miles for $400 a week ago.

My plan is to install:
New gaskets and seals
Replace belts
Install new water pump
Install new clutch and flywheel
Install aftermarket header which came with the new engine
Delete EGR and emission equipment
Delete A/C system

This is a budget build for right now, so I'm just looking to get her back up and running so I can enjoy some seat time at the track.

KurumaBaka
Posts: 13
Joined: Tue Mar 24, 2015 7:46 am
Car: 2002 Nissan S15 Silvia, 1993 S13 Nissan 240SX

Post

2_Liter_Turbo wrote:Welcome to NICO! That's a nice pair of cars! This is the correct spot to post this thread, so no worries there. What do you have done to the 240SX?
Thanks! And thank you for the compliment, I miss driving the S15 so much!

Mods on the S13:

Kaaz 2 Way LSD
Whiteline Racing front and rear sway bars
Rays Gramlight Wheels (57S model, 4-lug)
Hankook Ventus V12 tires (225/45/17)
Rotora 4-Pot Big Brake Kit (Front)
ARP hardened extended wheel studs
Stock struts with Megan Racing lowering springs
3" catback exhaust with Megan Racing muffler
ISIS short shifter
S14 240SX front seats

I believe that's all for now....

Image

Image

User avatar
2_Liter_Turbo
Posts: 2674
Joined: Sat Jan 24, 2004 10:41 am
Car: _________________
'96 S14 Coupe: SR20VET
'90 R32 TH1 GTR: RB26DETT
'92 S13 Fastback: SR20DET
'11 V36 Sedan: VQ25HR
'06 GMT800 2500HD: LBZ Duramax
Location: DFW, Texas
Contact:

Post

Off to a good start for sure. Looks like the motor is pretty tired across all four, but a leaky injector could definitely be a culprit for gas in the oil, as well as the low compression all around. You are probably getting a lot of blow-by.

KurumaBaka
Posts: 13
Joined: Tue Mar 24, 2015 7:46 am
Car: 2002 Nissan S15 Silvia, 1993 S13 Nissan 240SX

Post

I've taken out the rear subframe, because I will be installing ISIS solid aluminum bushings

Always nice to have a buddy around to give a hand
Image

Image


I found a pretty good deal and picked up the ISIS set for $90
Image

Currently in the freezer getting nice and cold :cool:
Image

Gonna clean up the subframe with some degreaser and whatnot, then paint it black once the bushings are installed.
Image

Plan on installing these nice Tein hardened inner and outer tie rods with a 7mm rack spacer and new boots. Picked these babies up for a good price at FRSport.com
Image


QUESTION:
Does anybody have recommendations on a good product or method to undercoat my car? I've read a few threads, but I'm not that convinced that spray on stuff from the auto parts store is really that durable. My car is from Georgia and is rust-free, so I'd like to keep it that way. There are certain parts where there is no undercoating anymore or where there never was any like above the fuel tank, etc.

ISSUE:
I'm puzzled about what to do with my Rotora 4-Pot Brake System. Here's why: Rotora simply does not exist anymore, they are out of business. I have searched all over the internet with the part numbers and even asked big vendors such as Enjuku and FRsport, but none of them can get replacement rotors or pads for this setup. It would be a real bummer to have to downgrade to stock brakes since these really do stop on a dime!
Image

My options are to go to stock S13 4-lug brakes. Or to swap over to a 5-lug 300ZX setup. But then I would have to also change over to 5-lug hubs, sell my wheels, get different wheels, and then buy the brake setup. That might just end up being the most sensible route if I'm not able to find replacement parts for the Rotoras. I'm not giving up hope yet. I'm also wondering if it is possible to swap parts with other brand 240sx big brake kits. That would be awesome!

KurumaBaka
Posts: 13
Joined: Tue Mar 24, 2015 7:46 am
Car: 2002 Nissan S15 Silvia, 1993 S13 Nissan 240SX

Post

2_Liter_Turbo wrote:Off to a good start for sure. Looks like the motor is pretty tired across all four, but a leaky injector could definitely be a culprit for gas in the oil, as well as the low compression all around. You are probably getting a lot of blow-by.
By "blow-by" are you still referring to the leaky injector seal? Or is this in reference to the cylinder head? I'm still really curious about the oil shooting out the tail pipe. I didn't really feel like turning the engine back on after I noticed the wall splattered with oil.

User avatar
2_Liter_Turbo
Posts: 2674
Joined: Sat Jan 24, 2004 10:41 am
Car: _________________
'96 S14 Coupe: SR20VET
'90 R32 TH1 GTR: RB26DETT
'92 S13 Fastback: SR20DET
'11 V36 Sedan: VQ25HR
'06 GMT800 2500HD: LBZ Duramax
Location: DFW, Texas
Contact:

Post

By blow by, I mean the piston rings being worn out so you are getting transfer of air and fluids between the crank-case and the combustion chamber.

As for your rotoras, if you can get me measurements in mm, I may be able to help you find some stuff. Give me a total rotor diameter, thickness and spacing between the back of the center hub to the back of the rotor. I'll also need to know the bolt pattern for the center hub. For pads, I'll need every measurement you can take. Not guaranteeing I can find something, but I can possibly help, lol.

MJH240SX
Posts: 52
Joined: Thu Feb 08, 2007 8:13 pm
Car: 1990 240SX Hatch, 2010 Mazdaspeed 3

Post

You can keep the 4-lug hubs if you switch to the Z32 brakes. You can drill the rotors like the rotors are for your Rotora system. The calipers bolt right onto the stock spindles. You will need adapter brake hoses, as the 240 one does not fit to the 300ZX calipers.

I found this write up EXTREMELY helpful:
http://importnut.net/300zxbrakeswap.htm

The rears can be trickier and require a little more work. The ebrake set-up is different, you need to take the backing plate off the Z32 spindle, the ebrake cables will need replaced/modified, but it can be done. I still have to do the rears myself.

KurumaBaka
Posts: 13
Joined: Tue Mar 24, 2015 7:46 am
Car: 2002 Nissan S15 Silvia, 1993 S13 Nissan 240SX

Post

2_Liter_Turbo wrote:By blow by, I mean the piston rings being worn out so you are getting transfer of air and fluids between the crank-case and the combustion chamber.

As for your rotoras, if you can get me measurements in mm, I may be able to help you find some stuff. Give me a total rotor diameter, thickness and spacing between the back of the center hub to the back of the rotor. I'll also need to know the bolt pattern for the center hub. For pads, I'll need every measurement you can take. Not guaranteeing I can find something, but I can possibly help, lol.
Okay, gotchya!

I will definitely try to get some measurements and more detailed pictures this weekend, thanks a lot! Feeling some luck coming my way with these....

KurumaBaka
Posts: 13
Joined: Tue Mar 24, 2015 7:46 am
Car: 2002 Nissan S15 Silvia, 1993 S13 Nissan 240SX

Post

MJH240SX wrote:You can keep the 4-lug hubs if you switch to the Z32 brakes. You can drill the rotors like the rotors are for your Rotora system. The calipers bolt right onto the stock spindles. You will need adapter brake hoses, as the 240 one does not fit to the 300ZX calipers.

I found this write up EXTREMELY helpful:
http://importnut.net/300zxbrakeswap.htm

The rears can be trickier and require a little more work. The ebrake set-up is different, you need to take the backing plate off the Z32 spindle, the ebrake cables will need replaced/modified, but it can be done. I still have to do the rears myself.
Wow, thanks for the info and reference to that thread! I'll definitely consider this if I can't find anything to replace the Rotora parts.

I don't mind eventually switching to a 5-lug setup (possibly the Cotano swap system), since it will give me more options for wheels in the future. But then I would have to sell my 4-lug Gramlight wheels. Wondering how much I could get for them. They are in good condition with just one small bend and a little paint chipping on the edges.

KurumaBaka
Posts: 13
Joined: Tue Mar 24, 2015 7:46 am
Car: 2002 Nissan S15 Silvia, 1993 S13 Nissan 240SX

Post

Been very busy lately with school and I hope I can get some more work done soon. Just 8 more weeks until I finally graduate.

Here are some more parts of my build I'd like to address.... RUST

I'm glad that my car was previously a southern car and that I didn't drive it in the snow and salt even once. The underbody is very clean with lots of undercoating still protecting the most important parts like the frame rails. But where I do have some rust is where Nissan decided to put what I like to call a "large sponge" on the trunk as a spoiler. I started noticing water pooling in the spare tire area a few times so I investigated and ended up removing the spoiler and found this.......

Image
:wtf2:
Image
*Sorry for the blurry pics, my phone's camera can never seem to focus just right

I've never done any welding before, but I do have a little bit of experience with fiberglass filler and regular body filler. I'm wondering what I can do about this rust.
I think the best thing to do would be to cut it out completely around the rust (1" past the edge of each patch of rust) and then weld in new metal patch panels and do some bodywork to smooth it out with the rest of the hatch. There are a few rust holes formed so far, and you can definitely tell that the rust has created some deep pores in the surface as it was rotting away.

I could also just find a used hatch with no rust, but then I'd have to go through the hassle of trying to remove my cool stickers which give me +50HP! Or I could just swap over the rear hatch glass onto a new hatch frame and call it a day.
Image

Image

I hope to spend some time on her this weekend and at least swap over my flywheel to the new engine and test the compression by jumping the starter.

In the meantime... check out my YouTube channel when you get a chance :chuckle: Bunch of videos from Japan and Ebisu Circuit on there. I hope to update it soon with some more footage! https://www.youtube.com/user/SupraSrbin/videos

KurumaBaka
Posts: 13
Joined: Tue Mar 24, 2015 7:46 am
Car: 2002 Nissan S15 Silvia, 1993 S13 Nissan 240SX

Post

Got a few things done this past week...

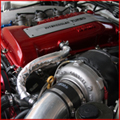
Here's the new (used) engine that I picked up for $400 from Illinois
Image

In with the old out with the..... old I guess!
Image


Compression Test on new engine:

DRY
Cylinder 1: 137 psi
Cylinder 2: 137 psi
Cylinder 3: 135 psi
Cylinder 4: 139 psi

Max difference of 4psi between cylinders.

WET
Cylinder 1: 151 psi
Cylinder 2: 146 psi
Cylinder 3: 146 psi
Cylinder 4: 152 psi

Added cap full of engine oil. Max difference of 6psi between cylinders.

Difference between WET & DRY:
Cylinder 1: 14 psi
Cylinder 2: 09 psi
Cylinder 3: 11 psi
Cylinder 4: 13 psi

Largest psi difference of WET & DRY is in Cylinder # 1 (14psi)

Opinions? Is this engine fairly healthy?

I used a fully charged battery, removed all spark plugs, and cranked over 6 times each cylinder. I did however forget to hold open the throttle, like I've read that I should on a few other threads. Since I didn't do this, anyone think my compression figures might be off? Should I retest with the throttle open?


Got her up on the engine stand to take a closer look and was pleasantly surprised by something
Image

Image

Image

EGR is already blocked off, so I can take that off of the list of things to order. Now I just need to find some write-ups to make sure that everything was deleted properly and that all vacuum hoses are in the correct place.


Moved on to burning out the old rubber subframe bushings
Image

At first it was a bit tough to keep them lit. I used a torch and some PB blaster to help out. After about 10 minutes of burning I stuck in a screwdriver and was able to lift out the metal inserts from the middle. This made a huge difference and the rubber burned so much easier and the fire was much stronger. I then took a screwdriver and kept on scraping away the burning rubber chunks from the metal sleeve onto some pieces of soaked cardboard. And voila....

Image

Image

I don't have a jig-saw at the moment, but I should get one soon so that I can do the next step of cutting a slit in the metal sleeves and then working them out of the subframe.


Next was removing some of the A/C condenser and other components since I will be deleting my A/C system.
Image

Image

I'm going to look for some write-ups soon on what exactly I need to do to the accessory belt and whatever else in order to delete the A/C pump.


Next on the list, steering rack and tie rods. My tie rods are pretty bad, the the last few times I drove my car the steering wheel was vibrating like crazy. There is a lot of play when moving the hub side to side. I started with removing the steering rack and the tie rods from the knuckles. I'll explain why this wasn't the smartest idea....

Image

Lots of oil and gunk built up
Image

Worn out steering rack bushings, going to be replacing these with Energy Suspension red bushings
Image

I then took a closer look and compared my new tie rods to the old ones. Turns out I already have Tein inner and outer tie rods, but my current pair have seen better days. These were great and took a lot of abuse, so I'm expecting great results from the brand new ones.
Image

"I'll take out the steering rack first, and then remove the inner and outer tie rods"
Image

Image

Cleaned her up real nice with some strong degreaser, some brushes, and a few rags
Image

Then I realized that there was no way I can get the tie rods off without the steering rack bolted to the crossmember. So back in it went. I'm gonna either rent or buy an inner tie rod removal tool sometime soon to install these new ones, since I had no luck getting them out with a wrench and a jack lifting up for more leverage.

Hope to get more done this coming weekend and post an update soon. 5 weeks until school is over, hoping it will fly by!

User avatar
Flicktitty
Posts: 4253
Joined: Tue Sep 21, 2004 11:56 am
Car: 1989 Nissan 240sx 2JZ-GTE Swapped
1994 Toyota Supra
2019 Lexus GX460
1992 Lexus SC400

Post

Looking good Alex! Glad to see you're going the right direction with the car, let me know if you need a hand i'll see if i can swing buy and help out.

KurumaBaka
Posts: 13
Joined: Tue Mar 24, 2015 7:46 am
Car: 2002 Nissan S15 Silvia, 1993 S13 Nissan 240SX

Post

Flicktitty wrote:Looking good Alex! Glad to see you're going the right direction with the car, let me know if you need a hand i'll see if i can swing buy and help out.
Thanks Nick, It would be great if you could stop by sometime in about 2 weeks. I'll be all done with school and putting in a lot of hours on the build. I'll message you about it.

Updates will be coming soon guys. Anybody have an opinion on the compression test of the new engine I posted?

Things left to do:

Clean Up:
- engine bay
- rear subframe
- underbody

Replace:
- steering rack bushings
- steering shaft linkage bushing
- oil pan
- valve cover gasket
- water pump and gasket
- clutch and flywheel
- throw out bearing
- rear main seal
- crankshaft pilot bearing
- rear transmission seal

I'm going to use "Honda-Bond" to seal up the oil pan and the upper/lower timing chain cover. It seems like a lot to do, but once I'm able to order all of the parts, I'm hoping it will take only a few days with some of my buddies helping. I keep daydreaming about turning her over and taking her out for a drive, it's getting really distracting while in class making computer programs haha

KurumaBaka
Posts: 13
Joined: Tue Mar 24, 2015 7:46 am
Car: 2002 Nissan S15 Silvia, 1993 S13 Nissan 240SX

Post

Wow, it's been a while since I've posted any update. All done with school now, but I've been working a ton to make this build possible.


So I picked up an SR20DET....
Image

JK, I wish! This SR actually got swapped into my friend Dusan's 1985 Mercedes 190E in his garage at home. It was quite a challenge, but it turned out awesome and is so rewarding to drive around in it after all of our blood, sweat, and frustration
Image

So, what have I been doing this whole time? I stripped down the engine to just the block and cylinder head in order to re-do as many gaskets and seals as I can. I could have just thrown the engine in since it supposedly ran with no issues, but I wanted to be sure it was sealed up well, and I was looking forward to learning a lot by tearing it apart.

I decided to keep the oil from my old engine to see just how much gasoline was in it. After a month or so this is how much gasoline evaporated
Image

The tear-down starts!

Getting rid of this crap
Image

Image

As you can see, there is a lot of oil and gunk built up over the years
Image

Image

Image

Image

Image

Image

Started to clean up the little things that no one will ever see or notice. I swear I have OCD. I just can't stand it being dirty, and me knowing about it...
Image

Image

Image

No more grease buildup on frame rails
Image

Image

Cleannnn
Image

Trying to keep all of the parts somewhat organized. Have all of the bolts in labeled ziploc bags
Image


I degreased and cleaned the hell out of the block and the timing chain covers and used a power washer on some parts. And I learned from my buddy Fester that Brake Cleaner is my new best friend when cleaning parts haha.Time for some painting.... first the block

Before
Image

Image

After
Image

Valve cover, I decided to match the color of my car as close as possible

Before
Image

After
Image

These guys have been a tremendous help!
Image

Also took the oil pan off of my old engine to use, since the one on the new one is starting to have pitted rust in the corner. Painted the old one black just like the block since it had a couple scratches from being lowered
Image

Then I applied 3M undercoating to the area that I had cleaned all of the grease from. This was an important thing in my mind to do, since I want to keep my rust-free car the way it is for as long as possible
Image

Image

Not sure why I didn't see that wierd shape I taped off haha, looks different from underneath the car
Image


Then I added all of my new seals that I ordered:

Front crank seal
Rear main seal
Oil galley front timing cover seal

Image

Image

Then I used Honda Ultra-Flange II or "Hondabond" to seal up the two timing chain covers.
The used engine didn't have any timing chain guides, and I felt a bit uneasy by that, so I stole the one off of my old engine, which only had one guide on it.

New parts came in the mail, courtesy of Nick "Flicktitty" at Axis Racing. He hooked me up with a deal better than any other aftermarket parts seller online, will be coming back soon for more parts, bud. This setup looks boss, and I can't wait to install it and see how she does. I've read great reviews about the Competition Clutch version of the white bunny clutch kit. I decided to go with the upgraded 6-puck over the organic style clutch. The difference between the 225mm and 240mm between the new and the stock flywheel is very noticable. I decided to go with this setup because I will be using my car at the track as much as possible, so it needs to be able to take a lot of abuse. It will see many clutch kicks in it's life soon hahaha :naughty: You think my 155hp will give this 500hp rated clutch any trouble?

Image

Image

My plan is to have her all ready to go with the clutch already broken in by June 21st for a Slide Society drift event at the Wisconsin Dells

KurumaBaka
Posts: 13
Joined: Tue Mar 24, 2015 7:46 am
Car: 2002 Nissan S15 Silvia, 1993 S13 Nissan 240SX

Post

2_Liter_Turbo wrote:By blow by, I mean the piston rings being worn out so you are getting transfer of air and fluids between the crank-case and the combustion chamber.

As for your rotoras, if you can get me measurements in mm, I may be able to help you find some stuff. Give me a total rotor diameter, thickness and spacing between the back of the center hub to the back of the rotor. I'll also need to know the bolt pattern for the center hub. For pads, I'll need every measurement you can take. Not guaranteeing I can find something, but I can possibly help, lol.
Update on these, I finally.... got measurements done

Part Number, 330mm rotor
Image

Image

Image

Image

Image

Image

Today I spoke to Tom at excelerateperformance.com and he thinks he can help me out with the replacement parts. He believes they will have the pads, but has to look into the rotors.

Not really sure that I want to stay with the Rotora setup much longer. Their product support is not so good and they have discontinued a lot of parts. I think what I will do this round is get the replacement parts for this kit, and then the next time I need replacements I'll sell my Rotora kit to fund a Stoptech bbk. The Rotora replacement parts are fairly expensive and there are a lot of extra fees that Rotora charges. I've heard Stoptech is just as good as Brembo, but cost much less to purchase and replace parts.

Opinions?

KurumaBaka
Posts: 13
Joined: Tue Mar 24, 2015 7:46 am
Car: 2002 Nissan S15 Silvia, 1993 S13 Nissan 240SX

Post

Just got a call back from Excelerate Performance

Based on the rotor number I have them, they think they matched it to the correct 4-piston bbk.

Street/Light Track Pads:
$218.39 shipped
RT.04.1

Race/Track Pads:
$367.17
RT.4N.2

Spoke with the owner of Adams Rotors (http://www.adamsrotors.com/big-brake-kits.html) about getting just replacement rotor hats. He doesn't have any 300mm, so I think I should play it safe and go with 228mm instead of taking a chance with the 332mm. He will get me prices on that soon.

It's such a relief that I've finally had some time to look this up on my own. I'll have some more posts soon with the parts that just arrived in the mail!


Return to “240sx General Discussion”