
MAP: I used one(1) 20 SMD panel [some cars have two(2) map lights, with these you would need two small panels (one for each light) the panel's would need to be around a 9 SMD each]. I purchased the 20 SMD panel a few months ago, and have not been able to find them for cheap lately, they've all been around $10 (F that). If I had to get a new panel for my map and couldnt find a 20 SMD piece I would go with a 12 instead. This is what I used in my map light. http://cgi.ebay.com/ebaymotors/Panel-20 ... 2c5edcdea2. I dont have any pics of just the MAP light right now (had to send my camera to Canon for repair). But when you order it be sure to get the one with the BLACK connector piece's. Also, once you receive the MAP panel, when you plug it directly in it will not work. Something about the way the MAP is wired, but you will need to switch connector around from the BA9S plug and the panel...like this
P>>>N
N>>>P
Instead of plugging them up like normal
DOME: I used one(1) 36 SMD panel. Unlike the above, the DOME IS plug and play. Connect the BLACK connectors in the normal manner (P to P, N to N). Once you put the festoon connector in the DOME socket if it does not work, simply pull the festoon out and flip it around. This is what I used for the DOME http://cgi.ebay.com/ebaymotors/Light-Pa ... 609wt_1165 and here is a pic of the DOME lit up
(sorry for the junky car, it was cold and hadnt been cleaned recently)
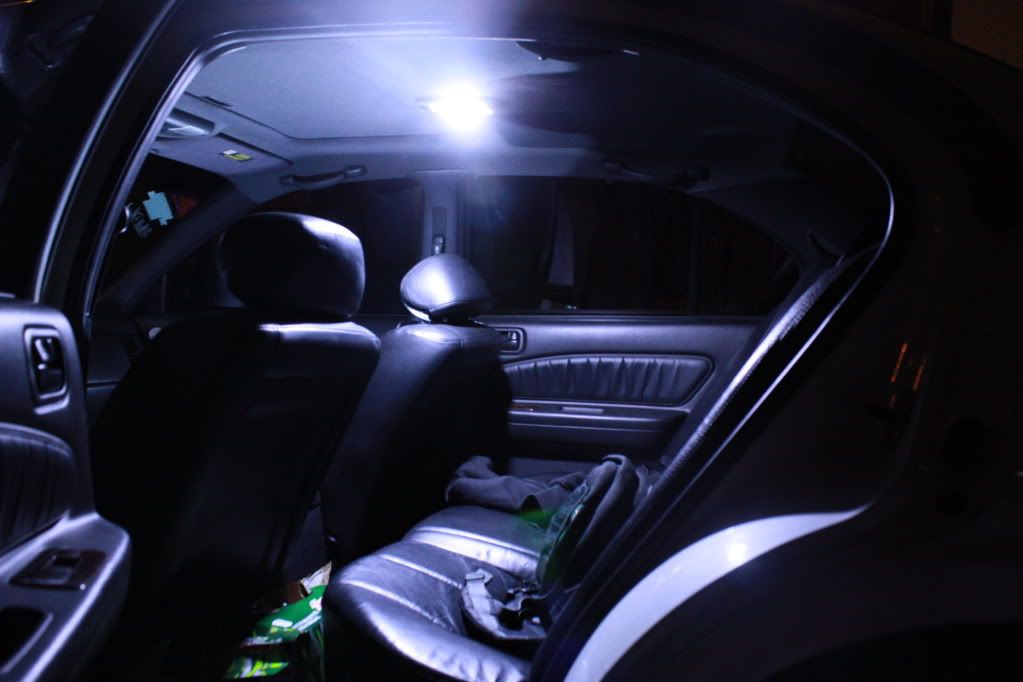
Door courtesy lights: I used one(1) 12 SMD panel per door. You will need to use the included T10 adapter and they will plug up like normal (P to P, N to N). As stated above in the DOME section, when you plug the T10 connector in to the door light socket if it does not work flip the connector over..the plug is polarized and will only work one way. This is what I used for the doors http://cgi.ebay.com/ebaymotors/Light-Pa ... 2499wt_939 and here is a pic of the door courtesy light lit up

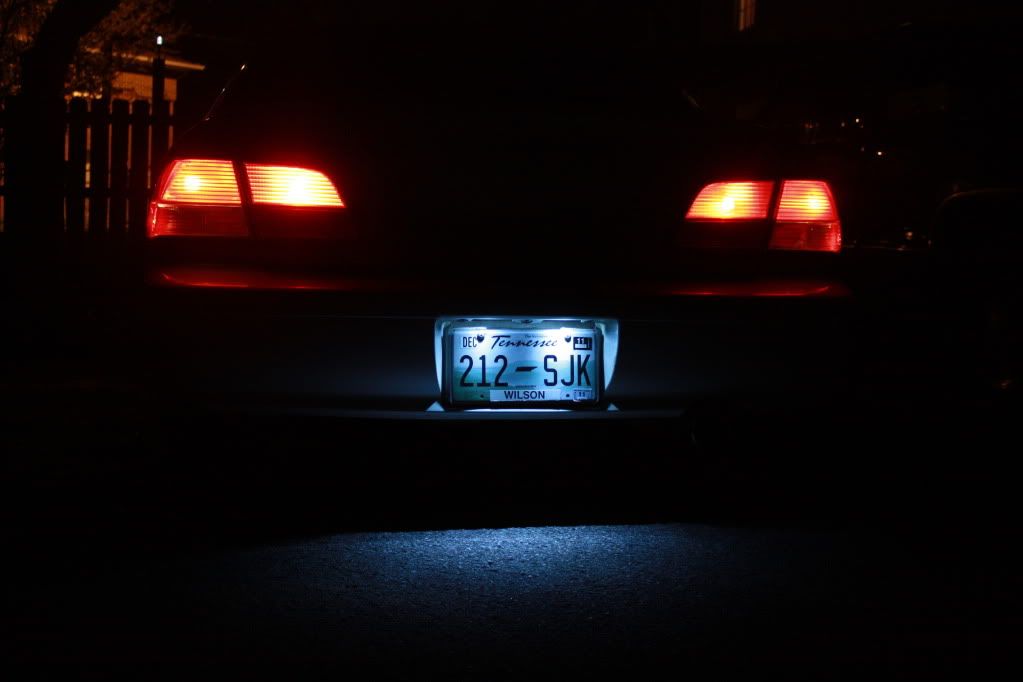
License plate lights: I used 2(two) T10 6 SMD bulbs [one for each light]. As stated above, when you plug the bulb in if it doesnt work flip it over..its polarized and will only work one way. These are what I used http://cgi.ebay.com/ebaymotors/2-T10-28 ... 1839wt_837 and here is a picture of them lit up
Gauge Cluster lights: NOTE: THESE ARE ONLY FOR THE 98-99 DIGITAL CLUSTER, IM NOT POSITIVE WHAT THE 95-97 CLUSTER USES. I used 5(five) of these bulbs [four for the main lights, and one for the odometer]. As stated above, they are polarized and only work one way so if they dont work the first time flip the around. I used the NEO-5xhttp://www.superbrightleds.com/cgi-bin/ ... %2FNEO.htm.
STEPS TO CHANGE THE GAUGE CLUSTER BULBS
1. Remove the knee bolster from under the steering wheel (two screws will need to be removed, the fuse panel cover, and one electrical connector once you pull the knee bolster down)
2. Remove the steering column cover (There are 4 screws that are accessible from the bottom of the cover)
3. Remove the gauge cluster trim CAREFULLY SO AS NOT TO BREAK IT (there are two screws on the top of the bezel and 3 electrical connectors which need to be "un-clipped" in order to remove the bezel)
4. Next, there are 4 screws that hold the cluster in place. Remove those screws
5. Next, slide the cluster out. There are 3 electrical plugs in the back of the cluster that will need to be "un-clipped"
6. Once the plugs are "un-clipped" pull the cluster out and you will see the 4 main bulbs on the back side (pic below)
7. Now, remove the 4 main bulbs and the odometer bulbs and put the 5(five) Neo-5 bulbs in the cluster.
8. Take the cluster back to your car and connect the electrical plugs in the back and plug the dimmer switch (on the bezel) back up and test your cluster bulbs
9. If any of your bulbs are not working you will need to turn them around, as they are polarized and will only work in one direction
10. Once all 4 bulbs are working, re-assemble everything and enjoy what you have accomplished

Cool White bulbs shown below
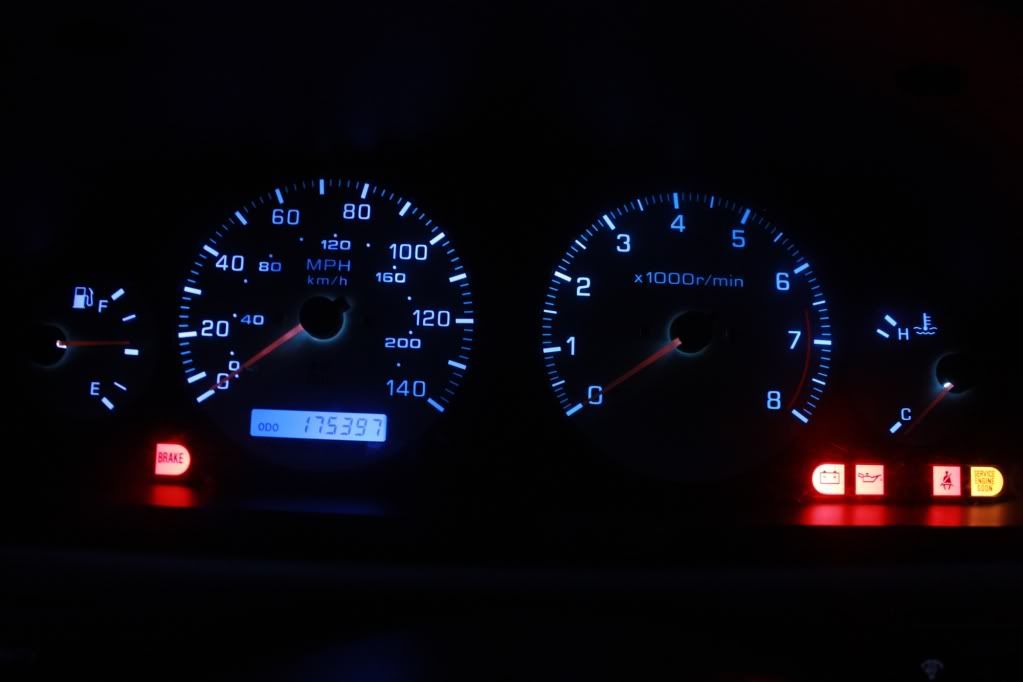
Red bulbs shown below *odometer bulb is not installed here, they only had 4 bulbs instock at the time

^^^^^AGAIN THESE CLUSTER BULBS ARE 98-99 ONLY^^^^^
For 95-97 cars you can use these
http://www.superbrightleds.com/cgi-bin/ ... LED-x5.htm
Output pics (courtesy of Mayur914)

99 ACC w/ AMB button When changing these bulbs..NOTE that they are polarized and will only work in one direction (before assembling everything back together test the ACC by turning the parking lights on). You will need 4(four) NEO4-x (I recommend the HP(high powered) bulbs whenever using these.
To gain access to change these bulbs you will need to;
1. Remove the waterfall section (shifter trim, AC vents and radio/ACC unit)
2. Remove the ACC by disconnecting the two grey plugs, one white plug and the hose that is attached and the 4 screws holding the ACC in the radio brackets
3. Once the ACC is removed, you will need to remove the faceplate (attached with clips) from the unit. At this time you can also clean the display face and plastic lens. There are also 4 silver screws around the edge that will need to be removed.
4. Once the faceplate is off, separate the two pieces off the ACC by un-clipping the plastic clips. Pull the two pieces apart carefully
5. You will now have the face and back, the face will have an electric circuit board on the back with 4 twist lock bulbs.
6. Put your new bulbs in
7. Reassemble the ACC unit and take back to car
8. Before putting the unit back into the brackets connect the 3 electrical connections and test the ACC to make sure your lights are all working (if any of them are not working you will have to take the ACC apart again and turn the bulbs around
9. Once all 4 bulbs are working, re-assemble everything and enjoy what you have accomplished
(NOTE: the hot spots arent that bad, I had to use a somewhat high ISO to take the pic without a tripod)

Vanity Mirror LED's
I will have to confirm that these fit 95-97 cars (Im pretty sure they do)
Here are the LED's I ordered (31mm Vanity mirror bulbs...xenon white)
http://www.wardenjp.com/stores/festoon.html
You can also get NEO-x bulbs from this site as well ($2.80 for two pieces)
http://www.wardenjp.com/stores/neowedge.html
How to install.
1.) drop down the sunvisor and open the mirror
2.) pry the plastic lens off of the bulb socket (insert flat object into the top between the lens and the visor, and twist)
3.) remove bulb and place in new LED bulb (bulb is polarized and only works in one direction)
4.) When finished re-install bulb cover lens
And here are the pics
LED on the right, OEM on the left......pinky up like a boss

FIN

If anybody feels I should add anything to this let me know. I will add more pics (MAP, and how to get to each bulb to change it).
Disclaimer: I am not responsible for any damages that may occur during this mod. If you don't know what you're doing, DON'T TRY IT. Use the write-up at your own risk!
DESCRIPTION OF EVERYTHING USED
MAP--- 20 SMD LED Panel ($2 on ebay)
DOME--- 36 SMD LED Panel ($3 on ebay)
Door Courtesy Lights--- 12 SMD LED Panel ($2 each EBAY)
License Plate Bulbs--- T10 6 SMD LED Bulbs ($1 each EBAY)
Cluster Bulbs--- NEO5-x bulbs ($2.29 each http://www.superbrightleds.com/cgi-bin/ ... %2FNEO.htm)
ACC Bulbs--- NEO4-x bulbs ($2.29 each http://www.superbrightleds.com/cgi-bin/ ... %2FNEO.htm)
Vanity Mirror Bulbs--- 31mm Vanity 3 SMD LED bulb xenon white ($2.49 each http://www.wardenjp.com/stores/festoon.html)

