Just completed this service item today.
Nissan OEM Fuel Filter Part Number: 16400-41B1A Nissan OEM O-Ring Part Number: 17342-01A00
Here's my tips:
1. Have a flat pan (16" sq by 4" deep or so) This will catch fuel left in the pump, fuel filter, lines. It's not much, but enough to leave an odor in the trunk.
2. Have the vacuum cleaner at hand. Since you'll be removing a large portion of the trunk liner it's a great time to vacuum out areas you normally miss.
3. Wear Nitrile type gloves to keep the gasoline off of your hands.
4. Make sure you've ordered the rubber o-ring for the fuel assembly as they need to replaced each time you service the filter.
5. Place a heavy terry cotton towel over the lip of the trunk opening to prevent your pant zippers, belt buckles from scratching the paint as you lean into the trunk.
6. Make sure to pull the injector fuse from the Fuse Box located on the sidewall by the drivers side parking brake pedal. I used needle nose pliers to reach it as they seat firm.
7. Make sure to start the car and let it run out of fuel. Then attempt to restart 2 -3 times to make sure the fuel is free of the lines before opening the fuel system assembly.
8. Make sure to open the gas cap.
9. Carefully / slowly liftout the fuel assembly from the fuel tank. Ditto for reinstalling, it should easily lay flat against the tank housing on reinstall.
10. Mark the fuel system housing cover and tank with a magic marker or slightly score it to make sure you get a perfect realingment when reinstalling the fuel system assembly.
11. Make sure to place the fuse back in the box and close the gas cap after install is complete.
12. Make sure to keep track of your interior trunk clips that retain the trim panels in place. (I used my pocket.)
13. The entire back trim panel needs to be removed along with the side panel clips to ease removal of the back trim panel.
2005 Q45 Fuel Filter Change
-
majorpanik
- Posts: 11
- Joined: Mon Jan 29, 2007 10:21 am
- Car: 03 G35 SEDAN 5AT / 06 Q45 Sport
- Location: Lexington KY
Re: 2005 Q45 Fuel Filter Change
Just curious was your filter dirty and could you post a photo of the old one?
Was this changed for a piece of mind or a related problem? i ask because I
have an 06 with 36,000 on her.
Was this changed for a piece of mind or a related problem? i ask because I
have an 06 with 36,000 on her.
-
maxnix
- Posts: 22627
- Joined: Mon Jul 22, 2002 8:11 pm
- Car: 1995 Infiniti Q45
1995 Infiniti Q45t
2000 Infiniti Q45
Re: 2005 Q45 Fuel Filter Change
Good post, less the pictures.gobose wrote:Just completed this service item today.
Nissan OEM Fuel Filter Part Number: 16400-41B1A Nissan OEM O-Ring Part Number: 17342-01A00
Here's my tips:
1. Have a flat pan (16" sq by 4" deep or so) This will catch fuel left in the pump, fuel filter, lines. It's not much, but enough to leave an odor in the trunk.
2. Have the vacuum cleaner at hand. Since you'll be removing a large portion of the trunk liner it's a great time to vacuum out areas you normally miss.
3. Wear Nitrile type gloves to keep the gasoline off of your hands.
4. Make sure you've ordered the rubber o-ring for the fuel assembly as they need to replaced each time you service the filter.
5. Place a heavy terry cotton towel over the lip of the trunk opening to prevent your pant zippers, belt buckles from scratching the paint as you lean into the trunk.
6. Make sure to pull the injector fuse from the Fuse Box located on the sidewall by the drivers side parking brake pedal. I used needle nose pliers to reach it as they seat firm.
7. Make sure to start the car and let it run out of fuel. Then attempt to restart 2 -3 times to make sure the fuel is free of the lines before opening the fuel system assembly.
8. Make sure to open the gas cap.
9. Carefully / slowly liftout the fuel assembly from the fuel tank. Ditto for reinstalling, it should easily lay flat against the tank housing on reinstall.
10. Mark the fuel system housing cover and tank with a magic marker or slightly score it to make sure you get a perfect realingment when reinstalling the fuel system assembly.
11. Make sure to place the fuse back in the box and close the gas cap after install is complete.
12. Make sure to keep track of your interior trunk clips that retain the trim panels in place. (I used my pocket.)
13. The entire back trim panel needs to be removed along with the side panel clips to ease removal of the back trim panel.
So this assembly does not come out of the top of the tank so the rear parcel shelf does not require removal?
-
solidglobe
- Posts: 36
- Joined: Sun Oct 09, 2005 3:57 pm
Re: 2005 Q45 Fuel Filter Change
to help with the clarification of fuel pump. the fuel pump does come out from the top of the tank. but you access the tank from the trunk. and the plastic molding has to be removed to access the fuel tank,
gobose. when you bought a new filter was it the same size as the one that came out of the tank? i tried to buy one from the dealership while back but it was actually smaller they also mentioned it does not need to be replace but i used a different filter and replaced anyway. but wanting to use oem..
gobose. when you bought a new filter was it the same size as the one that came out of the tank? i tried to buy one from the dealership while back but it was actually smaller they also mentioned it does not need to be replace but i used a different filter and replaced anyway. but wanting to use oem..
Re: 2005 Q45 Fuel Filter Change
Required at 30,000 miles. The new and old are identical if you use the part number I listed.majorpanik wrote:Just curious was your filter dirty and could you post a photo of the old one?
Was this changed for a piece of mind or a related problem? i ask because I
have an 06 with 36,000 on her.
I bought it online for $11.54 from infinitipartsonline.com (infiniti of Peoria) Arizona.
At that price, I went OEM.
Last edited by gobose on Sat Mar 19, 2011 6:18 am, edited 1 time in total.
Re: 2005 Q45 Fuel Filter Change
The fuel assembly does come out of the top of the fuel tank but from behind the rear trim panel in the trunk.maxnix wrote:Good post, less the pictures.gobose wrote:Just completed this service item today.
Nissan OEM Fuel Filter Part Number: 16400-41B1A Nissan OEM O-Ring Part Number: 17342-01A00
Here's my tips:
1. Have a flat pan (16" sq by 4" deep or so) This will catch fuel left in the pump, fuel filter, lines. It's not much, but enough to leave an odor in the trunk.
2. Have the vacuum cleaner at hand. Since you'll be removing a large portion of the trunk liner it's a great time to vacuum out areas you normally miss.
3. Wear Nitrile type gloves to keep the gasoline off of your hands.
4. Make sure you've ordered the rubber o-ring for the fuel assembly as they need to replaced each time you service the filter.
5. Place a heavy terry cotton towel over the lip of the trunk opening to prevent your pant zippers, belt buckles from scratching the paint as you lean into the trunk.
6. Make sure to pull the injector fuse from the Fuse Box located on the sidewall by the drivers side parking brake pedal. I used needle nose pliers to reach it as they seat firm.
7. Make sure to start the car and let it run out of fuel. Then attempt to restart 2 -3 times to make sure the fuel is free of the lines before opening the fuel system assembly.
8. Make sure to open the gas cap.
9. Carefully / slowly liftout the fuel assembly from the fuel tank. Ditto for reinstalling, it should easily lay flat against the tank housing on reinstall.
10. Mark the fuel system housing cover and tank with a magic marker or slightly score it to make sure you get a perfect realingment when reinstalling the fuel system assembly.
11. Make sure to place the fuse back in the box and close the gas cap after install is complete.
12. Make sure to keep track of your interior trunk clips that retain the trim panels in place. (I used my pocket.)
13. The entire back trim panel needs to be removed along with the side panel clips to ease removal of the back trim panel.
So this assembly does not come out of the top of the tank so the rear parcel shelf does not require removal?
You have two connectors to release prior to unscrewing (6 screws w/ very low torque settings to protect the oil ring seal).
These fuel line connector takes a little care and you may even want to order a backup of this plastic clip retainer along with your o-ring.
It's a compression type connector where you squeeze the two plastic tabs and pull on the fuel line to release.
The second connector is a simple wiring harness connector.
When removing the fuel assembly from the tank, take your time and do not yank on it as the float is connectoed to a wire at a 90 degree angle requiring some "jiggling?" to get it out of the tank.
-
thehacker3
- Posts: 98
- Joined: Sat Mar 19, 2011 9:37 am
- Car: 1997 Q45
2005 Q45 - Location: New York
Re: 2005 Q45 Fuel Filter Change
I have a 2005 with 104k miles. I took it to a mechanic when I first bought the car for a basic tune-up. As far as I can remember, all he did was change the spark plugs, and even they could've lasted for another 10-15k miles judging by their condition.
He was supposed to change the fuel filter too, but said it was welded on and couldn't be replaced - is this true?
If not, should I have this part replaced ASAP? I'm getting 17.4 mpg combined average.
He was supposed to change the fuel filter too, but said it was welded on and couldn't be replaced - is this true?
If not, should I have this part replaced ASAP? I'm getting 17.4 mpg combined average.

Re: 2005 Q45 Fuel Filter Change
plugs are every 105k.
It might 'seem' welded but it is accessable.
Agian, the FSM has descriptions and diagrams and maintanance schedules.
a fuel filter wont effect mileage.
case in point: I have an 02q45 sPORT w/ 230k. owned since 05 40k miles. never changed the filter. I get 27+ mpg on trips to texas form cal.
Ecomodder.com is a very factual site on getting better mpg.
your combined is irrelavant.....unless all of us drive the same route you drove to achieve it.
you have to have some factual baseline.
you need to find a relatively flat highway, at least 7 miles. make sure you car is warmed up 10-15 minutes of driving, on a relatively calm day.
have a starting landmark, like a mileage marker or a bridge. as you appoach reset the mpg screen. already have the cruise control set at 60 as you approach the marker. at the end of your run have another landmark. at that point note the mileage.
Now head back in the same direction doing the same thing.
This will dive u a definable baseline were you can alwasy go to 'check how your car is running'.
for example: on my 8 mile run on hyway 80 just north of sacramento on the way to rosevile I get 29.3mpg at 62mph. (that is averaging the two runs together)
I don't expect -and would not claim- that "i get 29.3mpg on the hyway".
But I can say factually that I get 29.3mpg 62mph over a defined 8 mile stretch of highway.
let's say that I want to run reg gas instead of premium. Will it affect my mileage?
If I just use the mpg over a tank, there is noway to make a comparision.
But if I run my test route I can see a differance. Also winter gas and summer gas are different. much better mpg with summer formula.
final couple of thoughts:
1. the transmission ecu can learn how you drive and adjust the shift points.
2. the 05 has a 3.08 rear ratio, the 02 2.76. the 02 gets better mpg.
3. I run a 255/45/18 instead of a 245. that give me a lower rpm at hyway speeds. the diameter of the tire is 3.4% more.
4. as you will see at ecomodder.com, the biggest adjustment is "the nut behind the wheel".
hope this was helpful
-
thehacker3
- Posts: 98
- Joined: Sat Mar 19, 2011 9:37 am
- Car: 1997 Q45
2005 Q45 - Location: New York
Re: 2005 Q45 Fuel Filter Change
Yes, it was very helpful - thank you!mcrews wrote:plugs are every 105k.
It might 'seem' welded but it is accessable.
Agian, the FSM has descriptions and diagrams and maintanance schedules.
a fuel filter wont effect mileage.
case in point: I have an 02q45 sPORT w/ 230k. owned since 05 40k miles. never changed the filter. I get 27+ mpg on trips to texas form cal.
Ecomodder.com is a very factual site on getting better mpg.
your combined is irrelavant.....unless all of us drive the same route you drove to achieve it.
you have to have some factual baseline.
you need to find a relatively flat highway, at least 7 miles. make sure you car is warmed up 10-15 minutes of driving, on a relatively calm day.
have a starting landmark, like a mileage marker or a bridge. as you appoach reset the mpg screen. already have the cruise control set at 60 as you approach the marker. at the end of your run have another landmark. at that point note the mileage.
Now head back in the same direction doing the same thing.
This will dive u a definable baseline were you can alwasy go to 'check how your car is running'.
for example: on my 8 mile run on hyway 80 just north of sacramento on the way to rosevile I get 29.3mpg at 62mph. (that is averaging the two runs together)
I don't expect -and would not claim- that "i get 29.3mpg on the hyway".
But I can say factually that I get 29.3mpg 62mph over a defined 8 mile stretch of highway.
let's say that I want to run reg gas instead of premium. Will it affect my mileage?
If I just use the mpg over a tank, there is noway to make a comparision.
But if I run my test route I can see a differance. Also winter gas and summer gas are different. much better mpg with summer formula.
final couple of thoughts:
1. the transmission ecu can learn how you drive and adjust the shift points.
2. the 05 has a 3.08 rear ratio, the 02 2.76. the 02 gets better mpg.
3. I run a 255/45/18 instead of a 245. that give me a lower rpm at hyway speeds. the diameter of the tire is 3.4% more.
4. as you will see at ecomodder.com, the biggest adjustment is "the nut behind the wheel".
hope this was helpful
I have had the FSM for a while and will take a look.
What would replacing the fuel filter do then, if it doesn't affect mileage?
When should I replace it?
Re: 2005 Q45 Fuel Filter Change
I'm following the recommended maintenance schedule.thehacker3 wrote:I have a 2005 with 104k miles. I took it to a mechanic when I first bought the car for a basic tune-up. As far as I can remember, all he did was change the spark plugs, and even they could've lasted for another 10-15k miles judging by their condition.
He was supposed to change the fuel filter too, but said it was welded on and couldn't be replaced - is this true?
If not, should I have this part replaced ASAP? I'm getting 17.4 mpg combined average.
My vehicle came from a rural area with few major gasoline stations so I figured perhaps it's best I replace it according to schedule.
Your mechanic was looking in the wrong area if he thought it was welded in place. It is not.
Clean fuel will help to keep your fuel injectors clear and performing to standards.
Could affect mileage or create hesitiation, rough idle, etc if injectors become clogged.
Re: 2005 Q45 Fuel Filter Change
hey gobose!!!
note on the rural aerea.
I hang uot at a buddy's ranch about 3 times a yr. 6 months ago started having slight overheating issues.
Finally replaced the radiator, even though it flowed 100%.
THe 1/4 inch between the water radiator and the A/C radiator was crammed full of small dirst, dust and grass. As I would high preesure spray the area behind the grill I was just cramming the fine particles into the fins
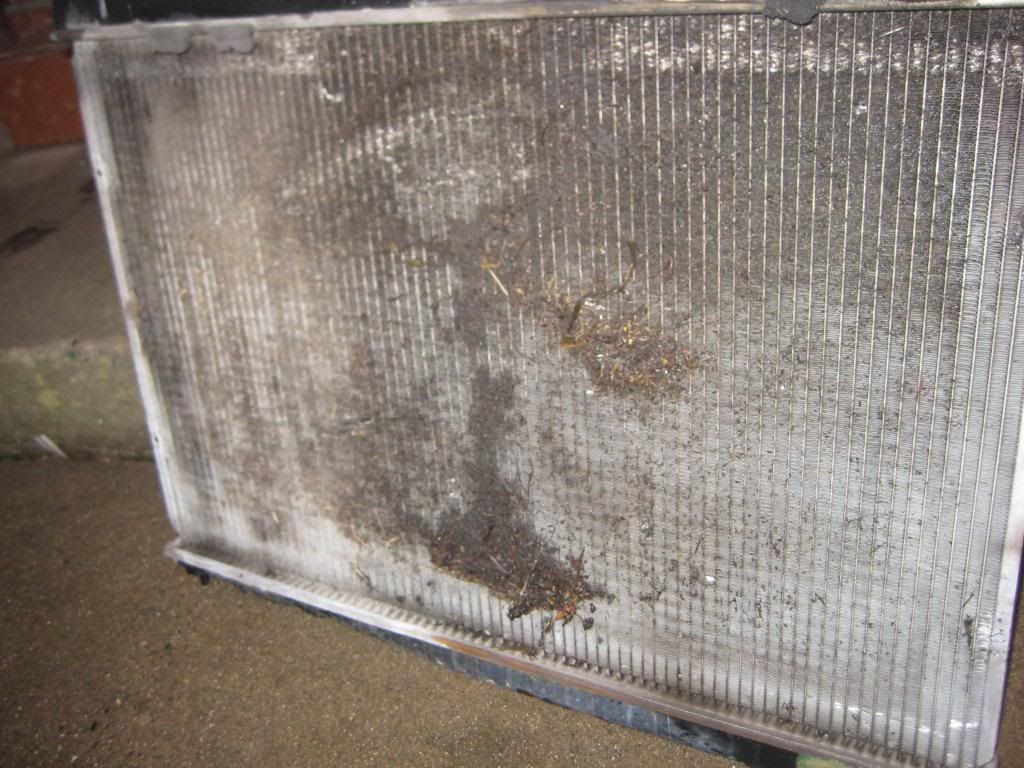
and I pressure wash the underside about 1 a week.
you can see the 2 pieces of the foam that lines the top and sides.
just and fyi.
note on the rural aerea.
I hang uot at a buddy's ranch about 3 times a yr. 6 months ago started having slight overheating issues.
Finally replaced the radiator, even though it flowed 100%.
THe 1/4 inch between the water radiator and the A/C radiator was crammed full of small dirst, dust and grass. As I would high preesure spray the area behind the grill I was just cramming the fine particles into the fins
and I pressure wash the underside about 1 a week.
you can see the 2 pieces of the foam that lines the top and sides.
just and fyi.
-
thehacker3
- Posts: 98
- Joined: Sat Mar 19, 2011 9:37 am
- Car: 1997 Q45
2005 Q45 - Location: New York
Re: 2005 Q45 Fuel Filter Change
So here's my write-up of my fuel filter change. The last two owners of this car seem to have been really negligent because they haven't done routine maintenances that are pretty necessary on a car like this. IE; never having changed either fuel or air filters for the entire 95k lifetime before I got my hands on the car. If you want to see what an air filter looks like after 95k miles, here you go: http://imageshack.us/photo/my-images/51/img0571qz.jpg/ Not embedding it because of how disgusting it looks.
Well I figured that it was about time to change the fuel filter as well, since it was probably never changed either. I read up about the service in the FSM and in a few threads like this one and got to it today. I'll outline my procedure as well.
1. Open trunk and remove everything in it. Remove the center trim panel closest to the front of the car. Keep all the plastic clips somewhere handy (pocket or jar). I removed the panel on the right first because I couldn't understand where the assembly was. It's the gold circular thing in the center of the fuel tank here:
I also found this pink hose running down from the fuel lines and was starting to worry that it was something that has gotten loose. Then I read in the FSM that it's just a drain hose, so leave it just dangling where it was and move on with the job.
I don't have any more pics of my procedure because it was getting dark by the time I had the O-ring shipped from the neighboring city, so I apologize, but I'll keep outlining my procedure.
2. Turn on engine, pull out fuse, try to start engine 2-3 times, disconnect negative battery terminal.
3. Disconnect white electrical plug and fuel line to the assembly. For some reason, I was sprayed with a decent amount of fuel when disconnecting the latter. It was an unpleasant experience, but luckily I had a drainpan handy. I highly recommend covering the plug with a rag or something when disconnecting it.
4. Remove the 6 bolts holding the fuel assembly to the fuel tank.
5. Pull out assembly very carefully. The last bit with the floater is a bit stubborn and takes a bit of wiggling around to get out.
6. Remove fuel filter clamps, bolt, replace filter, replace bolt, replace clamps.
7. Remove old o-ring, grease up new o-ring with oil and replace it.
8. Replace fuel assembly very carefully. This took me a few tries and I actually had to climb into the trunk to get it. For some reason, it wouldn't fit and I had to play around with positioning for quite a bit. I also noticed that the inner walls of the fuel tank are covered in some braided material. Can someone provide some insight to this?
9. Replace bolts, reconnect battery, replace fuse, start car (may take a few attempts, it took me 3), be happy.
10. Replace all trunk trim.
The whole procedure took about an hour.
Now, I decided to take apart the old filter and check it out. This is the OEM original filter that the car was fitted with when it rolled out of the factory: It seems a lot sturdier than the one I got from rockauto: http://www.rockauto.com/catalog/moreinfo.php?pk=478690
I started by shaking the old gas out of it, and after a few minutes of shaking, it struck me that gasoline goes in clear. The gas that I was shaking out was damn near black as oil.


Moral of the story: replace your filters regularly.
Well I figured that it was about time to change the fuel filter as well, since it was probably never changed either. I read up about the service in the FSM and in a few threads like this one and got to it today. I'll outline my procedure as well.
1. Open trunk and remove everything in it. Remove the center trim panel closest to the front of the car. Keep all the plastic clips somewhere handy (pocket or jar). I removed the panel on the right first because I couldn't understand where the assembly was. It's the gold circular thing in the center of the fuel tank here:
I also found this pink hose running down from the fuel lines and was starting to worry that it was something that has gotten loose. Then I read in the FSM that it's just a drain hose, so leave it just dangling where it was and move on with the job.
I don't have any more pics of my procedure because it was getting dark by the time I had the O-ring shipped from the neighboring city, so I apologize, but I'll keep outlining my procedure.
2. Turn on engine, pull out fuse, try to start engine 2-3 times, disconnect negative battery terminal.
3. Disconnect white electrical plug and fuel line to the assembly. For some reason, I was sprayed with a decent amount of fuel when disconnecting the latter. It was an unpleasant experience, but luckily I had a drainpan handy. I highly recommend covering the plug with a rag or something when disconnecting it.
4. Remove the 6 bolts holding the fuel assembly to the fuel tank.
5. Pull out assembly very carefully. The last bit with the floater is a bit stubborn and takes a bit of wiggling around to get out.
6. Remove fuel filter clamps, bolt, replace filter, replace bolt, replace clamps.
7. Remove old o-ring, grease up new o-ring with oil and replace it.
8. Replace fuel assembly very carefully. This took me a few tries and I actually had to climb into the trunk to get it. For some reason, it wouldn't fit and I had to play around with positioning for quite a bit. I also noticed that the inner walls of the fuel tank are covered in some braided material. Can someone provide some insight to this?
9. Replace bolts, reconnect battery, replace fuse, start car (may take a few attempts, it took me 3), be happy.
10. Replace all trunk trim.
The whole procedure took about an hour.
Now, I decided to take apart the old filter and check it out. This is the OEM original filter that the car was fitted with when it rolled out of the factory:
It seems a lot sturdier than the one I got from rockauto: http://www.rockauto.com/catalog/moreinfo.php?pk=478690I started by shaking the old gas out of it, and after a few minutes of shaking, it struck me that gasoline goes in clear. The gas that I was shaking out was damn near black as oil.
Moral of the story: replace your filters regularly.
Re: 2005 Q45 Fuel Filter Change
that pink drain hose is most likely the drain line for the sunroof, it should NOT just be left dangling or you are going to get water buildup in the trunk well, and eventually mold and rust issues. The end of the drain line should be connected to a grommet in the nearest inner quarterpanel area where the water will exit under the vehicle......look in FSM for correct routing if it is not obvious by a visual inspection.
-
thehacker3
- Posts: 98
- Joined: Sat Mar 19, 2011 9:37 am
- Car: 1997 Q45
2005 Q45 - Location: New York
Re: 2005 Q45 Fuel Filter Change
pink drain hose is clearly connected to the fuel filler port
-
Q451990

- Moderator
- Posts: 11030
- Joined: Tue Jul 23, 2002 8:21 am
- Car: 1990 Q45 - 118K, 2022 Toyota 4 Runner, 2004 Frontier M/T - 108K, 2012 Xterra (Mom's), 2023 Rogue (Inlaws)
- Location: Columbia, SC
- Contact:
Re: 2005 Q45 Fuel Filter Change
Looks like the same filter my Q and Frontier uses. I'm surprised they buried that in the tank! I would almost consider relocating it to the trunk on the outside of the sending unit, but redesigning anything fuel related is always risky. At least they redesigned the fuel tank a little in order to make everything accessible from the trunk instead of having to pull the package tray like on the earlier models.
I got similar junk out of my filter on the truck at about 65K in service when I changed it a few weeks ago.
Heath
I got similar junk out of my filter on the truck at about 65K in service when I changed it a few weeks ago.
Heath
Re: 2005 Q45 Fuel Filter Change
thehacker3 wrote:pink drain hose is clearly connected to the fuel filler port
Even worse than a disconnected sunroof drain hose then, as if it is connected to the fuel filler port it is designed to carry either liquid or vaporized gasoline, and should NOT just dump that into the trunk compartment....a little investigation on your part would be time well spent,probably even better spent than the time you took to change the filter.
-
thehacker3
- Posts: 98
- Joined: Sat Mar 19, 2011 9:37 am
- Car: 1997 Q45
2005 Q45 - Location: New York
Re: 2005 Q45 Fuel Filter Change
It's a drain hose.

not sure whether you can clearly see it there, but it's connected to the very very top of the filler pipe. No fuel should ever have to go through it. The only case I can imagine in which it will be carrying fuel is if the tank overflows - not a likely scenario. Besides, the bottom of the trunk isn't solid metal from what I understand, so no matter what, nothing will stay inside the trunk.

It's #5 in this diagram
Thank you for your concern, but I think I'm right about this one.
EDIT: I also realized that the initial picture I posted may be misleading. I tucked the hose into that compartment on the right side
not sure whether you can clearly see it there, but it's connected to the very very top of the filler pipe. No fuel should ever have to go through it. The only case I can imagine in which it will be carrying fuel is if the tank overflows - not a likely scenario. Besides, the bottom of the trunk isn't solid metal from what I understand, so no matter what, nothing will stay inside the trunk.
It's #5 in this diagram
Thank you for your concern, but I think I'm right about this one.
EDIT: I also realized that the initial picture I posted may be misleading. I tucked the hose into that compartment on the right side
Re: 2005 Q45 Fuel Filter Change
No, you are mistaken- the factory WOULD NEVER just let ANYTHING , be it fuel, water, or fuel vapor just drain into the trunk. Keep digging son.
PS, trunk bottom IS solid metal, not designed to allow liquids or vapors seep into it easily......otherwise you would have a buildup of exhaust fumes from tail pipe entering there.......pretty basic concept.
PS, trunk bottom IS solid metal, not designed to allow liquids or vapors seep into it easily......otherwise you would have a buildup of exhaust fumes from tail pipe entering there.......pretty basic concept.
-
thehacker3
- Posts: 98
- Joined: Sat Mar 19, 2011 9:37 am
- Car: 1997 Q45
2005 Q45 - Location: New York
Re: 2005 Q45 Fuel Filter Change
Can someone with an F50 please confirm where their pink drain hose from the fuel pipe leads? You would only have to remove the right trim panel; 5 minutes of work for my peace of mind. I appreciate it.
-
Q451990
- Moderator
- Posts: 11030
- Joined: Tue Jul 23, 2002 8:21 am
- Car: 1990 Q45 - 118K, 2022 Toyota 4 Runner, 2004 Frontier M/T - 108K, 2012 Xterra (Mom's), 2023 Rogue (Inlaws)
- Location: Columbia, SC
- Contact:
Re: 2005 Q45 Fuel Filter Change
If it's #5 in the diagram, I would be concerned that it's the one that drains fuel overflows out of the filler... as in when you're trying to cram that last drop in because you think this is the last time you'll ever see sub $4.00 gas in your lifetime and some of it spills out the 10th time you click pump handle after the pumps shuts off.  Can you tell I'm a habitual over-filler?
Heath
Heath
-
thehacker3
- Posts: 98
- Joined: Sat Mar 19, 2011 9:37 am
- Car: 1997 Q45
2005 Q45 - Location: New York
Re: 2005 Q45 Fuel Filter Change
I would still like an F50 owner to please confirm where the pink hose leads. I have not found anywhere to connect it to in the trunk for draining.
-
djwarner
- Posts: 407
- Joined: Sat Jan 23, 2010 6:07 pm
- Car: 1971 240Z Series I
2006 350Z - Location: Central Florida
Re: 2005 Q45 Fuel Filter Change
Refer to page FL6 of the FSM and look at the bottom illustration. The passenger side on top of the tank are two rubber hoses. The pink line you are concerned about should be inserted into one of these two hoses. The other rubber hose connects to the air vent line.
The middle illustration on page FL7 shows the hose routing looking from the rear of the vehicle.
The middle illustration on page FL7 shows the hose routing looking from the rear of the vehicle.
-
thehacker3
- Posts: 98
- Joined: Sat Mar 19, 2011 9:37 am
- Car: 1997 Q45
2005 Q45 - Location: New York
Re: 2005 Q45 Fuel Filter Change
I'm assuming you're using the 2002 FSM as your reference because those pages don't make sense in the 2005 FSM.djwarner wrote:Refer to page FL6 of the FSM and look at the bottom illustration. The passenger side on top of the tank are two rubber hoses. The pink line you are concerned about should be inserted into one of these two hoses. The other rubber hose connects to the air vent line.
The middle illustration on page FL7 shows the hose routing looking from the rear of the vehicle.
That said, I'm not sure what you mean by connecting the pink hose to one of the two hoses... The two hoses are already connected to the fuel tank as you can see in the picture I took in my first post illustrating my work process. Furthermore, the pink hose is a drain hose, which means that connecting it back to the fuel tank is a major no-no.
-
djwarner
- Posts: 407
- Joined: Sat Jan 23, 2010 6:07 pm
- Car: 1971 240Z Series I
2006 350Z - Location: Central Florida
Re: 2005 Q45 Fuel Filter Change
You're right, I splashed a little gas into the filler area an it drained down onto the ground via that little pink line. It might be easier to look for the hole from the bottom and stick a piece of wire up into the trunk.
The leakage came out in line with the gas cap and not more than 5 inches in from the bottom edge of the body.
The leakage came out in line with the gas cap and not more than 5 inches in from the bottom edge of the body.