Hi there,
the left side of my steering rack started leaking a bit and i noticed a broken rubber boot. Without much thinking i replaced the boot but the leaking got worse and spread to the other side as well. Now both sides are leaking, sometimes even dripping. Everything is covered in P/S fluid...
The first parts shop said I need a new rack, which is out of my price range atm. The wreckers wants 500 bucks for a 2002 steering rack from a car that was flooded...I have a 2000 R50, does that even fit? I couldn't find out so far and the guy couldn't tell me either.
From the service manual the removal and installation of the rack looks pretty straightforward. Although it says to take off the steering wheel before taking off the lower joint. Why? As far as I understand it, I disconnect the highpressure and lowpressure hose, and the lower joint from the rack, then loosen those monstrous bolts and slide out the whole thing.
Has anyone done this before? I read somewhere else that it is possible to install with the inner tierods, any experience on that?
Or is it worth trying to service the rack? I think the boot split and since I was driving offroad, sand or dust must have gotten into the cylinder. Are there any other (less grave) possibilities than broken seals?
Cheers!
2000 R50 Steering Rack replacement
-
Hawairish
- Posts: 463
- Joined: Sat Nov 08, 2014 1:43 pm
- Car: 2004 Nissan Pathfinder SE 4WD
- Location: Surprise, AZ
Re: 2000 R50 Steering Rack replacement
Haven't removed mine, just unbolted it to rotate it for my SFD, and pulled the steering link for a longer one.
They instruct pulling the steering wheel to prevent rotating the steering shaft, which can damage part of the SRS system's spiral cable. That is, you must not allow the steering wheel to fully rotate when it's disconnected from the rack. I just wrap the seat belt through the lower part of the steering wheel and buckle it.
Rock Auto has complete reman'd units start at $140 +$100 core. The 01+ racks do not appear to fit your 00. They also have full re-seal kits for $38-$50, but seems like a like of special work per the FSM. I do just about all my own work, especially suspension stuff, but this isn't something I'd touch. The cheapest one has a 2-year warranty on it.
Not sure what you mean by "install with the inner tie rods". You mean installing the rack on the truck with the inner rods already attached? I believe it's sold like that. I doubt you'd have any problems pulling it from the front if you just slide it over towards the wheels after disconnecting the TREs and bring one side out at a time.
Re: 2000 R50 Steering Rack replacement
thanks man, unfortunately I'm in the australian outback and here a used one comes to 400-500. A new one from the partsdealer was 1200 AUD plus shipping...
about the steering wheel, thats what i thought. thanks for the hints. i think ill have to keep driving and topping up as i get to the next bigger city.
i guess the pump shouldnt run empty to prevent damage,right?
cheers
about the steering wheel, thats what i thought. thanks for the hints. i think ill have to keep driving and topping up as i get to the next bigger city.
i guess the pump shouldnt run empty to prevent damage,right?
cheers
-
Hawairish
- Posts: 463
- Joined: Sat Nov 08, 2014 1:43 pm
- Car: 2004 Nissan Pathfinder SE 4WD
- Location: Surprise, AZ
Re: 2000 R50 Steering Rack replacement
Ah, yes, being in Australia would probably complicate getting parts.
You probably shouldn't it let it run dry, but being a steering component, I'd have a hard time risking driving on it altogether. Though, it should just act like manual steering, but if you're used to power steering, it's gonna be a doozy!
I supposed what I'd recommend in your case is to at least get as much visual inspection as you can on it while it's on the truck. Maybe pull the boots down and try to see if you can tell what's leaking turn-to-turn. If the downtime isn't a burden, you might have nothing to lose by pulling it, disassembling it, and at least cleaning it up. If you think it's bad seals or o-rings, pull them and see if local parts store has a replacement. Chances are that you don't need to rebuild the entire rack. It's a little old-school having to take this approach, but at this point it doesn't sound like you can worsen the scenario (unless you can't put it back together!).
Any chance of a local shop willing to rebuild it if you pull it from the truck? That at least saves on a few hours of labor and $$.
Re: 2000 R50 Steering Rack replacement
Well I poured in some leakstopper and it seemed to have worked a bit. At least it's not dripping like before. Since my possibilities here are somewhat limited I'll have keep topping up for the next 1000km until we get to Broome.
If I take it out I'll post some pictures. Wish me luck:)
"It's all part of the adventure"
If I take it out I'll post some pictures. Wish me luck:)
"It's all part of the adventure"
Re: 2000 R50 Steering Rack replacement
I did it! and im a little bit proud...
I got a steering rack from my local wreckers which looked like a brand new one and spent half a day on the replacement.
The whole thing is pretty straight forward and not too complicated. There are only a few things you need to really pay attention to. But lets go step by step.
You need:
- Tools, sorry I can't remember every socket and wrench but you will need a 7/8" Socket and an extension for the ratchet!
- plastic containers and some rags to catch leaking fluids
- hammer, rather bigger than smaller or "fork" to undo tie-rod ends
- wd40 always helps
- tape measure
- some clean cloth
- jack and stands obviously
- 2 new cotter pins
- 1L DEXIII power steering fluid
What to do:
Before you start you can try to use a big syringe to remove as much power steering liquid from the reservoir as possible.
1. Loosen wheel nuts
2. Jack up car (front) and put on stands
3. Take off wheels
4. Straighten cotter pins and remove at tie-rod end nut
5. Loosen nuts
6. Whack the s*** out of the knuckle where the tie-rod end sits to loosen the taper. I had serious trouble on one side, had to get the sledgehammer out^^
7. Once it's loose you wanna put your steering wheel in the straight ahead position fix it with the seatbelt so it won't move. This is important!! You must not move the steering wheel with no rack in place!!
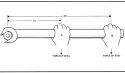
8. Remove plastic cover and metal "H-bar" to get access to the actual steering rack
10. Undo electrical connector on pressure line and try to put the cable somewhere where it's not in your way.
11. Loosen hydraulic line connectors that connect the rack to the pump. When you look at the rack they're the ones behind the pinion/steering column connection. Here it will get a bit messy, try to catch as much fluid as possible. The manual is talking about O-rings on the connecting bolts but I had copper seals, put them somewhere safe and clean.
12. Undo the two bolts on the pressure-line holder.
13. Take your humongous 7/8" nut and loosen those fat bolts holding the rack in place. There are four of them, two on each clamp. Remove clamps.
14. Loosen the nut on the pinion/column connection
15. I removed the tie-rod end on the steering wheel side to get the rack out. Otherwise I don't think it fits, i might be wrong. When you take the tie-rod end off make sure you count the threads and measure the distance "Tie-rod end - end of thread on inner tie-rod".
16. Disconnect the rack from the steering column. This step needs some wiggling and trying before you get it off. Make sure you don't actually rotate the column though!
17. Once everything is disconnected you slide the rack away from the steering column. The rack will come out on the side of the column and then you take it out from underneath. It does not slide all the way out on one side. You might have to use a cloth and pliers (or a manly grip) to turn the pinion and retract the inner tie rod.
18. Once it's out you may tap yourself on the shoulder, half way there!
19. Basically put everything back together in reversed order, some important notes:
- Don't forget the copper seals when installing the pressure lines, two on each bolt. Make sure they're clean.
- Your new rack has a mark for the middle position, make sure you line it up with the mark on the steering column.
- A wheel alignment should be done afterwards
- When filling in the new fluid make sure you move the steering wheel all the way from left to right a couple times to fill the whole system.
I messed up the alignment of steering wheel-steering rack so when the car goes straight, the steering wheel is not really straight. I'll have to fix that these days. So be extra careful not to make the same mistake.
Sorry no pictures and I hope its fairly understandable. As I said it's really straight forward.
I'm having a beer now...phew
Cheers, Franz
I got a steering rack from my local wreckers which looked like a brand new one and spent half a day on the replacement.
The whole thing is pretty straight forward and not too complicated. There are only a few things you need to really pay attention to. But lets go step by step.
You need:
- Tools, sorry I can't remember every socket and wrench but you will need a 7/8" Socket and an extension for the ratchet!
- plastic containers and some rags to catch leaking fluids
- hammer, rather bigger than smaller or "fork" to undo tie-rod ends
- wd40 always helps
- tape measure
- some clean cloth
- jack and stands obviously
- 2 new cotter pins
- 1L DEXIII power steering fluid
What to do:
Before you start you can try to use a big syringe to remove as much power steering liquid from the reservoir as possible.
1. Loosen wheel nuts
2. Jack up car (front) and put on stands
3. Take off wheels
4. Straighten cotter pins and remove at tie-rod end nut
5. Loosen nuts
6. Whack the s*** out of the knuckle where the tie-rod end sits to loosen the taper. I had serious trouble on one side, had to get the sledgehammer out^^
7. Once it's loose you wanna put your steering wheel in the straight ahead position fix it with the seatbelt so it won't move. This is important!! You must not move the steering wheel with no rack in place!!
8. Remove plastic cover and metal "H-bar" to get access to the actual steering rack
10. Undo electrical connector on pressure line and try to put the cable somewhere where it's not in your way.
11. Loosen hydraulic line connectors that connect the rack to the pump. When you look at the rack they're the ones behind the pinion/steering column connection. Here it will get a bit messy, try to catch as much fluid as possible. The manual is talking about O-rings on the connecting bolts but I had copper seals, put them somewhere safe and clean.
12. Undo the two bolts on the pressure-line holder.
13. Take your humongous 7/8" nut and loosen those fat bolts holding the rack in place. There are four of them, two on each clamp. Remove clamps.
14. Loosen the nut on the pinion/column connection
15. I removed the tie-rod end on the steering wheel side to get the rack out. Otherwise I don't think it fits, i might be wrong. When you take the tie-rod end off make sure you count the threads and measure the distance "Tie-rod end - end of thread on inner tie-rod".
16. Disconnect the rack from the steering column. This step needs some wiggling and trying before you get it off. Make sure you don't actually rotate the column though!
17. Once everything is disconnected you slide the rack away from the steering column. The rack will come out on the side of the column and then you take it out from underneath. It does not slide all the way out on one side. You might have to use a cloth and pliers (or a manly grip) to turn the pinion and retract the inner tie rod.
18. Once it's out you may tap yourself on the shoulder, half way there!
19. Basically put everything back together in reversed order, some important notes:
- Don't forget the copper seals when installing the pressure lines, two on each bolt. Make sure they're clean.
- Your new rack has a mark for the middle position, make sure you line it up with the mark on the steering column.
- A wheel alignment should be done afterwards
- When filling in the new fluid make sure you move the steering wheel all the way from left to right a couple times to fill the whole system.
I messed up the alignment of steering wheel-steering rack so when the car goes straight, the steering wheel is not really straight. I'll have to fix that these days. So be extra careful not to make the same mistake.
Sorry no pictures and I hope its fairly understandable. As I said it's really straight forward.
I'm having a beer now...phew
Cheers, Franz
-
Hawairish
- Posts: 463
- Joined: Sat Nov 08, 2014 1:43 pm
- Car: 2004 Nissan Pathfinder SE 4WD
- Location: Surprise, AZ
Re: 2000 R50 Steering Rack replacement
Well done, Franz!
I actually did most of this just the other week while changing out the steering rack bushings and boots, basically doing everything short of draining the system. Here are some other tips for you or anyone else considering this.
1. Use a 22mm socket instead of the 7/8" if possible. Yes, they are very close, but because these are also highly-torqued bolts (116-137 ft-lbs), you don't want to chance stripping anything.
2. If you have a Harbor Freight nearby, spend a couple bucks on their ball joint separator. I think they're $10 with coupon. It works nicely to pop off TREs. Just get it on and tightened up a little, then a good whack on the knuckle with the sledge hammer does the rest. Also, leave the nut on during this process...this keeps the TRE from flying off.
3. Removing the brackets for the sway bar gives a ton more clearance. It's also a good time to change those sway bar bushings. Changing the steering rack bushings and boots is also a good idea.
4. Correcting the steering wheel angle is pretty calculated. Easiest way is to just driving forward a few feet, hands off the steering wheel, and let the vehicle straighten itself out normally then park it (don't touch the wheel). Measure the angle however you see fit...for me, I just used the built-in Compass app on my iPhone (switch to the angle mode) and used points on the steering wheel for reference. Then, you figure out how many splines to rotate the top and/or bottom of the steering shaft :
a. Top joint: 1 spline = 12.86° (or 13° for convenience)
b. Bottom joint: 1 spline = 10°
If you're off 7°, rotate the bottom connection 20°(2 splines) in one direction and rotate the top connection 13° (1 spline) in the opposite direction (20-13=7). If you're off 10° degrees, you need to rotate the bottom connection 1 spline.
If you need to rotate both the top and the bottom in either direction, you have to do one end at a time. This means disconnect only one side of the steering joint at a time (you'll need to remove the bolt in the middle of shaft to allow it to fully collapse), make the adjustment, secure that joint, then repeat on the other side of the shaft.
The unfortunate part is that I don't remember which direction is which, despite the numerous times I've done this for my SFD installs (it uses a custom joint). You'll find out quickly if you did it in the wrong direction .
.
I actually did most of this just the other week while changing out the steering rack bushings and boots, basically doing everything short of draining the system. Here are some other tips for you or anyone else considering this.
1. Use a 22mm socket instead of the 7/8" if possible. Yes, they are very close, but because these are also highly-torqued bolts (116-137 ft-lbs), you don't want to chance stripping anything.
2. If you have a Harbor Freight nearby, spend a couple bucks on their ball joint separator. I think they're $10 with coupon. It works nicely to pop off TREs. Just get it on and tightened up a little, then a good whack on the knuckle with the sledge hammer does the rest. Also, leave the nut on during this process...this keeps the TRE from flying off.
3. Removing the brackets for the sway bar gives a ton more clearance. It's also a good time to change those sway bar bushings. Changing the steering rack bushings and boots is also a good idea.
4. Correcting the steering wheel angle is pretty calculated. Easiest way is to just driving forward a few feet, hands off the steering wheel, and let the vehicle straighten itself out normally then park it (don't touch the wheel). Measure the angle however you see fit...for me, I just used the built-in Compass app on my iPhone (switch to the angle mode) and used points on the steering wheel for reference. Then, you figure out how many splines to rotate the top and/or bottom of the steering shaft :
a. Top joint: 1 spline = 12.86° (or 13° for convenience)
b. Bottom joint: 1 spline = 10°
If you're off 7°, rotate the bottom connection 20°(2 splines) in one direction and rotate the top connection 13° (1 spline) in the opposite direction (20-13=7). If you're off 10° degrees, you need to rotate the bottom connection 1 spline.
If you need to rotate both the top and the bottom in either direction, you have to do one end at a time. This means disconnect only one side of the steering joint at a time (you'll need to remove the bolt in the middle of shaft to allow it to fully collapse), make the adjustment, secure that joint, then repeat on the other side of the shaft.
The unfortunate part is that I don't remember which direction is which, despite the numerous times I've done this for my SFD installs (it uses a custom joint). You'll find out quickly if you did it in the wrong direction
Re: 2000 R50 Steering Rack replacement
Good to know it's a 22mm! As a european I don't like the imperial screws anyway 
Since I'll have go follow your #4 tomorrow: what do you mean by top and bottom joint? I guess bottom joint is the one connecting to the rack. Is the top one the "next in line" up the shaft?
Since I'll have go follow your #4 tomorrow: what do you mean by top and bottom joint? I guess bottom joint is the one connecting to the rack. Is the top one the "next in line" up the shaft?
-
Hawairish
- Posts: 463
- Joined: Sat Nov 08, 2014 1:43 pm
- Car: 2004 Nissan Pathfinder SE 4WD
- Location: Surprise, AZ
Re: 2000 R50 Steering Rack replacement
Ha, yeah I prefer metric too.
By top and bottom, I mean the where the steering link (48080) connects to the pivot box (top, "SEC.489") and the steering rack (bottom, "SEC.492").

By top and bottom, I mean the where the steering link (48080) connects to the pivot box (top, "SEC.489") and the steering rack (bottom, "SEC.492").
Re: 2000 R50 Steering Rack replacement
Yeah, so I just loosened the two bolts "48025A" at the lower joint ("48080") to be able to lift the shaft off the steering gear.
With the wheels in straight ahead position I turned the steering wheel to straight position, connected the shaft to the gear and tightened the bolts again. All good, less maths (says the engineer ) Thanks for your tips!
With the wheels in straight ahead position I turned the steering wheel to straight position, connected the shaft to the gear and tightened the bolts again. All good, less maths (says the engineer
-
AZhitman

- Administrator
- Posts: 54540
- Joined: Mon Apr 29, 2002 2:04 am
- Car: 58 L210, 63 Bluebird RHD, 64 NL320, 65 SPL310, 66 411 RHD, 67 WRL411, 68 510 SR20, 75 280Z RB25, 77 620 SR20, 79 B310, 90 Z32, 91 GTi-R, 92 Silvia Qs, 98 S14, 23 Z.
- Location: Surprise, Arizona
- Contact:
Re: 2000 R50 Steering Rack replacement
Nice work, Gents!
Hey, Hawairish, looks like we're neighbors!
Hey, Hawairish, looks like we're neighbors!
-
Hawairish
- Posts: 463
- Joined: Sat Nov 08, 2014 1:43 pm
- Car: 2004 Nissan Pathfinder SE 4WD
- Location: Surprise, AZ
Re: 2000 R50 Steering Rack replacement
Indeed! We moved up here from the other side of town earlier this year. Keep meaning to head up to Crown King since it's right around the corner.AZhitman wrote:Hey, Hawairish, looks like we're neighbors!
-
AZhitman
- Administrator
- Posts: 54540
- Joined: Mon Apr 29, 2002 2:04 am
- Car: 58 L210, 63 Bluebird RHD, 64 NL320, 65 SPL310, 66 411 RHD, 67 WRL411, 68 510 SR20, 75 280Z RB25, 77 620 SR20, 79 B310, 90 Z32, 91 GTi-R, 92 Silvia Qs, 98 S14, 23 Z.
- Location: Surprise, Arizona
- Contact:
Re: 2000 R50 Steering Rack replacement
Yep - Good 4-wheeling up there!
Thanks for all your input and help here in the Trucks area - glad to have you aboard.
Thanks for all your input and help here in the Trucks area - glad to have you aboard.
-
Hawairish
- Posts: 463
- Joined: Sat Nov 08, 2014 1:43 pm
- Car: 2004 Nissan Pathfinder SE 4WD
- Location: Surprise, AZ
Re: 2000 R50 Steering Rack replacement
No prob, and thanks!
Re: 2000 R50 Steering Rack replacement
-
mdmellott

- Posts: 1269
- Joined: Mon Sep 02, 2019 3:32 pm
- Car: '13 Kia Soul+ 2.0L AT
'02 Pathfinder SE 3.5L AT P/4WD - Location: SF Bay Area, CA
Re: 2000 R50 Steering Rack replacement
Our Pathfinders are not like my grandfathers old Buick where proper alignment angles are +or- 2 or 3 degrees and can be set by eye or with a string and measuring tape. Even though castor and camber are fixed positions (not adjustable) on the '00 Pathfinder the toe angle and associated thrust angle have less than a degree of deviation from specified set positions and cannot be achieved with out a precision alignment. The comments in this thread are regarding coarse corrections for installations only. Proper precision alignment is still required, which is also noted in the comments. Get the alignment done at a shop with the right tools. Since your rear wheel alignment is not adjustable and the front wheels only need toe alignment (thrust angle and centering the steering wheel are always included no matter what), the alignment cost for our Pathfinders is the lowest cost out there. I just had mine down for $59 after I replaced my ball joints and tie-rod ends.
Re: 2000 R50 Steering Rack replacement
Ya, I'm good. I have over 15,000 on my 98 qx4 after replacing struts, tie rods, ball joints and rack and pinion and measuring it with a string and my tires are wearing perfectly. I can deal with the steering wheel being off a tiny bit since your reply was no help at all. I don't care that my car isn't like your grandaddys buick. I never said it was.
-
mdmellott
- Posts: 1269
- Joined: Mon Sep 02, 2019 3:32 pm
- Car: '13 Kia Soul+ 2.0L AT
'02 Pathfinder SE 3.5L AT P/4WD - Location: SF Bay Area, CA
Re: 2000 R50 Steering Rack replacement
Good for you. I wasn't hating on you or your ride. Just trying to give you the best advice I could and the reason for it.
-
rgk
- Posts: 588
- Joined: Tue Dec 23, 2014 4:48 am
- Car: 02 Pathfinder LE 3.5 auto 4x4
- Location: Indiana Dunes National Park
Re: 2000 R50 Steering Rack replacement
These folks are trying to help you out, and you come back with an attitude? This isn't customer service, it's a community. Have some decency.Geren8509 wrote: I can deal with the steering wheel being off a tiny bit since your reply was no help at all. I don't care that my car isn't like your grandaddys buick. I never said it was.
-
AZhitman
- Administrator
- Posts: 54540
- Joined: Mon Apr 29, 2002 2:04 am
- Car: 58 L210, 63 Bluebird RHD, 64 NL320, 65 SPL310, 66 411 RHD, 67 WRL411, 68 510 SR20, 75 280Z RB25, 77 620 SR20, 79 B310, 90 Z32, 91 GTi-R, 92 Silvia Qs, 98 S14, 23 Z.
- Location: Surprise, Arizona
- Contact:
Re: 2000 R50 Steering Rack replacement
RGK is right.Geren8509 wrote: ↑Sat May 23, 2020 11:20 amYa, I'm good. I have over 15,000 on my 98 qx4 after replacing struts, tie rods, ball joints and rack and pinion and measuring it with a string and my tires are wearing perfectly. I can deal with the steering wheel being off a tiny bit since your reply was no help at all. I don't care that my car isn't like your grandaddys buick. I never said it was.
Your attitude is unnecessary. You roll in looking to be a cheapskate, someone gives you a technical answer that is actually VERY relevant, and you're gonna lip off?
If you can't figure out why your steering wheel is crooked, you're clearly in need of some mechanical assistance. That's why we're here.
You don't move your steering rack to adjust your steering wheel. You get a proper alignment, and that adjustment is done at the tie rods.
Don't mistake this for Facebook, we don't play that crap here. Be respectful or GTFO.