1990 Q45 Valve cover gasket job.

A Q45 forum / Cima forum for the President of Infiniti's lineup. Brought to you by Infiniti Parts USA, your OEM source for Q45 parts!
subtle_driver
Posts: 332
Joined: Wed Jul 26, 2006 3:55 pm
Car: 1989 240sx hatchback, 1990 Q45 5-speed, 1973 Datsun 240z, 1987 Starion Turbo, 2003 Subaru wrx, 1995 Infiniti q45 5-speed,
Location: San Diego
Contact:

Post

I got tired of sucking out the oil in the spark plug recess'.

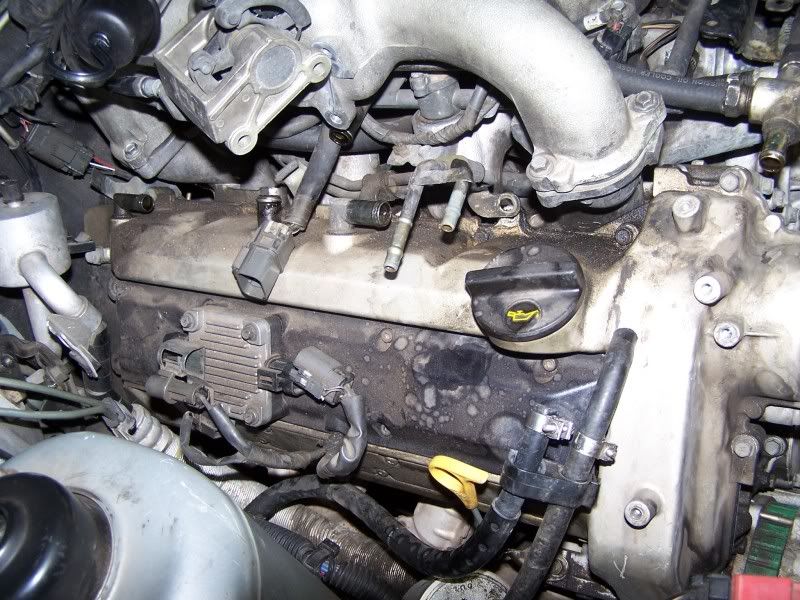
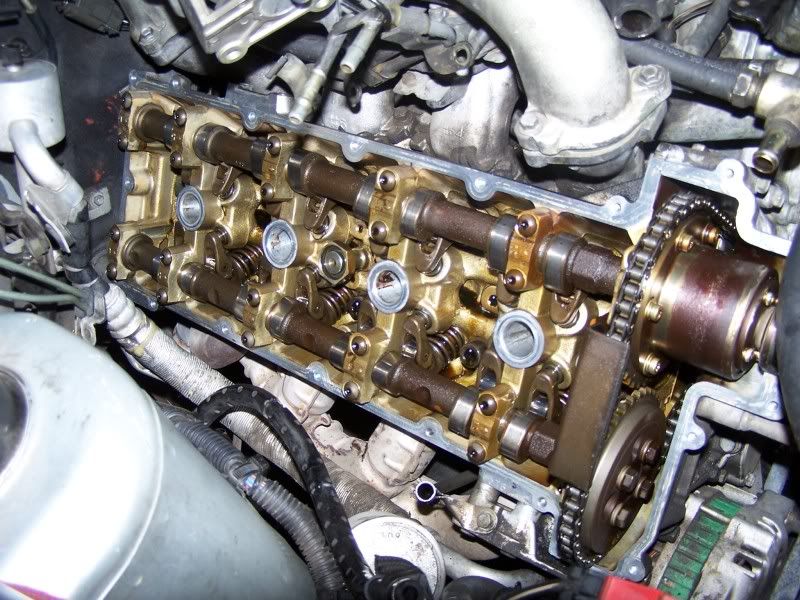
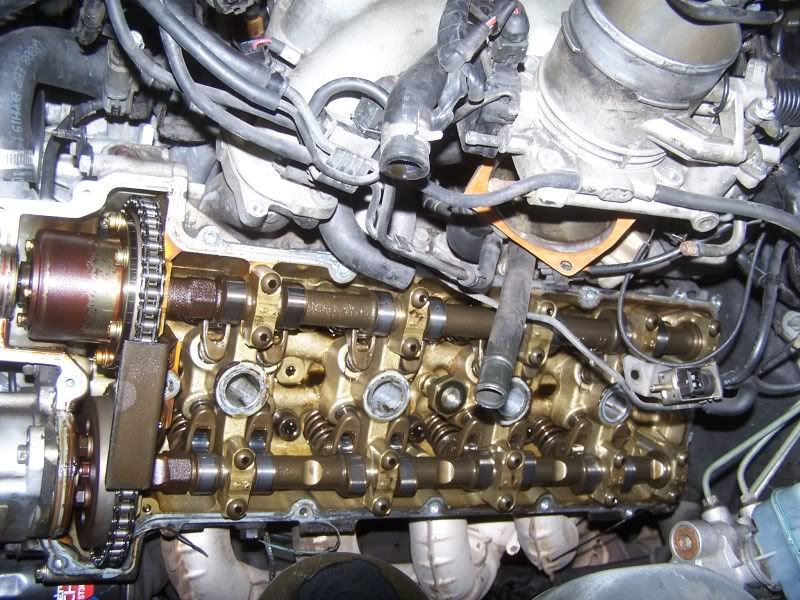
Did one valve cover gasket, took almost 4 hours.... Spent most of the time cleaning. :(

one more to go!

Runs a lot better now that there is no oil in the spark plug area.

ImageImageImageImageImageImageImage
ImageImageImage
ImageImage
ImageImage

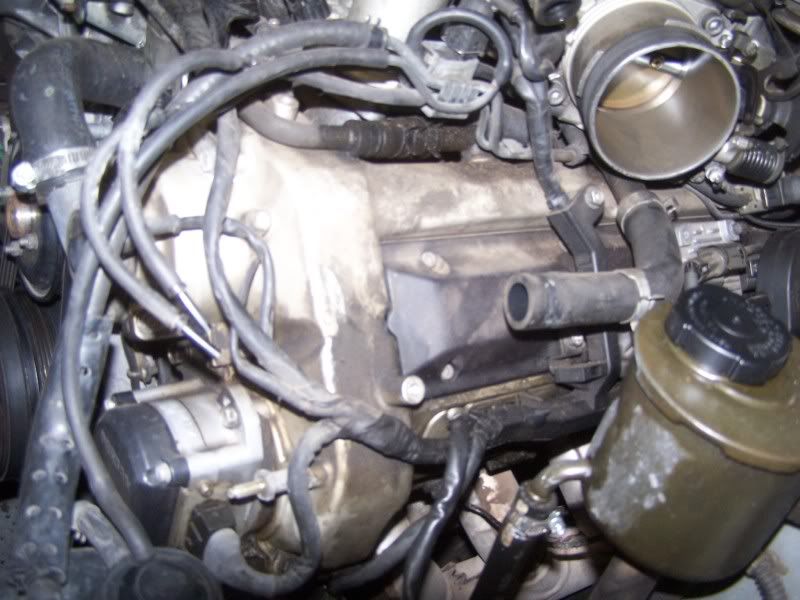
I'll get the other side done when I get around to it! I'm trying to figure out a way around removing the a/c pipe.


OwnerCS
Posts: 1771
Joined: Thu May 27, 2010 4:34 am

Post

Thanks for sharing the pictures. Your timing chain guide pictures have been a help for sure.

I got the passenger side off without disturbing the A/C hose. I had to get my 14 yo son to remove the bolt by the hose as he can get his hands in to areas like that where I can't. I hope I can maneuver the passenger side VC back into place without making a mess of the RTV. I saw a socket wrench at Lowe's with a flexible tube extension so you can bend it to reach around a corner like we need for the bolts on the back side.

I did find where a past Infiniti dealer mechanic didn't tighten many of the bolts beyond finger tight in hard to reach areas.

How do you like "The Right Stuff" (gray?) from Permatex?

subtle_driver
Posts: 332
Joined: Wed Jul 26, 2006 3:55 pm
Car: 1989 240sx hatchback, 1990 Q45 5-speed, 1973 Datsun 240z, 1987 Starion Turbo, 2003 Subaru wrx, 1995 Infiniti q45 5-speed,
Location: San Diego
Contact:

Post

So you bent the a/c tube for clearance? hrmmm..... I sure hope it works out for me. Thanks for that tip.

Also, ,, Yes that is "the right stuff" I use it on almost everything. It holds up great! well worth the money! I won't use anything else after being spoiled to this stuff.

Its good to know my timing chain pictures helped someone. I noticed there was a lack of detailed pictures in a lot of write-ups. I should have posted a separate thread for that.

I just did the oil pan too, It only had 2 tiny pieces of guide, but definitely worth doing for piece of mind.

Both mounts were destroyed, I bought one for the driver side because that one was in two pieces. I will make a set of urethane mounts for myself cause I will break the expensive factory ones in no time. I Autocross, and Gymkhana my Q45....

OwnerCS
Posts: 1771
Joined: Thu May 27, 2010 4:34 am

Post

Hey -- actually no A/C pipe bending.. Not sure if the dealer did that when they resealed the valve covers at 60,000.

I've got a bunch of chain guide pictures from tonight's work.. Stay tuned.

subtle_driver
Posts: 332
Joined: Wed Jul 26, 2006 3:55 pm
Car: 1989 240sx hatchback, 1990 Q45 5-speed, 1973 Datsun 240z, 1987 Starion Turbo, 2003 Subaru wrx, 1995 Infiniti q45 5-speed,
Location: San Diego
Contact:

Post

ok, no bending. lol. :biggrin:

User avatar
lino
Posts: 3533
Joined: Mon Aug 15, 2005 7:48 am
Car: 1991 Q45a Fed-Spec, IQP/White, Texasoil 9 Accumulator Recharge, '93 TCU 1st Gear Start, JWFSB, B&M 70268 Transmission Cooler, BBS Forged Wheels, DRLs, Silverstars, Tint, Very Well Serviced.
Contact:

Post

Well done! Thanks for sharing the pics :). Looks like you got your valve cover cleaned real well too.

User avatar
Infinitiguy19
Posts: 7787
Joined: Sat Dec 22, 2007 4:58 pm
Car: 1993 Infiniti Q45 188580 Miles
1994 Infiniti Q45a 240000 Miles

Post

subtle_driver wrote: Runs a lot better now that there is no oil in the spark plug area.
What did it run like before the Valve Cover (VC) reseal?

subtle_driver
Posts: 332
Joined: Wed Jul 26, 2006 3:55 pm
Car: 1989 240sx hatchback, 1990 Q45 5-speed, 1973 Datsun 240z, 1987 Starion Turbo, 2003 Subaru wrx, 1995 Infiniti q45 5-speed,
Location: San Diego
Contact:

Post

it had random missfire from the coil pack grounding to the block though the oil.

OwnerCS
Posts: 1771
Joined: Thu May 27, 2010 4:34 am

Post

What do you use (or where can I purchase) for the chain wrench on the crankshaft pulley?

I have a 300 lb torque wrench for the bolt -- but I cannot find a chain wrench large enough to do the job.

I didn't need a chain wrench for removal.

subtle_driver
Posts: 332
Joined: Wed Jul 26, 2006 3:55 pm
Car: 1989 240sx hatchback, 1990 Q45 5-speed, 1973 Datsun 240z, 1987 Starion Turbo, 2003 Subaru wrx, 1995 Infiniti q45 5-speed,
Location: San Diego
Contact:

Post

I used an impact wrench rated for that tq setting. I cheated. lol!

subtle_driver
Posts: 332
Joined: Wed Jul 26, 2006 3:55 pm
Car: 1989 240sx hatchback, 1990 Q45 5-speed, 1973 Datsun 240z, 1987 Starion Turbo, 2003 Subaru wrx, 1995 Infiniti q45 5-speed,
Location: San Diego
Contact:

Post

Here are the pics of the passenger side! NO bending of the a/c line required! But it was a little tricky to get back in. REMEBER; make sure to clean and RTV the "half-moons" on the back of the heads or it will leak again.
Image

Image
Image
Image


NOTE: here is the main and most important reason for doing this job, the engine oil gets into the spark plug tubes and can cause an ignition misfire (spark jumps from the coil-pack to the head, shorter path to ground). Ignition misfire is worse than a non functional fuel injector. Because the fuel does not get burned it will wash the cylinder of the protective layer of oil, and this will cause scoring of the cylinder walls and will quickly ruin compression.

This can also damage the catalyst or cause it to melt shut. Also not cheap or fun.
Here is a picture of oil in the spark plug tube on my car: Image


Image
Image
Image

I hope this visual will help someone.

OwnerCS
Posts: 1771
Joined: Thu May 27, 2010 4:34 am

Post

Hey - you're missing that ATF dipstick -- to get in the way.. :-)

User avatar
lino
Posts: 3533
Joined: Mon Aug 15, 2005 7:48 am
Car: 1991 Q45a Fed-Spec, IQP/White, Texasoil 9 Accumulator Recharge, '93 TCU 1st Gear Start, JWFSB, B&M 70268 Transmission Cooler, BBS Forged Wheels, DRLs, Silverstars, Tint, Very Well Serviced.
Contact:

Post

Thanks for sharing :yesnod.

OwnerCS
Posts: 1771
Joined: Thu May 27, 2010 4:34 am

Post

Bro I'm following right along your path.. Thanks again for leading the way!

willmoodom
Posts: 151
Joined: Sun Mar 07, 2010 7:04 pm
Car: 1991 Q45

Post

subtle_driver wrote:Here are the pics of the passenger side! NO bending of the a/c line required! But it was a little tricky to get back in. REMEBER; make sure to clean and RTV the "half-moons" on the back of the heads or it will leak again.
Image

Image
Image
Image


NOTE: here is the main and most important reason for doing this job, the engine oil gets into the spark plug tubes and can cause an ignition misfire (spark jumps from the coil-pack to the head, shorter path to ground). Ignition misfire is worse than a non functional fuel injector. Because the fuel does not get burned it will wash the cylinder of the protective layer of oil, and this will cause scoring of the cylinder walls and will quickly ruin compression.

This can also damage the catalyst or cause it to melt shut. Also not cheap or fun.
Here is a picture of oil in the spark plug tube on my car: Image


Image
Image
Image

I hope this visual will help someone.
i know this thread is a bit old, but how did you remove the bolts closest to the firewall(passenger side) without moving or bending anything? special or homemade tool??

User avatar
Infinitiguy19
Posts: 7787
Joined: Sat Dec 22, 2007 4:58 pm
Car: 1993 Infiniti Q45 188580 Miles
1994 Infiniti Q45a 240000 Miles

Post

Image

Between spark plugs 2 and 4 does the rubber donut gasket have to replaced when the valve cover is resealed?
willmoodom wrote: i know this thread is a bit old, but how did you remove the bolts closest to the firewall(passenger side) without moving or bending anything? special or homemade tool??
I used a Craftsman (Made in USA, Not the Chinese new "Craftsman" trash) universal joint. Along with a Snap -On 1/4" Drive Flex Head Swivel Ratchet and some extensions. The AC line had to come out. But my system has no R12 in it so there was no need to vacuum it out. And I hear 30LBS of R12 is at least $1600. Finding a competent tech with the right machine is just as hard as finding R12 cheaper than that. You could get away with not removing the AC components in the way but it would take a lot longer. So far one side in 90*F weather and rain (Did not work in the rain) has taken me 2 days. The hard part is cleaning the varnish and RTV. I believe Berrymans Chem tool will make quick work of that, 2 hours or so.

If the valve cover does not leak and the engine idles a little better because oil was in spark plug tube 2 (Not asking for a miracle). It will be the best gift I get for my Birthday. I think the drivers side valve cover will be easier than the passenger side. I have replaced the EGR and TB before. And I think its time they were cleaned out again, along with the plenum.

User avatar
Q451990
Moderator
Posts: 11030
Joined: Tue Jul 23, 2002 8:21 am
Car: 1990 Q45 - 118K, 2022 Toyota 4 Runner, 2004 Frontier M/T - 108K, 2012 Xterra (Mom's), 2023 Rogue (Inlaws)
Location: Columbia, SC
Contact:

Post

Infinitiguy19 wrote:Image

Between spark plugs 2 and 4 does the rubber donut gasket have to replaced when the valve cover is resealed? .
I replaced them when I did the job in the past. When T3 resealed mine, Byron just put a ring of RTV on top of the rubber one.

I had a thought on guiding the covers back on the heads. What about getting some longer screws/bolts with the correct threads, cutting their heads off, and lightly threading them into the heads before reinstalling the covers? This would give you guides for perfect alignment as you sit the cover onto the head. I always worry about getting the cover crooked to start, and then smearing the RTV around too much adjusting it.

I remember this being a bear of a job back in the late 90s. My back hurt then... can't imagine how much I would hate it now!

Heath

OwnerCS
Posts: 1771
Joined: Thu May 27, 2010 4:34 am

Post

Heath I tried several approaches and the one that seemed to work was to make a few "dry runs" without any RTV on the cover to get the my hands familiar with making the turns needed to snake the cover past the A/C components on the passenger side.

If I was closer, I would help you do it.

User avatar
Q451990
Moderator
Posts: 11030
Joined: Tue Jul 23, 2002 8:21 am
Car: 1990 Q45 - 118K, 2022 Toyota 4 Runner, 2004 Frontier M/T - 108K, 2012 Xterra (Mom's), 2023 Rogue (Inlaws)
Location: Columbia, SC
Contact:

Post

Fotunately, my 2003 reseal at T3 seems to be holding up pretty well. I'll keep my fingers crossed!

Heath

hafan228
Posts: 3
Joined: Sun May 29, 2011 9:05 am
Car: 1995 q45, 2001 Honda Odyssey, 2013 Toyota Highlander
Location: San Jose, California

Post

Can anyone answer my question?
On fourth phto, I don't see the EGR tubing. Do you need to remove it in order to remove the valve cover. Do you remove it from underneath?
I have hard time to remove my 95 Q45 driver side valve cover. The cover bolts are different than the one shown here.

User avatar
Q451990
Moderator
Posts: 11030
Joined: Tue Jul 23, 2002 8:21 am
Car: 1990 Q45 - 118K, 2022 Toyota 4 Runner, 2004 Frontier M/T - 108K, 2012 Xterra (Mom's), 2023 Rogue (Inlaws)
Location: Columbia, SC
Contact:

Post

I think I've just removed the valve, but left the pipe in place. Your heads and covers are an updated design, with a rubber gasket - which is a good thing. No smearing RTV. Some recommend replacing the rubber gaskets that fit between the washers and acorn nuts that hold your covers on. The only place you should need RTV is on the "half moon" portions of the gaskets. Check out your car's factory service manual at www.infinitiservicemanual.com for more details.

OwnerCS
Posts: 1771
Joined: Thu May 27, 2010 4:34 am

Post

On my 91 model refresh job I removed the EGR and tubing before removing the VC. Due to the limited amount of space to maneuver a wrench in that area, I remember finding a yellow handle "Stanley" brand compact crescent wrench at Walmart that let me break the pipe loose so I could remove it. The short handle and wide opening range made all the difference.

hafan228
Posts: 3
Joined: Sun May 29, 2011 9:05 am
Car: 1995 q45, 2001 Honda Odyssey, 2013 Toyota Highlander
Location: San Jose, California

Post

Thanks to Q451990 and OwnerCS for your reply, I really appreciate your comment.

I did removed the EGR, but I don't have access to remove the EGR tubing from the top.
For 90/91 model, the valve cover can be sliding out after removing the bolts.
For 95 model bolts are screwed in the body where valve cover attach to it. The cover has to be lifted up to clear the bolts and there are not enough space due to the metal EGR tubing and the metal tubing in the center location above the valve cover. I have the photos and I need to find a way to post the photos in this forum.

Jeff Williams has a post(he has 94 model probably same design as mine) and may be that is why he has to bend the EGR tubing which I don't feel like to do. All his posting photos are not there anymore so I could not see what he did.

forums.nicoclub.com/finally-got-around-to-replacing-the-driver-s-side-valve-cover-gasket-t107690.html

OwnerCS: Did you remove the EGR tubing from underneath the car? My car is sitting on the drive way with little slope and I hope I don't have to jack up the front end of the car to remove it.

hafan228
Posts: 3
Joined: Sun May 29, 2011 9:05 am
Car: 1995 q45, 2001 Honda Odyssey, 2013 Toyota Highlander
Location: San Jose, California

Post

I was be able to loosen the EGR tubing from top.

OwnerCS
Posts: 1771
Joined: Thu May 27, 2010 4:34 am

Post

I remember removing it from the top.


Return to “Q45 Forum / Cima Forum”