03 FX45 Radiator removal
03 FX45 Radiator removal
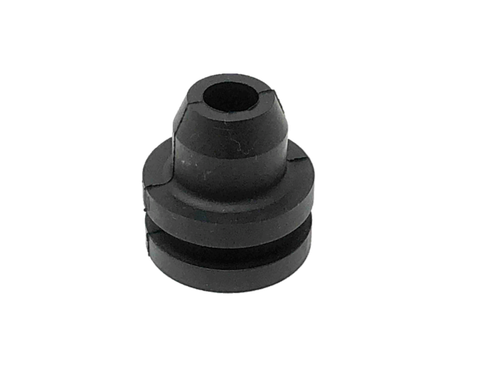
I have 230k on my 03 fx45 and the top end tank on my radiator started leaking. I was able to get the old radiator out but having trouble getting the new denso unit in. Can anyone tell me (or have pics) of the how the lower bushing sits in the support? i cant tell if the bushing is supposed to ride on top of the support hole of if I need to press it in (current bushing is pretty hard) so the groove in the bushing is in the support hole. Heres a pic of the bushing for reference
-
VStar650CL

- Technical Expert
- Posts: 11920
- Joined: Thu Nov 12, 2020 1:25 pm
- Car: 2013 Nissan Altima 2.5 SL
2004 Nissan Altima 2.5 S
Re: 03 FX45 Radiator removal
The skinny part goes into the hole. Some WD40 will help ease it in, if you have the right bushings then they shouldn't need to be pressed hard.
Re: 03 FX45 Radiator removal
Yea, i was putting the skinny part in the hole.. i wasnt sure if i need to press it in to the point there its acting like a grommet. the g35 has the same bushing and it looks like its not pressed in like a grommet. So at this point, ill just have to fight with the radiator to get it into place. Im tempted to remove the cooling fan as that might give me the little bit of angle i need to get it in easier. But with my luck, ill break the bolts and have a bigger problem on my hands!
Re: 03 FX45 Radiator removal
Looks like this radiator doesn’t fit. I dropped it down so it rested on the lower mounts and the uppers aren’t even close to lining up. Ugh
https://ibb.co/X88S86k

https://ibb.co/YB653Qk

https://ibb.co/X88S86k
https://ibb.co/YB653Qk
-
VStar650CL
- Technical Expert
- Posts: 11920
- Joined: Thu Nov 12, 2020 1:25 pm
- Car: 2013 Nissan Altima 2.5 SL
2004 Nissan Altima 2.5 S
Re: 03 FX45 Radiator removal
Yep, if the bottoms are in the holes then that's definitely a no-fit.
Re: 03 FX45 Radiator removal
I don’t know if I got a crappy denso unit or if the 03 is somehow different... I’ll order another one and see if it’s any better.
While everything is out, maybe I should take pics for a how-to since I couldn’t find anything on the net
While everything is out, maybe I should take pics for a how-to since I couldn’t find anything on the net
Re: 03 FX45 Radiator removal
I ordered a new radiator and it fit like a glove. The issue just turned out that the old unit didnt fit. All in all, the procedure was pretty easy. The biggest hassle was a cold garage in 0deg Chicago temps! Here are the steps to replace the radiator.
1. Remove belly pan. Most of my 10mm were rusted and gone so I couldnt tell you how many are there but there are videos on the internet for this. Heres a reference video : https://d2n97g4vasjwsk.cloudfront.net/2 ... 20480p.mp4
2. Drain coolant. On the bottom end tank near the lower radiator hose connection, there is a drain plug with a plastic phillips screw. Unscrew that and the coolant will come out of that hole. Heres a video for reference: https://d2n97g4vasjwsk.cloudfront.net/2 ... 20480p.mp4
3. Once all drained (pull off the radiator cap also), disconnect the lower and upper radiator hoses.
4. Remove trans cooler lines (I previously installed a dedicated trans cooler to prevent getting the strawberry milkshake so I skipped this step). There are two lines at the bottom of the radiator.. take them off and plug them up.
5. Remove snorkel and airbox. Heres a video from the internet : https://d2n97g4vasjwsk.cloudfront.net/2 ... 20480p.mp4
6. Remove fan shroud. This part is two pieces. On the bottom half, there are two clips on each side (red). Squeeze them and pop them out towards the engine. The lower shroud can be now removed from the bottom of the car. The upper shroud is held onto the radiator by two screws at the top (yellow) and slides into 2 grooves at the bottom (green). This can be lifted out of the car from the top. https://imgur.com/AbKOAMP
7. The radiator is the only thing left, unlock the clips holding the top mounting points by spinning them. When they are lined up, pull them up and out. The radiator is completely free now. Tilt the top back towards the engine and pull it up and out of the car. In my case, it was hard to pull up. I went under the car and pried it out of the bottom mounting holes to make it easier to remove.
8. Pull the upper and lower rubber bushings off the old radiator and use them for the new one. Follow this in reverse order and youre all done. Add coolant, burp and go.
-
VStar650CL
- Technical Expert
- Posts: 11920
- Joined: Thu Nov 12, 2020 1:25 pm
- Car: 2013 Nissan Altima 2.5 SL
2004 Nissan Altima 2.5 S
Re: 03 FX45 Radiator removal
Glad you got it straightened out, but jeeze... don't you just want to pummel vendors who mis-label or mis-pack parts? 
Re: 03 FX45 Radiator removal
Usually when I have a part that doesn’t fit, it’s the wrong part they sold me. In this case, the radiator even had the correct part number on it. Guess someone in the quality control dept missed it, luckily I didn’t need the car and was fine with it being down.

Re: 03 FX45 Radiator removal
Ironfist:
Thank you for updating us and even putting out a write up for your Nissan/Infiniti Bros!
Thank you for updating us and even putting out a write up for your Nissan/Infiniti Bros!
Re: 03 FX45 Radiator removal
No worries and hopefully it helps someone out. I should’ve taken a video so it’s easier to follow. When I had to pull the valve body out the trans, watching videos of others doing it made it 100x easier.