
[youtube]http://www.youtube.com/watch?v=eDN2xsb9D0A[/youtube]
This is a step-by-step replacement for the commonly failing Vent Control Valve on the Nissan Rogue. My vehicle is a 2009 Rogue S, but I believe the part is the same for all Rogues. Double check before following this.
The reason I replaced my valve is because my Service Engine Soon light came on, and after I had the code read for free at my local Advance Auto Parts, I learned that it was code P0455, which is an evaporative emissions leak. After searching the forums I learned that when this code is triggered on the Rogue, it is more often than not the Vent Control Valve. My car is out of warranty, which is why I replaced it on my own. I read from other members in the forum that this job can cost upwards of $300 dollars at a dealership. The other possible cause is a bad gas cap. Trying to save money, I first replaced the gas cap with a genuine Nissan gas cap from the dealer which cost around $20. Do not use aftermarket gas caps, as the seal may not be as tight. I installed the cap, cleared the code at Advance Auto Parts and a few days later the light came back on. So now it was time to replace the valve, and I did so in the following steps...
Difficulty: Easy
Time: 30 minutes
Tools Needed: Flathead screwdriver
1. Purchase the valve from your local Nissan dealership. Just ask the parts guy for a Vent Control Valve and you should be on your way. The part cost me $105.53 plus tax.
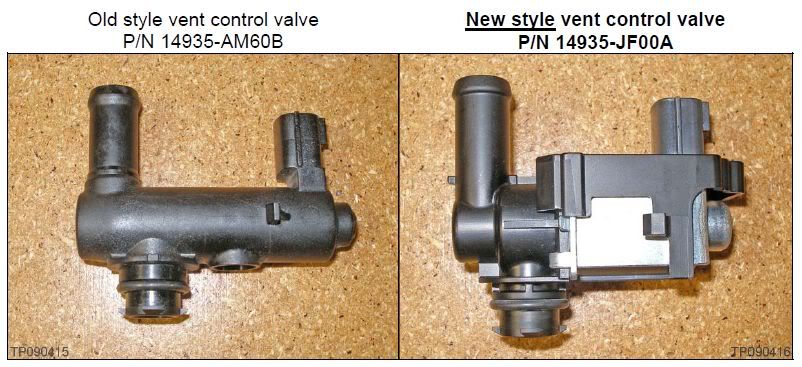
*Note - After I got the old valve off and compared the two, I noticed a new design on the new valve, so it's clear that there is a problem with the original design.
2. Locate the Vent Control Valve. The valve is connected to the Evap canister which is located on the passenger side of the vehicle all the way in the rear near the wheel. A nice thing to note, you should not have to jack up the vehicle to get to this! I didn't. When looking under the vehicle you will see a silver metal 'heat shield'. That is covering the Evap canister. Another nice thing to note, you don't have to remove this heat shield to replace the valve!
3. If you are laying on your back with your legs sticking out of the rear of the vehicle, you will notice that the side of the heat shield closest to the front of the car is wide open. If you look above the heat shield you will see a nifty little black thing with a hose and a wire coming off of it. Bingo, there's the Vent Control Valve.
4. To remove the old Vent Control Valve, simply turn it counter clock-wise and pull it towards you. It should come out with little effort. Refer to the following link on page EC-926 for more information:
http://www.nicoclub.com/FSM/Rogue/2009/EC.pdf
*Note: Make sure the O-Ring comes off with the Valve. It should, but double check to be sure.
5. To get the big hose off, just twist and pull until you finally maneuver it off.
6. To get the electrical clip off takes a little bit more work. To unclip it from the valve, you need to push down the little piece on top of the clip before pulling it off. It's difficult to do with just your hand, so I used a small flathead screwdriver to push it down and pull it off with my other hand.
7. Now you should have the valve completely removed from the vehicle. Install the old valve by re-connecting the hose and electrical clip. Push the valve back into the Evap canister and rotate it clockwise to lock it in.
*Note: Double check that there is an O-Ring on the new valve, but it should have come with one already on it when you bought it.
Congratulations! You just replaced the Vent Control Valve. The Service Engine Soon light most likely will not turn off right away, and may take a few cycles to turn off. I personally reset the light myself at Advance Auto Parts.

Vent Control Valve Replacement Step-by-Step
-
philipa_240sx
- Posts: 4138
- Joined: Thu Jun 21, 2007 7:30 am
- Location: Canada
Re: Vent Control Valve Replacement Step-by-Step
Good job EricBss7!
You can also read and reset the diagnostic codes yourself, no need to see a dealer or even leave the confines of your driveway!
Read all about it here:
post5563535.html#p5563535
You can also read and reset the diagnostic codes yourself, no need to see a dealer or even leave the confines of your driveway!
Read all about it here:
post5563535.html#p5563535
-
philipa_240sx
- Posts: 4138
- Joined: Thu Jun 21, 2007 7:30 am
- Location: Canada
Re: Vent Control Valve Replacement Step-by-Step
Note:
Nissan released a tech bulletin last year #NTB09-129. The Vent Control valve has a new part # and appears they have changed the design.
New part #: 14935-JF00A
I haven't looked closely at mine, but considering it was replaced recently it should be the new one.
Nissan released a tech bulletin last year #NTB09-129. The Vent Control valve has a new part # and appears they have changed the design.
Old part #: 14935-AM60BNTB09129 - SB Vent Control Valve Replacement
SERVICE INFORMATION When replacing the EVAP canister vent control valve for any reason: -Use the one listed in the PARTS INFORMATION section of this bulletin on Page 2. -For vent control valve replacement procedure, refer to the appropriate section ofthe Electronic Service Manual (ESM) if needed. -When installing the new valve, do not add any lube to its o-ring. -For Frontier (D40 series) only: install the protector listed in PARTS INFORMATION. --For protector installation, see the SERVICE PROCED URE section of this bulletin starting on Page 3. -Make sure to use the "new style" valve listed in PARTS INFORMATION.
New part #: 14935-JF00A
I haven't looked closely at mine, but considering it was replaced recently it should be the new one.
-
bill875

- Posts: 170
- Joined: Tue Nov 20, 2007 1:06 pm
- Car: 2008 Nissan Rogue SL AWD Indigo Blue / Premium Package / Fully Loaded
Re: Vent Control Valve Replacement Step-by-Step
Mine was replaced on 5/21/2009 and the older part was installed according to the service ticket I have in my glove box. I have 3 years/43,000 miles left on my ext. warranty. If it goes again, I just hope it's covered by the Security Plus Gold Ext. Warranty.
Re: Vent Control Valve Replacement Step-by-Step
According to an online parts dealer, the part number has been updated again to 14935-JF00B ...
http://www.courtesyparts.com/control-va ... 31988.html
Does anyone have an opinion about whether there is any value to buying it at the local dealer's parts window vs saving $10 by buying it online?
http://www.courtesyparts.com/control-va ... 31988.html
Does anyone have an opinion about whether there is any value to buying it at the local dealer's parts window vs saving $10 by buying it online?
-
kerrton

- Posts: 2201
- Joined: Mon Feb 04, 2008 8:48 am
- Car: 2008 Nissan Rogue SL FWD Gotham Gray
- Location: Southern Alberta, Canada
Re: Vent Control Valve Replacement Step-by-Step
EricBSS I have to say that was great of you to take the time to write that up, this is an example of an issue that I'd guess almost no one would be familiar with and would most likely end up paying the $300+ for the repair if outside of warranty. But your description shows how painfully simple the repair is, to the point where no tools are even require other than something to press down on the electrical clip to release it. Even someone with only very basic knowledge of vehicles should be able to save the labour cost of this procedure, and I'm guessing that if the original part is a weak design there will be lots of them failing after warranty expires.
If and when mine fails, I plan on saving a couple hundred bucks on labour by doing this myself, all thanks to you! This is much appreciated.
If and when mine fails, I plan on saving a couple hundred bucks on labour by doing this myself, all thanks to you! This is much appreciated.
-
rowdy_canuck
- Posts: 25
- Joined: Tue Dec 21, 2010 10:43 am
- Car: 2009 Nissan Rogue
Re: Vent Control Valve Replacement Step-by-Step
HI guys - thanks very much for posting this info. Just happened on our 09 Rogue. Will most definitely be replacing this part myself!
Re: Vent Control Valve Replacement Step-by-Step
My 2008 Nissan Rogue check engine light came on at 60000 miles. After reading about the frequency of the vent control valve failure, I decided to start with the control valve instead of trying a new gas cap. I ordered part number 14935JF00B from dealerdirectparts.com for about $90, and I replaced the part in about 14 minutes. The check engine light turned off the next day. Thank you to those who provided instruction and information.

Re: Vent Control Valve Replacement Step-by-Step
Got a same part number with B in the end from local dealer for $135. Could not wait because I'm going to Toronto this weekend and don't want to see any existing engine codes. Phillipa, I think you should stick this topic to "how to" since it is getting popular to all Rogue owners who pass 60k miles. Mine is 71k and just started to see this problem about a week ago. And thanks again for a great write-up.thomagp wrote:I ordered part number 14935JF00B from dealerdirectparts.com for about $90
-
stranger21ny
- Posts: 17
- Joined: Fri Apr 11, 2008 4:47 pm
- Car: 2008 ROGUE SL
Re: Vent Control Valve Replacement Step-by-Step
HI.
so i bought the old type valve for about $40 but the check engine light came back afew weeks later. i went yesterday and bought the NEW valve from the dealer for $130 put it on (i had a tough time putting it back on with he new O ring.
I cleared the check engine light last night and today it came back again. what should i do any one. i placed the O ring out alittle in order to squeeze the valve it and that was the only wayit will go on. My state inspection is due this month and i need to fix this. any help pppppppppppppppppppppppppplllllllllllssssssssssssssssssssss
-
kerrton
- Posts: 2201
- Joined: Mon Feb 04, 2008 8:48 am
- Car: 2008 Nissan Rogue SL FWD Gotham Gray
- Location: Southern Alberta, Canada
Re: Vent Control Valve Replacement Step-by-Step
Are you absolutely sure it's the vent control valve that is the problem? If you replace a part and the problem continues, normally you assume that the problem must lie elsewhere. I hate to suggest it, but your gas cap is tightened securely, right? If you don't click it several times and get a good seal it will also trigger the same code.
-
stranger21ny
- Posts: 17
- Joined: Fri Apr 11, 2008 4:47 pm
- Car: 2008 ROGUE SL
Re: Vent Control Valve Replacement Step-by-Step
should i replace the cap??? and what about the valve i bought from nissan do i take it back what do u think?
-
philipa_240sx
- Posts: 4138
- Joined: Thu Jun 21, 2007 7:30 am
- Location: Canada
Re: Vent Control Valve Replacement Step-by-Step
A few days ago I was unable to fill the fuel tank. So back to my trusted local mechanic and guess what?
The vent control valve failed for the second time in 16 mos!
This time it failed in the closed position which prevents air from escaping when you fill the tank. We examined the old valve against the photos I posted above. The failed part was the newer and supposedly better valve. My mechanic replaced it with the same OEM Nissan part.
Sadly there is no warranty on this. My vehicle is outside the original warranty, and the 1yr parts warranty is also expired. Cost of the valve is $125 CDN plus labor.
Let's hope it lasts longer this time!
Re: Vent Control Valve Replacement Step-by-Step
Hi friends,
Sharing my experience replacing the Vent Control Valve.
SES, and got P0455
Removed VCV, stuck open.
Soaked with WD40, cleaned with toothpick. Connected to 12V, after the plunger moved freely many times, then always ended up stuck-open again at the maximum-open / resting position. Many tries and repeated cleaning, got the same result.
I found, once the plunger already moved away 2-3 mm from its resting position, it didn't get stuck again.
So, I steel-epoxy-glued a U shape thick copper wire to the VCV body (inside the hole) (after cleaning, sanding it, free of oil / WD 40), to stop and prevent the plunger from retreating fully to its resting position.
The VCV function would not be affected since the plunger was still almost 100 % open, but stayed free.
After 3 month, it is still OK, no new SES light.
Ciao
Re: Vent Control Valve Replacement Step-by-Step
Hi all, I am having the same issue, P0455 and 456. Is it really that easy to change the valve?
Is there any harm on driving around with this issue for a couple weeks?
I used this site to figure out how to change my cabin air filter. Great success! Thanks guys.
Is there any harm on driving around with this issue for a couple weeks?
I used this site to figure out how to change my cabin air filter. Great success! Thanks guys.
-
soldier22nd
- Posts: 1
- Joined: Sun Mar 11, 2012 5:18 pm
- Car: Nissan Rogue SL AWD 2009
 Re: Vent Control Valve Replacement Step-by-Step
Bought the part online for about 98.00. Appears to be at least their 3rd revision. Installed it within 30 minutes just sliding under the car. If your not a real slender person you'll have to jack it up. Thankfully, I squeezed under there. Have a flat head handy to disconnect the wire harness. Easy to do and I'm so glad I found this posting!
Re: Vent Control Valve Replacement Step-by-Step
looking forward to doing this repair on my own after getting a quote of $550 from the dealership here. thanks for posting.
Re: Vent Control Valve Replacement Step-by-Step
im doing this within the next couple days. i called a garage for a quote and they told me the part alone would be $140, without labor! autozone has it for $70. i will definitely give this a try myself. and if i cant do it im sure i know someone who can. this is so helpful. thank you EricBss7
-
MyWhiteHorse
- Posts: 4
- Joined: Sat Aug 09, 2014 4:30 am
- Car: nissan sentra 05
Re: Vent Control Valve Replacement Step-by-Step
Do you know what size the o ring is that goes on this part? I'm thinking of just taking mine off first, cleaning it out, and seeing if that solves it. Not totally convinced it's bad, likely just dirty plus maybe a bad design that makes it get that way and seize up.
-
MyWhiteHorse
- Posts: 4
- Joined: Sat Aug 09, 2014 4:30 am
- Car: nissan sentra 05
Re: Vent Control Valve Replacement Step-by-Step
I've confirmed that the rubber o-ring size is 14mm.MyWhiteHorse wrote:Do you know what size the o ring is that goes on this part? I'm thinking of just taking mine off first, cleaning it out, and seeing if that solves it. Not totally convinced it's bad, likely just dirty plus maybe a bad design that makes it get that way and seize up.
Re: Vent Control Valve Replacement Step-by-Step
Worked perfectly. Great step by step instructions.
-
traffikflow
- Posts: 1
- Joined: Sun Sep 07, 2014 11:58 am
Re: Vent Control Valve Replacement Step-by-Step
I'm attempting to try and fix the valve spring and plunger first before buying a new one..I have the valve off and I'm looking into the hole that has the o ring and at the spring and punger in the hole with the valve in upright position it is in when intsalled...is the spring supposed to slide up to be open or slide down. I'm not sure how its supposed to look..can someone please explain. Thank you very much in advance!
Re: Vent Control Valve Replacement Step-by-Step
I need to replace the vent control valve on my 09 Rogue. The heat shield that goes over it is rusted out so I am going to replace it at the same time. I sprayed rock guard under coating on the outside of the heat shield but I am not sure if I should spray the inside. Does the vapour cannistor or anything else get hot as I do not want the under coat to burn off. I am assuming something gets hot since there is a heat shield there with vents am I right?
Re: Vent Control Valve Replacement Step-by-Step
[quote="Jostudly"]I need to replace the vent control valve on my 09 Rogue. The heat shield that goes over it is rusted out so I am going to replace it at the same time. I sprayed rock guard under coating on the outside of the heat shield but I am not sure if I should spray the inside. Does the vapour cannistor or anything else get hot as I do not want the under coat to burn off. I am assuming something gets hot since there is a heat shield there with vents am I right? Also do I need to disconnect the negative battery cable which installed the vent control valve?
-
ImStricken06

- Posts: 5052
- Joined: Wed Dec 07, 2011 8:45 am
- Car: 2008 Rogue(sold)
2013 Santa Fe
2016 Sorento - Location: Within Range
- Contact:
Re: Vent Control Valve Replacement Step-by-Step
88k and you can go ahead and add me to this list of problems: check engine light code P0455, which is an evaporative emissions leak.
-
Luckeeesmom
- Posts: 4
- Joined: Wed Apr 22, 2015 7:31 am
- Car: 2010 Nissan Rogue
Re: Vent Control Valve Replacement Step-by-Step
2010 Rogue. Our Service Engine Soon light came on around 30,000 miles or so. We just now got around to repairing it to be able to get the car inspected.
Engine code was PO444 so we replaced the vent control valve per the detailed instructions above (great info by the way!) but it did not resolve our engine code issue. I dug into it a bit more on the web and found that code PO444 can also be related to the wires leading the canister purge volume control solenoid valve.
There is a service bulletin from Nissan that details this issue: http://engine-codes.com/uploads/nissan/NTB10-018.pdf
The wires involved are very easy to check by just popping the hood and doing a quick visual inspection (no dissembly needed.) I recommend checking this before you proceed with the vent control valve replacement if you I are not 100% sure that is the issue.
When I checked our car, the wires were fully disconnected so I am having the wiring Harness replaced at a local repair shop tomorrow. Cost is about $140 including parts and labor and at the dealer is would have been $150 or so. It could probably be a DIY if you follow the steps in the service bulletin but we are running up against a deadline to get the vehicle inspected and we didn't have time to mess with it. Hoping this will resolve the service engine light issue!
I don't feel too bad about replacing the vent control valve because it appears it was a substandard part and the replacement is much better but I wanted to post about our experience in case it helps someone else who is getting the PO444 engine code.
-
Luckeeesmom
- Posts: 4
- Joined: Wed Apr 22, 2015 7:31 am
- Car: 2010 Nissan Rogue
Re: Vent Control Valve Replacement Step-by-Step
We went with the vent control valve first because of the info that I saw on the below posting that referred me to the DIY for the vent control valve. I now see that the DIY poster had pulled a different engine code than the PO444. p0444-code-and-check-engine-light-on-t543332.html
-
ImStricken06
- Posts: 5052
- Joined: Wed Dec 07, 2011 8:45 am
- Car: 2008 Rogue(sold)
2013 Santa Fe
2016 Sorento - Location: Within Range
- Contact:
-
ImStricken06
- Posts: 5052
- Joined: Wed Dec 07, 2011 8:45 am
- Car: 2008 Rogue(sold)
2013 Santa Fe
2016 Sorento - Location: Within Range
- Contact:
-
Mr. Music

- Posts: 724
- Joined: Thu Nov 29, 2007 2:09 pm
- Car: 2008 Altima Coupe 2.5S CVT w/ Convenience Package
In the family: '02 S15 Spec R, '09 Rogue - Location: Miami, FL
Re: Vent Control Valve Replacement Step-by-Step
Thanks for the video ImStricken06.  My mom's Rogue had the P0455 code and a quick search turned up this thread, making the fix quick and easy. Our local dealer asked for $450 to do the job!
Find Your Forum!