
My first Z32, and only w/ 19k miles!
 My first Z32, and only w/ 19k miles!
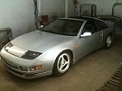
Hey guys, new to the forums, and thought I would just introduce myself. Picked up a red Z32 Auto NA 2+0 today. The car only has 19,000 original miles! I will try to get up better pictures pretty soon, but it does need a little cleaning even though it was stored inside all of its life. It's all original as well, which is awesome. If anyone is looking to buy a mint Z32, jut hold your horses for a few more weeks and buy this one! 
-
MaximA32
- Posts: 349
- Joined: Mon Jan 09, 2012 1:30 am
- Car: '98 Maxima (RIP)
'04 Maxima - Traded
'06 Mazda 6S- Traded
'15 Altima - Location: Valley of the Sun
Re: My first Z32, and only w/ 19k miles!
Wow! That's awesome! What'd you pay for it?
-
addicted4life
- Posts: 548
- Joined: Sun Jul 29, 2012 1:30 pm
- Car: RHD '93 Fairlady 2+2, 3076s, Haltech, & Hoosiers. Go baby, go.
- Location: Moncton, NB
Re: My first Z32, and only w/ 19k miles!
Wow great find!!
-
H1tman

- Posts: 136
- Joined: Wed Mar 14, 2012 3:38 pm
- Car: '90 300zx 2+2 Azure Blue
- Location: Temecula, CA
Re: My first Z32, and only w/ 19k miles!
Impressive.
Wheels are on backwards btw. Switch them to the correct side and you will get more $ for it
Wheels are on backwards btw. Switch them to the correct side and you will get more $ for it
Re: My first Z32, and only w/ 19k miles!
H1tman wrote:Impressive.
Wheels are on backwards btw. Switch them to the correct side and you will get more $ for it
Good catch. Tires are directional, so I'm going to leave it be until I get new ones. But the guy was a friend of my relative so I only paid $5000 for it, which I thought was a pretty good price for a Z with only 19k miles. I have time to only get the inside clean today, but tomorrow it will get washed, and a good buff on Monday. The only thing that kind of stinks is that the radio doesn't work out of all the speakers. It has the Bose system, and when I turn it on, sound only comes out of the speaker right by the headunit, and all the other speakers make weird ringing noises. And when I tap, or put my finger on the dial for the volume, the one speaker starts to make loud noises like when you tap a microphone...
-
Ace2cool

- Posts: 11650
- Joined: Sun Apr 20, 2008 5:21 pm
- Car: 1991 Nissan 300ZX TT
1966 Datsun Fairlady 1600
2005 Suzuki GSX-R 600
1974 Honda CB550 Four
2009 Ford F150 Lariat - Location: Murfreesboro, TN
Re: My first Z32, and only w/ 19k miles!
Either the head unit is toast, or the amps are all shot. Either way, I'd bypass the amps and replace the head unit. New speakers are a must as well. It took me forever to get my 2+2's audio the way I wanted it.
Re: My first Z32, and only w/ 19k miles!
Bummer, I was kind of hoping to keep the stock audio, but I guess I might as well do it right. I will investigate and see what I find. Thanks for the info.Ace2cool wrote:Either the head unit is toast, or the amps are all shot. Either way, I'd bypass the amps and replace the head unit. New speakers are a must as well. It took me forever to get my 2+2's audio the way I wanted it.
Re: My first Z32, and only w/ 19k miles!
Well I've decided to do one of two things. Since the car has only 19k miles, I want to keep it original as possible for resale value purposes. So, I'm going to
A: Live with no audio
or
B: Replace the caps in the BOSE amps.
Any input/ direction toward former DIYs would be great. Thanks guys.
A: Live with no audio
or
B: Replace the caps in the BOSE amps.
Any input/ direction toward former DIYs would be great. Thanks guys.
-
Ace2cool
- Posts: 11650
- Joined: Sun Apr 20, 2008 5:21 pm
- Car: 1991 Nissan 300ZX TT
1966 Datsun Fairlady 1600
2005 Suzuki GSX-R 600
1974 Honda CB550 Four
2009 Ford F150 Lariat - Location: Murfreesboro, TN
Re: My first Z32, and only w/ 19k miles!
Most DIY's entail R/R of the Bose components, since they're such garbage, lol.
Robo has a lot of good DIY stuff on his site, and we have a decent amount of tech as well, including a wiring diagram for the head unit and speakers.
Like I said, no one has really done much in the way of repairing the stock Bose system, because there are so many better options available, and they don't have insanely overpriced components.
Re: My first Z32, and only w/ 19k miles!
Thanks for the info! I have a bud who's good at soldering small components, so it shouldn't be too much of a problem. The only reason I want to keep the Bose is because I want to keep the car all original. I couldn't imagine the headunit being bad after the small amount of use it has had, so we are just going to do the caps in the amplifiers first. If that doesn't work, then we will diagnose more. I'm hoping to grab some good pictures tomorrow, so get ready! Haha.Ace2cool wrote:Most DIY's entail R/R of the Bose components, since they're such garbage, lol.
Robo has a lot of good DIY stuff on his site, and we have a decent amount of tech as well, including a wiring diagram for the head unit and speakers.
Like I said, no one has really done much in the way of repairing the stock Bose system, because there are so many better options available, and they don't have insanely overpriced components.
Re: My first Z32, and only w/ 19k miles!
My Z had the stock radio as well. Its pretty crappy and was causing most of the issues for me, my whole audio wasn't working at all. Once I replaced it my speakers livened up. Granted now that they've been working the rears and the passenger front have fried (21 years old, they're gonna die), so now I only have my driver side one working, but it works really well hahaha!
-
300ZXttZMAN

- Posts: 6800
- Joined: Mon Nov 22, 2010 4:07 pm
- Car: 1990 Nissan 300ZX TT 5spd pearl white
DD: 2008 Nissan Frontier NISMO pkg 4x4 Crew Cab - Location: Sulphur, LA 70665
- Contact:
Re: My first Z32, and only w/ 19k miles!
Welcome to NICO! Why do you want to sell it???
Re: My first Z32, and only w/ 19k miles!
I heard a lot of horror stories with the Bose, but when I read about the people who re-soldered in new capacitors, they said it works great! I know the speakers are old, but the car has been stored in a nice garage, so I think they will be decent and the headunit has barely any wear. I really want to get it working nicely like OEM!IonZ32 wrote:My Z had the stock radio as well. Its pretty crappy and was causing most of the issues for me, my whole audio wasn't working at all. Once I replaced it my speakers livened up. Granted now that they've been working the rears and the passenger front have fried (21 years old, they're gonna die), so now I only have my driver side one working, but it works really well hahaha!
300ZXttman, I bought the car for a good price, so I am looking to make a profit off of it. I feel like it would be a sin to do anything aftermarket to such a nice, rare car. Today I removed the pinstripes, and prepped it for a thorough cleaning including of claying, compounding, more compounding, buffing, polishing, then a nice wax to top it off. Everything has been cleaned besides the engine bay, and I have a small tune-up in store for it as well. I honestly love the car besides the Auto transmission. It's an amazing car, and I'm starting to debate about selling it, but profit is profit....
Sorry about making you guys wait for photos, but Christmas time is very busy for me with work, but here are some photos of previous cars...

Restored this RX7 after I found it in a field. It was an amazing car. Daily drove it, but it was essentially a race car...

A nice daily driver modern muscle car. Mainly bought it for the experience of owning American Muscle...

Got a great deal on this Teal SC300 with black interior and a five speed. Sold it pretty recently....

I am also currently restoring this truck with my Grandpa. It's great being able to relate with him on something, and he loves this truck.
So now I'm to this Z32. I've always liked them, but owning this one just makes it so awesome. It's a flashback to the 90's, and everything works great. Keep checking back guys for photos!
Last edited by RXEvan on Mon Dec 24, 2012 6:53 pm, edited 1 time in total.
-
brouib21
- Posts: 18
- Joined: Fri Dec 21, 2012 10:07 pm
- Car: 1991 300zx vh45de
2006 Jeep Grand Cherokee Srt8
2012 Jeep Grand Cherokee Laredo - Location: Houston, Tx
Re: My first Z32, and only w/ 19k miles!
Good job on finding an immaculate car like that!
-
300ZXttZMAN
- Posts: 6800
- Joined: Mon Nov 22, 2010 4:07 pm
- Car: 1990 Nissan 300ZX TT 5spd pearl white
DD: 2008 Nissan Frontier NISMO pkg 4x4 Crew Cab - Location: Sulphur, LA 70665
- Contact:
Re: My first Z32, and only w/ 19k miles!
Hmm interesting well good luck with the sale I guess. 
-
AZhitman

- Administrator
- Posts: 54542
- Joined: Mon Apr 29, 2002 2:04 am
- Car: 58 L210, 63 Bluebird RHD, 64 NL320, 65 SPL310, 66 411 RHD, 67 WRL411, 68 510 SR20, 75 280Z RB25, 77 620 SR20, 79 B310, 90 Z32, 91 GTi-R, 92 Silvia Qs, 98 S14, 23 Z.
- Location: Surprise, Arizona
- Contact:
Re: My first Z32, and only w/ 19k miles!
Well done.
Might make it mandatory that the new owner spend some time here, so we can "keep it in the family".
Also - Hit up George at shortcircuitrepair.com, he knows quite a bit about Nissan-specific Bose systems.
Might make it mandatory that the new owner spend some time here, so we can "keep it in the family".
Also - Hit up George at shortcircuitrepair.com, he knows quite a bit about Nissan-specific Bose systems.
Re: My first Z32, and only w/ 19k miles!
Thanks guys! I'm sure I will enjoy it at least for a month or two.AZhitman wrote:Well done.
Might make it mandatory that the new owner spend some time here, so we can "keep it in the family".
Also - Hit up George at shortcircuitrepair.com, he knows quite a bit about Nissan-specific Bose systems.
Re: My first Z32, and only w/ 19k miles!
Well today I had time to do the first full detail. I did five steps, and the paint turned out amazing. A lot of small and larger scratches came out, and it's extremely smooth and shiny now. I also tightened all 20 of the gas line hose clamps in the engine bay to prevent any leaks. A lot of them were loose, but I took care of it. Tomorrow I plan on completely degreasing the engine bay, and since you guys have been patient, I was able to grab some quick pics. Here they are!


Those are just a few. I'm planning on doing a photo shoot next week. Snow and salt around here need to clean up before I take it out and do that though...
Those are just a few. I'm planning on doing a photo shoot next week. Snow and salt around here need to clean up before I take it out and do that though...
-
truckmtr240

- Posts: 290
- Joined: Thu Aug 27, 2009 4:26 pm
- Car: 91 240sx hatch
- Location: Lancaster
Re: My first Z32, and only w/ 19k miles!
Looks good boss 
Looks like your local. We'll have to meet up with both of our red nissans.
Looks like your local. We'll have to meet up with both of our red nissans.
Re: My first Z32, and only w/ 19k miles!
Nice man. Photoshoot next week, or tomorrow depending on weather. I'll let you know. 
Re: My first Z32, and only w/ 19k miles!
Well I actually got around to a photoshoot today, and later with truckmtr240! Here they are!


Let me know what you guys think! Interior pictures to come, but it is flawless!!!
Let me know what you guys think! Interior pictures to come, but it is flawless!!!
-
Ziggy1621

- Posts: 1137
- Joined: Sun Jun 10, 2012 5:57 pm
- Car: '90 Z32 TT (Shibui)
'90 Z32 2+0 NA
'68 311 Roadster
2004 Rx330
2011 BMW 550i (TT) - Location: Cocoa, Florida
- Contact:
Re: My first Z32, and only w/ 19k miles!
Very nice dude! Taking great care of her. And is that a GMC 3800?
Re: My first Z32, and only w/ 19k miles!
Thanks man! Chevy 3600, my grandpa told me that he was using it one day in the field and went over a large bump, and it stopped running. No dents underneath or anything, so I'm thinking just something in the carb got messed up. Doing a good resto on it right now. I will grab some more pictures of it when I'm over there working on it again.
-
Ace2cool
- Posts: 11650
- Joined: Sun Apr 20, 2008 5:21 pm
- Car: 1991 Nissan 300ZX TT
1966 Datsun Fairlady 1600
2005 Suzuki GSX-R 600
1974 Honda CB550 Four
2009 Ford F150 Lariat - Location: Murfreesboro, TN
Re: My first Z32, and only w/ 19k miles!
Beautiful.
Re: My first Z32, and only w/ 19k miles!
Thanks man! Pics aren't the greatest, but they are the best I could do for winter time.Ace2cool wrote:Beautiful.
-
Ace2cool
- Posts: 11650
- Joined: Sun Apr 20, 2008 5:21 pm
- Car: 1991 Nissan 300ZX TT
1966 Datsun Fairlady 1600
2005 Suzuki GSX-R 600
1974 Honda CB550 Four
2009 Ford F150 Lariat - Location: Murfreesboro, TN
Re: My first Z32, and only w/ 19k miles!
Doesn't even need good pics man; The car speaks for itself, haha!
Re: My first Z32, and only w/ 19k miles!
I definitely agree!Ace2cool wrote:Doesn't even need good pics man; The car speaks for itself, haha!
Well today I got around to taking out all the speakers! Here's a link for the people who are interested on how to take them all out...
http://www.duglin.net/2011/03/joshs-300 ... -page.html
After I got them out, I wanted to get to the amps for repair.
There are just a few basic steps it takes to get them apart, as shown in the next few pictures...
First you take out the speaker, and depending on whether it is front or back, it will be just a few screws. After the speaker is unscrewed, take a flathead screwdriver and slightly pry up on the side and disconnect the two connectors keeping it in, and remove the speaker...

Speaker pried open, and as you can see, a furry little rodent found a storage home in this speaker box....

Speaker removed and connectors are shown.
Next, remove all the screw around the boxes. You can see in the previous picture, some are already removed.
Once that is done, simply pry up, and the top will come off.
Next, the amps are held in by two screws for the rear, and four for the front...

Remove those screws, and the amps will pop off. There is also a single screw holding down the wires connecting to the speaker, remove that.
Next, the amps are still held in by a connector, for the two front speakers I couldn't get the connector off, but the rear two I did.
Basically now you have access to repair your amp!

Rear.....

Front...
I also found out on the one amp, I had a friend component... This amp more than likely will need to be replaced, or sent out for better repair than I can do...

Fried amp...
Now for the front one, there are a few screws underneath. Remove them, then pry it open. Once open, remove the connectors to the speakers and you have access to your amp. Remove the four screws holding it down, and now you have access to repair the amp!

Then you are ready for repair on everything!

I haven't gotten around to repair, but I will as soon as I do some more research on other forums to figure out specifically what caps need to be replaced. That update will come soon....
Re: My first Z32, and only w/ 19k miles!
Well I started to repair the boards. I found a small article on a C4 Corvette with the Bose (similar to ours), and he had an article on Bose amp repairs. Here's the link..
http://www.corvetteforum.com/techtips/v ... &TopicID=2
So using this, I figured I would replace the two 1000uf capacitors on the board. I went to Radio Shack and picked up what I needed...

So I started working on the first board and removed the first capacitor by heating up the bottom with a soldering iron, and having a friend pull it on the other side. Here are the markings of what leads to heat up, as well as a picture of one removed...


Now that the one is removed, solder in the new capacitor, making sure to keep track of where the negative lead goes.

Now continue this for all the other boards! If your having trouble removing the capacitors from the glue, use an exacto knife to cut it out. Now for the main front speaker I replaced four capacitors. One 1000uf, two 220uf, and a 100uf. They were the four bigger ones. Once you are done, it should look like this....

I still haven't gotten all the capacitors replaced, but I'm hoping to get that done tomorrow. Now for the fried component I showed earlier, I figured out it was a transistor. I also read that these tend to go bad. After inspecting the other ones, they've shown signs of slight heat, so I am going to replace all of them on each board. There are four per board, so that totals 16. The front speaker boards and the rear speaker boards have the same transistor. I will grab the numbers from them tomorrow, and go pick some up at Radio Shack soon. Also, here is a pic of the fried transistor closer. I still think I can use the board....

It's just a little burnt, but the other side is okay, which is the important side, and the surrounding components look to be in okay condition. I will post again next time I work on it!
http://www.corvetteforum.com/techtips/v ... &TopicID=2
So using this, I figured I would replace the two 1000uf capacitors on the board. I went to Radio Shack and picked up what I needed...
So I started working on the first board and removed the first capacitor by heating up the bottom with a soldering iron, and having a friend pull it on the other side. Here are the markings of what leads to heat up, as well as a picture of one removed...
Now that the one is removed, solder in the new capacitor, making sure to keep track of where the negative lead goes.
Now continue this for all the other boards! If your having trouble removing the capacitors from the glue, use an exacto knife to cut it out. Now for the main front speaker I replaced four capacitors. One 1000uf, two 220uf, and a 100uf. They were the four bigger ones. Once you are done, it should look like this....
I still haven't gotten all the capacitors replaced, but I'm hoping to get that done tomorrow. Now for the fried component I showed earlier, I figured out it was a transistor. I also read that these tend to go bad. After inspecting the other ones, they've shown signs of slight heat, so I am going to replace all of them on each board. There are four per board, so that totals 16. The front speaker boards and the rear speaker boards have the same transistor. I will grab the numbers from them tomorrow, and go pick some up at Radio Shack soon. Also, here is a pic of the fried transistor closer. I still think I can use the board....
It's just a little burnt, but the other side is okay, which is the important side, and the surrounding components look to be in okay condition. I will post again next time I work on it!
Last edited by RXEvan on Sun Dec 30, 2012 5:55 am, edited 1 time in total.
-
Ace2cool
- Posts: 11650
- Joined: Sun Apr 20, 2008 5:21 pm
- Car: 1991 Nissan 300ZX TT
1966 Datsun Fairlady 1600
2005 Suzuki GSX-R 600
1974 Honda CB550 Four
2009 Ford F150 Lariat - Location: Murfreesboro, TN
Re: My first Z32, and only w/ 19k miles!
Transistors usually do heat up. Not to the point or scorching or anything, but it is normal for them to show a little sign of residual heat.
That last pic though, of the scorched black component sticking up next to the blue capacitor, looks a bit like a voltage regulator to me, not a transistor. And voltage regulators most certainly do get hot. Nothing to worry about with them.
That last pic though, of the scorched black component sticking up next to the blue capacitor, looks a bit like a voltage regulator to me, not a transistor. And voltage regulators most certainly do get hot. Nothing to worry about with them.
Re: My first Z32, and only w/ 19k miles!
Gotcha, after doing a bit of research though, I've come to find that it is indeed a MOSFET, or a field-effect transistor. They sometimes go bad from what I've read, as in this case. The plastic piece that covers the two MOSFETs on this side has simply melted onto it. I will replace the two on this side just to make sure that everything is good. The number on the side is K688. All of the boards have four of these MOSFETs, and when they burn like this one, it smells terrible. More updates on the way....Ace2cool wrote:Transistors usually do heat up. Not to the point or scorching or anything, but it is normal for them to show a little sign of residual heat.
That last pic though, of the scorched black component sticking up next to the blue capacitor, looks a bit like a voltage regulator to me, not a transistor. And voltage regulators most certainly do get hot. Nothing to worry about with them.