This how-to is a step-by-step procedure for cleaning and servicing disc brakes on the Rogue. Actually this could be applied to nearly any vehicle with disc brakes. It takes approximately one hour to do all 4 brakes. Newbies should expect to take at least 2-3 hours the first time around.
============================================
Legal Stuff:
The braking system is a critical part of your vehicle. The information provided below is for information only. I do not accept any responsibility should your braking system fail as a result of this procedure.
These procedures are meant for someone with decent mechanical knowledge. If you are unsure or have never worked on your vehicle before, then seek help... either from a fellow mechanic or someone knowledgeable in servicing brakes. Otherwise do no attempt this on your own! If in doubt then leave it for the professionals.
Important notes:
- Do not apply any lube to the brake pads or rotor. Clean up any mess promptly with brake parts cleaner and a clean rag.- Do not apply the brake pedal while the calipers are removed. The caliper pistons may pop out and you will have a very big mess.- Always pump the brakes several times before going for a test drive. This will seat the pads and avoid a loss of braking power at the first stop.- Double check all bolts. The diagrams below list torque values for the bolts:
ie. 59 - 78 N·m (6.0 - 8.0 kg-m, 43 - 58 ft-lb)
If you do not have a torque wrench, just firmly tighten everything. Do not over tighten by using a long breaker bar or extension pipe.
============================================
Part 1: Tools
Gather all the tools below. Do not start before you have everything as you will not be able to drive your vehicle to pick up parts.
- Open end wrenches 14mm & 19mm- Socket set 14mm & 19 mm- Disc Brake cleaning fluid- A set of brass or steel brushes, toothbrush sized, and a nylon brush (an old toothbrush will do)- Silicone or 'disc brake lube' that is compatible for brakes and rubber parts- Copper based anti-seize compound/lubricant- A large flat bladed screwdriver for prying- Jack, the OEM scissor jack can be used but a proper floor jack is better.- Jack stands to properly support the vehicle.- Wheel chocks to keep the vehicle from rolling- Shop Rags- A tarp or cloth to cover the ground- An oil drain pan or some sort of container to capture any dripping cleaning fluid.- A 12" piece of stiff wire to tie the caliper out of the way. A piece of rope will do in a pinch.- Safety glasses- Nitrile or latex gloves- Dust mask, brake dust should not be inhaled.
Optional:- Wheel lock adapter (if your Nissan came with wheel locks)- A heavy hammer- Breaker bar- Torque wrench- a 12" length of 1" pipe to gain extra leverage- A digital camera to document where parts go so you can reassemble everything.
Part 2: Prep and wheel removal
1 - Ensure you have a clean area on which to work. A firm surface such as asphalt or concrete is needed to support the jacks.
2 - Start with one of the front brakes. They are the easiest. Do only one wheel at a time. This way if you forget how something goes back together, you can refer to the opposite wheel.
3 - Loosen the lug nuts on the wheel 1/2 turn but do not remove them
4 - Refer to the owners manual for jacking locations. Place chocks under the remaining wheels then jack the vehicle so the tire leaves the ground. Note: I used different jack points on the subframe than the manual recommends. Please follow the jack points below:
5 - Place the jack stands under the frame to support the weight, then lower onto the jack stands. DO NOT rely on the jack to support the weight, use jack stands. You may need to adjust the jack stands so wheel remains off the ground
6 - Remove lug nuts and then the wheel.
Part 3: Disassembly
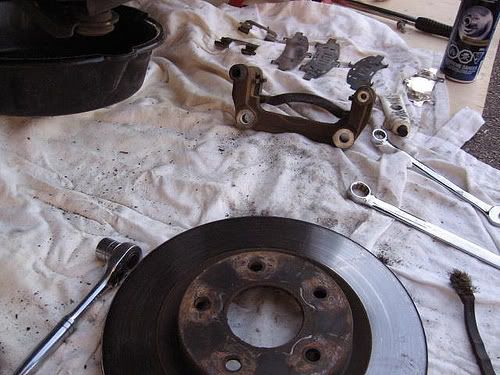
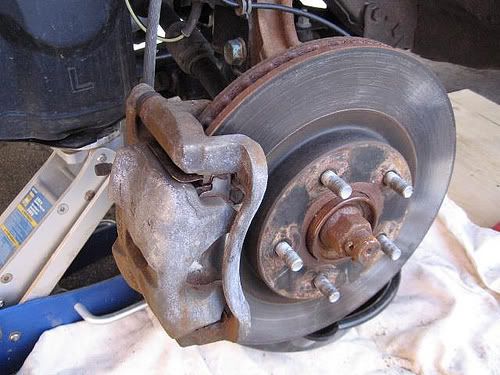
1 - Spray the disc brake assembly with disc brake cleaner. This will help to remove some of the dirt.
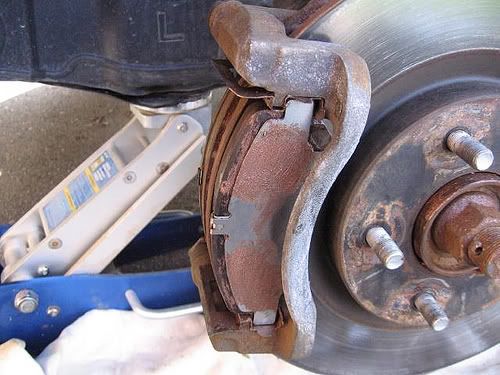
2 - Using a 14mm wrench, loosen then remove the lower caliper slider bolt. It's difficult to work with the bolt facing away from you so double check to make sure you are loosening not tightening the bolt.
3 - With the bolt removed, rotate the caliper upwards to expose the brake pads. Be sure not to loose the bolt!
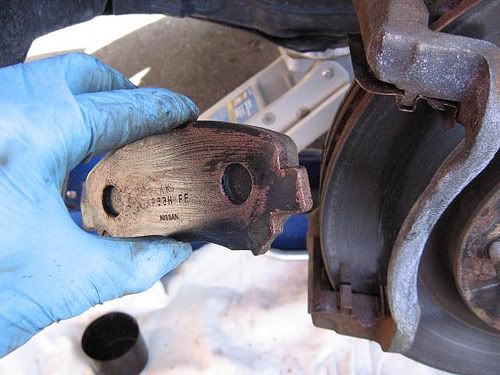
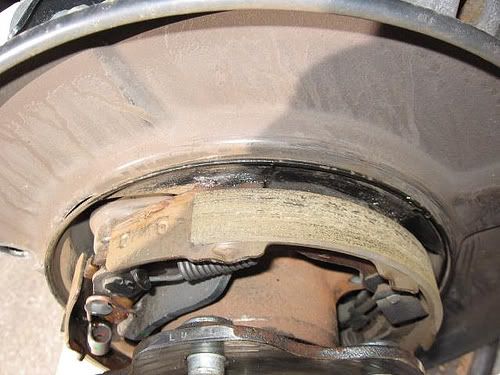
4 - Remove the pads. You may need to gently pry the pads outwards with a screwdriver. Be careful not to damage the pads. If you cannot get the pads out, leave them for now. They can be removed along with the bracket later. Be sure to keep track of any hardware and the brake pad locations. The pads for the back are different than the front.
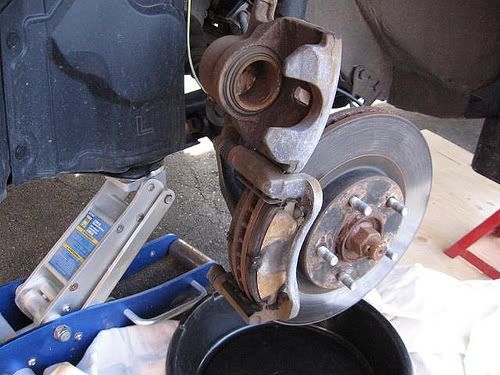
5 - The accordion looking rubber boot that protects the upper slider pin will be stuck to the brake caliper. Rotate it by hand to break it free, then slide the caliper back to remove it. Optionally, you could remove the 14mm bolt that holds slider pin and leave the pin in the caliper bracket. I use the first method as it saves removing a bolt.
6 - Attach the caliper to the coil spring by bending an S-shaped hook with the wire you have. This will keep it out of the way for the next step.
This next step is optional, but necessary if you want to service or replace the brake rotor. If you could not get the brake pads out, you will also have to do this step.
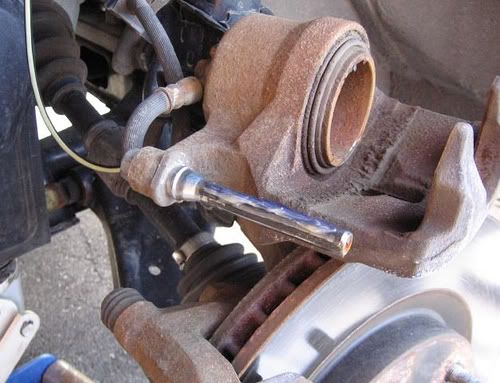
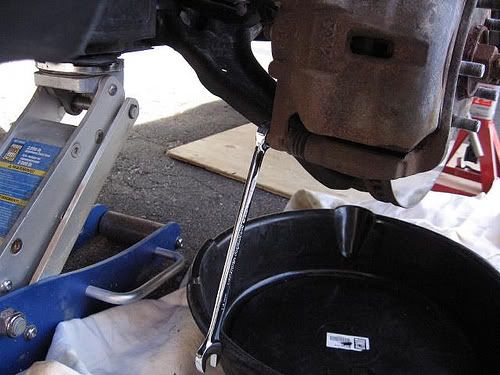
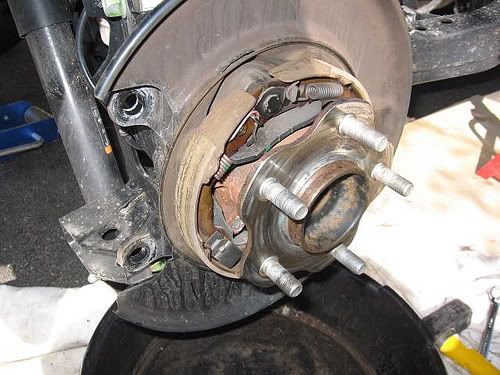
7 - Using a 19mm wrench, remove the two bolts securing the caliper bracket/torque member. These bolts are on very tight. You may need to use a longer breaker bar or a short length of pipe to increase your leverage. Be careful!
8 - If you were unable to remove the pads earlier, it should be much easier now. Also remove the 2 retaining clips from each end of the caliper bracket. Be sure to note their positions and orientation.
9 - Remove the shims from the back of the brake pads. Be sure to note their positions and orientation.
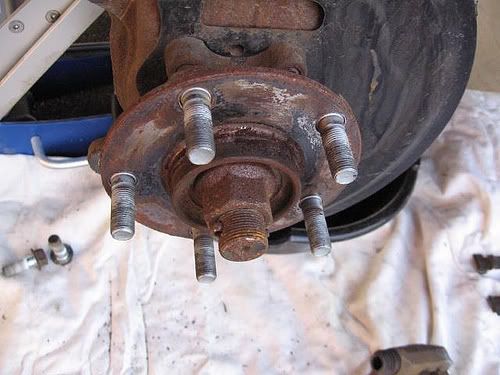
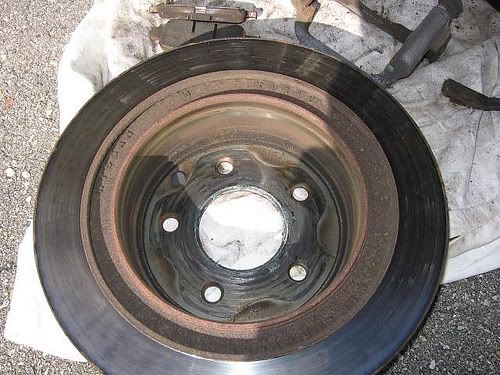
10 - If you removed the caliper bracket, you can also remove the brake rotor. Sometimes the rotor will seize itself to the hub. In this case, you can slowly rotate the rotor while tapping it from the side and the back with a hammer until it releases. This can be a very tedious process so take your time and be sure not to damage the rotor. You can also use penetrating lube on the hub, let it soak in for 10-15 minutes before trying.
DIY: Disc Brake Cleaning & Bleeding
-
philipa_240sx
- Posts: 3808
- Joined: Thu Jun 21, 2007 7:30 am
- Location: Canada
-
philipa_240sx
- Posts: 3808
- Joined: Thu Jun 21, 2007 7:30 am
- Location: Canada
Re: How to: Rogue Disc Brake Service (philipa_240sx)
Part 4: Cleaning
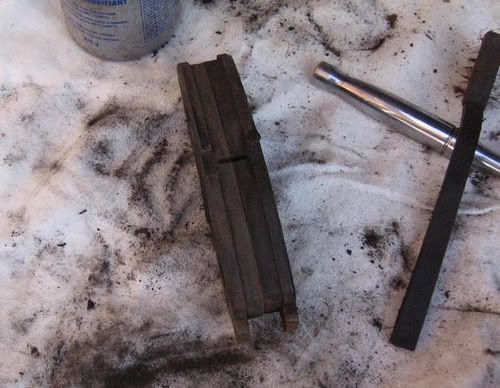
1 - Put the shims and retainer clips in a container for cleaning. DO NOT put the brake pads in, they should not be immersed in any cleaning fluid.
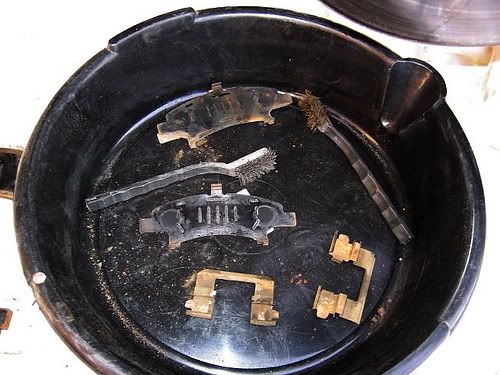
2 - Using a small brush, carefully clean the parts removing any stuck on brake dust and dirt.
3 - Allow the parts to dry.
4 - Take the brake pads and using a small amount of cleaner and a brush, remove any dirt from the edges and back of the pads. Try not to contaminate the brake pad material with fluid.
5 - Clean the caliper bracket. Remove any loose rust and dirt.
6 - Clean the caliper itself. Be careful not to damage the rubber dust boot. I sometimes use a nylon brush (ie. an old toothbrush) for this job.
7 - If you have removed the rotor, clean the hub mounting surface and the back of the rotor. Remove any loose rust and dirt.
Now you are ready for lubrication and reassembly.
1 - Put the shims and retainer clips in a container for cleaning. DO NOT put the brake pads in, they should not be immersed in any cleaning fluid.
2 - Using a small brush, carefully clean the parts removing any stuck on brake dust and dirt.
3 - Allow the parts to dry.
4 - Take the brake pads and using a small amount of cleaner and a brush, remove any dirt from the edges and back of the pads. Try not to contaminate the brake pad material with fluid.
5 - Clean the caliper bracket. Remove any loose rust and dirt.
6 - Clean the caliper itself. Be careful not to damage the rubber dust boot. I sometimes use a nylon brush (ie. an old toothbrush) for this job.
7 - If you have removed the rotor, clean the hub mounting surface and the back of the rotor. Remove any loose rust and dirt.
Now you are ready for lubrication and reassembly.
-
philipa_240sx
- Posts: 3808
- Joined: Thu Jun 21, 2007 7:30 am
- Location: Canada
Re: How to: Rogue Disc Brake Service (philipa_240sx)
Part 5: Lubrication and Reassembly
There are two types of lube used for disc brakes:
- A disc brake lube... it should be a translucent lube that is rubber compatible. This is used for caliper slider pins.- A heavy brake grease, I use an anti-seize compound/grease with a copper additive as per the manual. The grease will not wash away like the disc brake lube will. Any component of the brakes that sees metal to metal contact gets a light coating.
DO NOT allow the lube/grease to come in contact with the pad material.
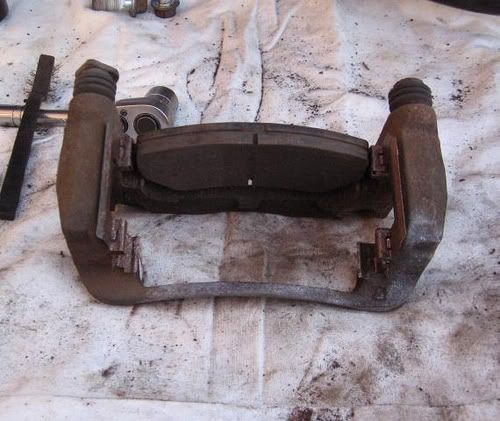
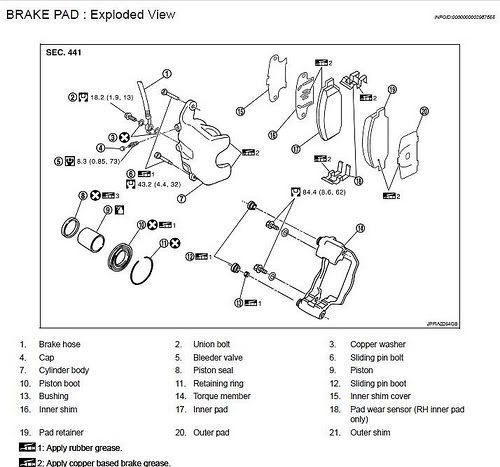
Front Caliper - Exploded view:

1 - Remove the lower slider pin. You may have to twist the slider dust boot with your fingers to break it free.
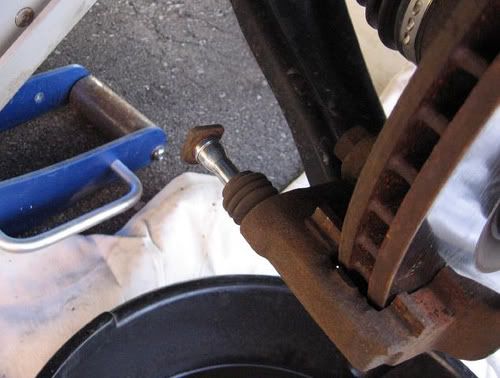
2 - Inspect the lower slider pin for rust and dirt. If it's clean, apply a very small amount of disc brake lube. DO NOT use anti-seize compound. Reinstall the slider pin ensuring the dust boot seats in the groove on the slider pin.
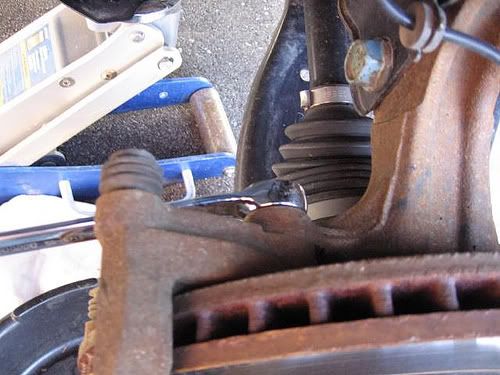
3 - Repeat the same for the slider pin attached to the caliper. Do not re-install it at this point.
4 - If you had removed the brake rotor, now is the time to reinstall it. Coat the surface of the hub with anti-seize then reinstall the rotor. This will make it easier to remove the rotor in the future.
5 - Apply some anti-seize compound to the caliper bracket where the retainer clips go. This will help to displace water and prevent corrosion.
6 - Install the retainer clips at each end. Be sure you put them in the same location and orientation you removed them. Be sure they are firmly seated as you will not be able to get the pads in otherwise.
7 - Lubricate the visible portions of the retainer clips with a thin layer of anti-seize. These will be in direct contact with the brake pads.
8 - Install the shims on the back of the pad in the same order they were removed. Use a light coat of anti-seize compound between the shims and on the back of the outer shim.
9 - Lubricate the small tabs on each end of the pad with anti-seize compound.
10 - I find it easier to pre-install the rear pad on the caliper bracket. If you have not removed the caliper bracket, then install the rear pad. It can sometimes be difficult to get the rear pad in place. It fits very tightly in place. Try inserting both ends simultaneously and lightly tap with a hammer until the pad is in place.
11 - If you have removed the caliper bracket/torque member earlier, reinstall it. Ensure the bolts are tightened.
12 - Install the front pad using the same procedure as step 10.
13 - With the pads in place, you can now re-install the caliper. Re-check the upper slider pin to ensure it has not gotten dirty. Clean and re-lube if necessary. Unhook the caliper from the 'hook' you made and slide the upper pin into the caliper bracket. Ensure the dust boot seats in the groove on the slider pin.
14 - Rotate the caliper downwards. Be sure it does not catch on the shims.
15 - Reinstall the lower slider retaining bolt.
16 - The caliper is now reassembled. Be sure to recheck all the bolts (4 in total) for tightness.
17 - You can now reinstall the wheel and hand tighten the lugnuts. Remove the jack stands and lower the vehicle. Torque the lug nuts with the tire on the ground... it's easier.
The process is repeated for the other brakes. There is a slightly different procedure for the rear caliper... see the next part.
One final and very important note:
Before going for a test drive, pump the brakes several times. The caliper piston may have been disturbed resulting in a loss of braking power the first time they are used. You don't want to find this out when it's too late!
There are two types of lube used for disc brakes:
- A disc brake lube... it should be a translucent lube that is rubber compatible. This is used for caliper slider pins.- A heavy brake grease, I use an anti-seize compound/grease with a copper additive as per the manual. The grease will not wash away like the disc brake lube will. Any component of the brakes that sees metal to metal contact gets a light coating.
DO NOT allow the lube/grease to come in contact with the pad material.
Front Caliper - Exploded view:
1 - Remove the lower slider pin. You may have to twist the slider dust boot with your fingers to break it free.
2 - Inspect the lower slider pin for rust and dirt. If it's clean, apply a very small amount of disc brake lube. DO NOT use anti-seize compound. Reinstall the slider pin ensuring the dust boot seats in the groove on the slider pin.
3 - Repeat the same for the slider pin attached to the caliper. Do not re-install it at this point.
4 - If you had removed the brake rotor, now is the time to reinstall it. Coat the surface of the hub with anti-seize then reinstall the rotor. This will make it easier to remove the rotor in the future.
5 - Apply some anti-seize compound to the caliper bracket where the retainer clips go. This will help to displace water and prevent corrosion.
6 - Install the retainer clips at each end. Be sure you put them in the same location and orientation you removed them. Be sure they are firmly seated as you will not be able to get the pads in otherwise.
7 - Lubricate the visible portions of the retainer clips with a thin layer of anti-seize. These will be in direct contact with the brake pads.
8 - Install the shims on the back of the pad in the same order they were removed. Use a light coat of anti-seize compound between the shims and on the back of the outer shim.
9 - Lubricate the small tabs on each end of the pad with anti-seize compound.
10 - I find it easier to pre-install the rear pad on the caliper bracket. If you have not removed the caliper bracket, then install the rear pad. It can sometimes be difficult to get the rear pad in place. It fits very tightly in place. Try inserting both ends simultaneously and lightly tap with a hammer until the pad is in place.
11 - If you have removed the caliper bracket/torque member earlier, reinstall it. Ensure the bolts are tightened.
12 - Install the front pad using the same procedure as step 10.
13 - With the pads in place, you can now re-install the caliper. Re-check the upper slider pin to ensure it has not gotten dirty. Clean and re-lube if necessary. Unhook the caliper from the 'hook' you made and slide the upper pin into the caliper bracket. Ensure the dust boot seats in the groove on the slider pin.
14 - Rotate the caliper downwards. Be sure it does not catch on the shims.
15 - Reinstall the lower slider retaining bolt.
16 - The caliper is now reassembled. Be sure to recheck all the bolts (4 in total) for tightness.
17 - You can now reinstall the wheel and hand tighten the lugnuts. Remove the jack stands and lower the vehicle. Torque the lug nuts with the tire on the ground... it's easier.
The process is repeated for the other brakes. There is a slightly different procedure for the rear caliper... see the next part.
One final and very important note:
Before going for a test drive, pump the brakes several times. The caliper piston may have been disturbed resulting in a loss of braking power the first time they are used. You don't want to find this out when it's too late!
-
philipa_240sx
- Posts: 3808
- Joined: Thu Jun 21, 2007 7:30 am
- Location: Canada
Re: How to: Rogue Disc Brake Service (philipa_240sx)
Part 6: Rear Brakes
The rear brakes are nearly identical to the fronts. Just a few different steps.
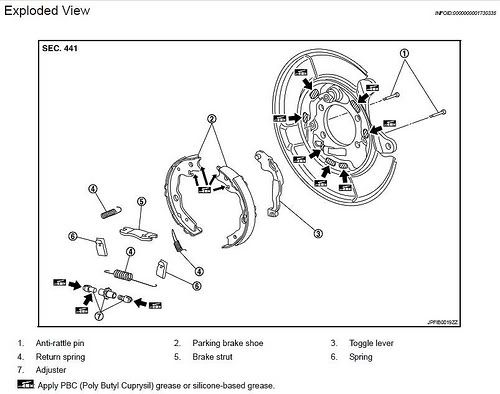
Rear disc brake diagram:
Parking brake diagram:
Here are the added steps:
1 - Before jacking the vehicle, chock the front wheels and release the parking brake. This is necessary to be able to remove the rear brake rotors.
2 - Repeat the procedure for the front brakes.
3 - Be careful when removing the rear brake rotor. There is an internal drum style parking brake that can easily be damaged. You may be able to get the drum a 1/4" off the hub and it will jam. This may be due to the parking brake being applied. Try spinning the rotor to ensure it is free then slowly wiggle the rotor off. If it still refuses to come off, I suggest leaving it alone. There is a way to loosen the parking brake adjuster, but it can be tricky. I would leave this for the dealer or a mechanic. Fortunately the rear parking brake does not need to be serviced as frequently as the brakes.
4 - If you have managed to remove the rear brake rotor, clean the contact points where the drum brake touches the backing plate with a brush. See the diagram above for locations.
5 - Apply disc brake lube to these locations after cleaning. I used a screwdriver to 'lift' the brake shoes away from the backing plate and used a smaller screwdriver to apply the lube.
6 - Clean the hub and rotor, apply anti-seize to the hub and reinstall the brake rotor.
7 - There are a few pointers regarding reassembling the rear brakes:
- The pads are more difficult to install. Take your time. It may be easier to re-install both pads with the bracket/torque member removed then reinstall the whole assembly.- The retainer clips are different. The one with the 'tab' in the middle goes on the bottom.- The rear rotors can easily seize to the hub. If you managed to get them off, be sure to lube the hub with anti-seize. They will come off much easier next time around.
The rear brakes are nearly identical to the fronts. Just a few different steps.
Rear disc brake diagram:
Parking brake diagram:
Here are the added steps:
1 - Before jacking the vehicle, chock the front wheels and release the parking brake. This is necessary to be able to remove the rear brake rotors.
2 - Repeat the procedure for the front brakes.
3 - Be careful when removing the rear brake rotor. There is an internal drum style parking brake that can easily be damaged. You may be able to get the drum a 1/4" off the hub and it will jam. This may be due to the parking brake being applied. Try spinning the rotor to ensure it is free then slowly wiggle the rotor off. If it still refuses to come off, I suggest leaving it alone. There is a way to loosen the parking brake adjuster, but it can be tricky. I would leave this for the dealer or a mechanic. Fortunately the rear parking brake does not need to be serviced as frequently as the brakes.
4 - If you have managed to remove the rear brake rotor, clean the contact points where the drum brake touches the backing plate with a brush. See the diagram above for locations.
5 - Apply disc brake lube to these locations after cleaning. I used a screwdriver to 'lift' the brake shoes away from the backing plate and used a smaller screwdriver to apply the lube.
6 - Clean the hub and rotor, apply anti-seize to the hub and reinstall the brake rotor.
7 - There are a few pointers regarding reassembling the rear brakes:
- The pads are more difficult to install. Take your time. It may be easier to re-install both pads with the bracket/torque member removed then reinstall the whole assembly.- The retainer clips are different. The one with the 'tab' in the middle goes on the bottom.- The rear rotors can easily seize to the hub. If you managed to get them off, be sure to lube the hub with anti-seize. They will come off much easier next time around.
-
philipa_240sx
- Posts: 3808
- Joined: Thu Jun 21, 2007 7:30 am
- Location: Canada
Re: How to: Rogue Disc Brake Service (philipa_240sx)
Part 7: Pad and Rotor replacement
The procedure above can also be used for brake pad replacement. Be sure you have the parts (rotor and pads). The retaining clips and shims can be reused a couple of times before needing replacement. Replacement shims are sometimes packaged with new pads. The retainer clips can be purchased from the dealer as a kit.
Added tools:
- Large C clamp 4-6" opening
Added steps:
1 - After you remove the caliper, use a large C-clamp to compress the piston back into the caliper. This is necessary as the new pads are thicker. Keep an eye on the brake master cylinder fluid level to ensure it does not overflow.
2 - Clean the rotors with brake parts cleaner to remove any oil or residue before installing.
3 - Do not forget to pump the brakes several times before you go for a test drive!
4 - New brake pads should be 'bedded in' before using them. Read the instructions that came with your new brake pads. Here is a list of common bedding procedures from our sponsor, Tirerack.com:
Tireack.com Brake Pad and Rotor Bed-in Procedures
-
philipa_240sx
- Posts: 3808
- Joined: Thu Jun 21, 2007 7:30 am
- Location: Canada
Re: How to: Rogue Disc Brake Service (philipa_240sx)
If you have questions, please post them at the end of this thread. I will delete irrelevant posts to avoid clutter.
-
kerrton

- Posts: 2161
- Joined: Mon Feb 04, 2008 8:48 am
- Car: 2008 Nissan Rogue SL FWD Gotham Gray
- Location: Southern Alberta, Canada
Re: How to: Rogue Disc Brake Service (Pescakl1)
I'm really surprised at how corroded looking all of the brake parts are, granted you put on 50,000 km but this vehicle is still only a little over a year old!
I only have 15,000 km on mine so it shouldn't look quite as bad, but man those parts look rusty and dirty to me. I guess the winter road salt and sand really take their toll, although surface corrosion shouldn't be anything to worry too much about, it's the underlying components like the pins that are critical I guess. Anyway, just rambling, you can delete this post if you wish!!
I only have 15,000 km on mine so it shouldn't look quite as bad, but man those parts look rusty and dirty to me. I guess the winter road salt and sand really take their toll, although surface corrosion shouldn't be anything to worry too much about, it's the underlying components like the pins that are critical I guess. Anyway, just rambling, you can delete this post if you wish!!
Re: How to: Rogue Disc Brake Service (kerrton)
Canucks are so funny. - We all end off by saying, "my post isn't very important, delete if you wish" -
Awesome job Philip! And Thanks for taking time to do this.
...And you can deleted this if you wish.
Awesome job Philip! And Thanks for taking time to do this.
...And you can deleted this if you wish.
-
philipa_240sx
- Posts: 3808
- Joined: Thu Jun 21, 2007 7:30 am
- Location: Canada
Re: How to: Rogue Disc Brake Service (ahhbeebee)
Let me know if there are any more mistakes.
-
philipa_240sx
- Posts: 3808
- Joined: Thu Jun 21, 2007 7:30 am
- Location: Canada
Re: How to: Rogue Disc Brake Service (kerrton)
Not sure how things are out west, but in Southern Ontario they use an incredible amount of road salt. Combined with water, it corrodes just about everything. You should see what my steel wheels look like!kerrton wrote:I'm really surprised at how corroded looking all of the brake parts are, granted you put on 50,000 km but this vehicle is still only a little over a year old!
The calipers are zinc plated or something similar. If I want to protect them, I would repaint them with high temp caliper paint/epoxy. But I just don't have the time to mess with that.
-
kerrton
- Posts: 2161
- Joined: Mon Feb 04, 2008 8:48 am
- Car: 2008 Nissan Rogue SL FWD Gotham Gray
- Location: Southern Alberta, Canada
Re: How to: Rogue Disc Brake Service (philipa_240sx)
I performed this brake service on my Rogue and our Mazda3 this weekend, it was very easy, even easier than the description implies. On my Rogue I didn't actually remove the pads though, because I only have 15,000 km on the vehicle and everything looked brand new and clean. I just checked the pins (which looked brand new and fairly lubricated still), lubed them and reassembled - very quick and easy. To be honest the most labour intensive thing is removing and reinstalling the tires! Mazda does have a slightly different caliper design, and like Philip said they are actually even simplier to work on, you just unscrew the slide pin and pull it out, clean them up, lube 'em, then screw them back in and you're done. This saved my around $140 bucks by NOT having Mazda perform the work.
Anyway, I won't be doing this maintenance on my Rogue every year because I only drive 15,000km and the looked brand new after 1 year of driving in southern AB. Perhaps every 2 to 3 years. If you are considering doing this yourself, I don't feel there is much to worry about, as long as you're careful there really isn't much that you can hurt down there, even if you make a few mistakes along the way.
Modified by kerrton at 12:09 PM 5/4/2009
Modified by kerrton at 12:12 PM 5/4/2009
-
Elton Noway

- Posts: 416
- Joined: Sun May 03, 2009 10:02 am
- Car: 2009 Rogue SL FWD Phantom White Black Cloth
Re: How to: Rogue Disc Brake Service (philipa_240sx)
Hey philipa_240sx NICE JOB!!! I for one can appreciate the amount of time and effort that you had to put into creating this step by step guide... from writing and editing the text files to taking and cropping all the great photos. Hats off to you sir. This should be a sticky!philipa_240sx wrote:This how-to is a step-by-step procedure for cleaning and servicing disc brakes on the Rogue. Actually this could be applied to nearly any vehicle with disc brakes. It takes approximately one hour to do all 4 brakes. Newbies should expect to take at least 2-3 hours the first time around.
============================================
Replacing brakes and rotors, while not overly complicated, can be intimidating for someone who does not do a lot of their own maintenance. However, anyone with the right tools and wanting to save some money should definitely give this procedure a go. Worse case, if you find it to overwhelming, or you can't crack a bolt loose... then simply quit and put it back together. Worse case you loose a couple hours and get some dirt under your finger nails.
-
philipa_240sx
- Posts: 3808
- Joined: Thu Jun 21, 2007 7:30 am
- Location: Canada
Re: How to: Rogue Disc Brake Service (Elton Noway)
Kerrton,kerrton wrote: I just checked the pins (which looked brand new and fairly lubricated still), lubed them and reassembled - very quick and easy.
There is more to this procedure than just lubricating the slider pins. If anything I have found the slider pins to be the least troublesome! Of more concern are the points where the pads contact the torque member/caliper bracket. They are exposed to the elements and tend to get very dirty causing the pad to bind up. ALL parts of the braking system should be lubricated for proper operation.
-
TheOriginalFreeride

- Posts: 10
- Joined: Sat Aug 01, 2009 6:45 am
- Car: '08 Rog
Re: How to: Rogue Disc Brake Service (philipa_240sx)
Thank you so much for all the work you've done here. I'm going to need to at least clean the brakes as they've started squealing and this is exactly what I was looking for.
Again, thank you for all your hard work, it is much appreciated.
Again, thank you for all your hard work, it is much appreciated.
-
philipa_240sx
- Posts: 3808
- Joined: Thu Jun 21, 2007 7:30 am
- Location: Canada
Re: How to: Rogue Disc Brake Service
I have to eat my own words this time...
I just serviced my brakes a couple of weeks ago. Last service was about 10 months ago so it was long overdue. There was a definite lack of lubrication as the rear pads were seized in the caliper. I need a mallet to tap them loose. This caused a fair bit of wear on the inboard pad. The front pads were in slightly better shape and moved freely, but were quite worn.
Once again, maintenance is key. I drive 30,000mi/year (48,000km) and ideally the brakes need to be serviced twice per year. By waiting so long to clean and re-lube the rear brakes, I ended up wearing out a rear set of brake pads prematurely... that's what I get for not following my own advice!
So, it was time for a full brake job. Mileage on the clock was approx 60,000mi (96,000km). I installed new 'ceramic' composite pads (Satisfied Performance Pro Ceramic), and rotors. I have used Ceramic composite pads before and have been pleased by their low dusting and kindness to rotors (read: they are less likely to warp). However, these are not performance pads so while they work well for the daily driver, I would not recommend them for a sports car.
Total bill was $280 for the pads (the fronts are pricey) and $320 for rotors. I saved a pile of money by doing the labor myself. BTW, the new brakes are great!

Re: How to: Rogue Disc Brake Service
I don't know about quality but about a month ago I bought the full set of pads and rotors for only $240 including shipping. BTW they're drilled/slotted but I didn't install them yet.philipa_240sx wrote:Total bill was $280 for the pads (the fronts are pricey) and $320 for rotors. I saved a pile of money by doing the labor myself. BTW, the new brakes are great!
-
Nick 568

- Posts: 304
- Joined: Tue Oct 07, 2008 5:59 am
- Car: 2008 Nissan Rogue
- Location: Anchorage, Alaska
Re: How to: Rogue Disc Brake Service
Just used this awesome tutorial to replace my pads/rotors this weekend! First brake job I've ever done. (well, I've replaced the pads in the Wilwood caliper on my snowmobile before, lol)
I would add a few things into this tutorial though.
In part 5, I would recommend adding something about how you'll need to compress the piston in the caliper with a c-clamp (or pry it back) in order for the new, thicker pads to fit. You mentioned it for the rear brakes, but not the front.
I'd also recommend mentioning that if buying a breaker bar, do not buy one longer than 12" as any longer will not fit inside the wheel well.
Also, I ended up using a can of brake cleaner per pair of wheels. May be me and my liberal use of it, but it might not be a bad idea to pick up two cans for anyone trying this. (brake cleaner has many other uses too, so having a spare can isn't a bad idea!)
I ended up purchasing a jack to do this work. I bought a 2.25 ton jack thinking this was plenty. Well, it works, but to anyone who might be going out and buying one, I'd recommend picking up something larger. I wasn't able to jack up the rear of the vehicle high enough under the rear crossmember in order to put jack stands under the 'frame rails'. I had to jack up the suspension arms, and then place the jacks under the arms--a lot less secure than them being placed under the 'frame rails', IMO. Especially considering you may be wailing on those rear brakes since they're more likely to have seized components.
Another note on jack stands: make sure you verify they'll work for the Rogue before starting. I went out, bought my supplies, jacked up the rear, and got out the jack stands I already had--turned out the 'head' on them was too small to support any part of the Rogue. Had to drive to Lowes to buy a new set.
My rear rotors were seized to the hubs and wouldn't even budge (they'd spin freely, but they weren't coming off the hub by hand). No issue with the parking brake or anything here, they were just seized to the hubs after the past 3 6-month long winters. I ended up using PB Blaster and coating around where the rotor goes over the center part of the hub as well as around the wheel studs. Let it sit for 20 minutes then gave the back of them a good firm whack with the hammer. Spun the rotor, gave the opposite side a whack and they came free. (I was REPLACING the rotors, so I had no qualms about hitting the braking surface with a hammer.)
Just thought I'd throw out some tips that would've made it easier for me. Do with it however you see fit.
And thanks again for the tutorial, Philipa! I wouldn't have even attempted this if it wasn't for your tutorial...and my general distrust of the shops around here, lol.
-
philipa_240sx
- Posts: 3808
- Joined: Thu Jun 21, 2007 7:30 am
- Location: Canada
Re: How to: Rogue Disc Brake Service
Update:
The Satisfied Performance Pro Ceramic brake pads I mentioned earlier are no longer available. This is probably a good thing as I noticed my braking performance wasn't all that good lately. The brakes lacked initial 'bite' and under some conditions is was becoming difficult to stop quickly. It wasn't a lack of grip, rather I could press hard enough on the brakes to even get the ABS to activate!
I am back to OEM Nissan brakes now. These are probably still the best option for Rogue owners out there.
-
bill875
- Posts: 176
- Joined: Tue Nov 20, 2007 1:06 pm
- Car: 2008 Nissan Rogue SL AWD
Indigo Blue
Premium Package / Fully Loaded
Re: How to: Rogue Disc Brake Service
I noticed the same thing after looking for the Satisfied Ceramic and failing to locate both front and back pads at the same online shop. I finally broke down and ordered 2 front/2 rear house brand Rotors and Ceramic Pads from Advance Auto Parts with some coupon codes for a total of $235.86 which wasn't too bad IMO. It's nice to drive without warped rotors. I was able to drive 61,000Mi on the stock OEM pads/rotors which beats the 20-25,000Mi I used to get on the factory brakes of my GM vehicles.
The Advance Ceramic pads seem fine to me, maybe a little less bite, but I've been going easy on them since installing them three weeks ago. Had I purchased Nissan OEM from my local dealer, I would be looking at close to $450 just for parts. Perhaps the local dealer is overpriced, but Advance had a great deal and I'll be glad if I can get another 50-60k Mi on this set.
The Advance Ceramic pads seem fine to me, maybe a little less bite, but I've been going easy on them since installing them three weeks ago. Had I purchased Nissan OEM from my local dealer, I would be looking at close to $450 just for parts. Perhaps the local dealer is overpriced, but Advance had a great deal and I'll be glad if I can get another 50-60k Mi on this set.
Re: How to: Rogue Disc Brake Service
What's the lug nut torque in lb ft?
-
philipa_240sx
- Posts: 3808
- Joined: Thu Jun 21, 2007 7:30 am
- Location: Canada
Re: How to: Rogue Disc Brake Service
Refer to your owners manual around pg 8-37, 'Changing Wheels and Tires'.jmbones wrote:What's the lug nut torque in lb ft?
-
tiggy_rogue
- Posts: 38
- Joined: Thu Jul 28, 2011 1:41 pm
- Car: 2008 Nissan Rogue
Re: How to: Rogue Disc Brake Service
Where can I find OEM brake pads? I called courtesynissan and they said they don't carry it anymore for rogue. Any nico sponsor companies will be preferable and I can pay few bucks more as they support this excellent forum!
-
philipa_240sx
- Posts: 3808
- Joined: Thu Jun 21, 2007 7:30 am
- Location: Canada
Re: How to: Rogue Disc Brake Service
You must be kidding... either that or the person you were talking to is clueless.tiggy_rogue wrote:Where can I find OEM brake pads? I called courtesynissan and they said they don't carry it anymore for rogue.
Here are all the brake parts for the Rogue... right from CourtesyNissan's website:
http://www.courtesyparts.com/rogue-part ... _9316.html
-
tiggy_rogue
- Posts: 38
- Joined: Thu Jul 28, 2011 1:41 pm
- Car: 2008 Nissan Rogue
Re: How to: Rogue Disc Brake Service
Thanks for your response. However when you click the "front brake pads" on the link you provided, here is the note you see "This part number is flagged as a Service File by Nissan and may have changed or need additional parts for replacement. Please contact us before ordering!" There is not even "add to cart" button. I called them and was told that it is not possible to order at this point and they don't have an estimated time when it will be back in stock. Over the last 10 years, I purchased probably around $5k from courtesynissan and I know they are good company. I don't have any experience with other online vendor, that's why I asked the question. I am not located near a dealership as well.philipa_240sx wrote:You must be kidding... either that or the person you were talking to is clueless.tiggy_rogue wrote:Where can I find OEM brake pads? I called courtesynissan and they said they don't carry it anymore for rogue.
Here are all the brake parts for the Rogue... right from CourtesyNissan's website:
http://www.courtesyparts.com/rogue-part ... _9316.html
Re: How to: Rogue Disc Brake Service
I don't have a manual handy which is why I posted here for a quick answerphilipa_240sx wrote:Refer to your owners manual around pg 8-37, 'Changing Wheels and Tires'.jmbones wrote:What's the lug nut torque in lb ft?
Re: How to: Rogue Disc Brake Service
Thanks a lot for posting this, it'll definitely make the job easier for me. Would you consider at some point in the future making a tutorial for changing the brake fluid? I think it would be a great addition to this guide.
-
philipa_240sx
- Posts: 3808
- Joined: Thu Jun 21, 2007 7:30 am
- Location: Canada
Re: How to: Rogue Disc Brake Service
jmbones,jmbones wrote:I don't have a manual handy which is why I posted here for a quick answer
The lug nuts should be tightened to 80 ft-lb
I commonly refer everyone back to the owners manual as it seems it's seldom if ever read by anyone. Hopefully by referring owners back to the manual, they will get in the habit of using it more frequently.
If you have misplaced or don't have the owners manual handy, you can also refer to the online version here: http://www.nissan-techinfo.com/deptog.aspx?dept_id=62
-
philipa_240sx
- Posts: 3808
- Joined: Thu Jun 21, 2007 7:30 am
- Location: Canada
Re: How to: Rogue Disc Brake Service
A few more tips:
- Although you can replace just the brake pads themselves, sometimes it's best to swap all new parts in while you have everything apart. Brake rotors are designed to be disposable nowadays... don't bother getting them turned on a lathe, buy new ones.
- If you have difficulty installing new pads it may be due to rust on the torque member where it contacts the pad retainer. Excessive amounts of rust can tighten up things to the point you cannot install the pads. Simply clean the surface with sandpaper and/or file. Be gentle as you do not want to take off any of the underlying metal.
- It's much easier to remove the pad carrier/torque member (simply slide the brake piston assembly off) and work on it at your workbench. You can completely dissemble, clean, and reassemble the brakes this way. Be sure to provide sufficient clearance between the pads so it will slide over the brake rotor afterwards.
NOTE: Be sure to protect the open holes where the caliper slider pins reside to prevent getting debris inside. DO NOT dunk the entire part in cleaning solution! If you do, you will have to completely dissemble, clean and repack the slider pin bores with the proper lube.
- Brake servicing is also a good time to dress up your calipers and rotors. I like to paint the hubs of my rotors with hi temp brake caliper paint. Usually silver to match the wheels. You can also paint the calipers themselves. NOTE: mask all areas that are in direct contact with the brakes before painting. This includes the pad retainers, brake pads, piston and any rubber parts.

Re: How to: Rogue Disc Brake Service (philipa_240sx)
kerrton wrote:Anyway, I won't be doing this maintenance on my Rogue every year because I only drive 15,000km and the looked brand new after 1 year of driving in southern AB. Perhaps every 2 to 3 years.
Modified by kerrton at 12:12 PM 5/4/2009
I am confused.
- Owners manual says, as a part of the scheduled maintenance at 24.000 km/12 months I should REPLACE THE BRAKE FLUID
- According to the leaflet that my Nissan service gave me, Nissan recommends brake service every 6 months/12.000 km. I talked with my service advisor and he said I don't need to replace the fluid.
Why Nissan made things so complicated. I am trying to follow a schedule and the maintenance booklet says something, their authorized service says another thing?
My car has 12.200 km's on it and 10 months old (in a year I make 14000 km's max). So my next oil change will be at 24.000 km/12 months maintenance. Do you think I should ask them to service the brakes (for $ 180
Re: How to: Rogue Disc Brake Service
I thought Rogues all had 4 wheel disc brakes?
I swear I saw disk brakes on the rear of my 2010. must look closer
I swear I saw disk brakes on the rear of my 2010. must look closer