So after some hard core research I discovered that the 85-88 Maxima used a 274mm rotor of the same thickness with the same caliper and the same hub assembly, just 4 lug and the caliper mounting bracket and pads are different. It turns out that this is the SAME EXACT caliper/mounting bracket/pad that nissan used on the 180sx 91-96. The difference in the rotor diameter 88 to 89 maxima is 6mm exactly btw meaning that the bracket is adjusted 6mm lower.. perfect.
And infact IT IS PERFECT. So without further adue... here it is ....
Difficulty: Scale of 1-10 for difficulty this is a 3. You have to be able to break the 19mm caliper bracket bolts free and have knowlege of brake bleeding.
Price: For me this cost $190 total. I got cross drilled and slotted rotors also... Loaded caliper (comes with bracket, hardware and pads) cost 180 - the 70 core charge... so 110 total. I payed 70 for the rotors from 88 rotors. +10 for the brake fluid (I got a good DOT 4) If you got standard rotors you would save 30 bucks..
The car with it's old stock size replacement cross drilled and slotted rotors from 88 rotors... 252mm diameter 18mm thickness


The new equipment. You need 88 Maxima loaded calipers (came with Raybestos Semi-metallic pads and bracket and all hardware) cost me $100 for the pair at Mainly Foreign. (a local auto parts store that makes autozone etc look bad) And 93-01 Altima 280mm rotors (I got them from 88 rotors for $70, they match the rears I got when I did the stock upgrade)

The size difference.. 280mm diameter 22mm thickness for the new ones

Ok from here you need to install the new stuff by removing the old (19mm socket to get caliper bracket off/back on) and you have to modify the hell out of the splash guard/sheild on the hub. You can see I just cut mine and bent it back. Also remove the brake line from the caliper by pinching the rubber line with a vice grip then removing the 12mm bolt from the back of the caliper. This bolts directly to the new caliper perfectly. Loosen bleeder, then remove the vice and wait for brake fluid to come out of the bleeder. You have now bled your new caliper and its ready to use. That's called a gravity bleed and it works fine if done correctly if your just replacing a caliper like this. If your not satisfied with that you can bleed them correctly with a friend.
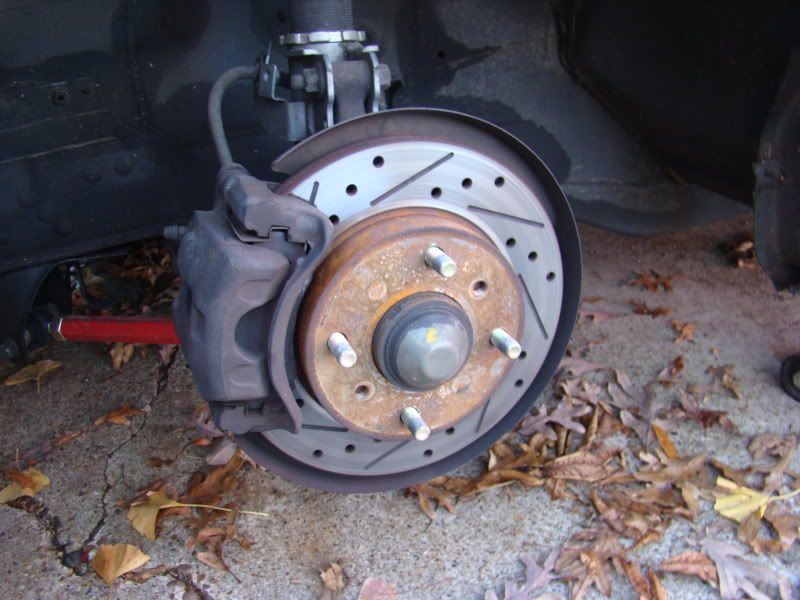
Installed


NO OVERHANG AT ALL


Their will be a slight gap BELOW the pad because the pads are made for a 274mm rotor not a 280mm one... but that is ok because the gap is BELOW the pad and not above the rotor (Note: the stock 180sx also has this gap) You could get rid of it by modifying the hell out of the mounting bracket to make the altima (same year as rotor) pads fit with modification to the pad as well. But that was WAY more work than I wanted to do. The gap is fine by me. A bigger pad would just increase front brake bias.

And FILLING UP a 15" sport tuner wheel...

Very close to the wheel wieghts on the inside of the rim...


Also I installed some brake vents to cool the brakes down better. They don't rub either.
Here's a mini write up on them just as a bonus lol.
I have the inner fender lining cut away on the front half of my fender. No pics but just cut yours off at the highest point in the wheel well and only use the back half of it. The part that goes back under the chasis to the door. The front part is not necessary and will have to be removed to be out of the way. You also have to remove that black box thing from the driverside inner fender and IDK about the windshield washer reservoir clearance because I don't have mine anymore... I'd say it would probably be in the way but I'm not 100% sure about that.
I used a 20ft piece of standard RV sewer hose cut in half using half for each side as the tubing. It's $7 at walmart. I used long black automotive zip ties to attach it. I attached it to the FACTORY BRAKE COOLING VENTS that are non functional from the factory. I made them functional by removing the vent and pulling the tubing through the hole in the bumper and zip tieing the tube to the vent. (note that the tube is bigger around than the vent is tall so you will have to squish it slightly to get it through the hole)
Here you can see how it's monted to the vent.


Zip tie the tube to the factory toe hook running it OVER the fender brace and zip tie it also to the Tension Rod and since I have no sway bar I used the sway bar end link hole in the LCA to mount it also. You could just zip it to the sway bar or it's endlinkif you have one.
You then run the other end of the tube to the hole in the spash guard just behind the caliper and shock tube. The hole is slightly smaller than the tube and is square but it should work none the less. Since my splash guard is bent back I just zip tied it through the hole to secure it. The zip ties do not touch the rotor.
Best pic of the way it runs to the hole and hole location I could get. You'll find it and see what I'm talking about.

Edit: found a picture showing the hole. And also the modification required to the splash guard..

Anyways hope you enjoy my little brake upgrade. I still can't believe I'm the first person to discover this swap...