240Z Project Car
-
assocpubNSI
- Moderator
- Posts: 18
- Joined: Fri Aug 25, 2006 11:48 am
- Car: 1973 240Z
- Contact:
240Z Project Car
It's been a while but the 240Z project is about to get moving again. I plan to overhaul the entire suspension by replacing all the stock bushings with Energy Suspensions complete kit and installing new strut assemblies, both front and back with Tokico Illuminas. Look for a write-up in the Spring issue of Nissan Sport. If all goes well, I will drive it up to Denver for this years Midwest Z Fest.
-
Spyder Z 15
- Posts: 11
- Joined: Sat Feb 09, 2008 10:47 am
- Car: 1993 300zx Zlicktop
Re: 240Z Project Car (assocpubNSI)
I wondered if this is going to be a strickly restoration or will it be a performance restoration?assocpubNSI wrote:It's been a while but the 240Z project is about to get moving again. I plan to overhaul the entire suspension by replacing all the stock bushings with Energy Suspensions complete kit and installing new strut assemblies, both front and back with Tokico Illuminas. Look for a write-up in the Spring issue of Nissan Sport. If all goes well, I will drive it up to Denver for this years Midwest Z Fest.
-
assocpubNSI
- Moderator
- Posts: 18
- Joined: Fri Aug 25, 2006 11:48 am
- Car: 1973 240Z
- Contact:
Re: 240Z Project Car (Spyder Z 15)
The project will be built in two phrases.
Phase 1) Taking the a 240Z from a junkyard/parts car to a daily driver. That is the phase it is in now.
Phase 2) Going from daily driver to street modified (still will be considered a daily driver). Will be replacing the stock L24 with a 280ZX Turbo motor along with upgrades to the suspension and brakes.
This project is being built on a budget. Yes there are some sponsors that donate parts, but I also spend a lot of time in U-Pull-It's and will be doing 95% of the work myself. The idea is to build a Z like most average Z owners (guys with no money to spend on the car) would. For example: I could get a set of brand new SU's and bolt them up, but what would be learned from that. So instead, I replace the throttle bodies and rebuild the rest.
The project has slowed somewhat, but when funds are lean, that's the way it goes. I want to have it street worthy in time for the Midwest Z Fest that will be held in Denver Colorado this year as well as the National Convention in San Antonio, Texas.
From time to time I will post updates here that didn't make it into the magazine. Stay tuned.

-
IanS

- Posts: 9757
- Joined: Thu Dec 23, 2004 3:07 pm
- Car: 2002 Subaru WRX, 2010 Subaru Forester XT, 2004 Infiniti G35 Coupe.
- Location: Esko, MN
- Contact:
Re: (MellowS13)
We demand pictures.
-
assocpubNSI
- Moderator
- Posts: 18
- Joined: Fri Aug 25, 2006 11:48 am
- Car: 1973 240Z
- Contact:
Re: (FlatBlackIan)
I will have to upload images to a photobucket type site so that I can post pics. Will try to do that later today.
-
assocpubNSI
- Moderator
- Posts: 18
- Joined: Fri Aug 25, 2006 11:48 am
- Car: 1973 240Z
- Contact:
Re: (assocpubNSI)
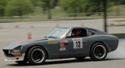
Here are some of the car itself and the engine
All of the brown sheetmetal was found at a U-Pull-It.
The only difference with the engine is now it has a 280ZX distributor and an electric fan.
All of the brown sheetmetal was found at a U-Pull-It.
The only difference with the engine is now it has a 280ZX distributor and an electric fan.
-
IanS
- Posts: 9757
- Joined: Thu Dec 23, 2004 3:07 pm
- Car: 2002 Subaru WRX, 2010 Subaru Forester XT, 2004 Infiniti G35 Coupe.
- Location: Esko, MN
- Contact:
Re: (assocpubNSI)
Moar, we want more.
-
ScrapMetal

- Posts: 3420
- Joined: Fri Jan 05, 2007 9:19 am
- Car: 1999 Chevrolet S10
1991 Ford Bronco 5.0 - Location: Sugarcandy Mountain
- Contact:
Re: (assocpubNSI)
assocpubNSI wrote:
I want an S30 so bad.
Keep us updated, oh and pics, we want MOAR!
-
assocpubNSI
- Moderator
- Posts: 18
- Joined: Fri Aug 25, 2006 11:48 am
- Car: 1973 240Z
- Contact:
Re: (evildky)
I'm rebuilding the suspension starting this week. Should have the front done by early next week. Will be replacing struts, springs and bushings. I will post some pictures early next week.
-
assocpubNSI
- Moderator
- Posts: 18
- Joined: Fri Aug 25, 2006 11:48 am
- Car: 1973 240Z
- Contact:
Re: (assocpubNSI)
Am almost finished with the front end. Here are some pics showing old to new.
This is pretty self explanatory. The beginning. I find it easier to work on the front underside of the car with the front bumper and lower valance removed.
Everything removed except the control arm
New strut assembly is in place with all new bushings from Energy Suspension. On the tension rod I used an Energy Suspension bushing in the front and a stock rubber bushing on the back side.
If you use energy suspension bushings you will need to remove the inner metal sleeve that's used with the original bushing. There are no instructions telling you to do this but you will find out it needs to be done as soon as you try to put in the new bushing. I used a hacksaw to cut through the sleeve on two sides and it will tap out with not much of a struggle.
Burning the old bushing out is the easy way to remove it. I'm not even sure there is any other way of doing it.
With the front suspension removed, it's the best and easiest way to change out the steering rack bushings. After unbolting the mounts and removing the old bushings you will have about an inch of space to shift the rack up towards the oil pan allowing you to easily place the lower half of the Energy Suspension bushing in its place. The great thing about these bushings is that they come in two pieces with the lower part being the smallest making it easy to install. Unlike the stock bushing which is a one piece with a slit cut through it. There is no way I could have replaced those bushings with the rack on the car. There just didn't seem to be enough space to squeeze it in. And if you can, it would be a lot of work (IMO).
Since all the brake fluid has drained, I felt it would be a great time to upgrade my master brake cylinder. I'm replacing the 7/8" with the 15/16" that came with the 280ZX's. Not sure how much of an upgrade it will be, but I figured it can't hurt to see.
I will be starting on the rear suspension next week and should have more pictures of that install along with a report on how well my spindle pin puller worked. Stay tuned.
-
audtatious

- Moderator
- Posts: 25014
- Joined: Sun Oct 27, 2002 5:31 pm
- Car: 2017 Q60 Red Sport. Gone: 2014 Q50s, 2008 G37s coupe, 2007 G35s Sedan, 2002 Maxima SE, 2000 Villager Estate (Quest), 1998 Quest, 1996 Sentra GXE
- Location: Stalking You
- Contact:
Re: (assocpubNSI)
Burning bushings out is about the easiest way to do it. Hell, if you watch the DIY TV shows they do the same thing
Nice build, keep posting updates
Nice build, keep posting updates
-
assocpubNSI
- Moderator
- Posts: 18
- Joined: Fri Aug 25, 2006 11:48 am
- Car: 1973 240Z
- Contact:
update
It's been so hot that it's hard to work outside, but I have finally got the front end completely back together. I will start working on the rear end later this week. I will post pictures as i go along.
-
assocpubNSI
- Moderator
- Posts: 18
- Joined: Fri Aug 25, 2006 11:48 am
- Car: 1973 240Z
- Contact:
Re: another update (assocpubNSI)
Well, looks like my upcoming project article has been pushed back for another issue. The good thing is I can demand more pages. But I do have a DIY article on fixing a common problem on 1972/73 center consoles going into the next issue. It is a how-to on replacing the broken off dowels that hold the fuse box cover on the console. Most fixes I have seen used screws or bolts as replacement parts. The way I did mine can have it looking as if it was never broken (if you paint the replacement piece). Costs a couple of bucks and about 30 minutes (once the console has been removed from the car) to fix. Look for it in the DIY section of the upcoming issue of Nissan Sport.
-
assocpubNSI
- Moderator
- Posts: 18
- Joined: Fri Aug 25, 2006 11:48 am
- Car: 1973 240Z
- Contact:
Re: another update (assocpubNSI)
It took me a while but I'm working on the Z again. The front end is complete and within the next two weeks I will have the new rear end installed. I have also decided that since I'm completely removing the rear end, I might as well put in a 5-speed transmission and R-200 diff from a 1983 280ZX (83K miles on the car so no need for a rebuild). I will also be installing an ACT clutch (my newest sponsor). I will post pics as the project progresses.
Re: 240Z Project Car (assocpubNSI)
Well good looking.The good thing is I can demand more pages.Thanks for sharing.
-
assocpubNSI
- Moderator
- Posts: 18
- Joined: Fri Aug 25, 2006 11:48 am
- Car: 1973 240Z
- Contact:
Re: 240Z Project Car
From my last post you would think it took me a year to change out the drive train and rear suspension. Well, I guess in a way it did. I completed the clutch, transmission and diff switch before my major road trip last summer (10,000 miles in 4 months). Why anyone would want to keep the stock 4-speed is beyond me. Driving across the country with the 5-speed overdrive makes the 240Z that much more comfortable to drive. In between the road trips and now I have changed directions in a couple of ways. First, instead of staying with rear brake drums I decided to switch them out with a rear disc brake conversion kit. I just finished that install this past week. Not only did I replace the brakes but also the entire strut assemblies. When I test drove the car I thought there was something wrong. What I realized was how quiet the car was now that I had replaced the assemblies and of course the bearings that go with them. It was so quiet in the car that I now hear noises that I never heard before due to the sounds coming through the tunnel from the rear. The new sounds were not actually noises, but more of what a car sounds like when it is running. I just completed my project article on the switch and it will be out in the next issue. I also took my original air cleaner/airbox out and replaced it with a CAI. From what I can tell, it is the first of it's kind. A company called Unique Z Products came up with the idea and I'm trying it out on the 240Z. It's a very easy install and again you can read about it in the upcoming issue of NSM. I will get some images uploaded asap so you can see the transformation of the project car to date.
-
300ZXttZMAN

- Posts: 6800
- Joined: Mon Nov 22, 2010 4:07 pm
- Car: 1990 Nissan 300ZX TT 5spd pearl white
DD: 2008 Nissan Frontier NISMO pkg 4x4 Crew Cab - Location: Sulphur, LA 70665
- Contact:
Re: 240Z Project Car
interior pics !!!!!!!!!!!!!!!!!!!!!!!!!!!! i love s30's
-
dmuramoto
- Posts: 311
- Joined: Mon Mar 16, 2009 5:20 pm
- Car: 350Z street, 350Z GT3 and T3 racecars, Versa HB and Infiniti G37xS sedan
Re: 240Z Project Car
Project 240Z is currently on the road after attending Branson and then going to the Windy City Z car club meet this weekend. I doubt we're going to get any interior shots up soon, as that Z has to get Art back so he can design the rest of issue #19!
-
assocpubNSI
- Moderator
- Posts: 18
- Joined: Fri Aug 25, 2006 11:48 am
- Car: 1973 240Z
- Contact:
Re: 240Z Project Car
Well I'm back from all my travels and ready to get back to working on the 240Z. Sorry to say but the interior is the last thing I will be working on. I've just finished the rear disc brake conversion and I'm happy with the results. Although while doing the conversion I realized that all of the kits out there for sale don't utilize the e-brake bracket from the 240Z. Most use brackets from other cars, ie: Maxima's, 300ZX's, etc. So I decided to take the time and figure out a way to use the existing bracket for my conversion. With a few hours of trial and error I figured out a way to use the bracket from the 240Z that would allow me to use all of the hardware associated with it. In fact, my friend and I are in the process of putting together our own rear disc brake conversion kit. We hope to have the first kits ready for sale by the end of the summer and we think the kits will cost less than $400.00. We think they will be around $350.00. The kit will include everything for installation except for brake pads and fluid.
I've also been busy fabricating other parts for the 240Z. In particular, a choke lever mounting bracket for the series 2 240Z (1972/73) and early 260Z (1974). Never worry again the next time you have to use your choke on any carbureted 240Z and 260Z from early 1972 to early 1974 that use the series 2 console where the choke lever was shifted to the drivers side. This choke lever bracket allows you to bolt the lever to the tunnel instead of the center console (eliminating any chance of cracking the console at one of its weakest points due to a sticky choke cable). With the lever bracket mounted on the tunnel, it also allows for easier console removal as well. No more having to use a screwdriver to disconnect the lever from the console now that it is mounted to the tunnel. The only thing you will need to remove is the choke handle. The kit comes complete with all mounting hardware and instructions needed to install the bracket. Installation is anticipated to be under an hour from start to finish. So if you are looking for a quick fix to an old problem and still want to keep that stock look, then the Choke Cable Lever Mounting Bracket is the easy solution.
Project 240Z is now being prepped for wrapping. I have decided to go with wrap instead of paint mainly because of the price and the fact that I can have a lot of graphics added to the car at no extra cost. I will post pictures when it is done. Should be finished in about a month.