
What Broadfield Has Been Up To......
-
playero_loko

- Posts: 463
- Joined: Tue Jun 03, 2008 10:34 am
- Car: 1991 240sx
- Location: Nasville, TN
- Contact:
Re: What Broadfield Has Been Up To......
thats good to know, i making the switch to LSX and i was really wondering if the digital climate control would be still fully functional... thanks for info! i guess there's no really a pressing issue t oget AC working in IL right away anyways, but here in TN; you best have some A/C or you will suffer extremely!!!
-
Broadfield

- Posts: 2681
- Joined: Tue Sep 05, 2006 2:57 pm
- Car: 1992 240sx
- Location: Normal, IL
- Contact:
Re: What Broadfield Has Been Up To......
It's not too much different here in the summer than TN. It's just as humid and about 5 degrees cooler on average. I come down there every year for Import Alliance and you really don't notice any difference over central Illinois. I work all day in a hot humid garage with no air flow, so maybe I get used to the temp. Even when I had A/C on my SR, I didn't really use it that much. Now in my Acura, yes, I use it all of the time.playero_loko wrote:thats good to know, i making the switch to LSX and i was really wondering if the digital climate control would be still fully functional... thanks for info! i guess there's no really a pressing issue t oget AC working in IL right away anyways, but here in TN; you best have some A/C or you will suffer extremely!!!
-
Broadfield
- Posts: 2681
- Joined: Tue Sep 05, 2006 2:57 pm
- Car: 1992 240sx
- Location: Normal, IL
- Contact:
Re: What Broadfield Has Been Up To......
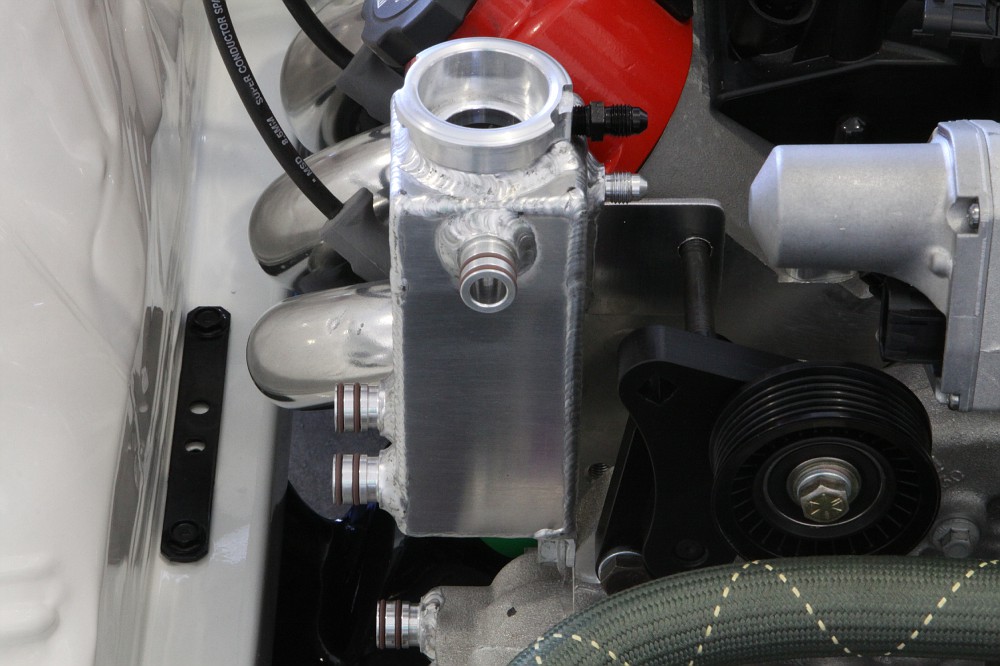
Got all of my XRP fittings welded onto the water pump and thermostat housing. I obviously hacked off the -16 threaded male from the thermostat housing to make room for the XRP clamshell port. Then the two -8 ports for the heater hoses.
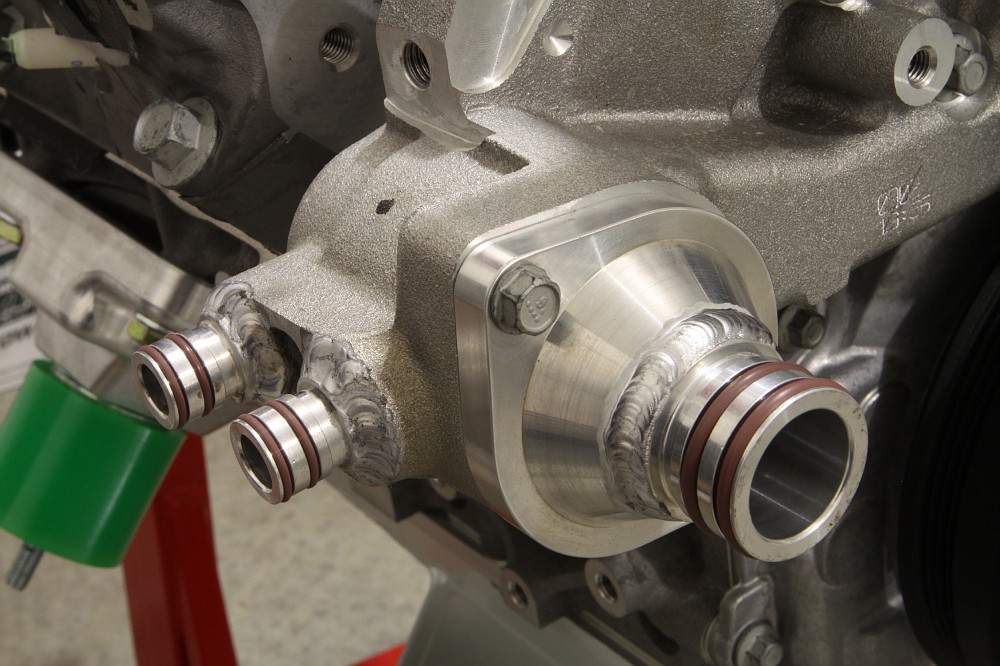

Upper port welded on and mocked up with a 90 degree -16 clamshell fitting.


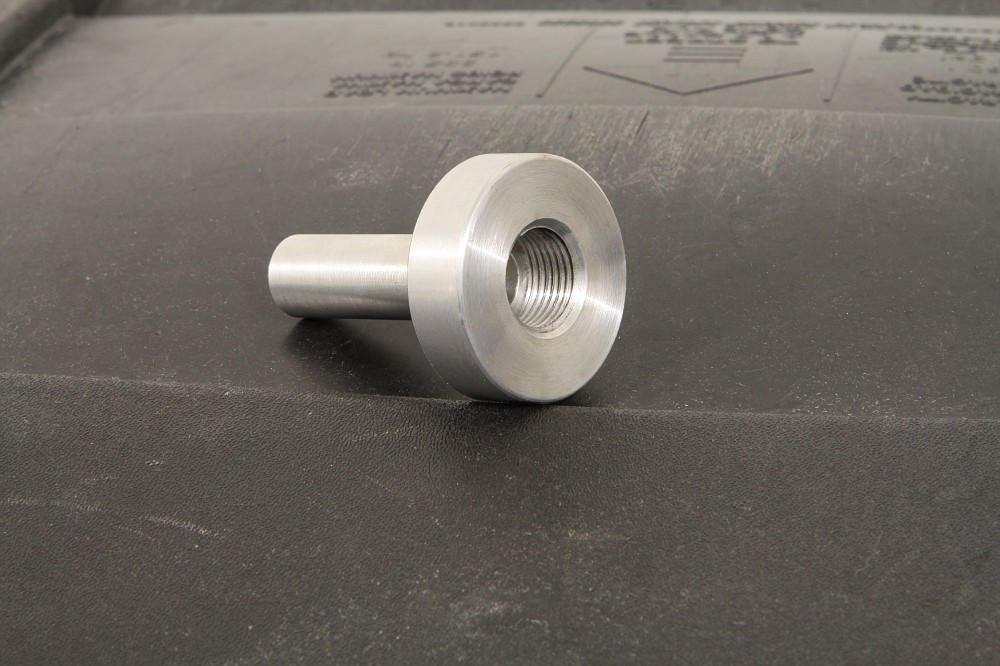
I also came up with a bulkhead design for the heater line connection at the firewall. 1/2" aluminum plate with a -8 straight cut threaded center. Then a 5/8" round tube welded to the back side. This tube will actually get cut down quite a bit. It will then attach to the plastic tube coming off the heater box on the inside of the vehicle via a rubber hose. I will also need to cut down the plastic tubes as far as I can to squeeze it all in there. I still need to thread the outside of the 5/8" tube. I will use a large washer and nut threaded onto it to sandwich the bulkhead to the firewall. Lastly I will powder coat the bulkheads black.

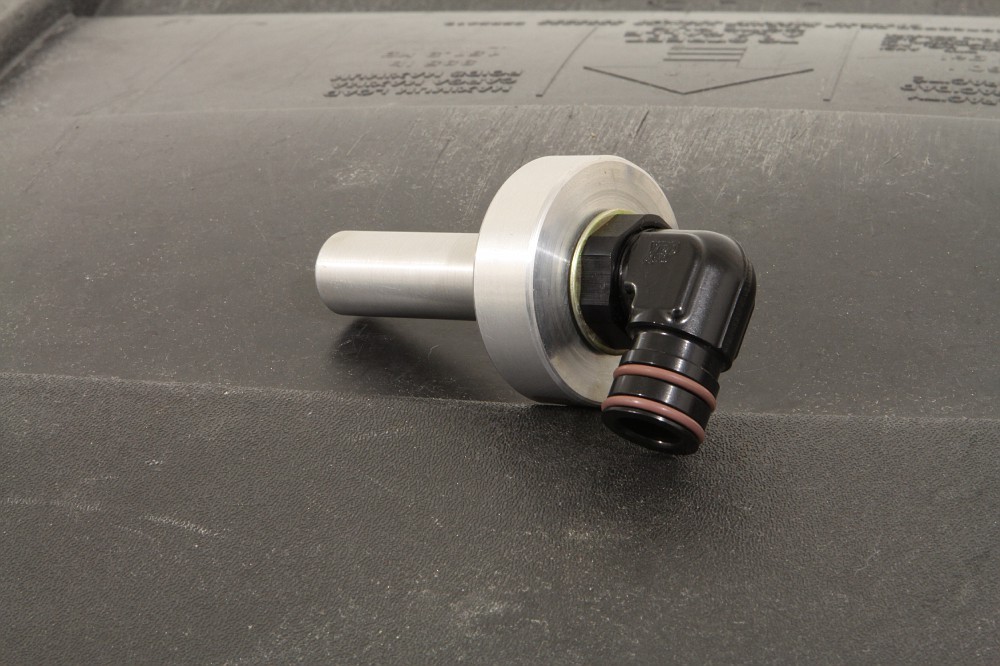
With 90 degree XRP -8 clamshell fittings:
Mocked up in the car. Note: I may not use the 90 degree ports... I also have 45 degree ports, straight ports etc. to tryout and see which is going to work best with the motor in there. I just tossed them on there for picture sake.


Upper port welded on and mocked up with a 90 degree -16 clamshell fitting.
I also came up with a bulkhead design for the heater line connection at the firewall. 1/2" aluminum plate with a -8 straight cut threaded center. Then a 5/8" round tube welded to the back side. This tube will actually get cut down quite a bit. It will then attach to the plastic tube coming off the heater box on the inside of the vehicle via a rubber hose. I will also need to cut down the plastic tubes as far as I can to squeeze it all in there. I still need to thread the outside of the 5/8" tube. I will use a large washer and nut threaded onto it to sandwich the bulkhead to the firewall. Lastly I will powder coat the bulkheads black.
With 90 degree XRP -8 clamshell fittings:
Mocked up in the car. Note: I may not use the 90 degree ports... I also have 45 degree ports, straight ports etc. to tryout and see which is going to work best with the motor in there. I just tossed them on there for picture sake.
-
homeslicej2

- Posts: 5450
- Joined: Mon Jan 15, 2007 5:46 pm
- Car: 1990 S13 SR'd hatch
Re: What Broadfield Has Been Up To......
Looking good!
-
Broadfield
- Posts: 2681
- Joined: Tue Sep 05, 2006 2:57 pm
- Car: 1992 240sx
- Location: Normal, IL
- Contact:
Re: What Broadfield Has Been Up To......
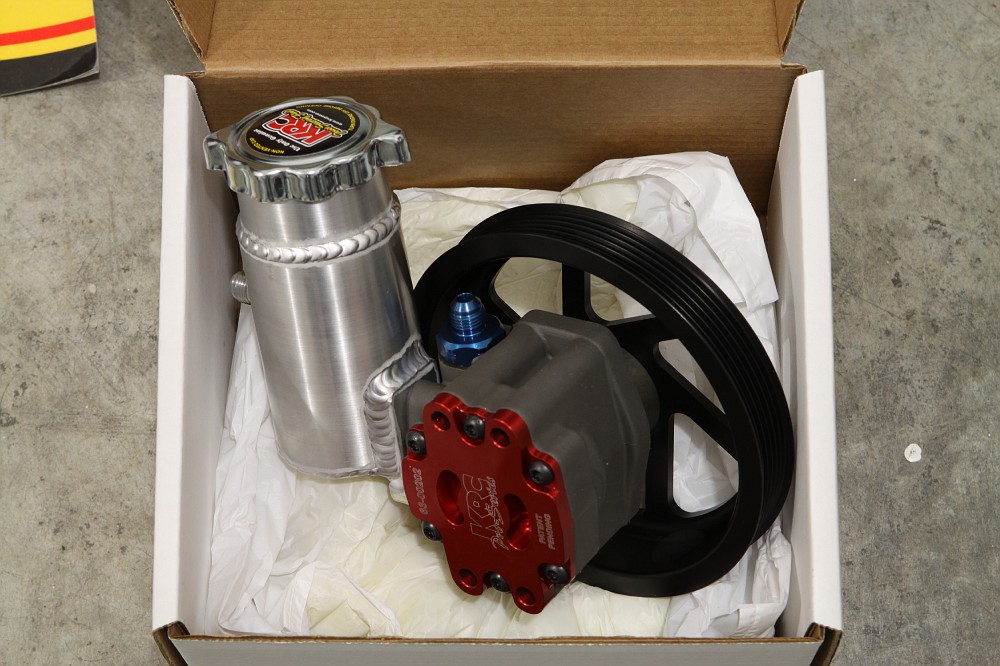
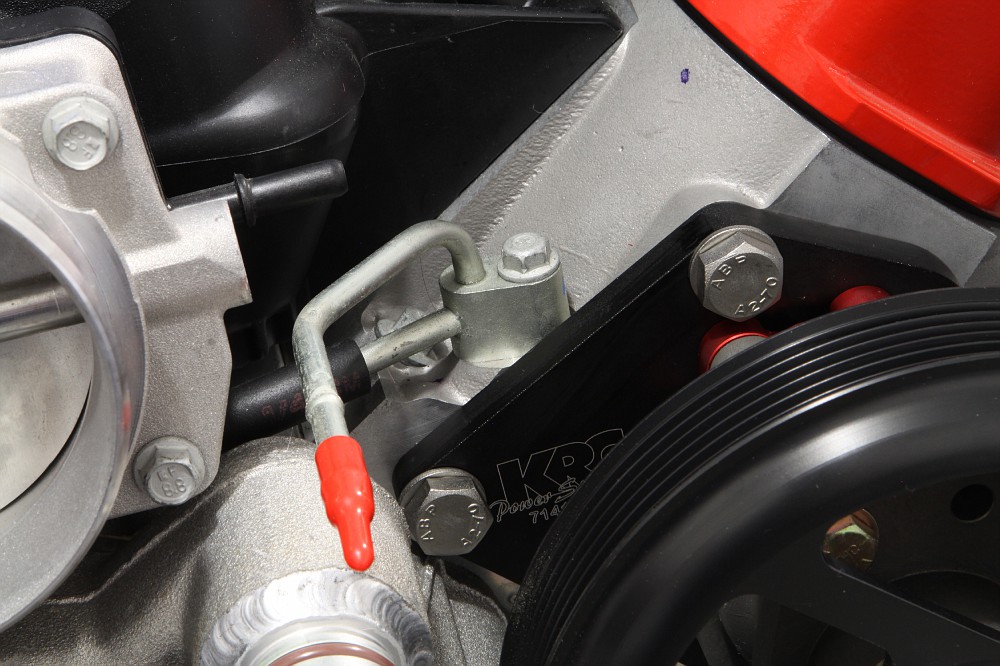
Almost all of my KRC product showed up today. I have always loved this stuff.... great craftsmanship, looks sick and will perform at the top. Norm over at KRC had hooked me up a few months ago with an alternator bracket that isn't advertised anywhere. KRC was actually commissioned to make them for the V8 Supercar series in Australia. He still had some left over and let me buy one.
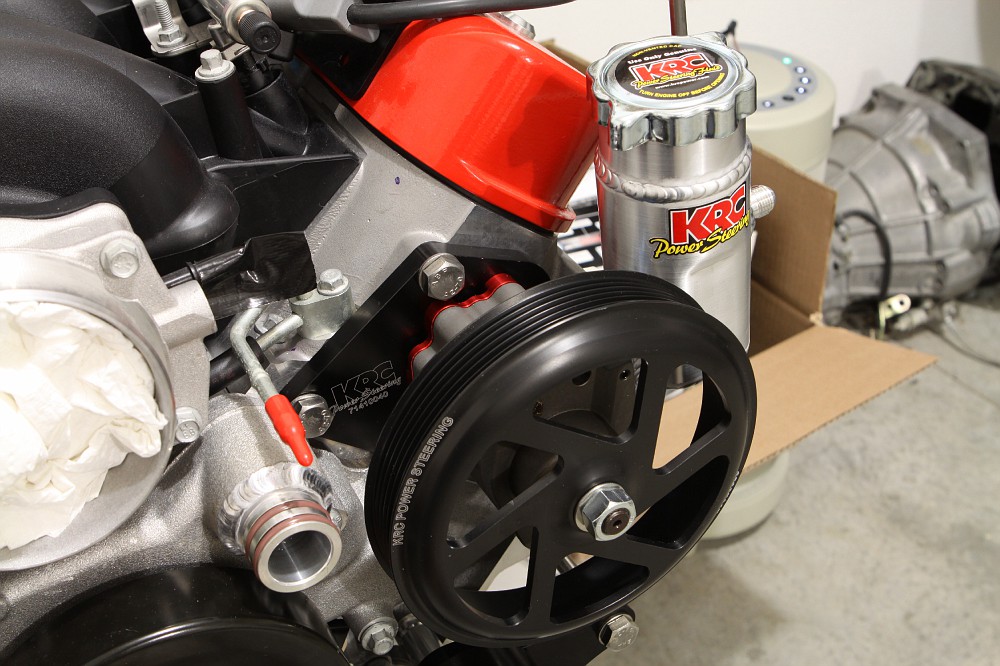
So today I received their brand new aluminum power steering pump. I guess these new ones are the bees knees. I obviously won't put it through its paces as much as a lot of guys would, but by the time I would of bought a new GM unit, pulley and reservoir etc, it wasn't all that much more for the KRC setup... and it looks a thousand times better. I also received the mounting bracket for the pump to bolt directly to the head, their LS idler-tensioner, LS 6" pulley for the pump and their custom LS AN steam ports for the heads. I also have their surge tank on the way, but it was on back-order.

I love the attached reservoir for the power steering pump:

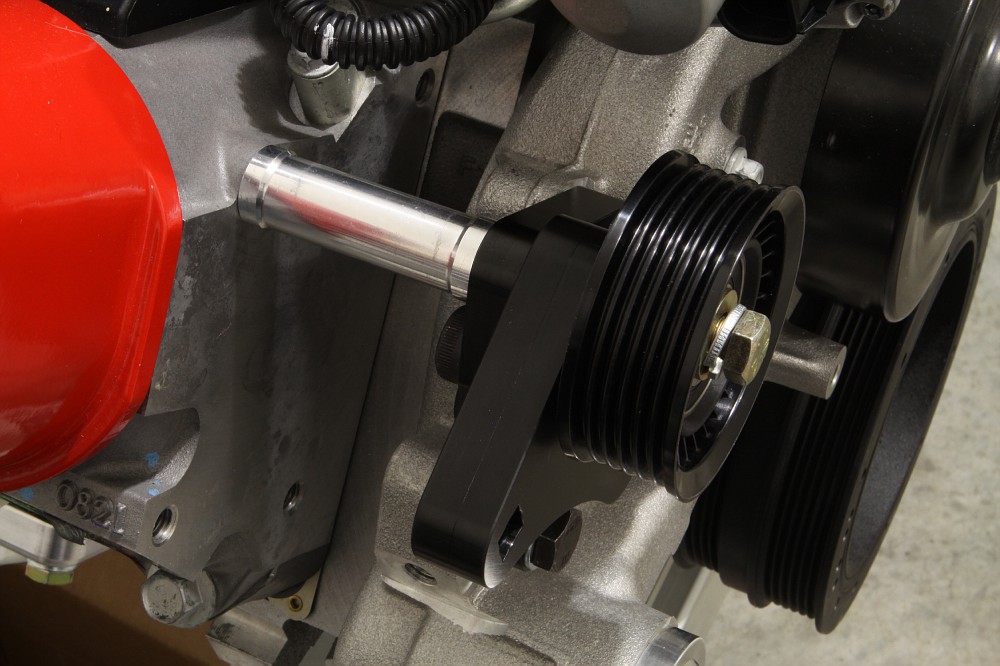
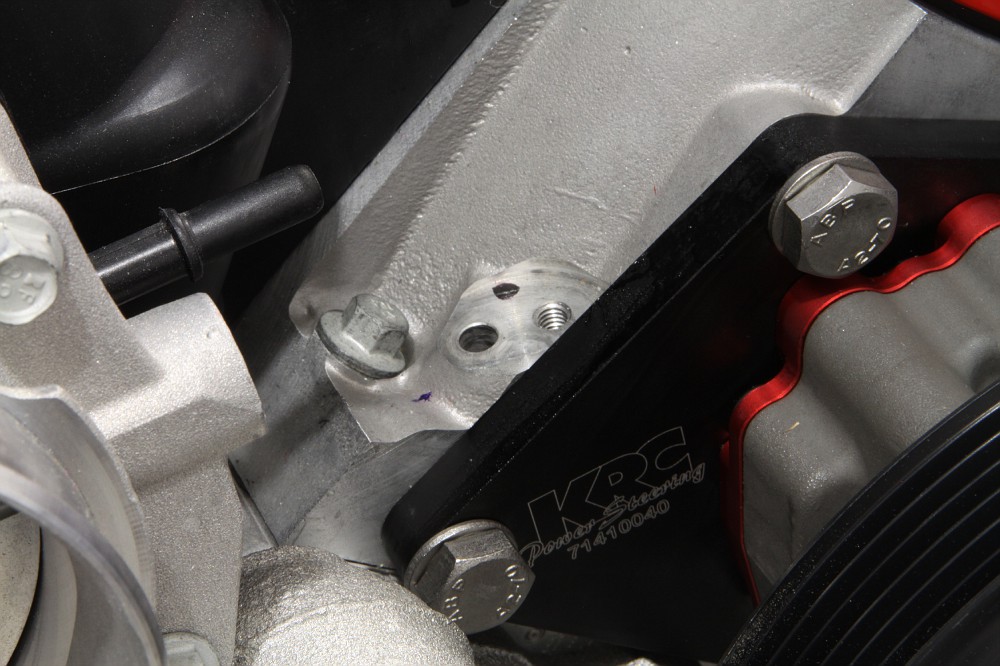
Bracket on the head:
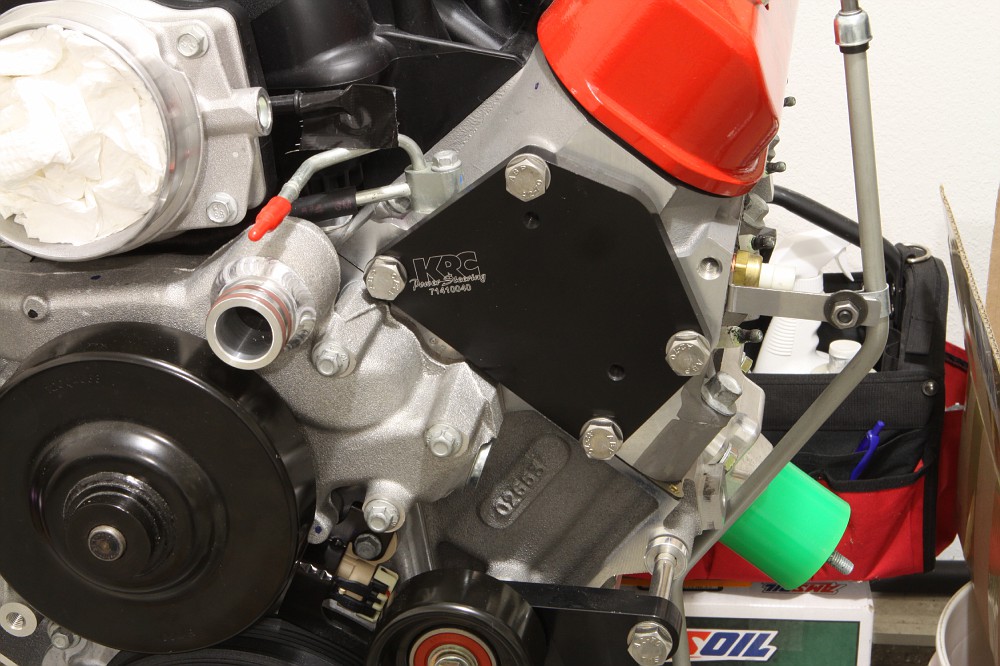
Mounted up, as about as easy as you can get:

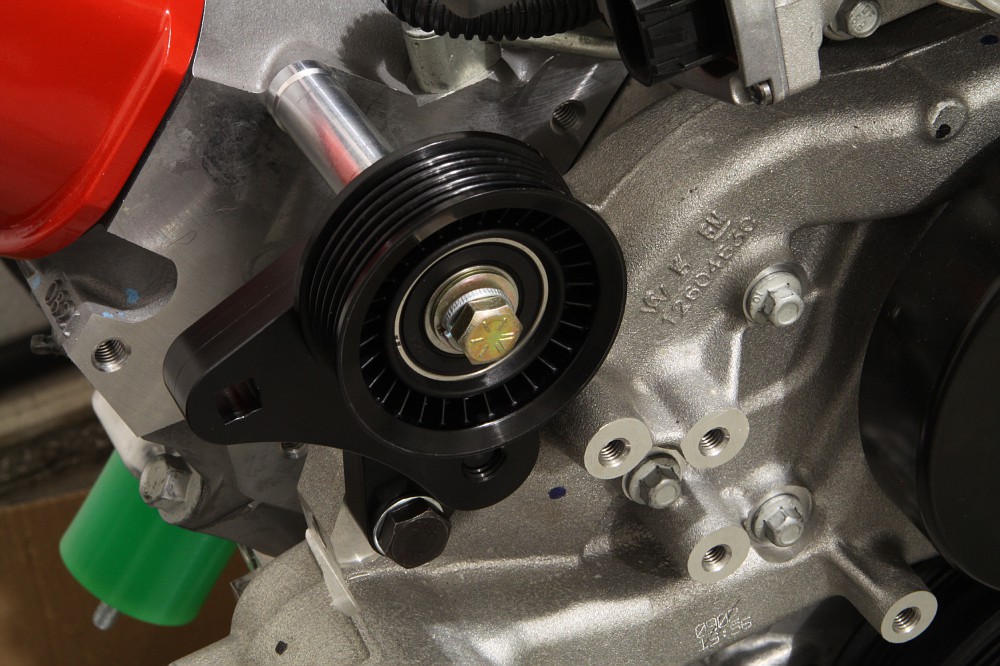
Fixed idler-tensioner:
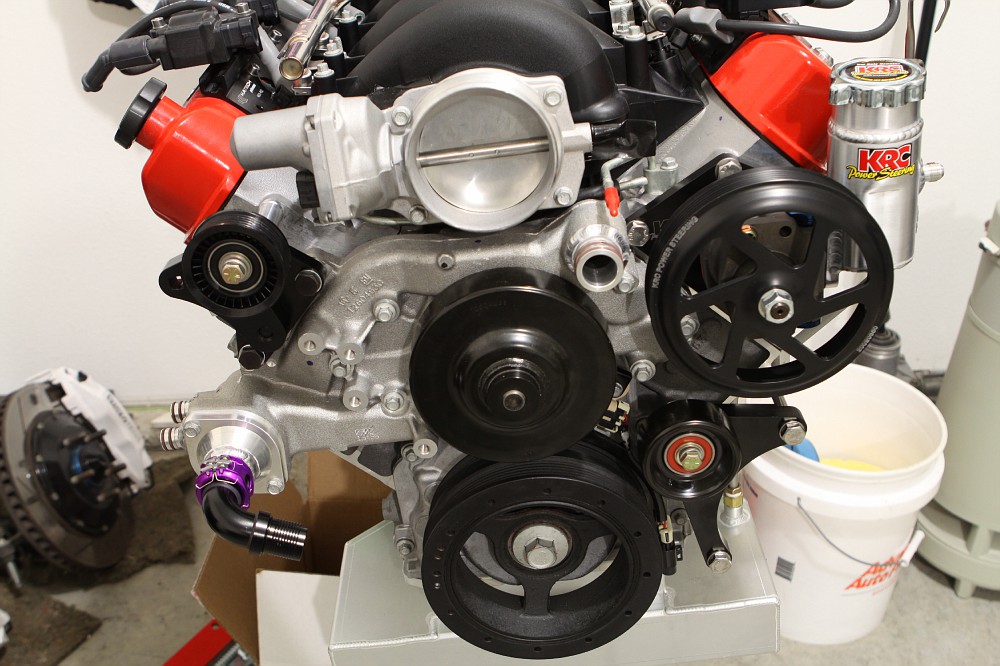
About done with the front accessories. As stated before, I will worry about A/C probably this next winter. I just need to go pick up an alternator that works with the bracket and fab up a way to mount the surge tank to the front of the passenger side head. The surge tank will be my high point in the coolant system:

I got a little time to test fit the heater box assembly into the car. And I say test fit because I knew it wasn't going to fit since I had to hammer the s*** out of the front of the transmission tunnel... which it didn't. The vent for the floor had to be removed. I never have it on floor mode anyway.... and besides, it will still shoot air onto the floor, just not as directional.
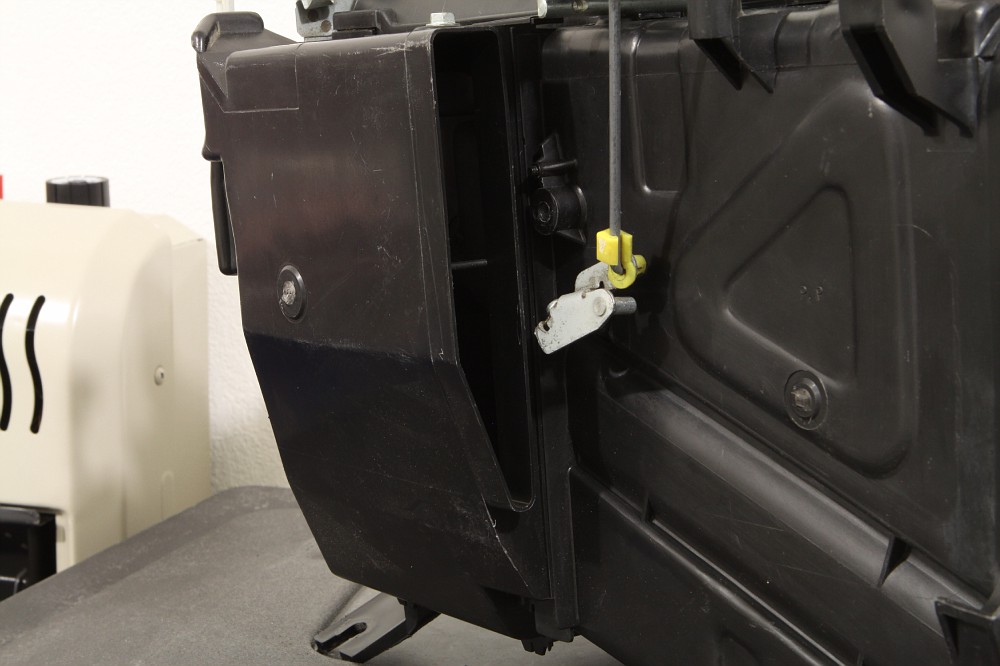
I started to cut that angle section out until I quickly realized that section just unclips, bonus.... although I really like to cut s*** up.
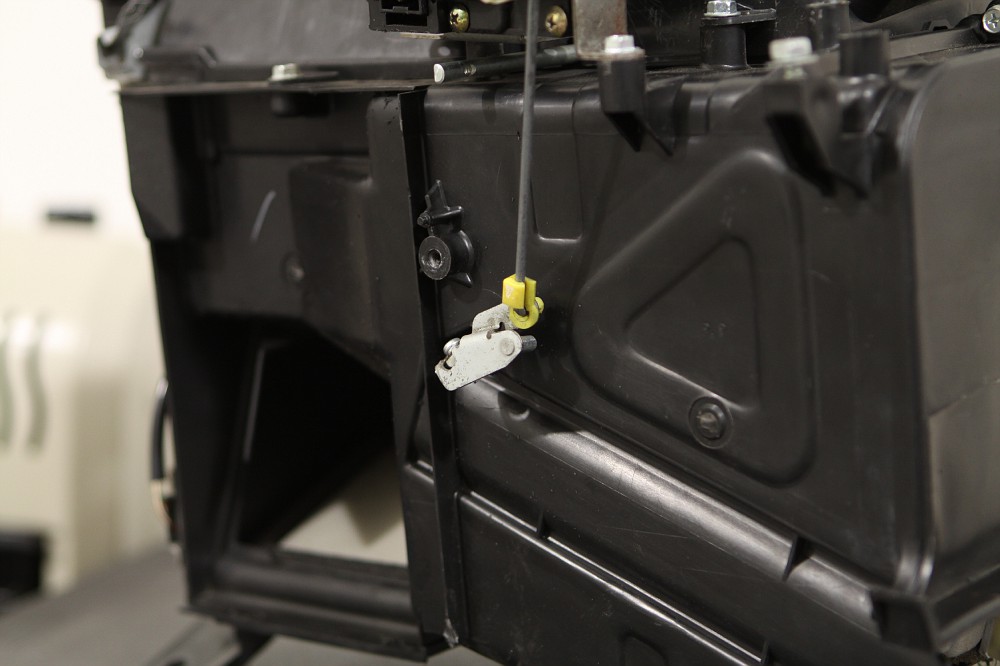
It actually fits perfect now, barely. Below are the plastic hard lines that I will cut down so there is room for my custom bulkheads inside the cabin. I will most likely need to cut them all the way down to the lip. I will then grind the lip down and the raised bar that forms a "T" with said lip. So that little 1-1/4" section left over will be where I attach my rubber jumper hoses which will attach to my bulkheads. With it bolted in the car you can see there is plenty of room to work with in there to attach some hoses:
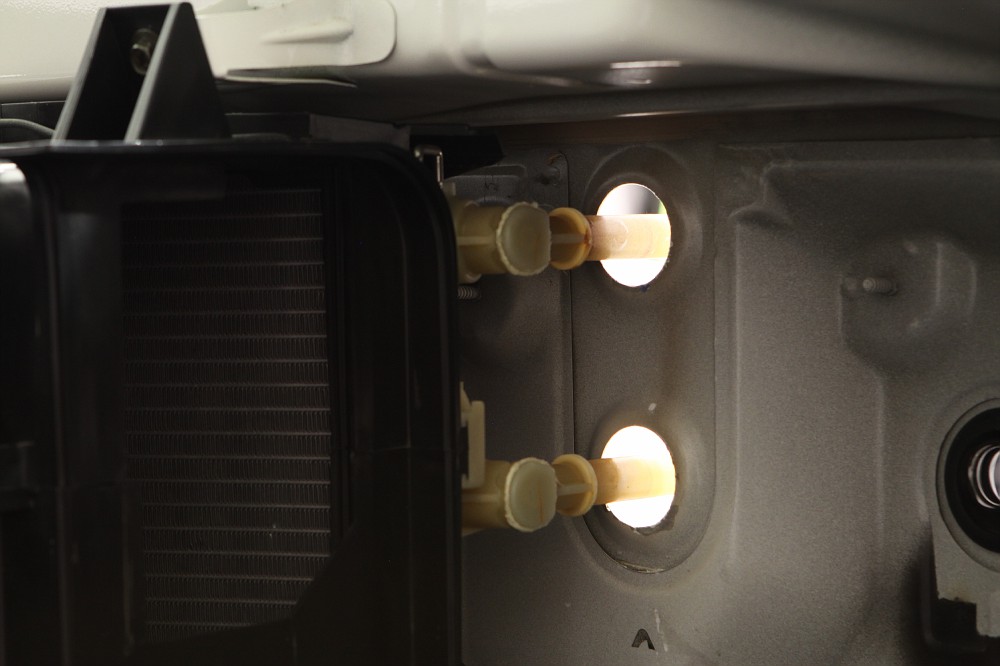
Once I get time I will get the bulkheads coated in black, then mod the plastic tubes and get everything all mounted up.
So today I received their brand new aluminum power steering pump. I guess these new ones are the bees knees. I obviously won't put it through its paces as much as a lot of guys would, but by the time I would of bought a new GM unit, pulley and reservoir etc, it wasn't all that much more for the KRC setup... and it looks a thousand times better. I also received the mounting bracket for the pump to bolt directly to the head, their LS idler-tensioner, LS 6" pulley for the pump and their custom LS AN steam ports for the heads. I also have their surge tank on the way, but it was on back-order.
I love the attached reservoir for the power steering pump:
Bracket on the head:
Mounted up, as about as easy as you can get:
Fixed idler-tensioner:
About done with the front accessories. As stated before, I will worry about A/C probably this next winter. I just need to go pick up an alternator that works with the bracket and fab up a way to mount the surge tank to the front of the passenger side head. The surge tank will be my high point in the coolant system:
I got a little time to test fit the heater box assembly into the car. And I say test fit because I knew it wasn't going to fit since I had to hammer the s*** out of the front of the transmission tunnel... which it didn't. The vent for the floor had to be removed. I never have it on floor mode anyway.... and besides, it will still shoot air onto the floor, just not as directional.
I started to cut that angle section out until I quickly realized that section just unclips, bonus.... although I really like to cut s*** up.
It actually fits perfect now, barely. Below are the plastic hard lines that I will cut down so there is room for my custom bulkheads inside the cabin. I will most likely need to cut them all the way down to the lip. I will then grind the lip down and the raised bar that forms a "T" with said lip. So that little 1-1/4" section left over will be where I attach my rubber jumper hoses which will attach to my bulkheads. With it bolted in the car you can see there is plenty of room to work with in there to attach some hoses:
Once I get time I will get the bulkheads coated in black, then mod the plastic tubes and get everything all mounted up.
-
Broadfield
- Posts: 2681
- Joined: Tue Sep 05, 2006 2:57 pm
- Car: 1992 240sx
- Location: Normal, IL
- Contact:
Re: What Broadfield Has Been Up To......
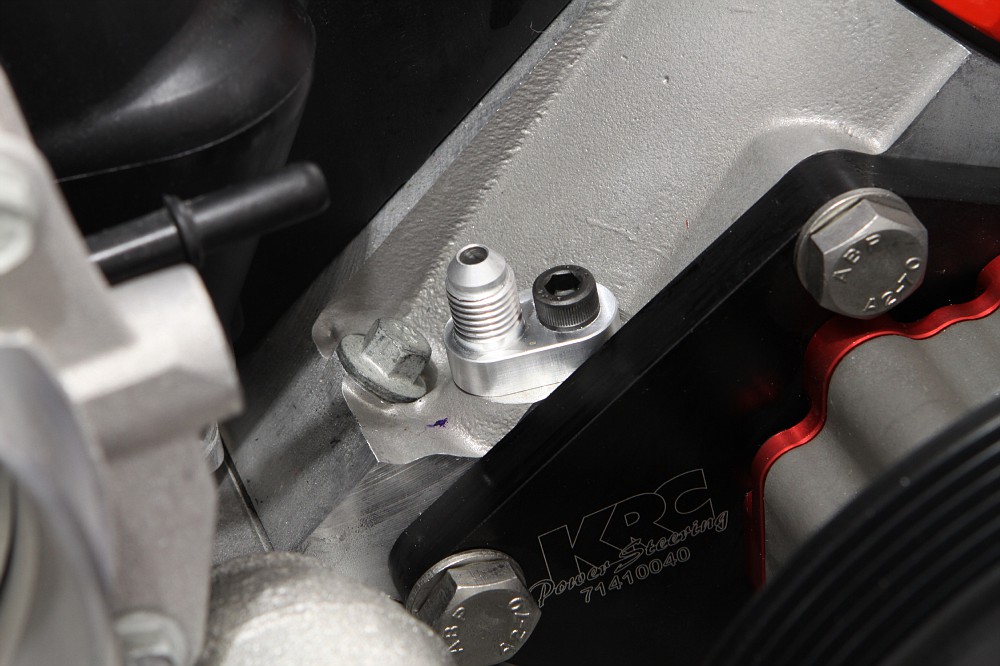
Not much of an update, but I figure I might as well post them if I have them. Installed the KRC LS steam port fittings. These replace the OEM hard lines and make it easy to integrate into the rest of the AN setup. The driver's side will "T" off at the passenger side and then into the surge tank.


I also snapped some pics of the alternator bracket even though I have had it for a few months. Now I just need to find the correct alternator to work with it:D


I also snapped some pics of the alternator bracket even though I have had it for a few months. Now I just need to find the correct alternator to work with it:D
-
Broadfield
- Posts: 2681
- Joined: Tue Sep 05, 2006 2:57 pm
- Car: 1992 240sx
- Location: Normal, IL
- Contact:
Re: What Broadfield Has Been Up To......
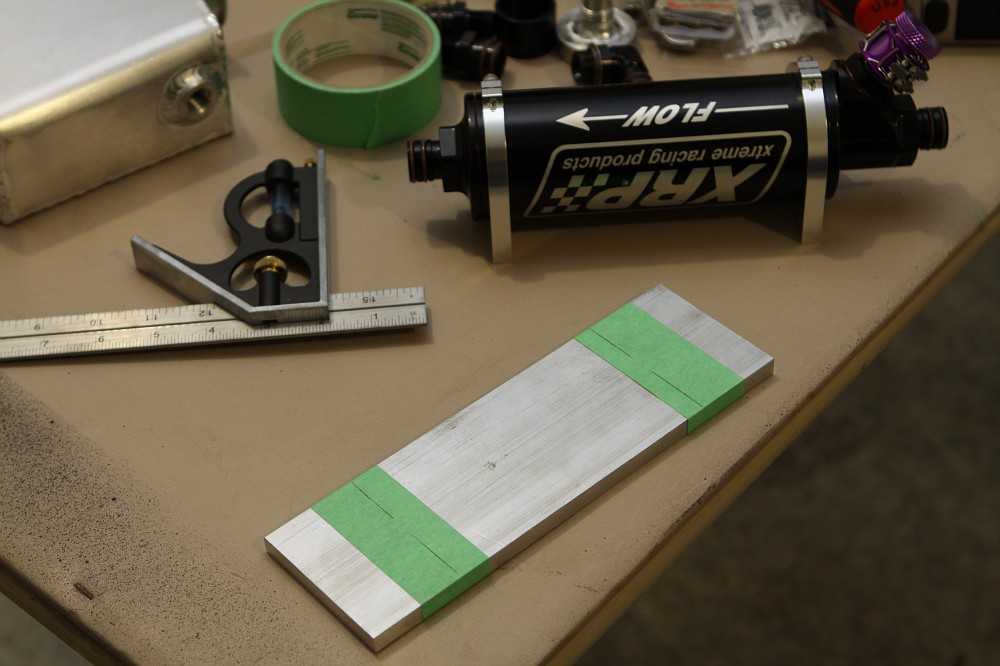
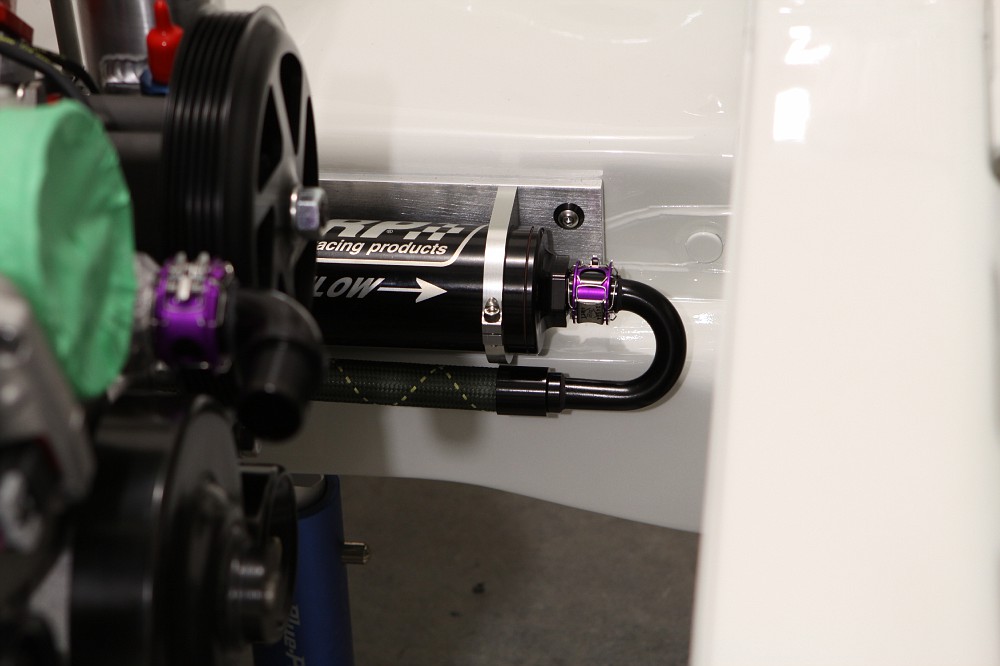
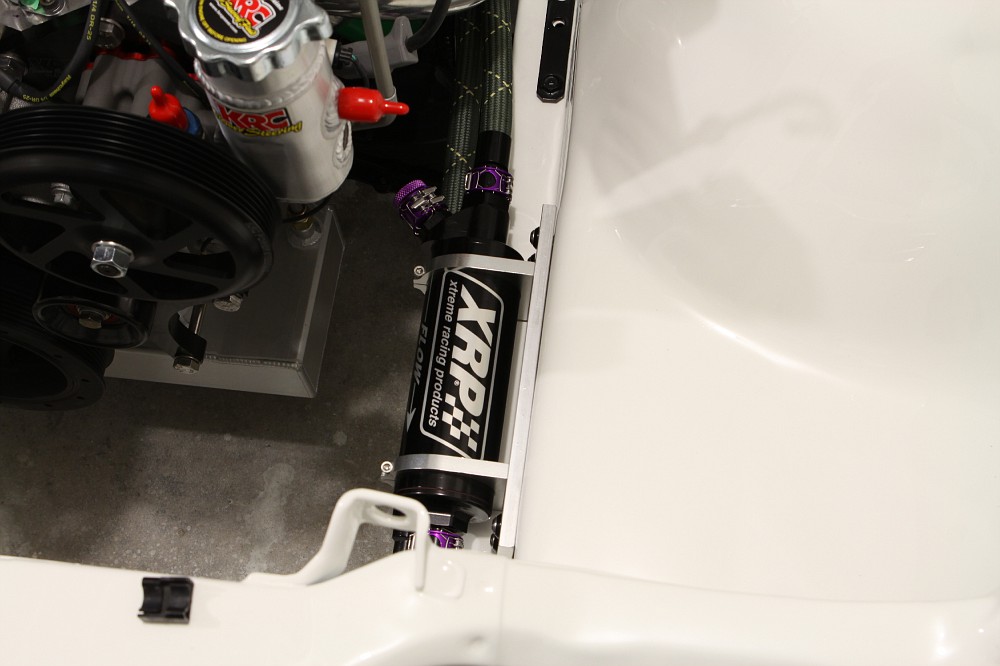
I decided to mount the XRP oil filter above the frame rail on the drivers side. I needed to mount it somewhere that was accessible and would also show it off a little. Since the brackets for the filter mount using bolts from the rear, I needed to make it so it was easier to unbolt and access. So I am mounting the brackets to an aluminum 1/4" plate. I will then mount the plate to the vehicle using some nice hardware. I will also powder coat the plate black before it's all said and done.
Marking the plate for drilling:
Holes for the brackets drilled and counter sunk:

Drilling with a 90 for the plate mounts:


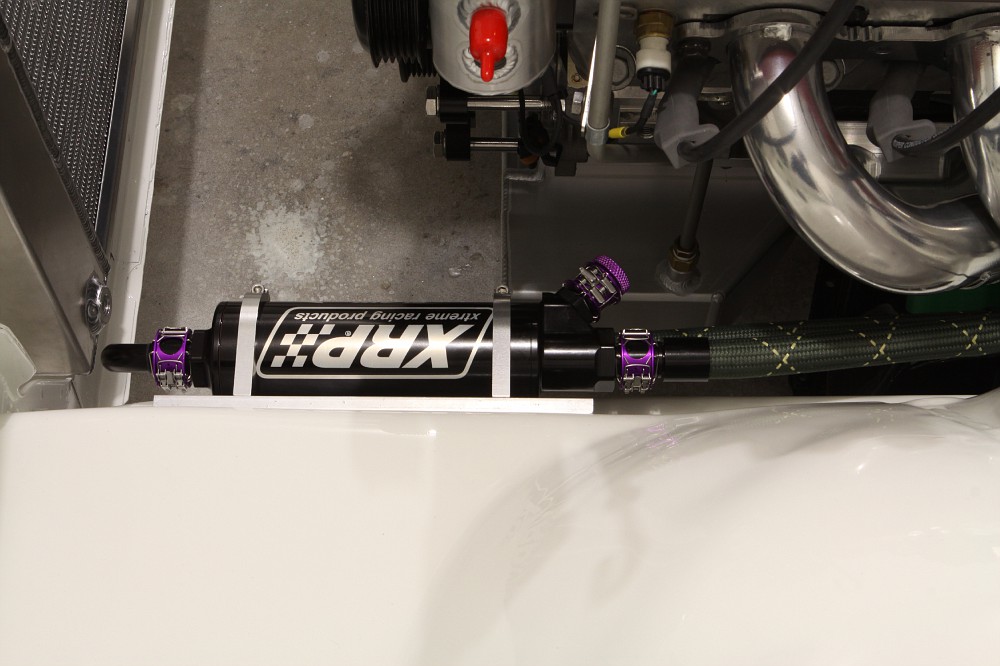
Test fit:

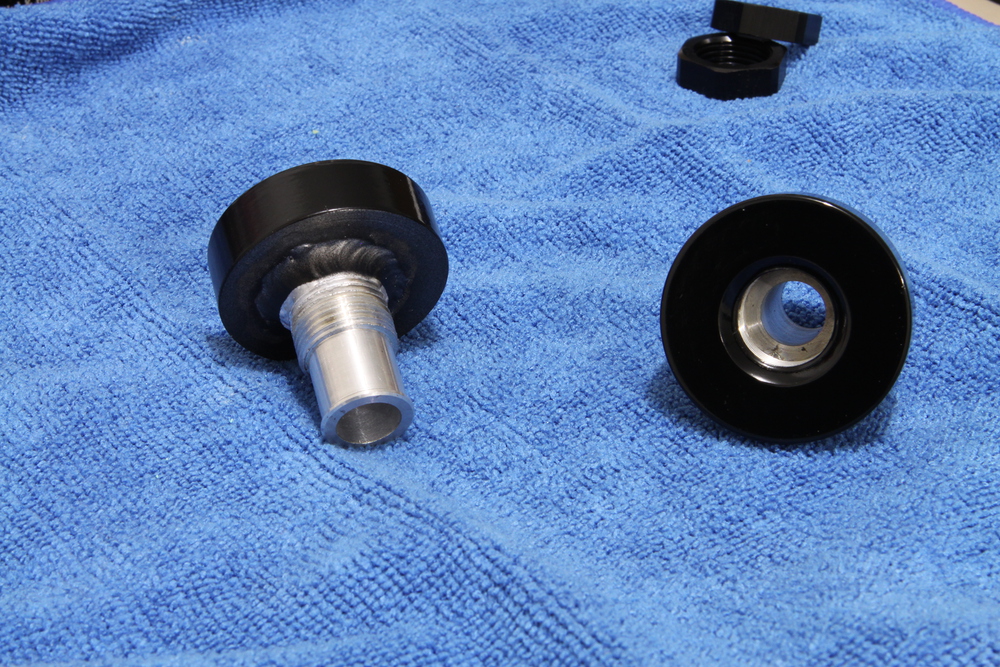
Here are the heater hose bulkheads all finished. Using 1/2" aluminum at 1-3/4" diameter. Drilled, tapped and counter sunk for the XRP o-ring fitting. Backside consists of 3/4" solid rod with a 3/4"-16 thread cut on the front half, then the back half milled to 5/8" diameter with a hose catch on the end. Then the center drilled out to 7/16". I then used a black epoxy paint to give it the proper finish. Some washers and an XRP bulkhead nut will hold it all in place.


XRP fitting in place:

Bulkheads mounted:


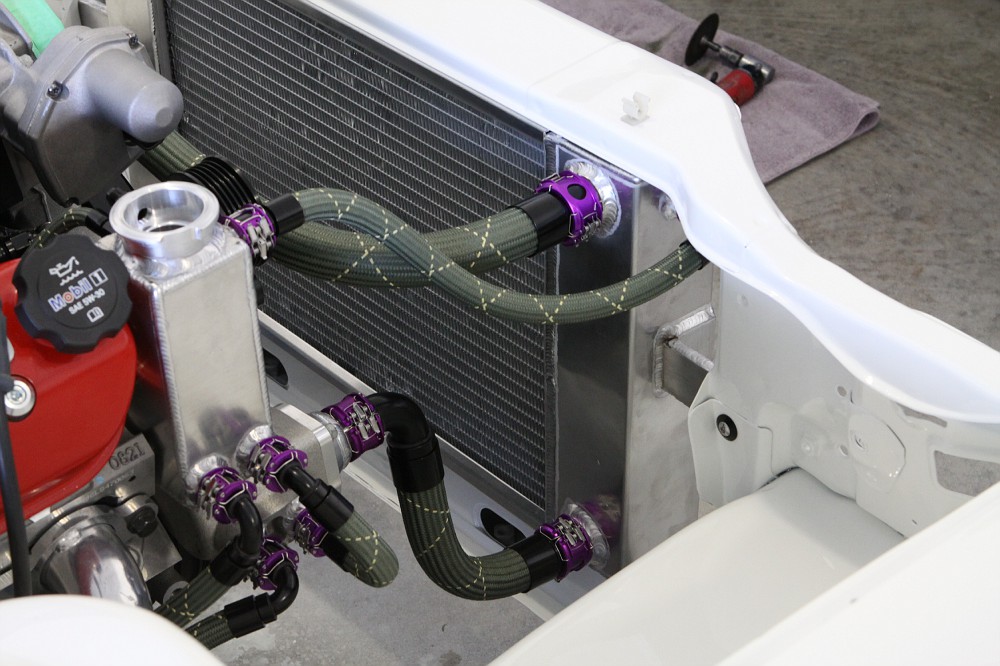
Mounting the tucked radiator I picked up from Chase @ Chase Bays. I had him custom build me one to fit the way I wanted it to fit.
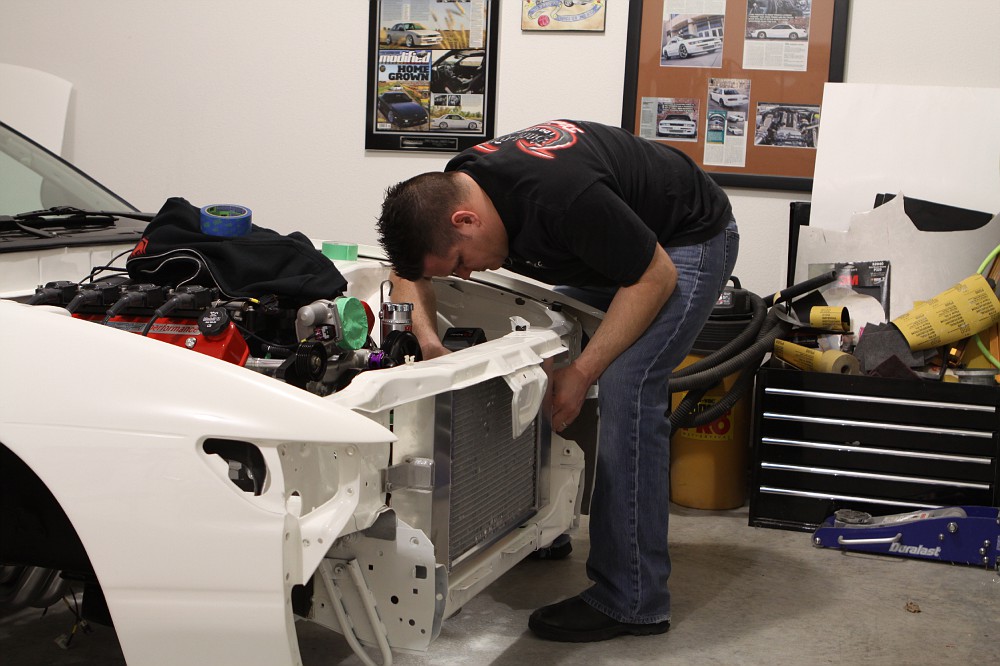
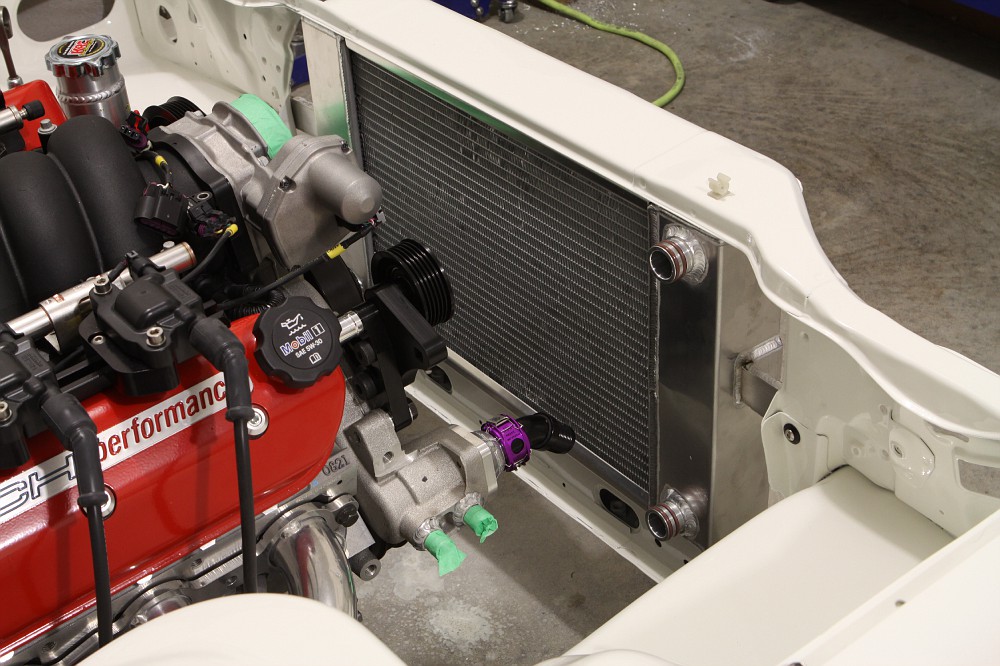
Again, using nice hardware throughout:


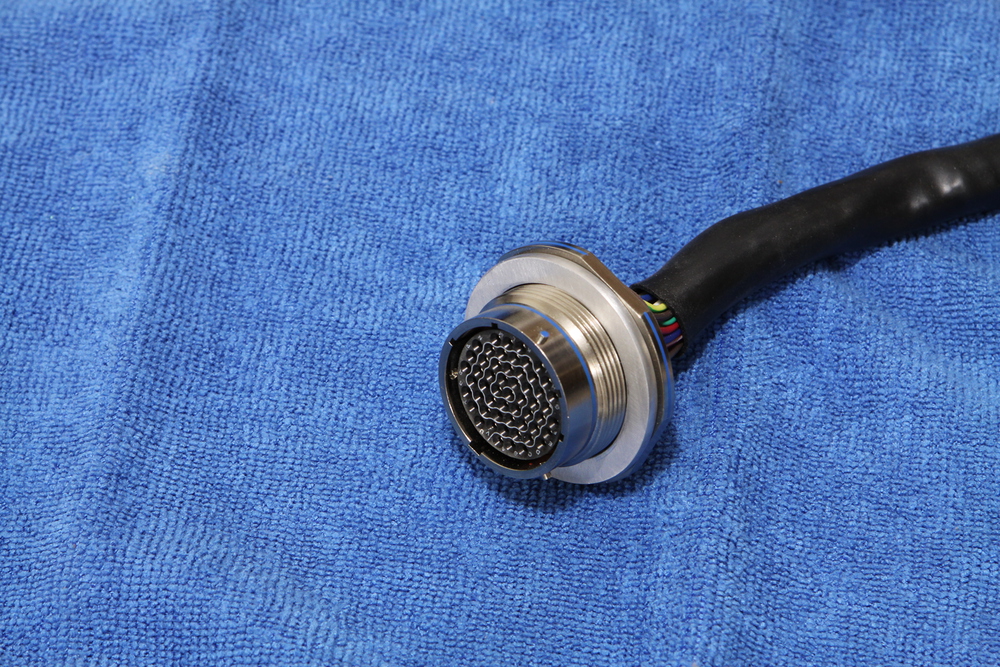
I also received my engine harness from Chase @ Chase Bays... thing is awesome! More pics of that in an upcoming update.
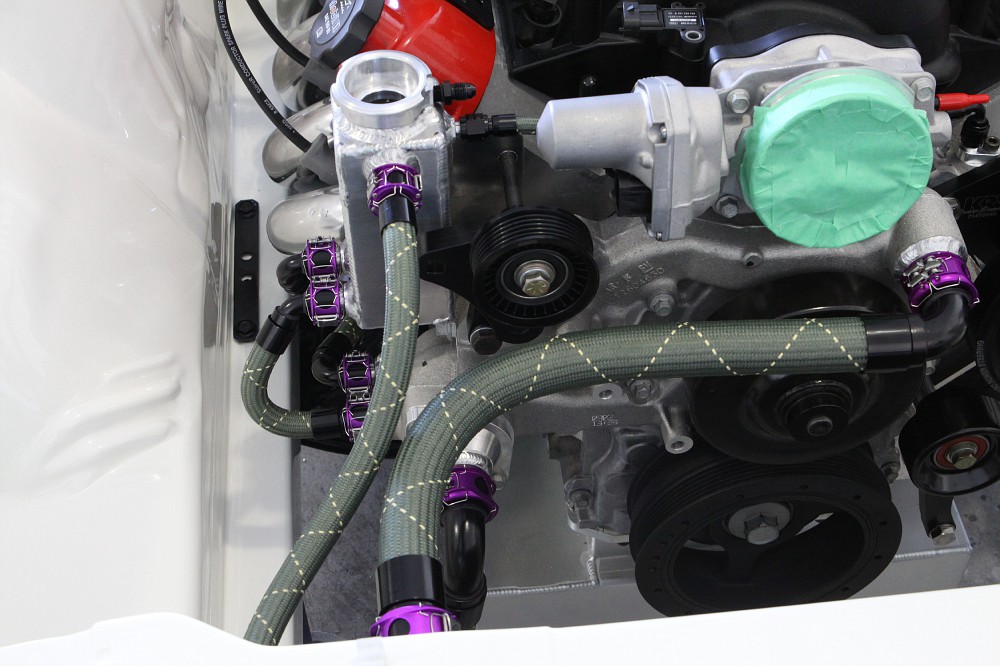
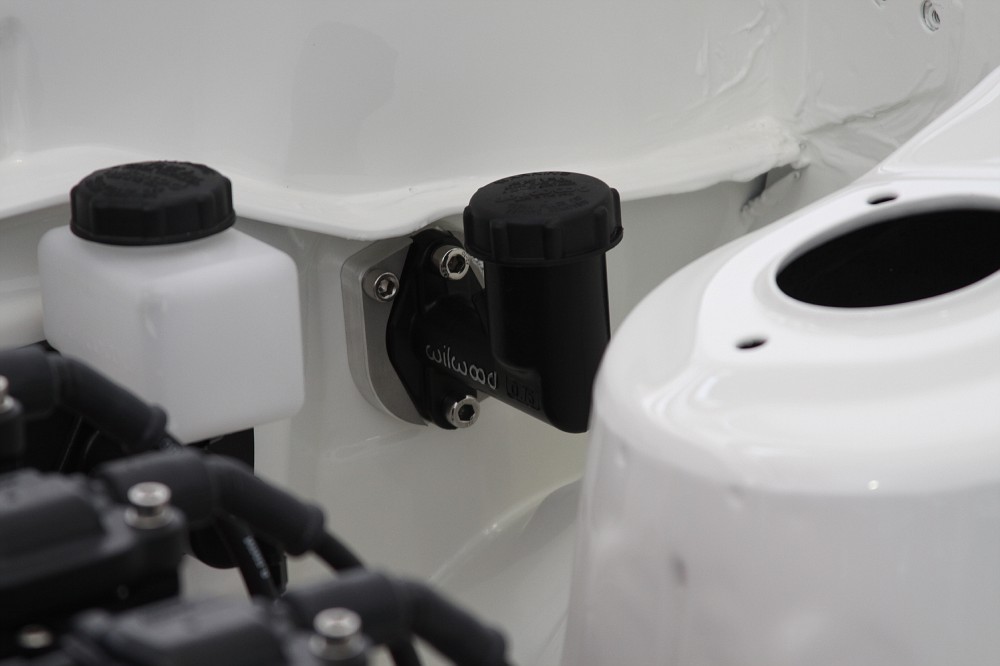
For now I needed to get the Mil-Spec connector mounted up for test fitment. I decided to go low on the firewall. Since I am keeping the A/C ports on the firewall, there really wasn't the standard place to mount it. I thought it would look funny running the harness across the A/C lines, above or below them, and have it mounted where the OEM harness comes out. So I decided to mount it where the green marker circle is:

It will fit there perfectly, but I had to fab an aluminum washer for it on the engine bay side. Usually where most people mount it there's more room for a bigger mount plate, but not for me. So I cut this little booger out of 1/8" aluminum:


I should have a lot more updates rolling in for a while, so don't stray off too far;)
Marking the plate for drilling:
Holes for the brackets drilled and counter sunk:
Drilling with a 90 for the plate mounts:
Test fit:
Here are the heater hose bulkheads all finished. Using 1/2" aluminum at 1-3/4" diameter. Drilled, tapped and counter sunk for the XRP o-ring fitting. Backside consists of 3/4" solid rod with a 3/4"-16 thread cut on the front half, then the back half milled to 5/8" diameter with a hose catch on the end. Then the center drilled out to 7/16". I then used a black epoxy paint to give it the proper finish. Some washers and an XRP bulkhead nut will hold it all in place.
XRP fitting in place:
Bulkheads mounted:
Mounting the tucked radiator I picked up from Chase @ Chase Bays. I had him custom build me one to fit the way I wanted it to fit.
Again, using nice hardware throughout:
I also received my engine harness from Chase @ Chase Bays... thing is awesome! More pics of that in an upcoming update.
For now I needed to get the Mil-Spec connector mounted up for test fitment. I decided to go low on the firewall. Since I am keeping the A/C ports on the firewall, there really wasn't the standard place to mount it. I thought it would look funny running the harness across the A/C lines, above or below them, and have it mounted where the OEM harness comes out. So I decided to mount it where the green marker circle is:
It will fit there perfectly, but I had to fab an aluminum washer for it on the engine bay side. Usually where most people mount it there's more room for a bigger mount plate, but not for me. So I cut this little booger out of 1/8" aluminum:
I should have a lot more updates rolling in for a while, so don't stray off too far;)
-
Broadfield
- Posts: 2681
- Joined: Tue Sep 05, 2006 2:57 pm
- Car: 1992 240sx
- Location: Normal, IL
- Contact:
Re: What Broadfield Has Been Up To......
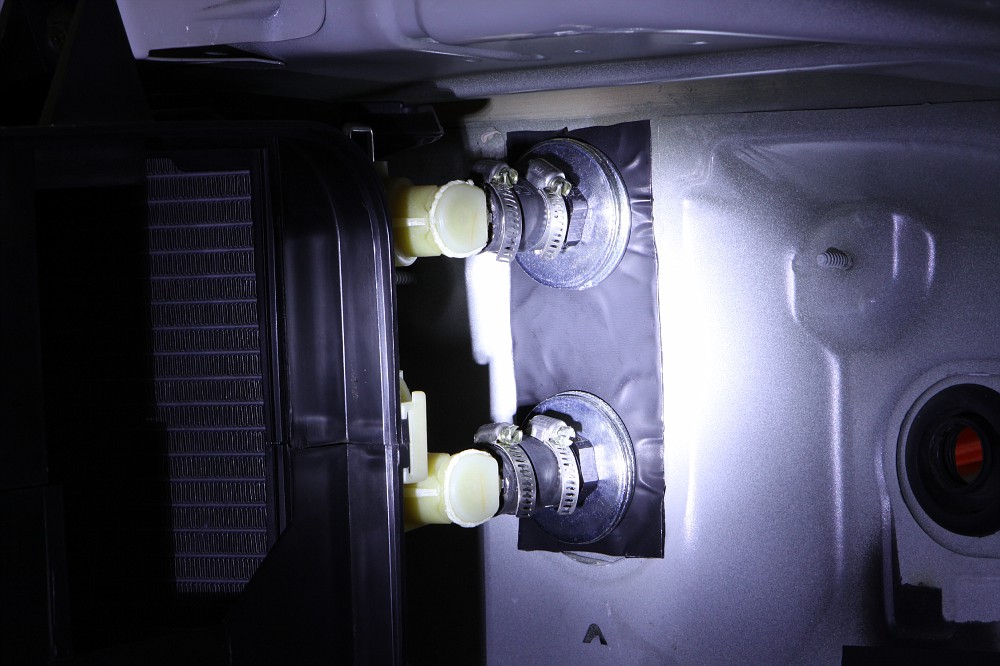
I got off my a** and finished the heater core setup. I cut the hard tubes down as far as I could and still allow me to get some 5/8" heater hose onto them securely.

As you can see I basically cut them down to the rib on the tube:

I then simply sanded down the tubes so they were basically smooth:
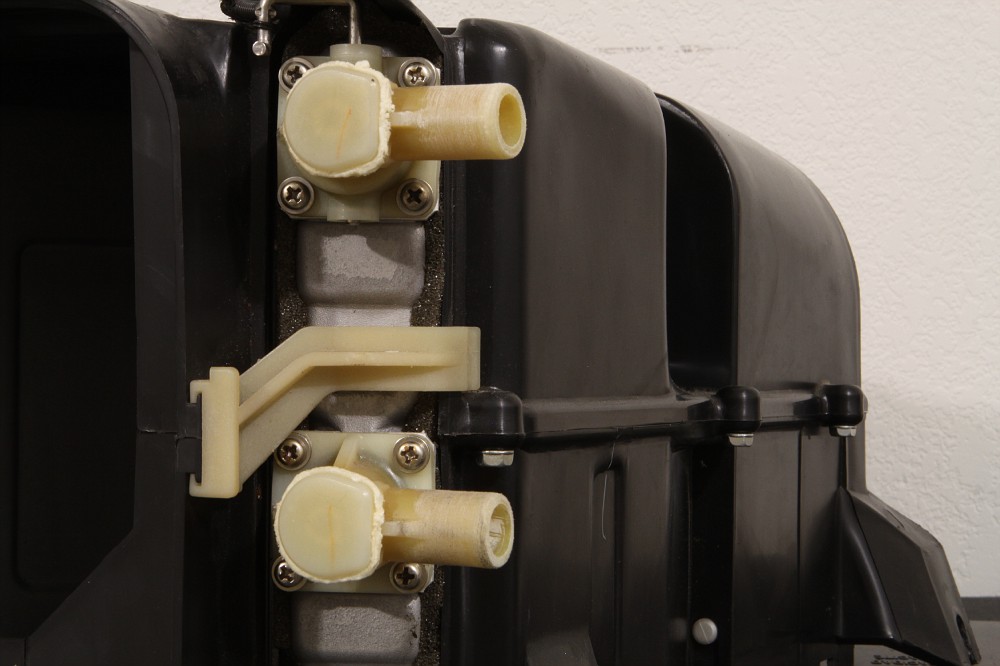
This is how they mate up to the backside of the machined bulkheads in the car:
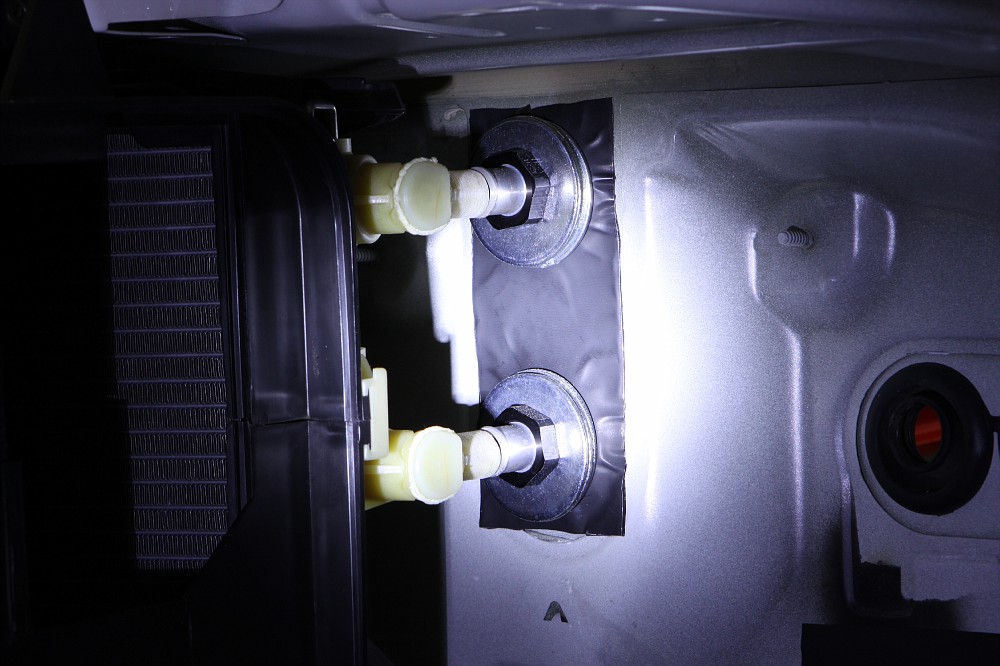
Some simple heater hose and hose clamps... it's done. Since this is only in there temporarily anyway, I will be swapping out those nasty hose clamps for some XRP Ensure Clamps on the final install.

I also mocked up the radiator hoses:

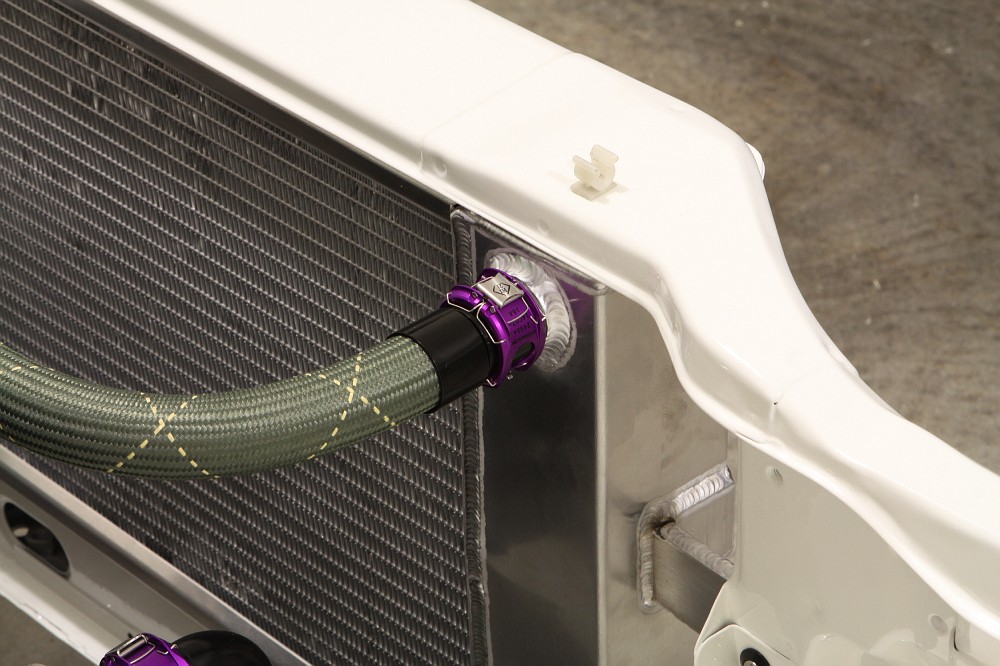
I will be doing a surge tank for my high point in the coolant system. I will be running the steam ports into the top side of the tank, looping the output heater hose through the bottom of the tank and then into the front port on the water pump. I was going to use the KRC surge tank, but it's just not going to fit the way I want it to. I also need to add a port to it. So I think I'm going to design my own surge and have my local machine shop fab it up for me.
As you can see I basically cut them down to the rib on the tube:
I then simply sanded down the tubes so they were basically smooth:
This is how they mate up to the backside of the machined bulkheads in the car:
Some simple heater hose and hose clamps... it's done. Since this is only in there temporarily anyway, I will be swapping out those nasty hose clamps for some XRP Ensure Clamps on the final install.
I also mocked up the radiator hoses:
I will be doing a surge tank for my high point in the coolant system. I will be running the steam ports into the top side of the tank, looping the output heater hose through the bottom of the tank and then into the front port on the water pump. I was going to use the KRC surge tank, but it's just not going to fit the way I want it to. I also need to add a port to it. So I think I'm going to design my own surge and have my local machine shop fab it up for me.
Last edited by Broadfield on Tue Mar 27, 2012 6:12 pm, edited 2 times in total.
-
Broadfield
- Posts: 2681
- Joined: Tue Sep 05, 2006 2:57 pm
- Car: 1992 240sx
- Location: Normal, IL
- Contact:
Re: What Broadfield Has Been Up To......
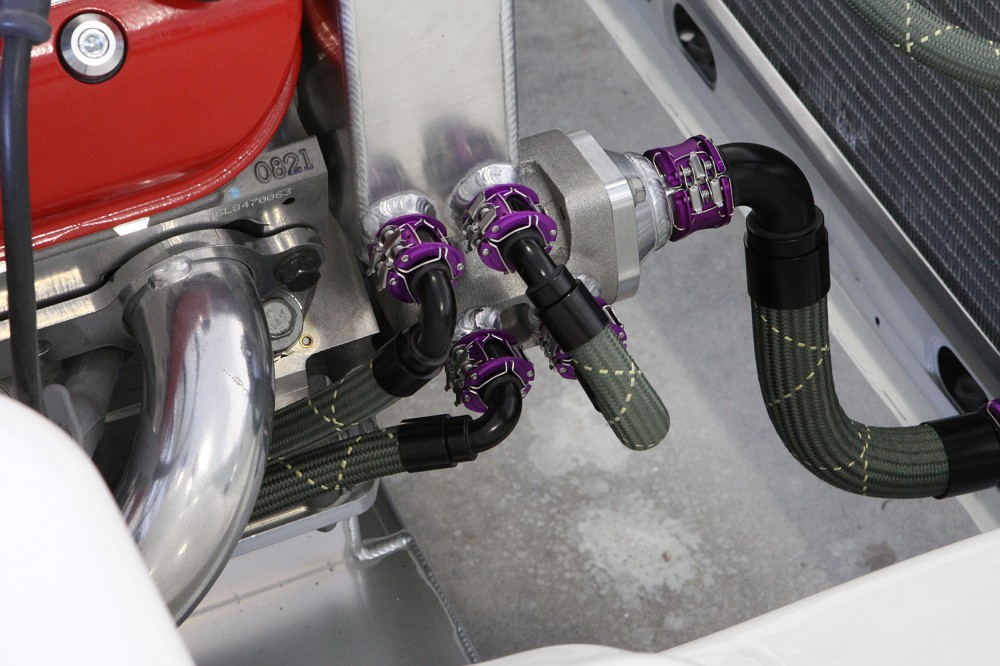
I designed a surge tank last week and had my local machine shop fab it up for me. It consists of a billet upper neck with a 1/8" NPT port for a -4 overflow line. On the upper front a -8 weld-on XRP double o-ring port that leads to the top side of the radiator. A weld-on -4 AN nipple at the top side for the steam ports. Then at the bottom left two -8 weld-on XRP double o-ring ports for a pass-thru from the heater core to the front inlet port on the water pump:


All of the lines mocked up:


All of the lines mocked up:
-
Encryptshun

- Posts: 11525
- Joined: Mon Jun 04, 2007 7:48 am
- Car: 2005 Xterra
- Location: Outside Chicago
- Contact:
Re: What Broadfield Has Been Up To......
Just when I think the Broadfield auto-pr0n can't up the ante, you post something like this.
Utterly beautiful.
Utterly beautiful.
-
breadbox

- Posts: 8550
- Joined: Tue Oct 17, 2006 4:09 pm
- Car: Red 89 240sx,Black 89 Koop, White 84 720 4x4KC
- Location: Va Bch
Re: What Broadfield Has Been Up To......
Those connections are pretty sweet.
Re: What Broadfield Has Been Up To......
Goddamn...
-
dre1507

- Posts: 4357
- Joined: Sat Nov 07, 2009 7:41 pm
- Car: Some boring Lexus that's currently at home with a smashed mouth (crashed).
- Location: Miami, FL
Re: What Broadfield Has Been Up To......
Good stuff. It's nice to have been able to see this car go through all its changes.
-
pepesilvia

- Posts: 584
- Joined: Tue Feb 21, 2012 8:15 pm
- Car: 96 S14
- Location: New Jersey :(
Re: What Broadfield Has Been Up To......
wow...im speechless. this car is so clean. i just got done reading the whole build so far on his blog....  keep it comming
-
krash

- Posts: 5064
- Joined: Mon Apr 11, 2005 10:43 am
- Car: 1993 Nissan 240sx Convertible
- Location: Memphis, TN
- Contact:
Re: What Broadfield Has Been Up To......
Razi wrote:Goddamn...
Razi wrote:Goddamn...
Razi wrote:Goddamn...
Razi wrote:Goddamn...
Razi wrote:Goddamn...
Razi wrote:Goddamn...
Razi wrote:Goddamn...
Re: What Broadfield Has Been Up To......
wow!!!!!! super clean... i hope one day i can build a car as nice as yours
-
DMan II-40

- Posts: 1234
- Joined: Sun Oct 22, 2006 5:49 am
- Car: 1995 240SX SE
- Location: East Bay Area, CA
Re: What Broadfield Has Been Up To......
any updates?
-
Driftnaut

- Posts: 48
- Joined: Mon Apr 23, 2012 8:44 am
- Car: 2005 Nissan Altima 2.5s
- Location: Tennessee
Re: What Broadfield Has Been Up To......
I love work meister! And you have the cleanest s chassis I've ever seen, 1,000 times cleaner than when it rolled off the line
-
SX APPEAL

- Posts: 1345
- Joined: Tue Oct 05, 2004 10:26 am
- Car: 06 G35 Coupe 6MT
95 Maxima SE 5MT - Location: Springfield, MO
Re: What Broadfield Has Been Up To......
DAMN IT!!! Every time I see new posts in this thread I rush in here expecting to see an update from Broadfield, but it just turns out to be someone else asking for one! I think we should make a rule that says only Broadfield himself can bump his thread after long periods of down time in the event the he actually has a real update, so that we avoid such false alarms (and near-miss trouser accidents) in the future...
-
Chase Bays

- Posts: 20
- Joined: Tue Feb 15, 2011 1:14 pm
- Car: 1989 Nissan 240sx, 2004 Mitsubishi EVO 8, 1995 Lexus LS400
- Location: Birmingham, AL
- Contact:
Re: What Broadfield Has Been Up To......
Hope all of the Chase Bays products worked out well for you! Thanks for the support!
-
Broadfield
- Posts: 2681
- Joined: Tue Sep 05, 2006 2:57 pm
- Car: 1992 240sx
- Location: Normal, IL
- Contact:
Re: What Broadfield Has Been Up To......
I apologize for not posting any updates, but I have not really had anything too substantial... A lot of time spent on the house and family this summer. I have some updates worth posting now though:
More so an informational update on this first one, but I'll toss a of couple pics in there to make it pretty.
I finally found a TR6060 that is going to be mine. I was originally going to go with the old trusty T56, but the damn things keep going up in price. The cheapest you can typically find them for is $1500... while they average around $1700. Then Jeff from Jordan Innovations opened my eyes to how cheap TR6060's are going for at the moment. It's even more bullet proof than the T56 and typically has 1/10th of the mileage.
So I typically Google for TR6060's every few nights with little luck. Either it's a trans that was for sale 2 years ago or something that is overpriced... or just no results at all. Well, I came across a WTB thread on Camaro5.com about 4 weeks ago. I figured I would check to see what luck, if any, the guy was having finding one. Very first reply a guy said he had one that he was selling along with the OEM clutch, hydraulics, OEM pedals, Hurst shifter etc. He wanted $2000 + shipping for everything. Basically he was switching over to an automatic 4L80E for the drag strip... he has a 850whp 5th gen Camaro that was just built. So I promptly become a member on Camaro5 as fast as my man fingers could slap the keyboard. As I go to click on his username to send him a PM, I realize that the dude lives in the same damn town as me... Normal, IL. I thought to myself, you have to be s*** me! So I end up talking to the guy and the trans was on the east coast where the car was built. But he said he could do everything for $2000 shipped.
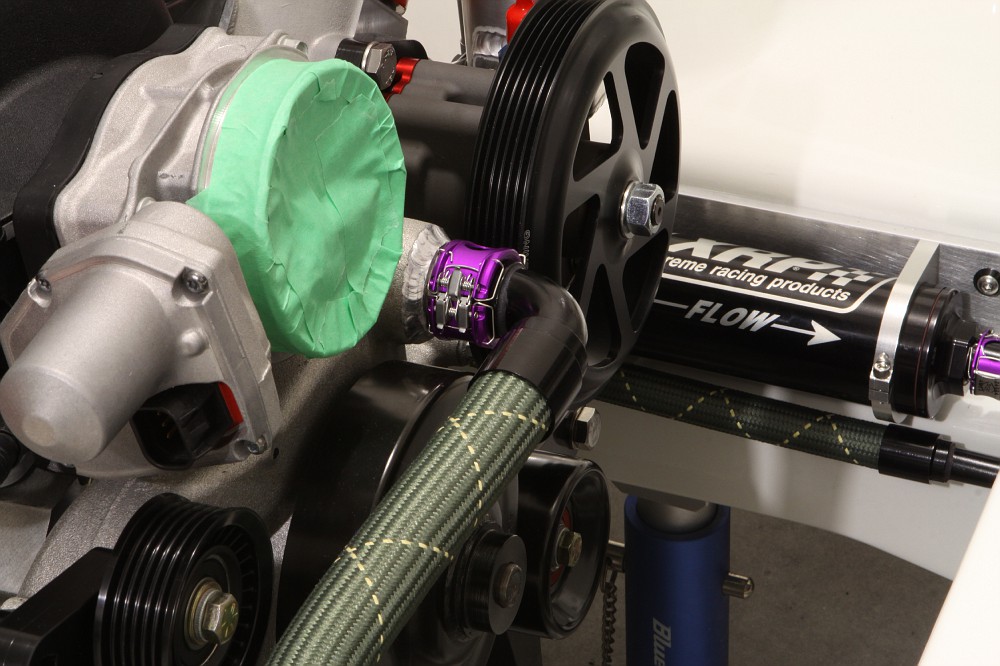
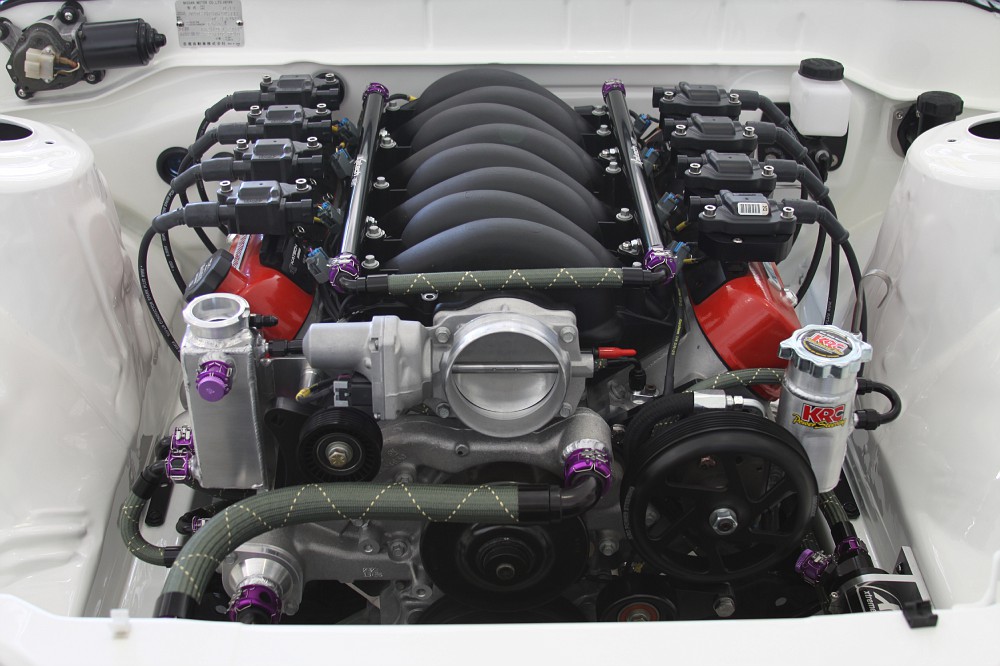
As far as pics, nothing major as I have been waiting to post them in a substantial update. But I'm here, so I might as well toss up a couple pics from a couple months ago. I finally found some black fuel rails. The Black Label ones that I planned on going with have seem to be discontinued. But lucky me Katech just released some a few months back. They are simply FAST rails made for Katech in a black color... and believe or it not the price isn't jacked up just because it says Katech on them. I also finished all of my hoses including the power steering hoses. Note: the power steering hoses, heater hoses and oil filter hoses will get fastened to the block, frame rail etc to keep them where I want them. I won't do that until the hose ends are actually crimped on though. I also got my engine harness from Chase on there, but I don't have the coil pack sub harness plugged in yet in these pics.


More so an informational update on this first one, but I'll toss a of couple pics in there to make it pretty.
I finally found a TR6060 that is going to be mine. I was originally going to go with the old trusty T56, but the damn things keep going up in price. The cheapest you can typically find them for is $1500... while they average around $1700. Then Jeff from Jordan Innovations opened my eyes to how cheap TR6060's are going for at the moment. It's even more bullet proof than the T56 and typically has 1/10th of the mileage.
So I typically Google for TR6060's every few nights with little luck. Either it's a trans that was for sale 2 years ago or something that is overpriced... or just no results at all. Well, I came across a WTB thread on Camaro5.com about 4 weeks ago. I figured I would check to see what luck, if any, the guy was having finding one. Very first reply a guy said he had one that he was selling along with the OEM clutch, hydraulics, OEM pedals, Hurst shifter etc. He wanted $2000 + shipping for everything. Basically he was switching over to an automatic 4L80E for the drag strip... he has a 850whp 5th gen Camaro that was just built. So I promptly become a member on Camaro5 as fast as my man fingers could slap the keyboard. As I go to click on his username to send him a PM, I realize that the dude lives in the same damn town as me... Normal, IL. I thought to myself, you have to be s*** me! So I end up talking to the guy and the trans was on the east coast where the car was built. But he said he could do everything for $2000 shipped.
As far as pics, nothing major as I have been waiting to post them in a substantial update. But I'm here, so I might as well toss up a couple pics from a couple months ago. I finally found some black fuel rails. The Black Label ones that I planned on going with have seem to be discontinued. But lucky me Katech just released some a few months back. They are simply FAST rails made for Katech in a black color... and believe or it not the price isn't jacked up just because it says Katech on them. I also finished all of my hoses including the power steering hoses. Note: the power steering hoses, heater hoses and oil filter hoses will get fastened to the block, frame rail etc to keep them where I want them. I won't do that until the hose ends are actually crimped on though. I also got my engine harness from Chase on there, but I don't have the coil pack sub harness plugged in yet in these pics.
-
Broadfield
- Posts: 2681
- Joined: Tue Sep 05, 2006 2:57 pm
- Car: 1992 240sx
- Location: Normal, IL
- Contact:
Re: What Broadfield Has Been Up To......
I Received the TR6060 a couple weeks ago. Everything looks to be good-to-go on it. I can see that I'm gonna need to figure out lines for the slave cylinder as it uses a quick disconnect... which is different than the slave T56 quick disconnect. I'm not sure if there are any options out there to convert it over to AN, but worst case scenario I can cut the line and weld on a -4 male end.

I also received my stage 3 (they have 6 stages) Monster clutch/flywheel combo. The stage 3 is good for 700hp/tq... so I think I'll be good:) I have a couple friends that run this clutch on their LS's and they have nothing but great things to say about it. I have also read a lot of positive feedback on the www, so I went with Monster. I'm use to spending a gang of loot on a Blitz or Cusco for import engines... this thing was on sale for a measly $649.

Since I'm trying to source everything I can to get this trans in and not have to take it back out, I went ahead and also picked up a MGW short shifter. It's fully adjustable and cures the issues the stock shifter is known to have. This kit is a beauty:

In all of the new parts bliss, I almost forgot about getting a starter. So I went ahead and ordered up a MSD 5096 starter. Also fully clockable to aid in any clearance issues.

I also received my stage 3 (they have 6 stages) Monster clutch/flywheel combo. The stage 3 is good for 700hp/tq... so I think I'll be good:) I have a couple friends that run this clutch on their LS's and they have nothing but great things to say about it. I have also read a lot of positive feedback on the www, so I went with Monster. I'm use to spending a gang of loot on a Blitz or Cusco for import engines... this thing was on sale for a measly $649.
Since I'm trying to source everything I can to get this trans in and not have to take it back out, I went ahead and also picked up a MGW short shifter. It's fully adjustable and cures the issues the stock shifter is known to have. This kit is a beauty:
In all of the new parts bliss, I almost forgot about getting a starter. So I went ahead and ordered up a MSD 5096 starter. Also fully clockable to aid in any clearance issues.
-
Broadfield
- Posts: 2681
- Joined: Tue Sep 05, 2006 2:57 pm
- Car: 1992 240sx
- Location: Normal, IL
- Contact:
Re: What Broadfield Has Been Up To......
I received my AiM Sports MXL Strada display last week. I'm pretty excited to make another cluster for myself. This one will be the most challenging yet as the MXL doesn't exactly fit in there.


I chose the AiM Sports because:
I chose the AiM Sports because:
- They seem to be the leader in race displays
- I like the clean look of it
- The display is completely customizable
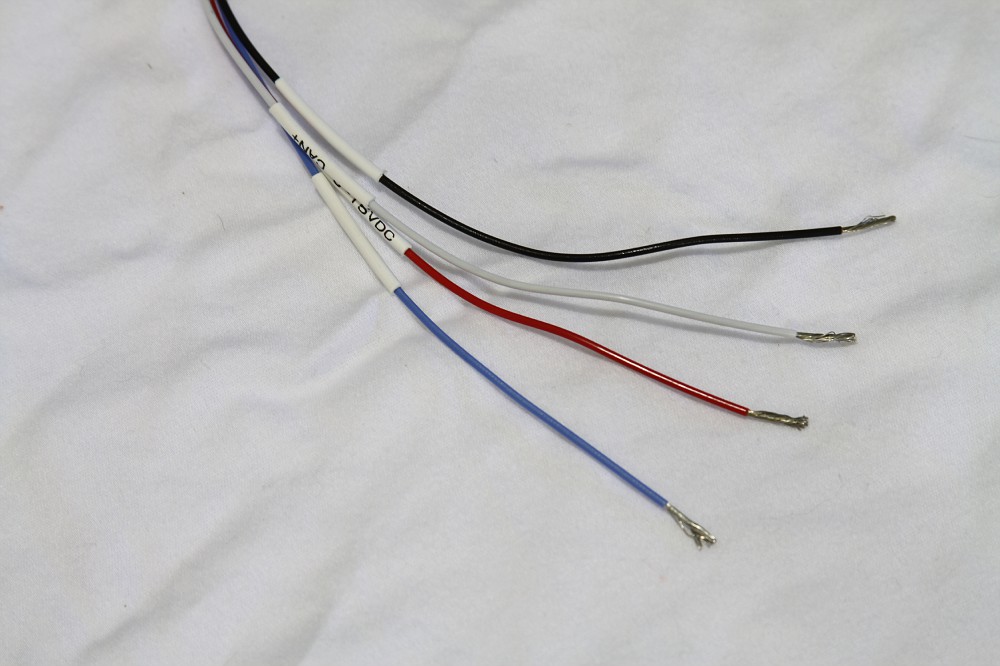
- I can hook it up to my LS3 ECU via these 4 simple wires and it will read every sensor on there
Re: What Broadfield Has Been Up To......
Is the Strada too tall for the cluster area?
Engine bay is looking spectacular!
Engine bay is looking spectacular!
-
Broadfield
- Posts: 2681
- Joined: Tue Sep 05, 2006 2:57 pm
- Car: 1992 240sx
- Location: Normal, IL
- Contact:
Re: What Broadfield Has Been Up To......
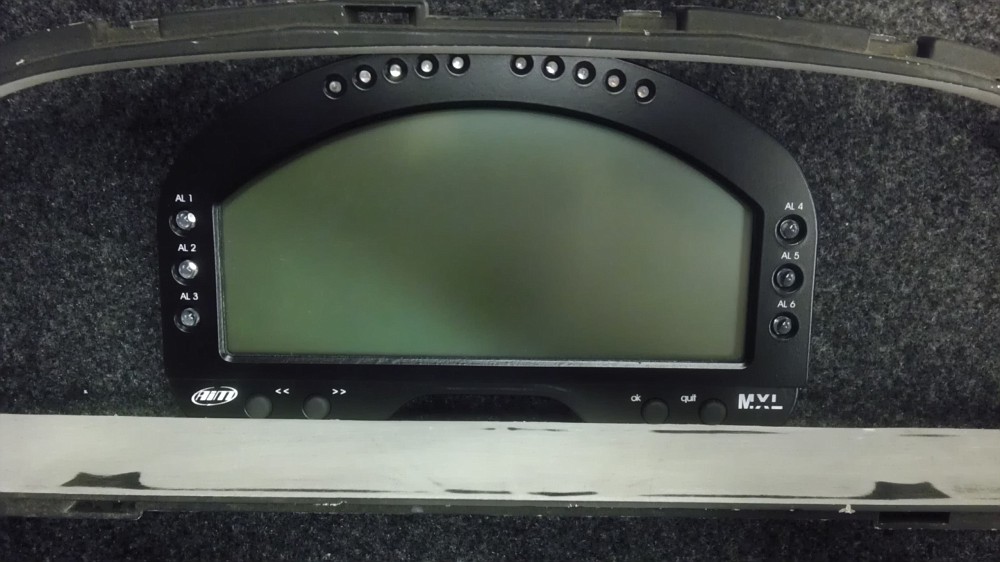
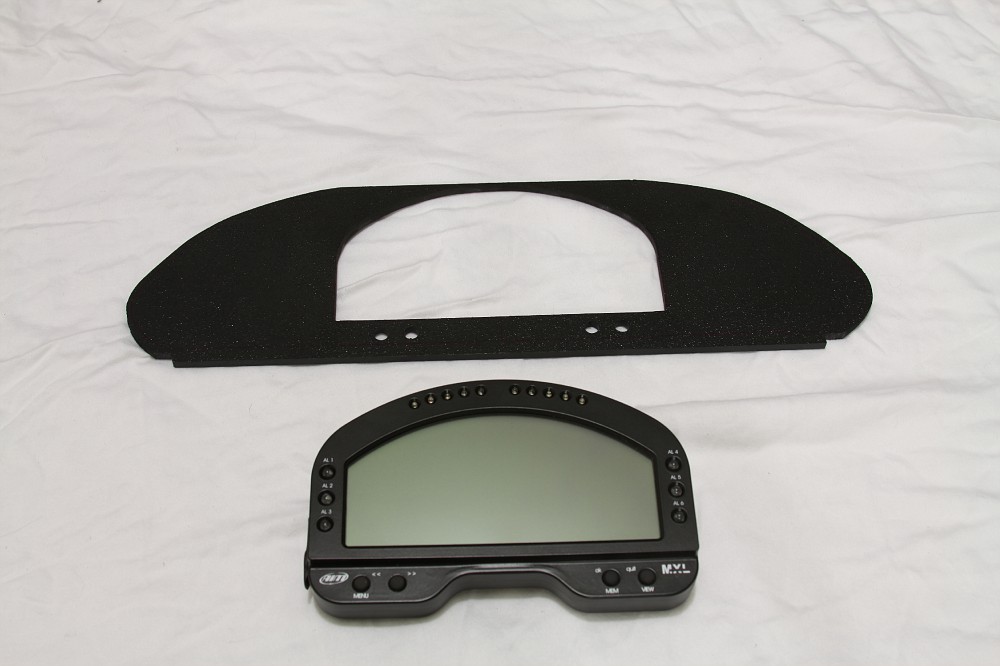
Yes, it is about 1/2" taller then the opening in the cluster. I actually already have the cluster finished, just waiting on my turn signal indicators to come off back-order so I can insert those. Then I'll post a complete build on it. The way I gained the 1/2" was pretty ingenious, but simple at the same time.Razi wrote:Is the Strada too tall for the cluster area?
Here is a crappy cell phone pic to show how far off the opening is:
Re: What Broadfield Has Been Up To......
This build is absolutely amazing. I am speechless.
-
Broadfield
- Posts: 2681
- Joined: Tue Sep 05, 2006 2:57 pm
- Car: 1992 240sx
- Location: Normal, IL
- Contact:
Re: What Broadfield Has Been Up To......
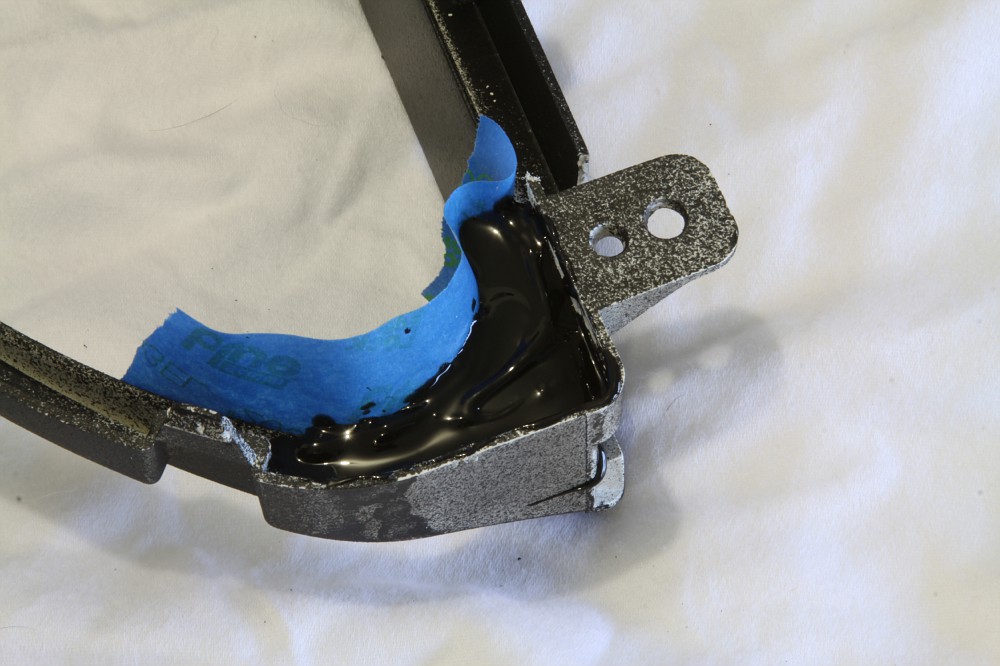
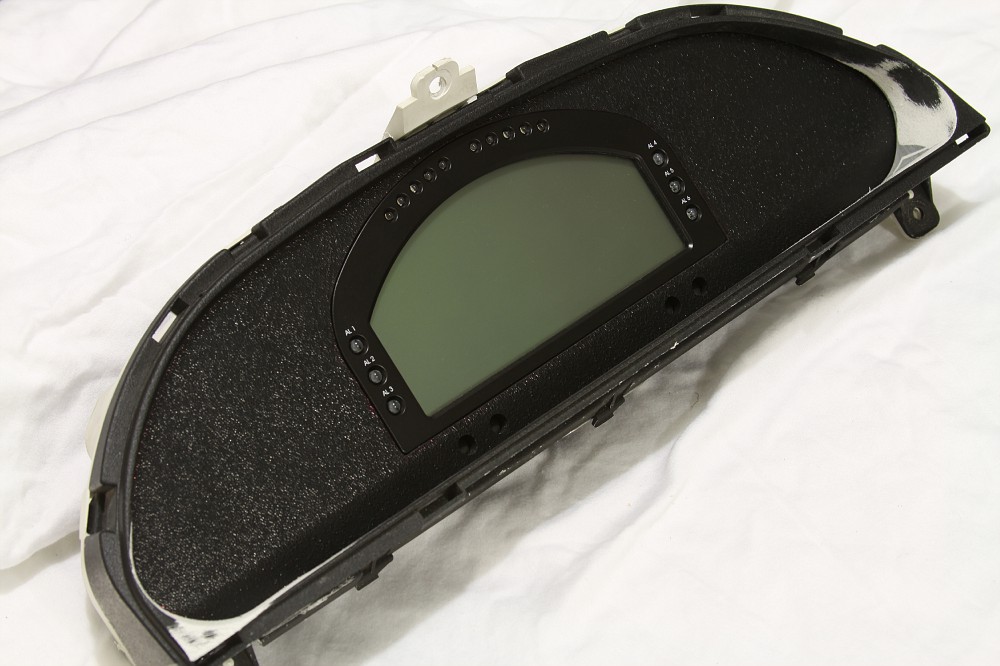
My cluster build is complete. Although the finished product looks very basic, there was a lot that went into keeping the simple look. So bear with me while I post a lot of build pics during the process.
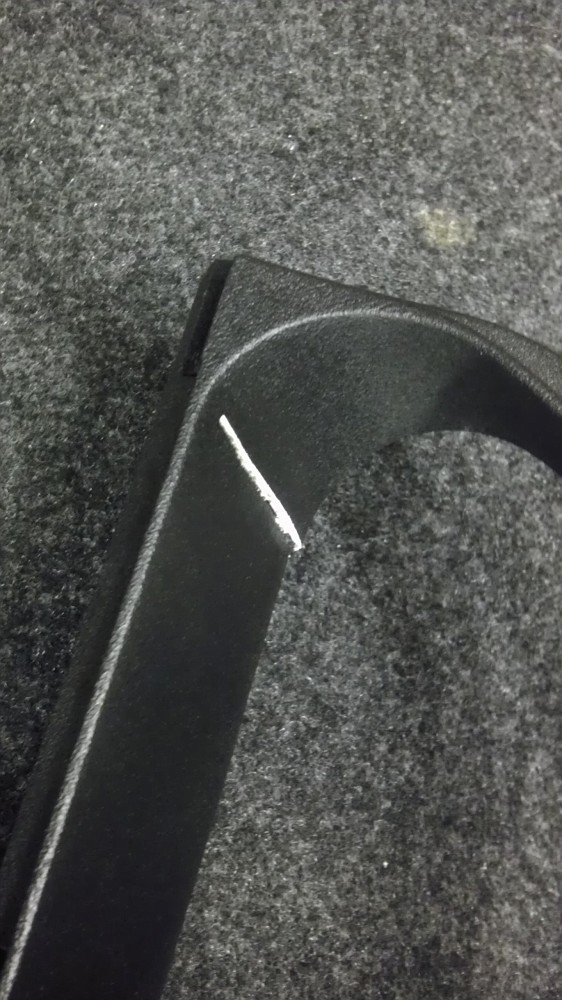
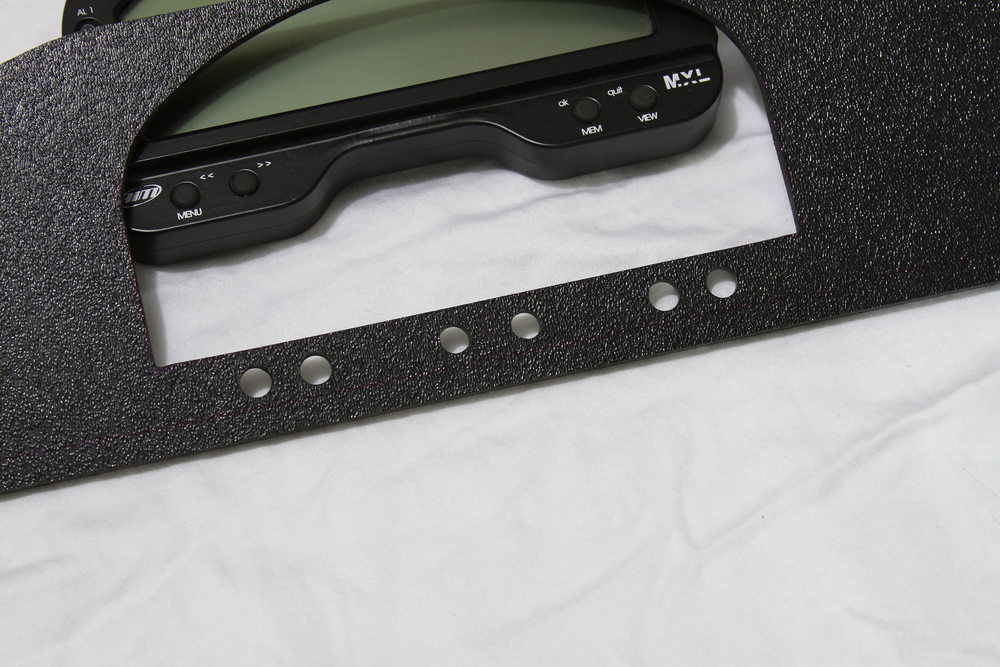
The first hurdle was the size of the MXL... it's too damn tall to fit within the constraints of the cluster framework. As you can see in the photo below(don't mind the crappy cell pics in the next four images ) it is about 3/8" too tall overall. The top is cut off and at the bottom the buttons are smashed into the lower lip of the framework. Note: the framework has obviously already been modified to the specs of my standard clusters I make.
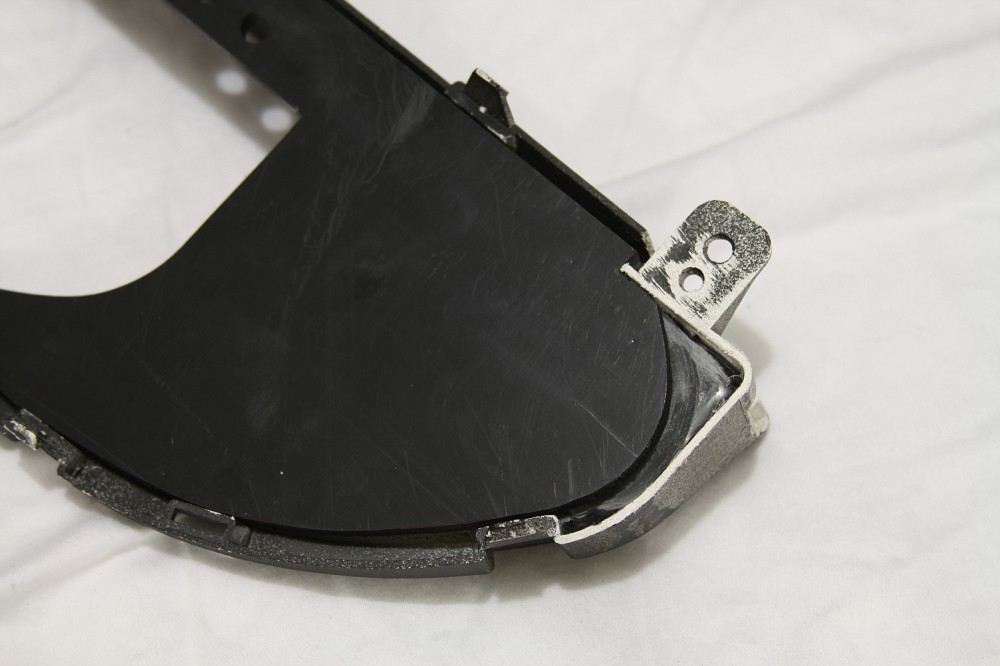
I knew that I wanted to keep the front edge of the framework as is because I need the OEM cluster surround to butt up in front of it so it fits like stock. So essentially I need the front lower edge to stay put, but the back lower edge that butts up against the plate needs to drop down 3/8". First I slit the bottom ledge at each corner just inside the lower mounting points:
I then twisted the lower ledge down to gain the needed 3/8""

Backside shot:
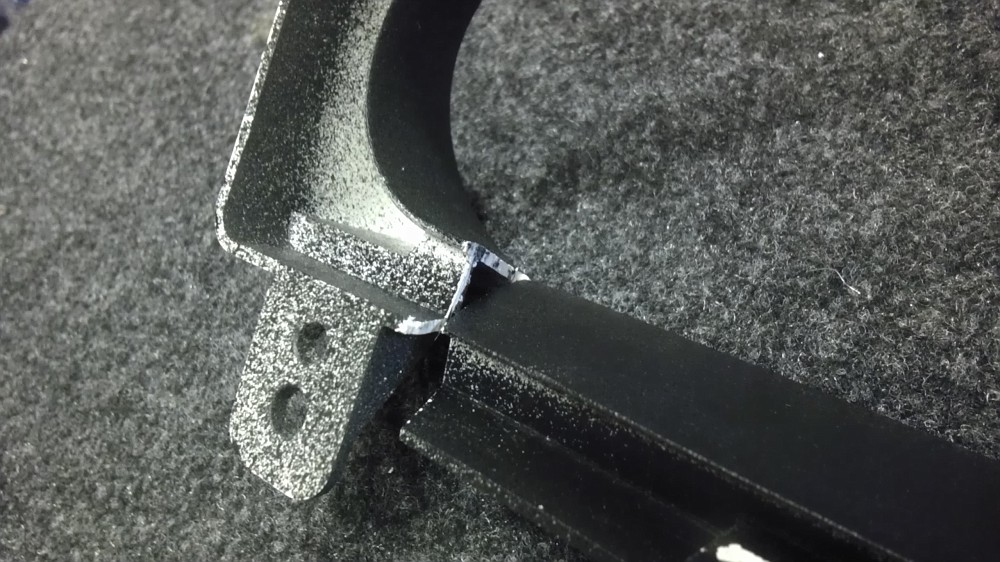
I used a piece of aluminum rod to keep the bent down section in place while I glued it up with some Norton Speed Grip:

I also filled in the small area that was now exposed because of the bent down section. It's hard to tell because the glue is also black, but it's filled in next to the slivers of white plastic:

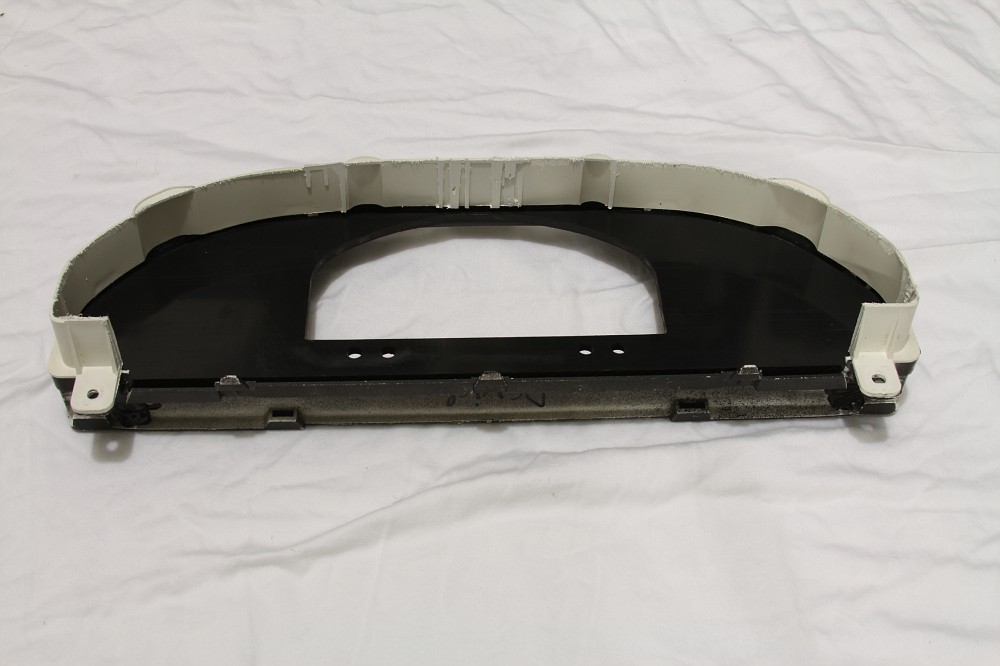
The 2nd hurdle was to reshape the contour in the lower corners. I obviously couldn't leave that break in the plastic there. So I filled the entire backside corners in with the same Norton Speed Grip:
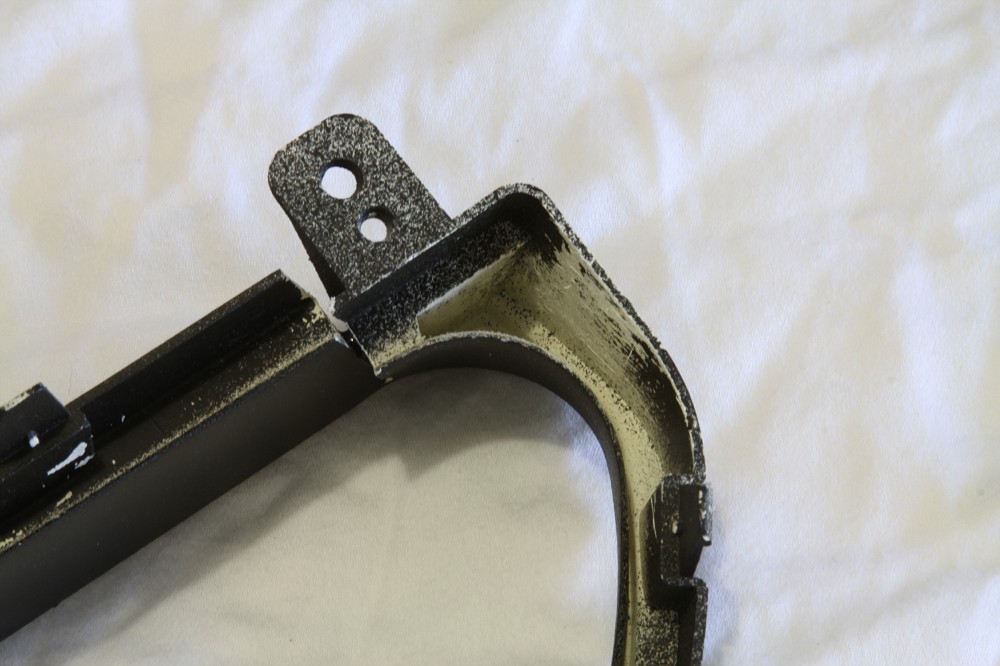
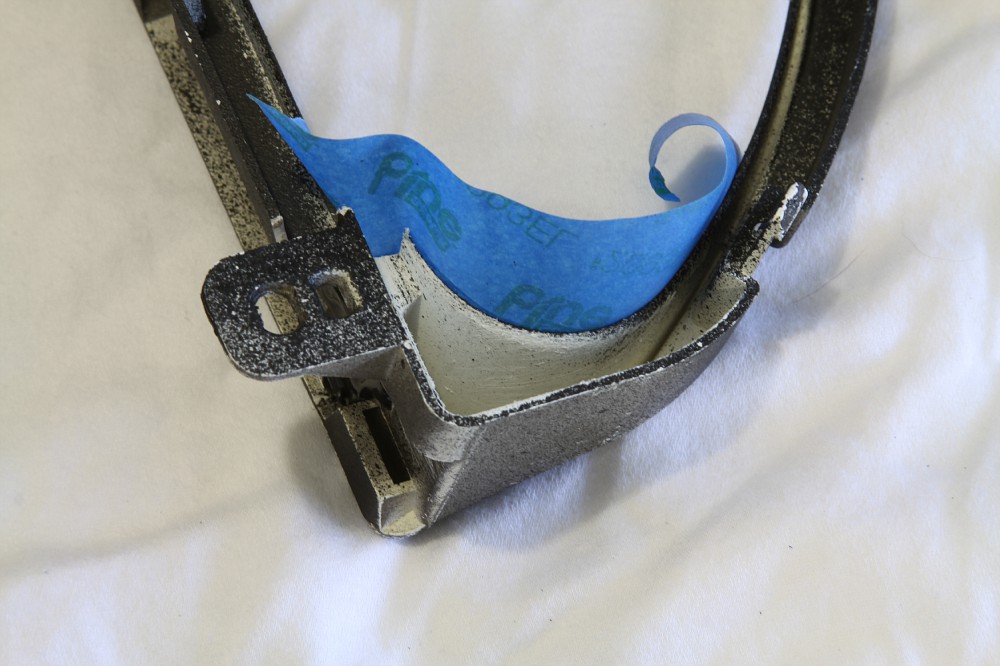

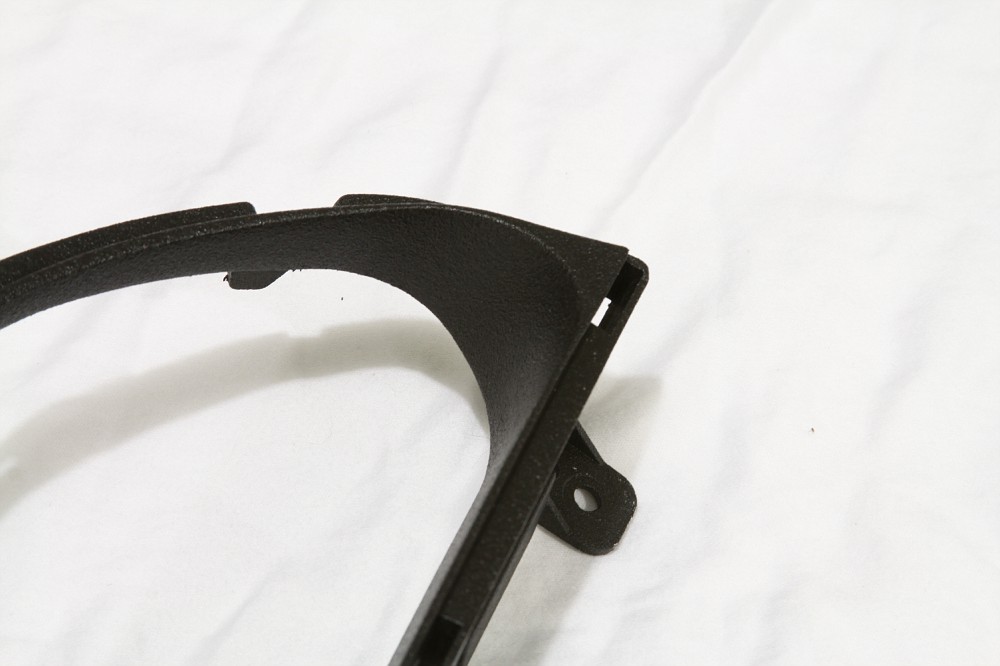
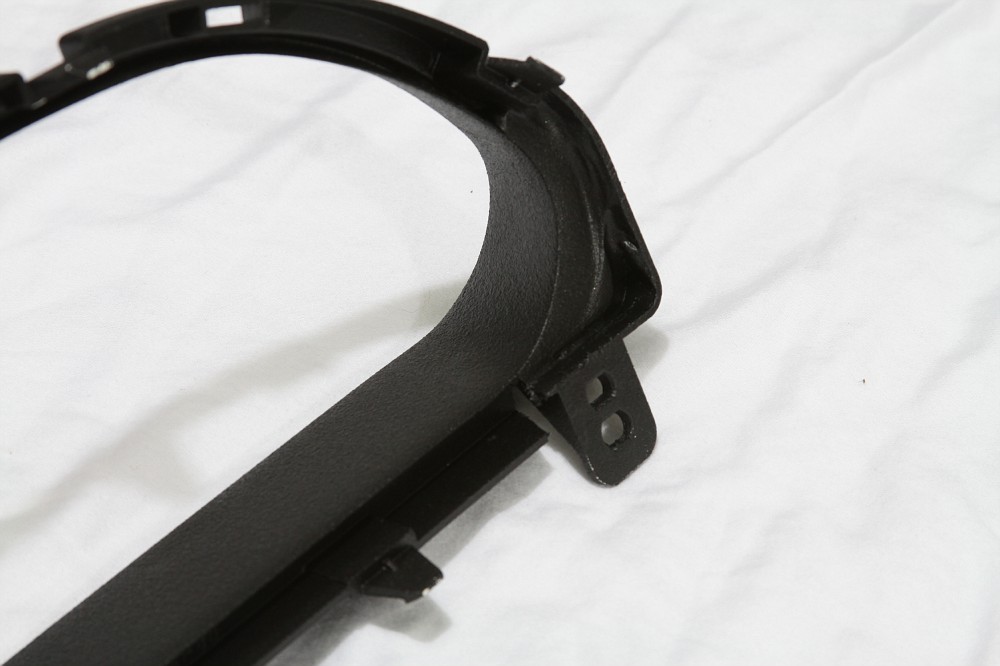
Now when I grind the corner, there is solid material there to give me my shape. Here is after grinding it with a sanding drum. The black area around the white plastic that is shaped line a "L" is the actual hardened Norton Speed Grip:

Also had to grind down the backside level to the framework so my plate would butt up against it flush:

Front view of the new lower corner contour:


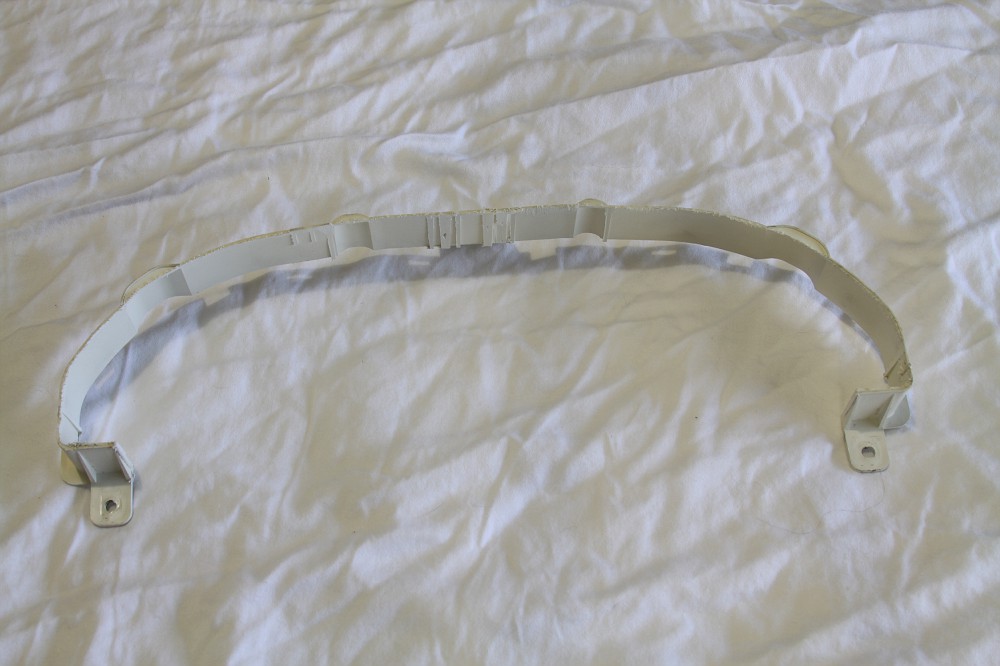
Framework textured and completed:

3rd hurdle is the fact that the buttons on the MXL are on a recessed area. Which means flushing it in a flat plate isn't going to work out too well... or not look finished anyway. So I came up with the idea of just covering that entire recessed section and only flushing the screen area itself. This would really frame the unit nicely since the bottom edge of the screen is flat and so is the bottom ledge of the cluster framework. So I went ahead and cut a plate out of 1/4" ABS to fit inside of the cluster framework. Once the plate fit properly and dropped in from the backside, I cut out the opening for the MXL so it would flush in the plate.
Only obvious problem are the buttons... how the hell am I going to get to them now that they are covered by the plate!?! First thought was too relocate them to a completely different spot in the car. I was close to doing this, but thought to myself that this is what any typical installer with my skills would do. So I wanted to do something different, equally as cool, but keep a nice clean look to it. I decided to keep the buttons right where they are, but extend them out through the 1/4" ABS plate. To do this I needed to make new buttons, that when pressed, would depress the rubber buttons below them.
First thing was to drill out the holes for the new buttons exactly above the MXL buttons. Since I already had the opening perfectly cut for the display section of the MXL, I disassembled the MXL down to the raw metal front fascia. I then popped it in place on the plate and simply used the button holes in the metal fascia to guide my drill bit through the plastic from the backside. So this is what the plate looks like at this point:
MXL pressure fit in place. You can see the rubber buttons perfectly lined up under the holes in the ABS:


A real quick peak of the panel in place... although the shadow of the framework makes it hard to see the button locations in this picture:
Fitment of panel from the back:

The back of the OEM cluster housing completely gutted with the three mounting locations still intact:
Closeup of the buttons that need to be integrated to my panel:

I also needed to put some turn signal indicators in the cluster. I thought it would look stupid if they were just floating around anywhere on the outskirts of the plate around the MXL display. So lucky for me, the shape of the MXL allowed me to install them in the dead space where the designers of the MXL intended for a steering column to reside. Also, the side of the indicators that I use are really close to the diameter of the holes I drilled for the MXL buttons. So I dropped the indicators in between the buttons:
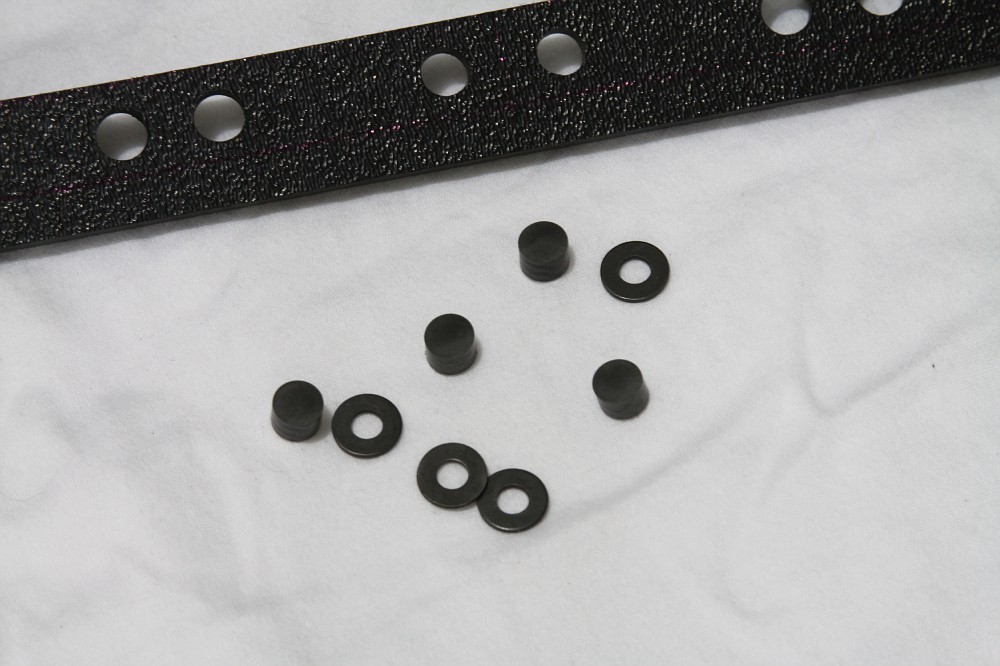
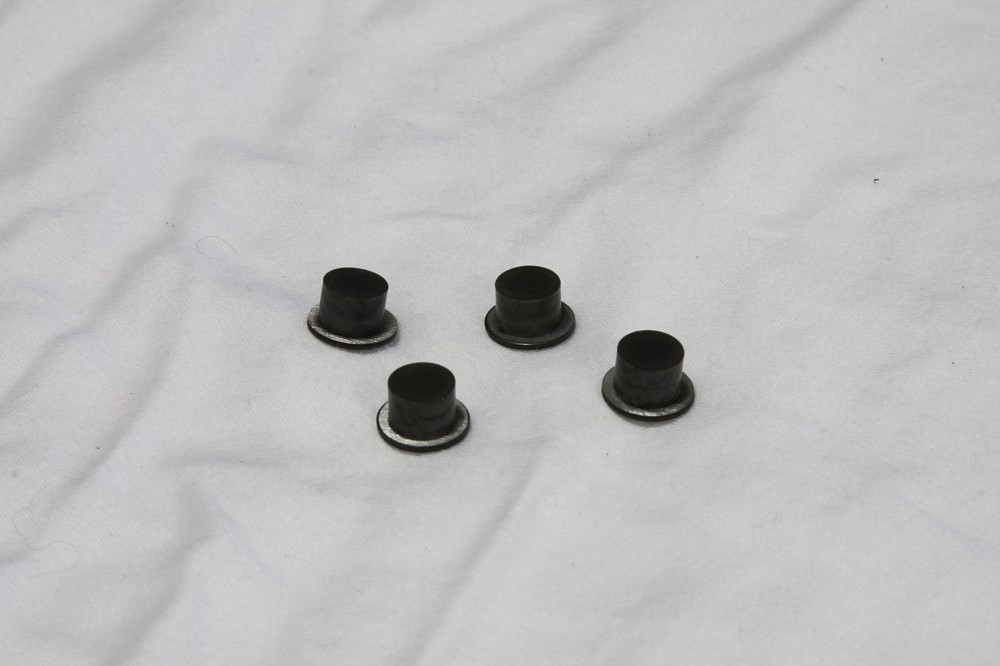
Next is making the button extensions. There were several criteria that they needed to meet in order for this to work:
In order for the catch to work, I had to countersink the button assembly into the back of the plate. The drill press came in hand for this to get the proper depth and the centering exact:

Washer and button test fit before I glue them together:


A good pic of how the extensions look:
After I confirmed fitment was good, I went ahead and glued the buttons to the washers. Some good super glue and accelerator made this an easy task. I then turned the button extensions over and filled in the center of the washer with super glue to make it a level surface on the back of the button. I then sanded that down so it was perfectly level with the washer:


Even though the ABS is textured, I don't like the finish of it. So I sanded the main plate down and applied my texture coat to it. Everything reassembled... just waiting on the turn signal indicators to come in at this point:

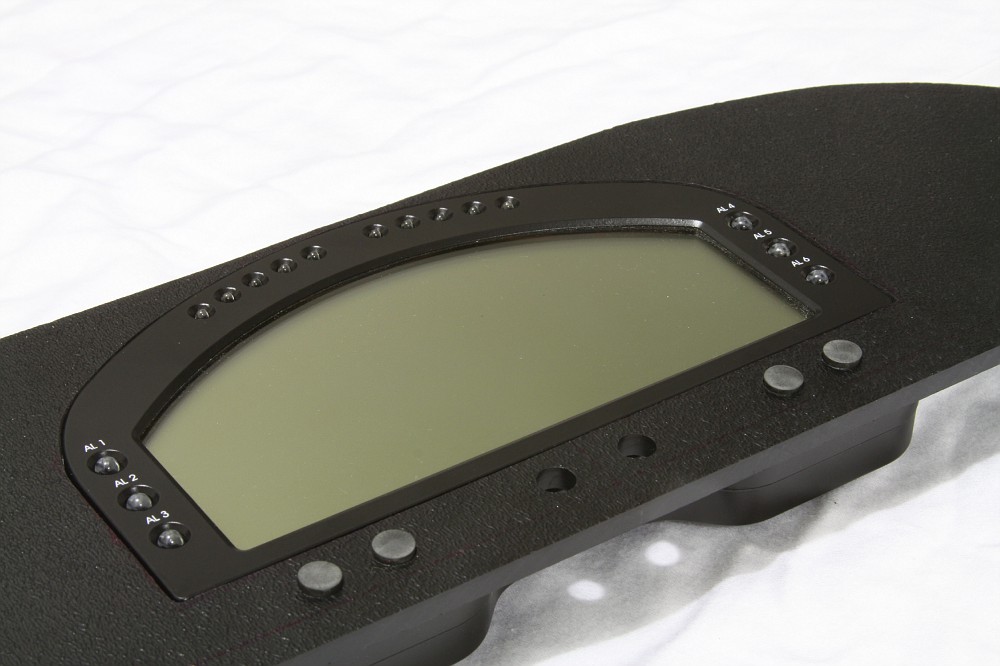
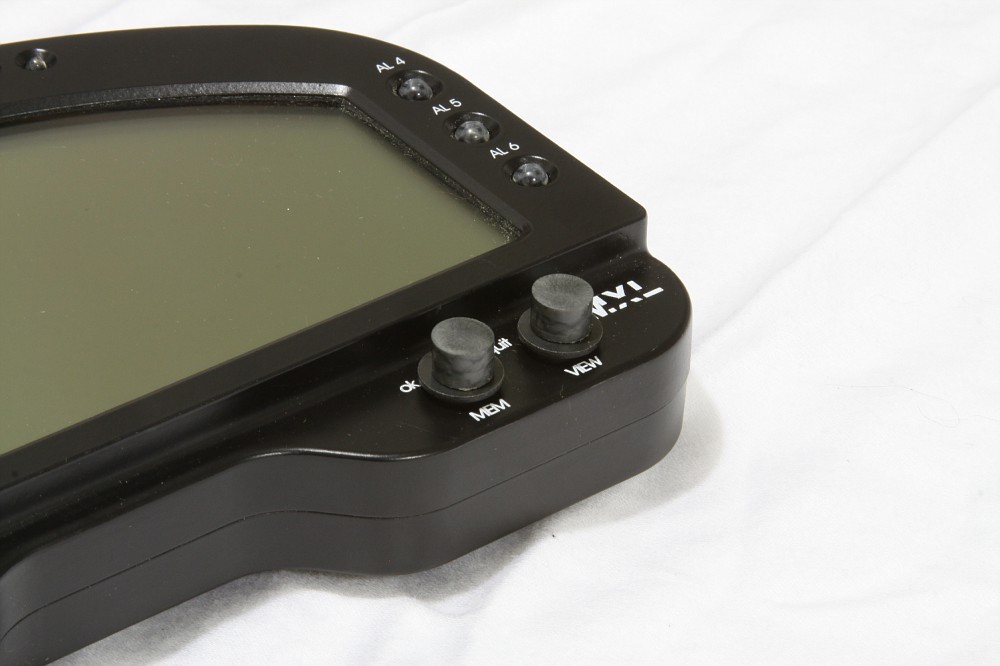
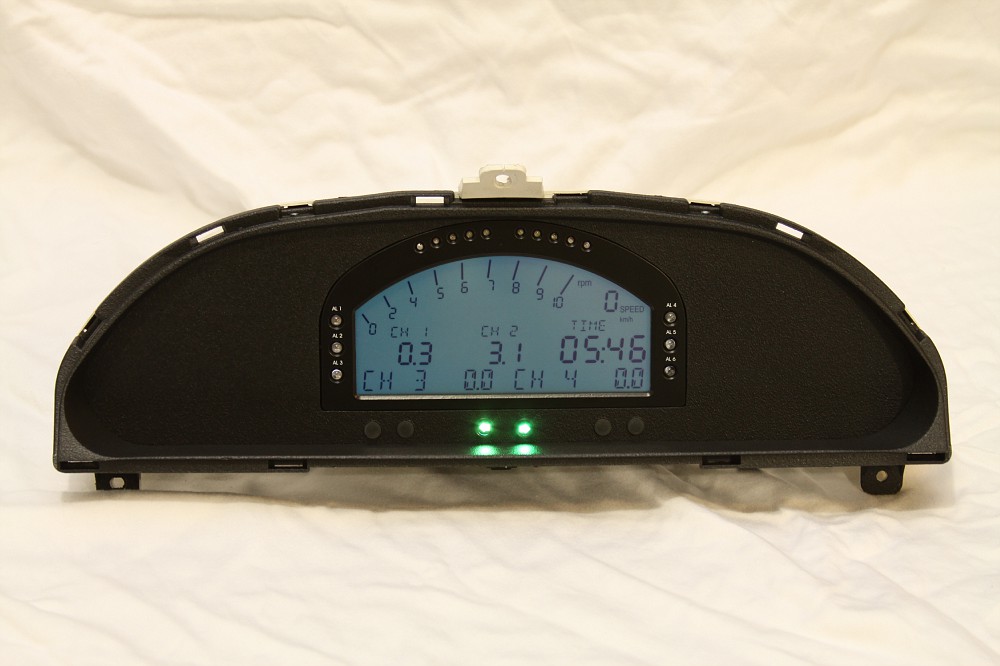
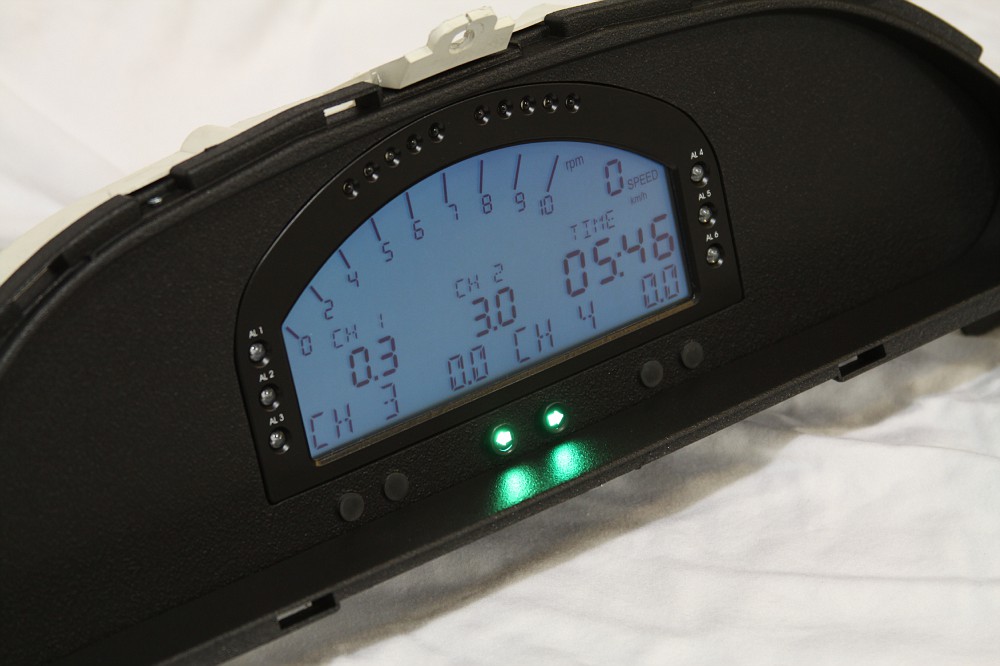
Indicators in place and finished. I will not be running front glass on this cluster for obvious reasons. I really like the end result in the fact that no one will have any idea of the modifications that were necessary to squeeze the MXL into the constraints of the OEM cluster:

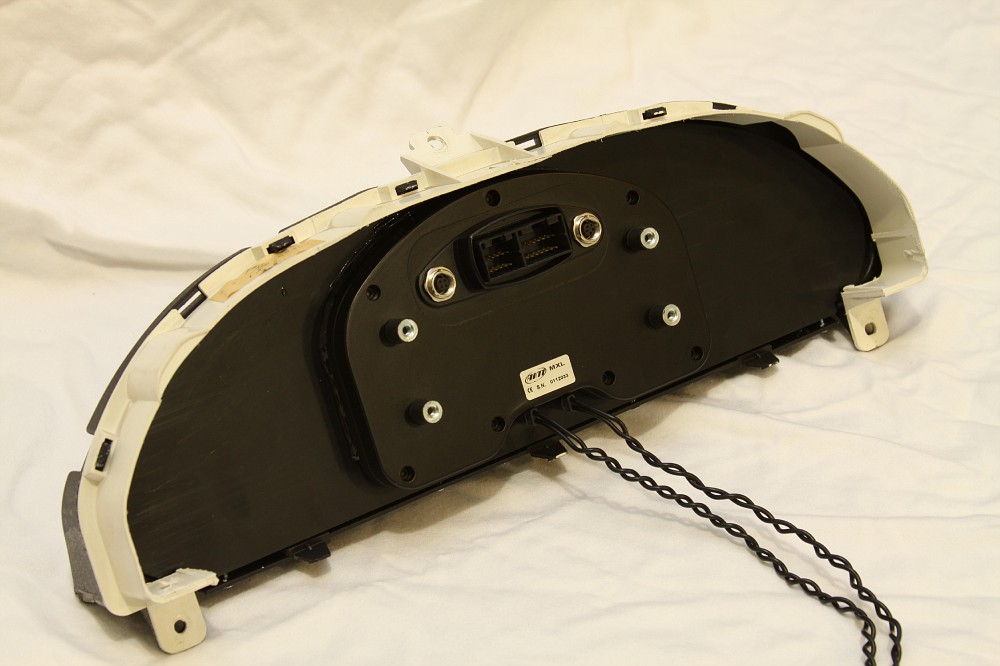
Backside:
Illuminated:
The first hurdle was the size of the MXL... it's too damn tall to fit within the constraints of the cluster framework. As you can see in the photo below(don't mind the crappy cell pics in the next four images
I knew that I wanted to keep the front edge of the framework as is because I need the OEM cluster surround to butt up in front of it so it fits like stock. So essentially I need the front lower edge to stay put, but the back lower edge that butts up against the plate needs to drop down 3/8". First I slit the bottom ledge at each corner just inside the lower mounting points:
I then twisted the lower ledge down to gain the needed 3/8""
Backside shot:
I used a piece of aluminum rod to keep the bent down section in place while I glued it up with some Norton Speed Grip:
I also filled in the small area that was now exposed because of the bent down section. It's hard to tell because the glue is also black, but it's filled in next to the slivers of white plastic:
The 2nd hurdle was to reshape the contour in the lower corners. I obviously couldn't leave that break in the plastic there. So I filled the entire backside corners in with the same Norton Speed Grip:
Now when I grind the corner, there is solid material there to give me my shape. Here is after grinding it with a sanding drum. The black area around the white plastic that is shaped line a "L" is the actual hardened Norton Speed Grip:
Also had to grind down the backside level to the framework so my plate would butt up against it flush:
Front view of the new lower corner contour:
Framework textured and completed:
3rd hurdle is the fact that the buttons on the MXL are on a recessed area. Which means flushing it in a flat plate isn't going to work out too well... or not look finished anyway. So I came up with the idea of just covering that entire recessed section and only flushing the screen area itself. This would really frame the unit nicely since the bottom edge of the screen is flat and so is the bottom ledge of the cluster framework. So I went ahead and cut a plate out of 1/4" ABS to fit inside of the cluster framework. Once the plate fit properly and dropped in from the backside, I cut out the opening for the MXL so it would flush in the plate.
Only obvious problem are the buttons... how the hell am I going to get to them now that they are covered by the plate!?! First thought was too relocate them to a completely different spot in the car. I was close to doing this, but thought to myself that this is what any typical installer with my skills would do. So I wanted to do something different, equally as cool, but keep a nice clean look to it. I decided to keep the buttons right where they are, but extend them out through the 1/4" ABS plate. To do this I needed to make new buttons, that when pressed, would depress the rubber buttons below them.
First thing was to drill out the holes for the new buttons exactly above the MXL buttons. Since I already had the opening perfectly cut for the display section of the MXL, I disassembled the MXL down to the raw metal front fascia. I then popped it in place on the plate and simply used the button holes in the metal fascia to guide my drill bit through the plastic from the backside. So this is what the plate looks like at this point:
MXL pressure fit in place. You can see the rubber buttons perfectly lined up under the holes in the ABS:
A real quick peak of the panel in place... although the shadow of the framework makes it hard to see the button locations in this picture:
Fitment of panel from the back:
The back of the OEM cluster housing completely gutted with the three mounting locations still intact:
Closeup of the buttons that need to be integrated to my panel:
I also needed to put some turn signal indicators in the cluster. I thought it would look stupid if they were just floating around anywhere on the outskirts of the plate around the MXL display. So lucky for me, the shape of the MXL allowed me to install them in the dead space where the designers of the MXL intended for a steering column to reside. Also, the side of the indicators that I use are really close to the diameter of the holes I drilled for the MXL buttons. So I dropped the indicators in between the buttons:
Next is making the button extensions. There were several criteria that they needed to meet in order for this to work:
- The buttons need to fit snug in the panel, but still be able to actuate smoothly.
- The buttons need to be made out of hard material to give them a solid feel.
- They need to have a "catch" on the backside so they wouldn't simply fall though the front of the plate over bumps etc.
- They need to be made out of a material that was easy to cut. They were only going to be 5/16" tall, so cutting something that small out of metal was going to be difficult without metal working tools
In order for the catch to work, I had to countersink the button assembly into the back of the plate. The drill press came in hand for this to get the proper depth and the centering exact:
Washer and button test fit before I glue them together:
A good pic of how the extensions look:
After I confirmed fitment was good, I went ahead and glued the buttons to the washers. Some good super glue and accelerator made this an easy task. I then turned the button extensions over and filled in the center of the washer with super glue to make it a level surface on the back of the button. I then sanded that down so it was perfectly level with the washer:
Even though the ABS is textured, I don't like the finish of it. So I sanded the main plate down and applied my texture coat to it. Everything reassembled... just waiting on the turn signal indicators to come in at this point:
Indicators in place and finished. I will not be running front glass on this cluster for obvious reasons. I really like the end result in the fact that no one will have any idea of the modifications that were necessary to squeeze the MXL into the constraints of the OEM cluster:
Backside:
Illuminated:
Re: What Broadfield Has Been Up To......
Great idea with the button extensions! Cluster looks great.
Where did you buy the rods?
Where did you buy the rods?
-
Broadfield
- Posts: 2681
- Joined: Tue Sep 05, 2006 2:57 pm
- Car: 1992 240sx
- Location: Normal, IL
- Contact:
Re: What Broadfield Has Been Up To......
McMaster-Carr... my favorite place!Razi wrote:Great idea with the button extensions! Cluster looks great.
Where did you buy the rods?
-
jsturges18
- Posts: 297
- Joined: Wed Nov 03, 2010 1:42 pm
- Car: 1990 240sx hatch - totaled/parts car
1990 240sx hatch - replacement
2005 pt cruiser
2004 350Z - Location: connecticut
Re: What Broadfield Has Been Up To......
do you plan on labeling which button does what or just leaving it and know what each one does?
Find Your Forum!