My S13 SR20DET Prep
-
ProjectX001
- Posts: 31
- Joined: Sun May 25, 2008 11:59 am
- Car: 2005 Nissan Sentra SE-R Spec V
-
RB25Dreamz
- Posts: 7
- Joined: Wed Oct 24, 2007 12:46 pm
Re: (positronone)
For most of you're torque settings. You say torque to about .86 and under 5. Just curious on what torque wrench(es) you use.
-
positron1

- Posts: 3609
- Joined: Mon Mar 21, 2005 12:29 am
- Car: Project: 1993 Nissan 240SX Coupe SR
Daily: 2010 Honda Civic Coupe - Location: Starkville, MS.
Re: (RB25Dreamz)
I was using the old needle type but was wised up recently and bought a click type torque wrench.
-
positron1
- Posts: 3609
- Joined: Mon Mar 21, 2005 12:29 am
- Car: Project: 1993 Nissan 240SX Coupe SR
Daily: 2010 Honda Civic Coupe - Location: Starkville, MS.
Re: (ProjectX001)
Thanks!ProjectX001 wrote:Man this step by step thing you're doing is great good for people who aren't to familiar with the prep before drop process alot of useful information here for people looking to do a swap!
Re: (positronone)
this thread is a gem
and it should be the ultimate sr20det how to
and it should be the ultimate sr20det how to
-
positron1
- Posts: 3609
- Joined: Mon Mar 21, 2005 12:29 am
- Car: Project: 1993 Nissan 240SX Coupe SR
Daily: 2010 Honda Civic Coupe - Location: Starkville, MS.
Turbo Continued....
I got some stainless steel turbo lines in to replace the stock hardlines with.
Tools needed:Socket wrench15mm deepwell socket18mm socket19mm deepwell socket12mm line wrenchBreaker barTorque wrenchHammer
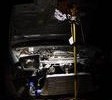
T25 TurboCircuit Sports Stainless Steel Turbo LinesThe top left line is the water inlet line, the top right line is the water return line and the bottom line is the oil inlet line.I started with the oil inlet line.Use a 18mm socket with a breaker bar to remove the banjo bolt for the oil inlet line.After I busted the banjo bolt loose I just used a socket wrench to remove the banjo from the turbo.Off. You'll notice that there are two washers on either side of the banjo, I have a question about that later.Flip the turbo over to move to the next set of lines. You'll need a line wrench to get the water return line off but you have to get the water inlet line off first to get to it.Use the same 18mm socket to remove the banjo bolt on the water inlet line.Off.Line wrench.I took a line wrench for the water return line...placed it around the line like so...and since I couldn't crank it off by hand I used a hammer to tap it one time to bust it loose.Like so.Lines off next to their counterparts.Oil inlet lines.Water inlet lines.Water return lines.I started with the water return line.I don't know if this is the way to do this but it seemed easier to get these lines on by taking the fittings off the line...threading them in the turbo by hand...and using a socket to tighten them. I used a 15mm deepwell socket here so it would fit over the fitting. The fitting gets torqued to 14-23ft.lbs.I placed the line on the fitting...and used a 13mm wrench to tighten the line onto the fitting.Water return line complete.Next, I moved on to the water inlet line.I took the fitting off.I threaded the fitting in by hand.I used a 19mm deepwell socket to tighten it, it also gets torqued to 14-23ft.lbs.Place the line on and use a 19mm wrench to tighten it down.Finally, I moved to the oil inlet line.Remove the fitting...Place it on like so and use a 19mm deepwell socket to tighten and torque to 14-23ft.lbs.Place the line on and use a 19mm wrench to tighten.Complete!
TO BE CONTINUED........
QUESTION TIMEThe stainless steel lines have a fitting that come with only one washer on one side of the fitting while the OEM banjo bolts have two washers on either sides so should I use one of the banjo bolt washers so that the new lines have washers on both sides when they get bolted to the turbo?????
Tools needed:Socket wrench15mm deepwell socket18mm socket19mm deepwell socket12mm line wrenchBreaker barTorque wrenchHammer
T25 TurboCircuit Sports Stainless Steel Turbo LinesThe top left line is the water inlet line, the top right line is the water return line and the bottom line is the oil inlet line.I started with the oil inlet line.Use a 18mm socket with a breaker bar to remove the banjo bolt for the oil inlet line.After I busted the banjo bolt loose I just used a socket wrench to remove the banjo from the turbo.Off. You'll notice that there are two washers on either side of the banjo, I have a question about that later.Flip the turbo over to move to the next set of lines. You'll need a line wrench to get the water return line off but you have to get the water inlet line off first to get to it.Use the same 18mm socket to remove the banjo bolt on the water inlet line.Off.Line wrench.I took a line wrench for the water return line...placed it around the line like so...and since I couldn't crank it off by hand I used a hammer to tap it one time to bust it loose.Like so.Lines off next to their counterparts.Oil inlet lines.Water inlet lines.Water return lines.I started with the water return line.I don't know if this is the way to do this but it seemed easier to get these lines on by taking the fittings off the line...threading them in the turbo by hand...and using a socket to tighten them. I used a 15mm deepwell socket here so it would fit over the fitting. The fitting gets torqued to 14-23ft.lbs.I placed the line on the fitting...and used a 13mm wrench to tighten the line onto the fitting.Water return line complete.Next, I moved on to the water inlet line.I took the fitting off.I threaded the fitting in by hand.I used a 19mm deepwell socket to tighten it, it also gets torqued to 14-23ft.lbs.Place the line on and use a 19mm wrench to tighten it down.Finally, I moved to the oil inlet line.Remove the fitting...Place it on like so and use a 19mm deepwell socket to tighten and torque to 14-23ft.lbs.Place the line on and use a 19mm wrench to tighten.Complete!
TO BE CONTINUED........
QUESTION TIMEThe stainless steel lines have a fitting that come with only one washer on one side of the fitting while the OEM banjo bolts have two washers on either sides so should I use one of the banjo bolt washers so that the new lines have washers on both sides when they get bolted to the turbo?????
-
positron1
- Posts: 3609
- Joined: Mon Mar 21, 2005 12:29 am
- Car: Project: 1993 Nissan 240SX Coupe SR
Daily: 2010 Honda Civic Coupe - Location: Starkville, MS.
Tranmission Drain Plug
I also swapped out my transmission drain plug with a magnetic transmission drain plug.
Tools needed:Socket wrenchSocket extension3/8 socket adapterA rag
OEM magnetic drain plug part#:32103-U840AIt's basically serves the same purpose as a magnetic oil drain plug by collecting any metal particles in your transmission fluid.Get access to the transmission drain plug on the bottom of the transmission.Use a socket extension with a 3/8 adapter on it...to remove the drain plug.New plug vs. old plug.Keep a rag or paper towel handy to wipe off any excess fluid still in the transmission that may leak out after you remove the drain plug.Place the new plug in.Tighten and torque to 18-25ft.lbs."Something something something darkside....something something something complete!!!!"
-
duffman1278
- Posts: 6816
- Joined: Sun Apr 01, 2007 3:09 pm
- Car: 89 240sx Hatch, the wildcats!
-
positron1
- Posts: 3609
- Joined: Mon Mar 21, 2005 12:29 am
- Car: Project: 1993 Nissan 240SX Coupe SR
Daily: 2010 Honda Civic Coupe - Location: Starkville, MS.
Re: (duffman1278)
But do I get washers for both ends of the stainless fittings along with the teflon tape yes?
Modified by positronone at 10:55 PM 5/29/2008
Modified by positronone at 10:55 PM 5/29/2008
-
duffman1278
- Posts: 6816
- Joined: Sun Apr 01, 2007 3:09 pm
- Car: 89 240sx Hatch, the wildcats!
-
positron1
- Posts: 3609
- Joined: Mon Mar 21, 2005 12:29 am
- Car: Project: 1993 Nissan 240SX Coupe SR
Daily: 2010 Honda Civic Coupe - Location: Starkville, MS.
Re: (duffman1278)
Cool man, thanks!
-
senor_nismo

- Posts: 24
- Joined: Fri May 23, 2008 8:23 am
Re: My S13 SR20DET Prep (positronone)
awesome thread bro, this will help me out alot, im building a type x right now
Re: Front Main Oil Seal Replacement (homeslicej2)
safarest
is the Front main oil seal. Part#13510-53J10for a redtop the same one from the 93 Sentra se-r
I would like to pick one up at the dealership rather then order it.
thank you.
is the Front main oil seal. Part#13510-53J10for a redtop the same one from the 93 Sentra se-r
I would like to pick one up at the dealership rather then order it.
thank you.
-
positron1
- Posts: 3609
- Joined: Mon Mar 21, 2005 12:29 am
- Car: Project: 1993 Nissan 240SX Coupe SR
Daily: 2010 Honda Civic Coupe - Location: Starkville, MS.
Re: Front Main Oil Seal Replacement (Kalypso123)
That Sentra SE-R front main seal is 15020-79E00 and the rear is 12279-1N510. I also had no luck with the guy I spoked to but I see you did make a progression on the problem though.
Re: Front Main Oil Seal Replacement (positronone)
I am graduating tommorow and my parents are coming to visit - so i've givin it a rest but,
I may haved switched up the wires, I think its that simple.I am looking for a picture of the lower harness/ starter - alternator areaone look and I will know.
- new water pump coming monday, - im removing the crank pulley- new front main seal,- paint the pulleys black.- lube it all up and put it back together.
What type of belts are best for an SR I want to ask someone who knows
-
positron1
- Posts: 3609
- Joined: Mon Mar 21, 2005 12:29 am
- Car: Project: 1993 Nissan 240SX Coupe SR
Daily: 2010 Honda Civic Coupe - Location: Starkville, MS.
Re: Front Main Oil Seal Replacement (Kalypso123)
I'm not sure either, I just went with the Gates belts that West Covina sells.Kalypso123 wrote:What type of belts are best for an SR I want to ask someone who knows
-
positron1
- Posts: 3609
- Joined: Mon Mar 21, 2005 12:29 am
- Car: Project: 1993 Nissan 240SX Coupe SR
Daily: 2010 Honda Civic Coupe - Location: Starkville, MS.
Re: My S13 SR20DET Prep (senor_nismo)
Got any pics?senor_nismo wrote:awesome thread bro, this will help me out alot, im building a type x right now
Re: Front Main Oil Seal Replacement (positronone)
that'll workpositronone wrote:I'm not sure either, I just went with the Gates belts that West Covina sells.
-
positron1
- Posts: 3609
- Joined: Mon Mar 21, 2005 12:29 am
- Car: Project: 1993 Nissan 240SX Coupe SR
Daily: 2010 Honda Civic Coupe - Location: Starkville, MS.
Motor/Engine Mounts
I got my motor mounts in today.
Tools needed:Socket wrench13mm socket14mm deepwell socket14mm wrenchTorque wrench
There are quite a few brands of motor mounts for the 240SX...I went with the NISMO motor mounts.Right mount part#:11210-RS540Left mount part#:11220-RS540Don't forget your heatshields. Take the heatshield...and place it on the mount like so.Use a 13mm socket to tighten and torque it to 16-21ft.lbs. If you need replacement nuts for the heatshields you can use M8-1,25 and for the the top and bottom motor mount nuts you can use M10-1,25. Don't put the motor mount nut on yet, that's just for show, you can't put the mount on the brackets with the nut on them.The mounts are clearly marked with a "L" for left and a "R" for right. But if for some reason yours aren't, the gold one goes on the passenger side while the black one goes on the drivers side.Take your mount...and place it on the motor mount bracket.You'll need a deepwell 14mm socket here to tighten the mount to the bracket and torque to 32-41ft.lbs. You can also use a 14mm wrench to tighten them if need be because it gets kind of cramped on the intake side. You may need to remove that intake manifold bracket if it gets in your way when you go to torque this nut down.Finished on the intake side...and the exhaust side as well.You can go ahead and place another M10-1,25 nut on the bottom of your mounts for the install but remember to remove it when it comes time to drop the motor in or you might have a bad day. When you do drop the motor in the bay these get torqued to 51-58ft.lbs.
-
positron1
- Posts: 3609
- Joined: Mon Mar 21, 2005 12:29 am
- Car: Project: 1993 Nissan 240SX Coupe SR
Daily: 2010 Honda Civic Coupe - Location: Starkville, MS.
Turbo Lines Continued....
I went back and re-did my turbo lines based on some good information from a forum member(duffman1278) and a mechanic.Before, I had decided to use the supplied washers and get an extra set from the parts store so I could have crush washers on both sides of the lines but I found out some useful information.
"The crush washer is used to seal the fittings going into the turbo center section. The lines all have AN fittings on their ends, which seal on the 37* flare, so you don't need to put the washers between the fittings and the lines. Put them between the fittings and the turbo."
This made since as I was wondering why they would only supply half of the washers that you would need to put these lines on, turns out they do supply the right amount of washers you just need to know where to use them.I hadn't pad attention earlier but they even provide two new washers for the water inlet line.Thanks to duffman1278 I went back and applied some teflon tape to the fitting to turbo side and I learned something new from a mechanic about applying teflon tape that I didn't know...you apply the teflon tape in the opposite direction of the way that the bolt/fitting is going to be threaded...you learn something new everyday!Tighten and re-torque the fittings down and you are done. Also, no crush washer is needed on the smaller water inlet to turbo fitting because it's has a AN fitting on that end as well.
-
duffman1278
- Posts: 6816
- Joined: Sun Apr 01, 2007 3:09 pm
- Car: 89 240sx Hatch, the wildcats!
-
positron1
- Posts: 3609
- Joined: Mon Mar 21, 2005 12:29 am
- Car: Project: 1993 Nissan 240SX Coupe SR
Daily: 2010 Honda Civic Coupe - Location: Starkville, MS.
Re: (duffman1278)
Crap, that is the wrong way...redo!
-
homeslicej2

- Posts: 5446
- Joined: Mon Jan 15, 2007 5:46 pm
- Car: 1990 Nissan 240SX S13 SR'd hatch
Re: (positron_)
Looking good Posi
-
positron1
- Posts: 3609
- Joined: Mon Mar 21, 2005 12:29 am
- Car: Project: 1993 Nissan 240SX Coupe SR
Daily: 2010 Honda Civic Coupe - Location: Starkville, MS.
Re: (homeslicej2)
Thanks bro!
-
I WE TODD ED
- Posts: 296
- Joined: Fri Jul 27, 2007 3:01 pm
- Car: '90 & '91 S13
Re: (Kalypso123)
We need more updates!! PLEASE
Keep up the awesome work though man
Keep up the awesome work though man
-
ST240
- Posts: 575
- Joined: Sun Aug 04, 2002 11:45 am
- Car: RB30DET Nissan S13
'01 Nissan Pathfinder - Location: Edmonton, Canada
Re: (positron_)
This is from a few pages back, but where did you get the SS clutch line?
-
I WE TODD ED
- Posts: 296
- Joined: Fri Jul 27, 2007 3:01 pm
- Car: '90 & '91 S13
Re: (positron_)
Hey man really great job so far.
And since you have a redtop...Could you take a picture of the A/C Compressor Bracket, please?
I need it for reference.
Thanks
And since you have a redtop...Could you take a picture of the A/C Compressor Bracket, please?
I need it for reference.
Thanks
Re: (I WE TODD ED)
you removed your crank pulley and replaced the front main seal, but I cant find that post anymore.
where is it?
where is it?
-
positron1
- Posts: 3609
- Joined: Mon Mar 21, 2005 12:29 am
- Car: Project: 1993 Nissan 240SX Coupe SR
Daily: 2010 Honda Civic Coupe - Location: Starkville, MS.
Re: (I WE TODD ED)
Do you need pics of it mounted?I WE TODD ED wrote:Hey man really great job so far.
And since you have a redtop...Could you take a picture of the A/C Compressor Bracket, please?
I need it for reference.
Thanks