ok so here goes.
id searched on here and google didn't really find what i was looking for so i figured i create it for anybody else interested in doing this. so i went ahead and chose megan springs (yes i know not everyone likes them) but i figured id give them a try they were a good drop and they advertized a stiffer spring rate. in conjunction with this i went ahead and tried out some godspeed suspension components.(again i know these are not everyone's cup of tea at all) now i'm not here to argue about my setup or anything if your interested ask questions i'll answer the best i can. if you don't like it that's fine. if you know something i don't and want to let me know go for it.
anyways i'm just gonna do a brief run through for those about to take on this project. ill post as many helpful pics as i can and do my best to explain. again feel free to ask.
what i'm installing:
tokicko blue struts
Megan lowering springs
adjustable suspension (front and rear)
what i used:
21mm socket
14mm deep socket
17mm deep socket
slide hammer (not necessary, however very helpful in removing long bolts that wont slide easy)
impact wrench (not ultimately necessary, but i wouldn't have done it without this tool)
assorted open end wrenches.
10mm socket
12mm socket
flat head screwdriver
blow torch (might be overkill but helpful for stuck nuts and bolts)
PB blaster or liquid wrench (necessary!)
Prybar
spring compressor
ok so some before shots:


now i did the rear first, first use the 21mm socket to remove the wheel nuts, then jack the car up on a proper jack point and put jack stands underneath the car. (you could put the car up on four jack stands i just did the rear first) now take of the wheel and spray some pb blaster or liquid wrench on any bolts you will be removing. you should see something like this:


now for the rear, remove all trim pieces in the back so you can have clear access to the rear shock towers. this requires the use of the 10mm socket i believe. be sure to save all the nuts and bolts and the retaining clips for the rear sun shade must be removed as well. on a side note now would be a great time for changing those speakers while your at it.
once all the trim is out go ahead and focus on the suspension.


now here is where you need to figure out what you want. if your just replacing springs, then you can go ahead and just pull the strut assembly. i wouldn't do this if you are going to do a significant drop. from what i've been told anything over 1.5" should get some adjustable upper arms front and rear to correct camber. if you are going to throw all adjustable pieces on as well then we are going to remove all the suspension components along with the strut assembly.
first remove the bolt on the bottom of the strut assembly, then next remove the two nuts inside the car on the shock tower holding the assembly in. have a friend stand on the wheel hub and force it down as far as it will go. this should remove pressure from the strut assembly. try and wiggle the bottom off of its perch. and slide it towards the inside of the car at which point you should pull the whole assembly out and down through the rear upper control arm. (if yours is as bad as mine it wont want to come easy keep at it and it will eventually come out after much swearing
so now you should have the strut out and if you are replacing suspension components go ahead and remove all the bolts for the desired pieces. be sure to support the lower control arm with a jack so that you can adjust its height and position easily. for this it was a combination of 14mm and 17 mm sockets with a prybar and i also found a 3/4 open wrench helped here as well.

in my case some of these nuts and bolts would not come out even with a pry bar and lots of liquid wrench. sooooo i opted for the blowtorch for some of these items. focus it on the spot for a bit. (be careful) and it should loosen things up just enough to remove it with the prybar. if it doesn't work at first repeat but do be careful. also for where you can get to it an impact wrench is a wonderful tool here as it can do alot of the work for you!

once all these components are removed, place the adjacent replacement suspension component next to the original and adjust it to a similar length. depending on your drop and camber preferences you can play with this a bit at this point but most of the adjustments will be done when you align the car. (which you will need to do if you want it to be correct)
now you should have all the suspension pieces in the car, you can begin on removing the top hats from the strut assembly.first you will need to affix the spring compressors to the spring so that you don't have an explosion when you remove the top hats. there is a ton of stored energy in these springs be very careful. once the spring compressors are on and tensioned slightly, you can begin to remove the actual top hat.here i found it will vary slightly by strut what size the nut on top is (it could just have been my car?) but the rear ones on mine took a 14" open end wrench and i used a much smaller open wrench to hold the shaft from spinning. there should be a flat section above the threads. once this is removed, slide the spring off the strut and remove the bump stop and dust covers off of the original strut all this will be reused on the new ones. be sure to remember the order everything came apart in so you can put it back together correctly. also at this point inspect the bushings and see if they need to be replaced, if its questionable then replace if you have to ask, replace. if its beautiful and good then reuse it. now assemble the new strut. when i was doing it i had a sheet with specs i read before doing this. also take notice of the position of the bolts on the top hat and the way the bottom strut mount is situated, try and replicate this when you reassemble so you wont need to trial and error fit the new strut in to the right spot. in the time since then it has gone somewhere. so be sure to check that out as well to be safe.

Now have someone put weight on the hub again and slide the strut assembly through the upper control arm and place the bottom bracket of the assembly on the perch again. and place the bolt back on. put the nuts back on the two studs in the shock towers and torque down. tighten everything up, re tighten, and the double check everything. now adjust the whole hub by eye until it looks about straight, (no major toe or anything like that) adjust camber to your liking. remount wheel and repeat on the other side of the car.


now on to the front.
loosen lug nuts on the wheel, and jack the car up again, place a jack stand under the car and remove wheel. you should see something like this:

remove the small screw and bracket holding the brake line to the bottom of the front strut assembly and move this out of the way. remove the nut and washer holding the strut assembly to the front hub and then remove the nuts at the top of the shock tower (under the hood) have your friend put their weight on the front hub again and wiggle the front strut off of its stud and down and out.
repeat steps from above for dis-assembly and reassembly of front struts with spring using the spring compressor.
again at this point i'm adding adjustable suspension pieces so this may or may not be useful to all. at this point i removed the bolt holding the front upper control arm to the front hub assembly (don't know the term, its slipped my mind this second
after removing the bracket remove the bolt holding the upper control arm to the bracket.(it could be difficult so be patient) place the new adjustable upper control arm into place and place the bolt through the bracket and control arm again and tighten. now re mount the bracket back into the place it came from and tighten. now attach the free end of the new upper control arm to the hub assembly (forgot name again

remove the two nuts on the bottom of the lower front control arm for the tension rod. remove these and pull the tension rod up. now you must remove the front tension rod bracket. so you must remove the front sway bar bracket and bushing (14mm socket i believe) now remove the two large bolts holding the bracket in place.(17mm socket) remove the whole tension rod and tension rod bracket. remove the tension rod front the bracket. and adjust the new tension rod to match. install the new tension rod into the bracket. make sure you tighten the bolt through this very tight you do not. i repeat do not want play in the front tension rod. (you don't want ti tension rod to slide back and forth within the bracket.)
now re install the tension rod with its bracket back into its proper spot, re attach he sway bar bracket and bushing. and tighten to specs. now put the two studs on the back of the tension rod through their respective holes in the lower control arm and tighten.
now have a friend put their weight on the hub again and re install the strut assembly by placing the bottom mounting point on first then lining the top hat back into place (be sure the top hat metal spacer is on and there are gaskets) tighten up. now adjust the new components to your desire and remount the brake line bracket, and replace nut and washer on the bottom of the strut assembly. tighten everything!
now re attach your wheels and lower the car back down. take a look around the car inspect the fruits of your labor and enjoy your new height. that being said take notice of things like camber, and toe and caster and be sure to get the car aligned. now it is up to you on when you get it aligned, i have friends at a shop so they aligned it for me right after i installed the parts and then told me to come back in a weeks time to double check everything after the springs settle. this could be from anywhere between 100-500miles of use. you could just wait until somewhere in that amount of mileage before getting it aligned but i just wanted everything checked out and to not wear my tires out too bad.
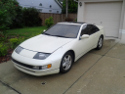
and a few pics of the car after all this work.