How To – Install 5K or 6K White Amber Switchback V3 Triton

Forum for Infiniti M35 and M45, and Nissan Fuga owners.
User avatar
moedawg140
Posts: 175
Joined: Sat Jan 23, 2010 8:47 pm
Car: 06 M35 S (Adv. Tech)
LI Quad
G37 BBK with H&R DRS
(15mm F, 10mm R)
Focal 165KRX2 (F)
Infinity Kappa 63.9i (R)
Alpine Type-X 10"
JL HD900/5 (sub chnl.)
RF CPCD10-03
Morimoto 4,300K H11

Post

How To – Install 5K or 6K White Amber Switchback V3 Triton LED System (Version 2)

I have always wanted to install LEDs for my entire car, but I never thought that there were good enough LED lights that were worthy of becoming my new LED front turn signals. Once I found out about the V3 Triton, and its switchback capabilities, I became intrigued. This V3 Triton Switchback System is very versatile: You can choose to make it solely turn signals in the daytime, run it as a DRL switchback system or manually turn on the system, and make the white LEDs dim 50% when the headlights are on via Dim Wire connected to the V3 Triton Dim Wire plug. The 5K White Amber LEDs look great during the day, and match up perfectly with the HID OEM lighting at night. Some say the V3 Triton is expensive, well, just wait until they have 10%-30% sales during different times of the year; use that coupon code and you will have saved up to $30. I still think they are worth the money even at full price. Enough of my spiel, onto the System!

These instructions will work for the 2006-2007 M35/M45 series cars with HID. I am not sure if the wiring is the exact same for the 2006-2007 M35/M45 series cars without HID (to connect the V3 Triton Dim Wire), the 2008-2010 M35/M45 series cars (the wiring is probably similar), the 2003-2004 M45 Y34 series cars and the 2011+ M35h/M37/M56 Y51 series cars. Make sure to check Infiniti’s FSM for your particular car model and year for wiring diagrams, and make sure to probe the wires you are going to splice into making sure there is power going to them, and stay powered (or turn off) when the V3 Triton is running. The V3 Triton (Version 2) has resisting built into its Control Box, so you will not need to purchase and install LED decoders/resistors.

Time: Varies greatly. If you correctly connect everything, it should take you around 2-3 hours. It took me much longer than that because my friend and I had to probe every lighting wire to make sure we were splicing into the right wires! I did the hard part of finding out the correct wires to splice/tap into, so make sure to use only the ones I show to use (unless you want to turn the V3 Triton into a DRL that always stay on, which I will cover later).

Disclaimer: If you splice the wrong wire(s) and damage the V3 Triton bulbs and/or V3 Triton Control Box, you will wait a week up to a month to receive replacement part(s) after returning the defective device. You can always re-purchase new part(s) from the website and they will reimburse you once they receive the defective parts to help speed up time, but you may still be waiting up to a month to receive the part(s) if they are currently out of stock.

Supplies Needed:

- Either the 5K or 6K White Amber Switchback V3 Triton LED System (Version 2)

Link to 5K V3 Triton: http://www.vleds.com/v3-wa-5k.html

Link to 6K V3 Triton: http://www.vleds.com/v3-wa-6k1.html

- Make sure to purchase the “7443 7440 | 1 Pair” Base Adapter from the drop-down menu.

- Two (2) 16 or 18 gauge (I am using 16 gauge) speaker/automotive wire around 18 inches in length each should suffice if you want to manually turn on the V3 Triton. You will need longer length of the speaker/automotive wire (long enough to reach the ACC/constant on source via V3 Triton) if you decide to use the V3 Triton as a DRL System.

- Red (22-18 gauge) or Blue (18-14 gauge) Wire Taps

Link to 3M Red (22-18 gauge) Wire Taps: http://www.amazon.com/3M-22-18-Wire-Tap ... +wire+taps

Link to 3M Blue (18-14 gauge) Wire Taps: http://www.amazon.com/3M-18-14-Wire-Tap ... +wire+taps

You will need a total of Six (6) Red or Blue Wire Taps if you are connecting with the Dim Wire.

You will need a total of Four (4) Red or Blue Wire Taps if you are not connecting with the Dim Wire.

I advise connecting the Dim Wire because the white LEDs are extremely bright and need to be dimmed at night as to not blind oncoming vehicles.

- Male (Spade Type) Connectors

Link to 3M Male (Spade Type) Connectors: http://www.amazon.com/Scotchlok-Nylon-F ... connectors

You will need a total of Six (6) Male Connectors if you are connecting with the Dim Wire.

You will need a total of Four (4) Male Connectors if you are not connecting with the Dim Wire.

- Socket Wrench or Wrench

- Pliers

- Phillips Screwdriver

- Wire Stripper tool

- Zip-ties

Process:

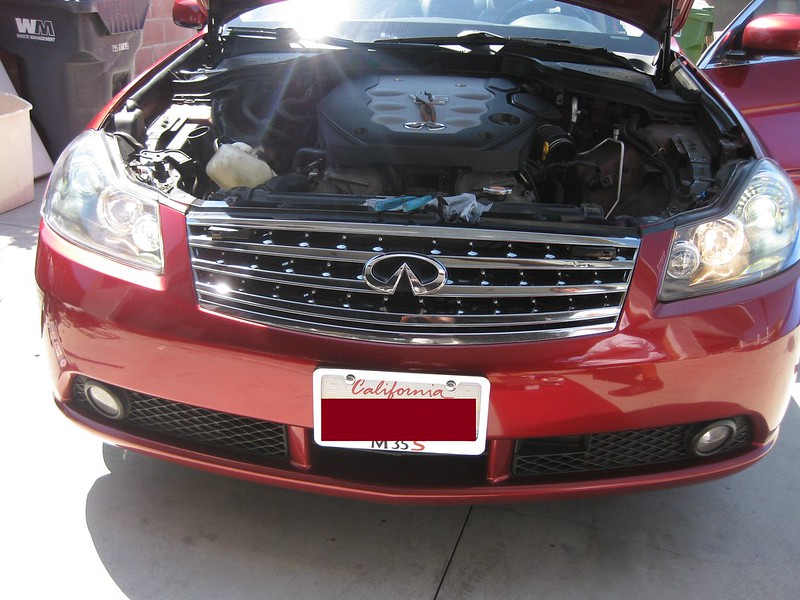
1) Open hood, take off engine covers, including center intake piece.

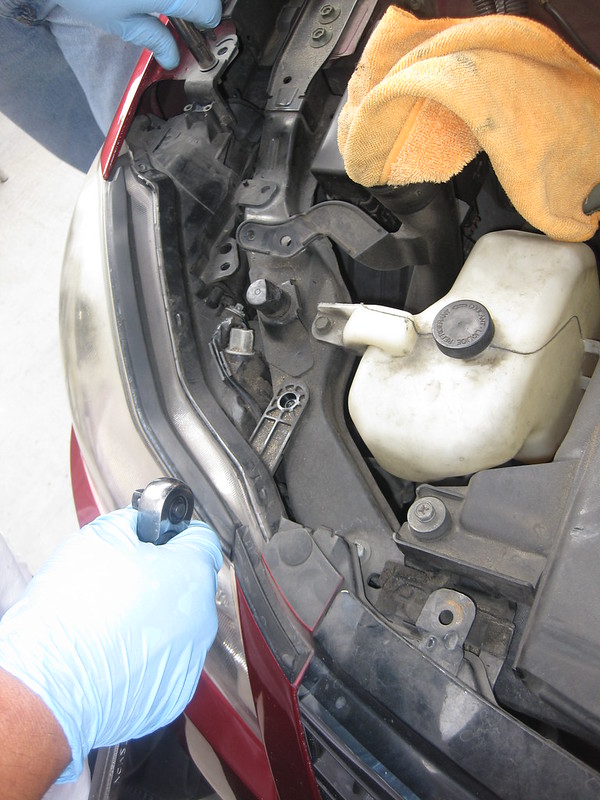
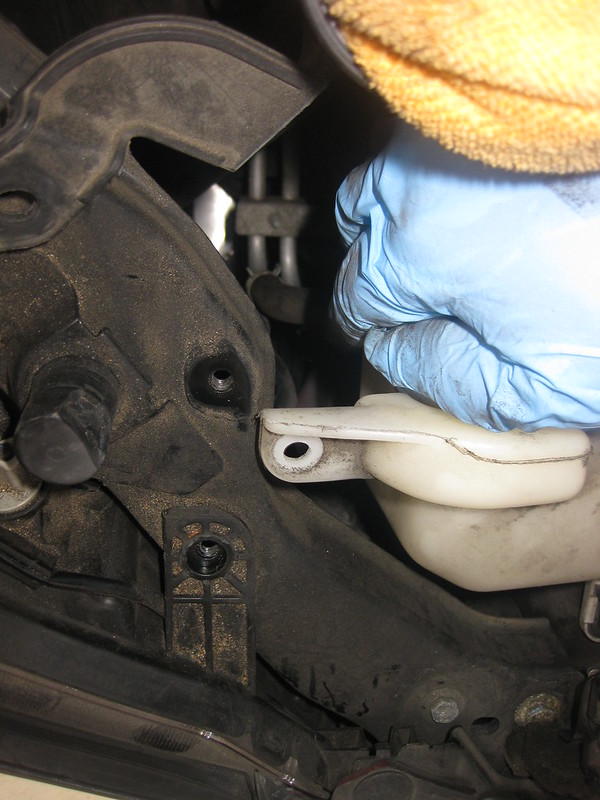
2) Use a Phillips Screwdriver to remove the MAF sensor and air box on the driver’s side so you can have room to reach where you need to. Also, use a socket wrench or pliers, and then lift and move the coolant tank and slide the washer tank out of the way on the passenger side.

Image

Image

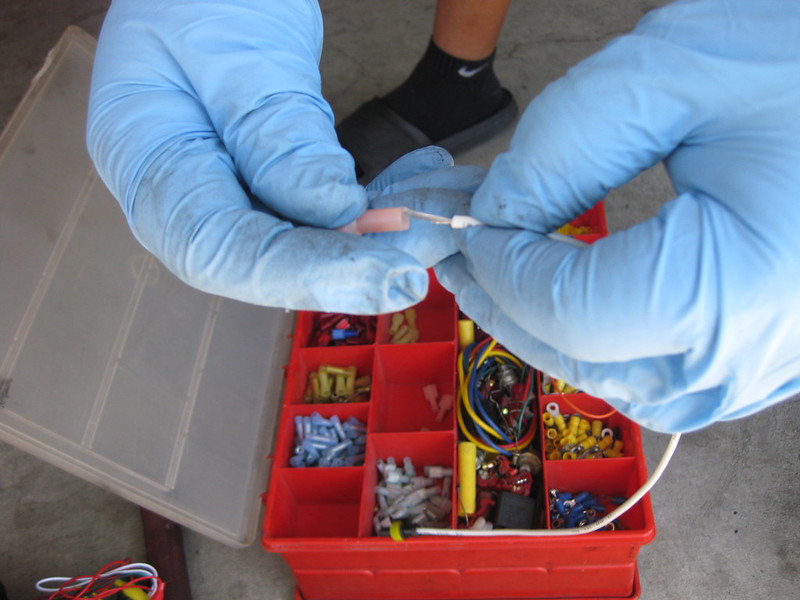
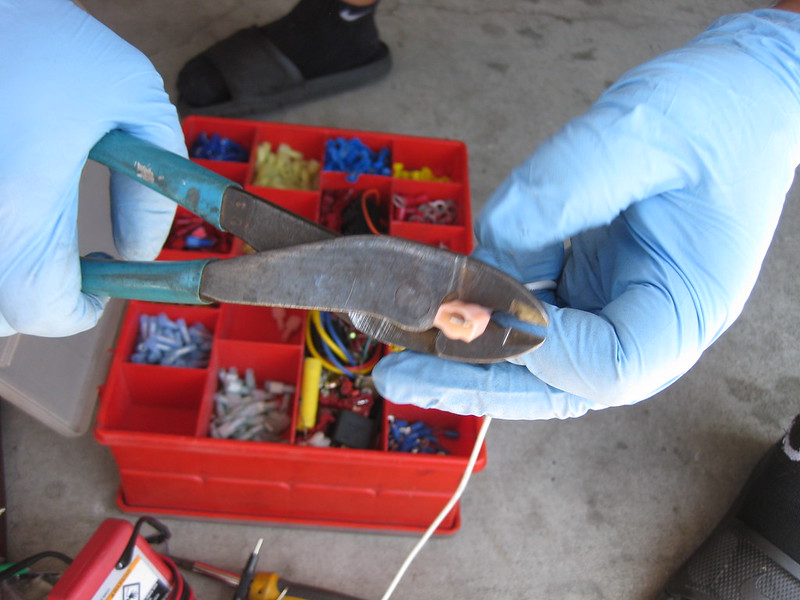
3) Strip the ends of the speaker/automotive wires and slide the bare wire into each Male Connector and use the wire stripper tool to clamp the Male Connector to the wire so it won’t be able to be pulled apart. You should now have the 2 speaker/automotive wires with the Male Connectors on both ends, and 1 Male Connector on each of ends of the Dim Wires that comes with the V3 Triton. Process is shown here:

Image

Image

Image

4) If you decide to have the option to manually turn on and off the White LEDs, locate the RED car parking light wire and clamp a Red or Blue Wire Tap to it, shown here:

Image

Use pliers to tighten the clamp of the Red or Blue Wire Tap. If you decide to use the V3 Triton as a DRL System, you will not need to use the Red or Blue Wire Tap to the parking light wire – you will need to locate, probe, test and then use an ACC/constant on source for your constant power: using an Add A Circuit/Fuse will be the easiest way to do this.

Link for the Add A Circuit/Fuse: http://www.amazon.com/Littelfuse-FHA200 ... s=fuse+tap

5) Connect the V3 Triton connectors together. Make sure the 7443 7440 Base Adapter is connected to the V3 Triton as well.

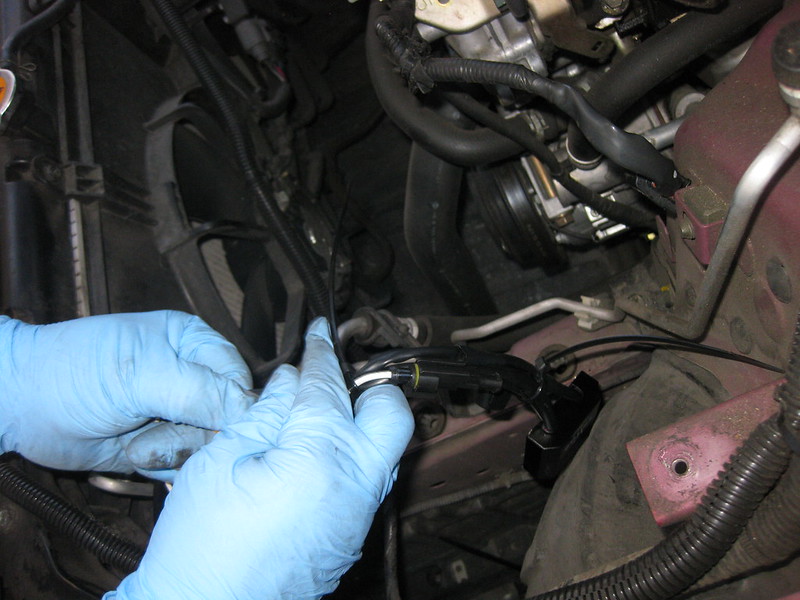
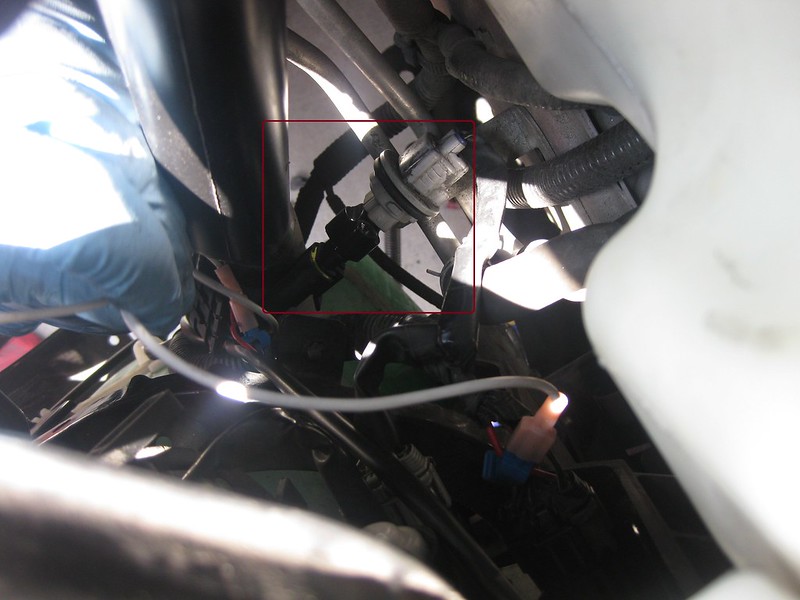
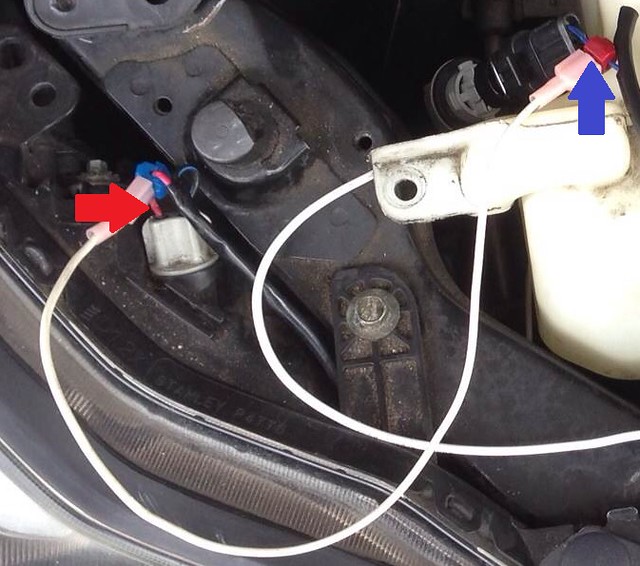
6) Locate the thicker RED with black stripe wire from the lighting housing shown here:

Image

Now clamp a Blue Wire Tap (Red Wire Tap should work as well, but I have not verified) to the thicker RED with black stripe wire and use pliers to tighten the clamp of the Blue Wire Tap. You will not need to install the Blue Wire Tap in this step if you do not want to use the Dim Wire.

7) Connect the Male Connector (that is connected to speaker/automotive wire on one end, and the Dim Wire plug on the other end), and connect it to the receptacle of the Blue Wire Tap, shown here:

Image

Image

You will not need to do this step if you do not want to use the Dim Wire.

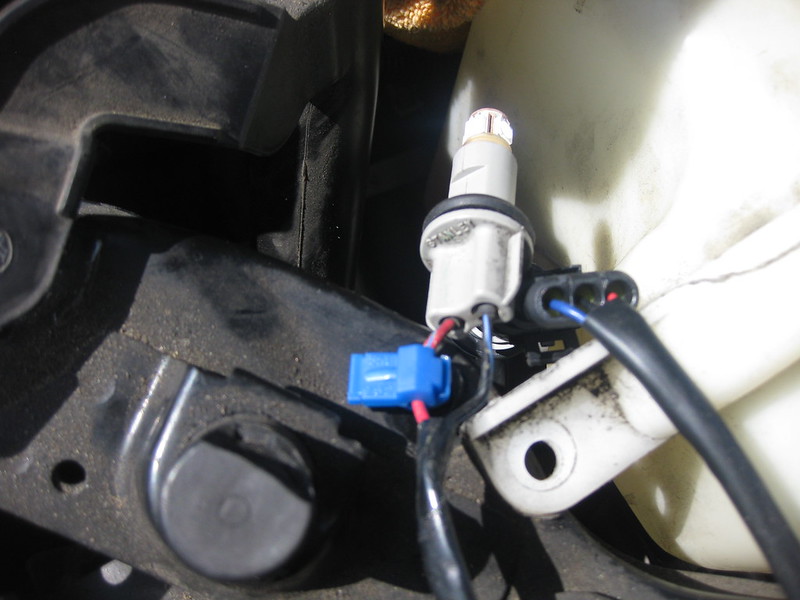
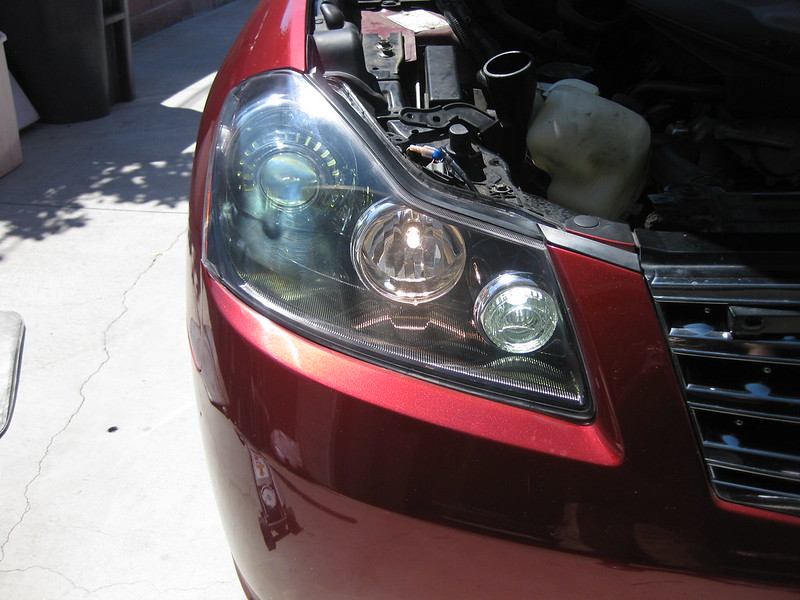
8) Locate the front turn signal connector… (gray with purple dot on it as shown in the picture)

Image

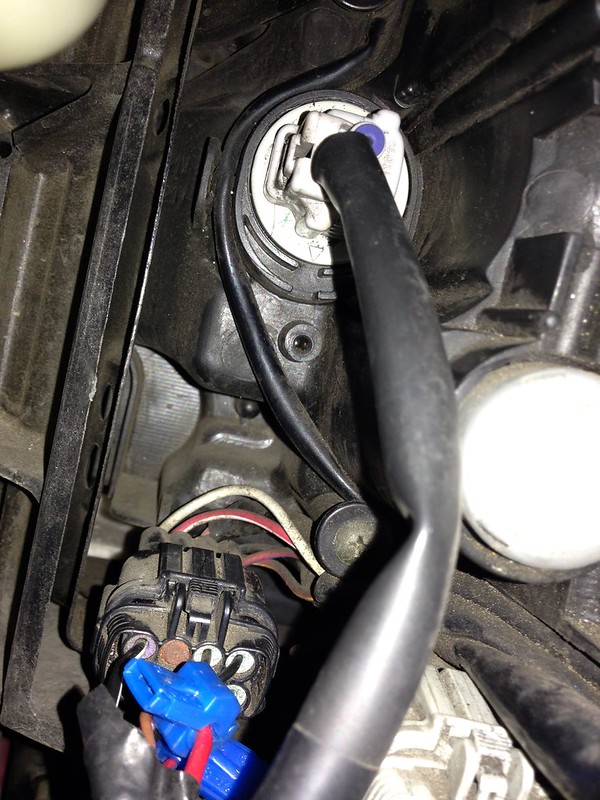
…and turn and pull it out from the headlight housing, then pull the turn signal bulb and take it out. Now connect the 7443 7440 Base Adapter (which is also connected to the V3 Triton) to the front turn signal connector. Shown here:

Image

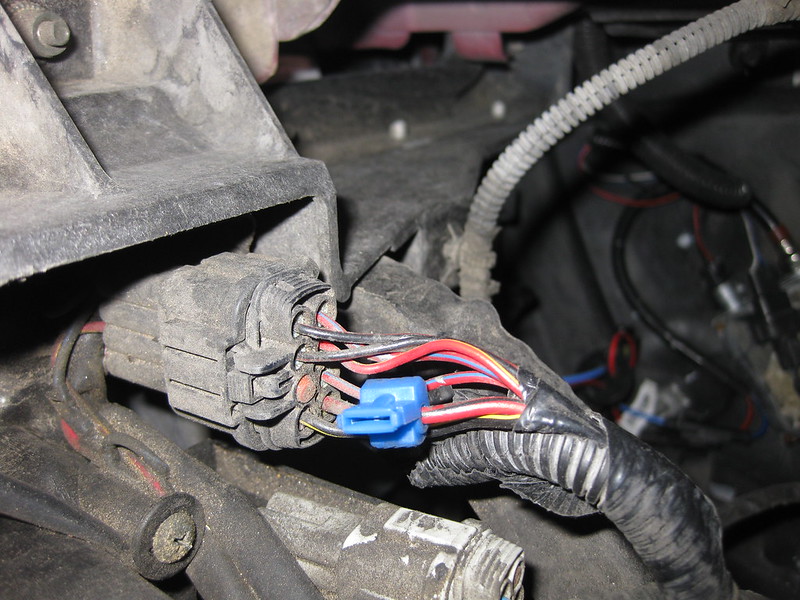
9) Very important step! Locate the BLUE parking light wire on the V3 Triton Control Box Input Connector. This is the same BLUE parking light wire that is connected to 7443 7440 Base Adapter. Shown here:

Image

Image

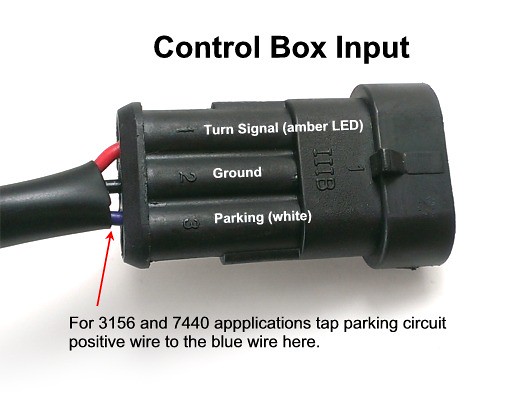
Now clamp a Red or Blue Wire Tap to the BLUE parking light wire on the V3 Triton and use pliers to tighten the clamp of the Red or Blue Wire Tap (shown above). Make sure to NOT tap into the blue wire that is a part of the orange, blue, black and red wire connectors. If you clamp and connect the wrong wire and turn on the V3 Triton after hooking everything up, you may damage the V3 Triton LED Bulbs, V3 Triton Control Box, or both.

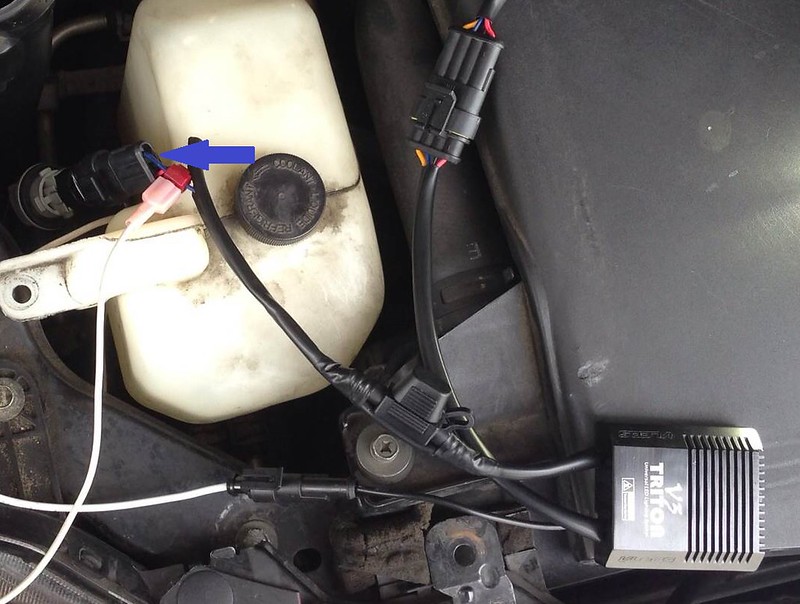
10) Take your speaker/automotive wire that has the Male Connectors on both ends, and connect one end to the Red or Blue Wire Tap that is connected to the BLUE parking light wire on the V3 Triton Control Box Connector, and connect the other end of the speaker/automotive wire to the RED car parking light wire Red or Blue Wire Tap. Shown here:

Image

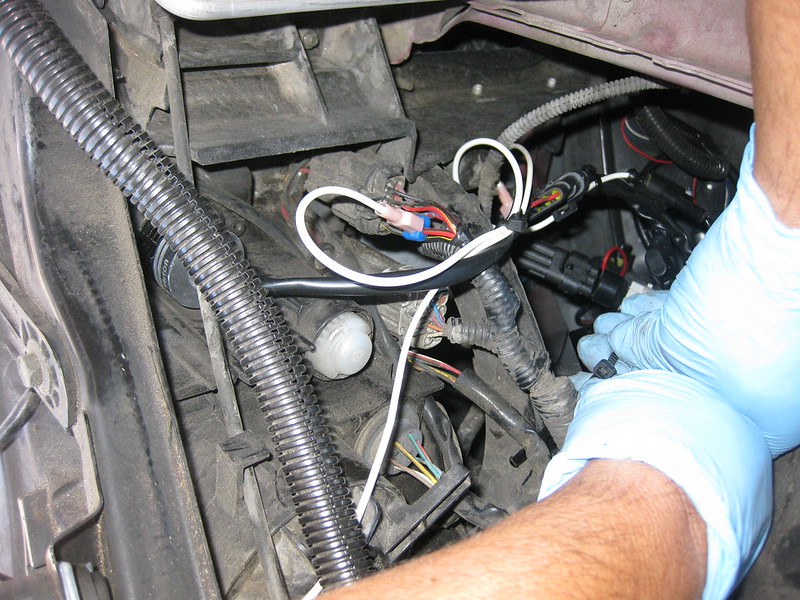
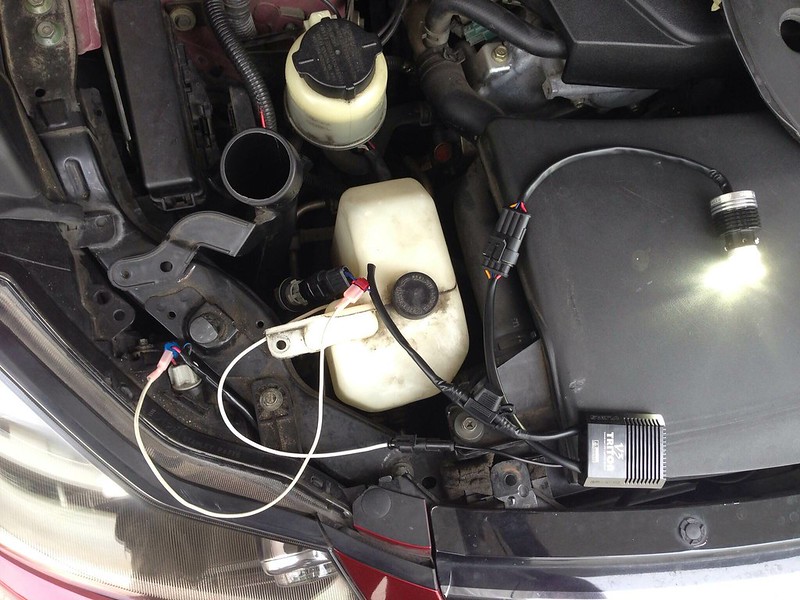
If you have chosen the DRL route, you will need to connect one end of the speaker/automotive wire that has the Male Connector on one end to the Red or Blue Wire Tap that is connected to the BLUE parking light wire on the V3 Triton, and connect the other side (bare wire) to the Add A Circuit/Fuse wire connector you already connected to an ACC/constant on power source. This is how the V3 Triton will look when it is fully connected: (the pictures below don’t show this, but the other end of a speaker/automotive wire is tapped into the lighting housing RED with black stripe wire as well)

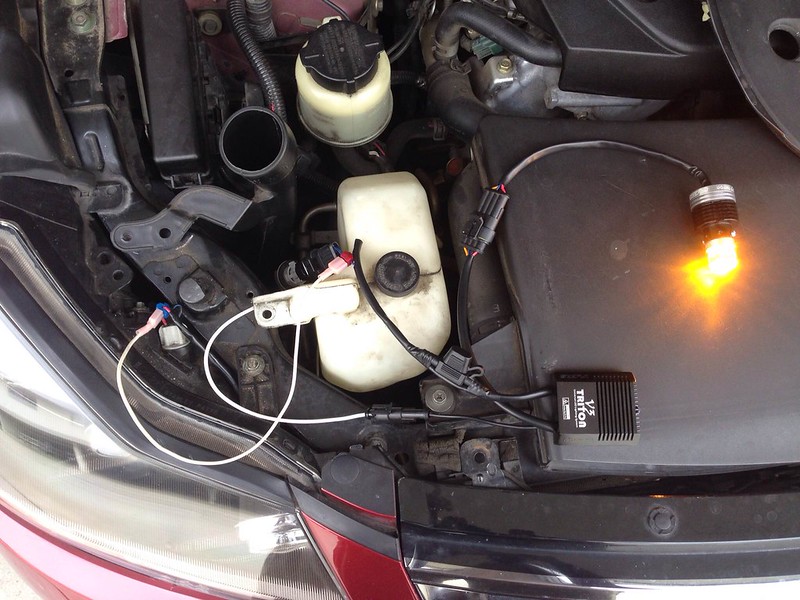
(5K White LEDs showing)

Image

(Amber LEDs showing)

Image


11) Test the V3 Triton LED System. If working correctly:
- When you use the turn signals or the hazards, they will work just like regular turn signals - they will just look a lot better.
- If you turn the signal stalk to the parking lights, the V3 Triton will turn White @ 100% brightness. If you use the signal stalk to the left, for example, the left turn signal will turn from White to Amber, and when you put it back in the neutral position, the Amber flashing light will turn White.
- If you turn on the headlights (if you installed the Dim Wire), the White lights will dim to 50% brightness.
- If you went the DRL route, as soon as you turn on the car, the V3 Triton will turn White @ 100% brightness and will turn White @ 50% brightness when the headlights are on (if you installed the Dim Wire).

12) Once everything is working, screw 2 of the V3 Triton 3mm screws in opposing sides of the V3 Triton LED bulb, (no rubber washers are needed) then insert into the turn signal housing in the headlight, and screw the V3 Triton LED bulb into the turn signal housing in the headlight. It should have a snug fit.

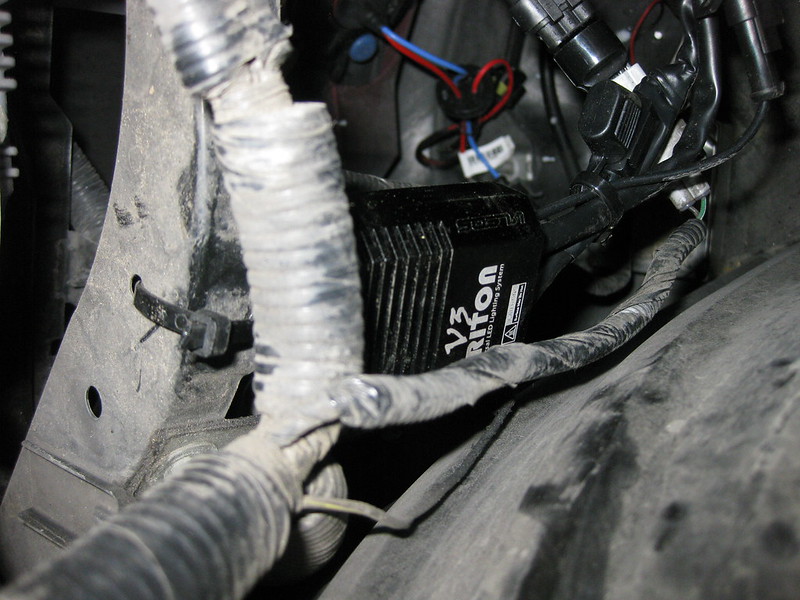
13) Test the V3 Triton LED System again. Install and test the V3 Triton LED System the other side of the car. Zip-tie the V3 Triton LED System to the car so the various wires and Control Box won’t fly everywhere, as shown below:

Image

Image

Reinstall the air box, MAF sensor, and put the coolant and washer tanks back into their place. Replace engine covers.

14) Ride in style.

Photos and Videos:

Passenger Side is the Amber V3 Triton LEDs, Driver Side is the stock halogen amber light:

Image

White light closest to center of car is the 5K White V3 Triton LEDs:

Image

Passenger Side is the 5K White V3 Triton LEDs, Driver Side is the stock halogen amber light (not lit because the turn signal/hazards are not being activated):

Image

Here is a daytime video demonstration of the 5K White Amber Switchback V3 Triton LED System (Version 2) using the turn signals, hazards, turning on and off the parking lights, and turning on and off the headlights:

[youtube]http://www.youtube.com/watch?v=ieXpTDBm ... re=youtu.b[/youtube]

Inside of parking lot video demonstration:

[youtube]http://www.youtube.com/watch?v=MlAQCoO- ... e=youtu.be[/youtube]

Nighttime video demonstration:

[youtube]http://www.youtube.com/watch?v=8Rgp0jRI ... e=youtu.be[/youtube]

I hope this is helpful to anyone wanting to install the 5K or 6K White Amber Switchback V3 Triton LED System, and if you have any questions, I will be more than happy to answer them as best as I can.


User avatar
TXT
Posts: 363
Joined: Wed Jul 11, 2012 7:13 pm
Car: 2006 M45 Sport
Location: Mooresville, NC

Post

I must say, that's a very nice write up. This matches up well with the V3 Triton write up for the tail lights that already exists.

User avatar
finikM35
Posts: 248
Joined: Thu Dec 20, 2012 8:36 pm
Car: 2007 M35x tech package
5/16 plenum spacer, element 114 exhaust, ztube,k&n, grounding kit, uprev tuned, D2 coilovers.
Location: Brooklyn NY

Post

Promised myself im done with mods but i want this!!!!!!!! Looks great, good job!
130 for LED sounds like a lot though but they look so bright is that 5k?

Larz
Moderator
Posts: 3054
Joined: Thu Feb 21, 2013 8:55 pm
Car: 2019 Q70-L RWD
Location: Ft Lauderdale, Florida
Contact:

Post

Moedawg that is absolutely brilliant! I didn't realize they can also be used as DRLs and that is yet another great feature. My add-on DRLs alone were nearly $200. Now, with this new Vled system, you get the amazing quality of the Tritons, the switchback technology for front turn signals, and front parking lights that are more visible in daylight and rainy weather with or without using the DRL option! In my opinion, that makes this Triton system a staggering bargain at less than $150!
And with your brilliant DIY, anyone can install it !

User avatar
TXT
Posts: 363
Joined: Wed Jul 11, 2012 7:13 pm
Car: 2006 M45 Sport
Location: Mooresville, NC

Post

Larz wrote:Moedawg that is absolutely brilliant! I didn't realize they can also be used as DRLs and that is yet another great feature. My add-on DRLs alone were nearly $200. Now, with this new Vled system, you get the amazing quality of the Tritons, the switchback technology for front turn signals, and front parking lights that are more visible in daylight and rainy weather with or without using the DRL option! In my opinion, that makes this Triton system a staggering bargain at less than $150!
And with your brilliant DIY, anyone can install it !
Larz, what do you do for a living? Are you a salesperson? lol.

Larz
Moderator
Posts: 3054
Joined: Thu Feb 21, 2013 8:55 pm
Car: 2019 Q70-L RWD
Location: Ft Lauderdale, Florida
Contact:

Post

LMAO TXT !

I am not a sales person, but I reckon I'd make a fair good one. I have a Doctorate in Clinical Pharmacology and I'm Board Certified in Infectious Disease and Parenteral Nutrition. I have an LLC that manages patients for Infectious Disease and TPN specialist MDs. I'm also a rugby player and a wanna-be motorhead who was raised on Top Gear (the REALTop Gear from England) and my mates say I'm the young version of Jeremy Clarkson, LOL

Larz
Moderator
Posts: 3054
Joined: Thu Feb 21, 2013 8:55 pm
Car: 2019 Q70-L RWD
Location: Ft Lauderdale, Florida
Contact:

Post

Moedawg, what bulb did you use for the T10/194 that mounts inside the top of the high beam housing?

cruzad3r
Posts: 1340
Joined: Fri Mar 05, 2010 6:34 pm
Car: 2006 M35x fully loaded
Location: CT

Post

very nice write up- good stuff bro

mikesd1980
Posts: 57
Joined: Sat Aug 31, 2013 11:00 am
Car: 2007m35x
Location: NE PA

Post

Moedawg nice write up. I decided to take your advice and just go with Vleds for the front LED's and keep the LED decoders and LEDs around or sale. Been watching your video for the last few days and really like them switchback's. I installed 6k low beams and fogs on Fri and loving the look. I think them switchbacks will make it look alot better. I will be using your write up to do the job. Thanks :greg:

User avatar
moedawg140
Posts: 175
Joined: Sat Jan 23, 2010 8:47 pm
Car: 06 M35 S (Adv. Tech)
LI Quad
G37 BBK with H&R DRS
(15mm F, 10mm R)
Focal 165KRX2 (F)
Infinity Kappa 63.9i (R)
Alpine Type-X 10"
JL HD900/5 (sub chnl.)
RF CPCD10-03
Morimoto 4,300K H11

Post

TXT wrote:I must say, that's a very nice write up. This matches up well with the V3 Triton write up for the tail lights that already exists.
Thanks, TXT! I didn't see anyone online installing the Switchback V3 Triton LED System, so I thought it would be nice to put it out there for our M's (Infiniti as a whole). As for the tail lights, I have the Amber V3 Triton LED System for the rear turn signals as well, and I love them so much, that every single time I use them, I think about how brilliant they look, the people behind me noticing the lights (and thinking they look so spectacular) because they are so bright and intense...it's just a weird very nice feeling I have that comes over me when I use them - every single time. I'm pretty sure Larz, (who created the awesome Amber V3 Triton LED System [Version 1] DIY) knows exactly what I'm talking about.
finikM35 wrote:Promised myself im done with mods but i want this!!!!!!!! Looks great, good job!
130 for LED sounds like a lot though but they look so bright is that 5k?
Thank you finikM35! As I say, you only live once (YOLO). If you are on the fence about it, get it, simple as that! As for the temperature of White lights I have, yes, I am using the 5K White Amber Switchback V3 Triton LED System (Version 2). They are very bright, but the Dim Wire helps out so much to lessen the intensity of the light at night, and trust me, you need that Dim Wire installed!
Larz wrote:Moedawg that is absolutely brilliant! I didn't realize they can also be used as DRLs and that is yet another great feature. My add-on DRLs alone were nearly $200. Now, with this new Vled system, you get the amazing quality of the Tritons, the switchback technology for front turn signals, and front parking lights that are more visible in daylight and rainy weather with or without using the DRL option! In my opinion, that makes this Triton system a staggering bargain at less than $150!
And with your brilliant DIY, anyone can install it !
Thanks Larz! I personally like to have the option to turn on the lights and use them as a DRL that way, because there are times where I want to just stay in the car with the music on at night, and it's nice to be able to turn off the lights if need be. ;) Anyone can install it, they just need to follow the directions completely, because if the System isn't installed correctly the System will be damaged, no doubt about that.
Larz wrote:Moedawg, what bulb did you use for the T10/194 that mounts inside the top of the high beam housing?
The picture of the 194 parking light blub (the picture in step #4) is an earlier 5K version of a 5 LED bulb from vleds.com. The current bulb being sold on vleds.com is a 6K version that features "3 Chip" SMT technology. I haven't seen these in person, but I'm pretty sure they are just a little brighter than the 5 LED bulb I used. The link for the 6K blub is here: http://www.vleds.com/6k-white-3-chip-5- ... -pair.html However, I wanted a brighter parking light bulb that would match up well with the V3 Triton LED System, and wanted to stay in the 5K White color family, so I purchased, installed and currently use a pair of "Standard 5K White 194 6 LED" from vleds.com. It is definitely brighter than my 5 LED bulb, so I wound up purchasing 3 more sets for the four doors. Why did I purchase 3 sets for 4 doors? Because, I received 2 duds. You can always return them for a refund within 30 days and the bulbs carry a year warranty, so at least the bulbs have that going for them. Here's the link for the "Standard 5K White 194 6 LED bulbs": http://www.vleds.com/6-5k.html
cruzad3r wrote:very nice write up- good stuff bro
I appreciate your kind words, cruzad3r. Are you going to purchase and install the System?
mikesd1980 wrote:Moedawg nice write up. I decided to take your advice and just go with Vleds for the front LED's and keep the LED decoders and LEDs around or sale. Been watching your video for the last few days and really like them switchback's. I installed 6k low beams and fogs on Fri and loving the look. I think them switchbacks will make it look alot better. I will be using your write up to do the job. Thanks :greg:
Thanks, mikesd1980! You won't be sorry for getting the 5K or 6K White Amber Switchback V3 Triton LED System, but I think your car will have the more classy look by purchasing the 6K version to keep the different lights on the front of your car flowing with uniformity. As for the videos, I made them on different times of day/night and places to show the System's capabilities...but pictures and videos don't do this System justice! Once you install the System, please let us know how you like it!
Last edited by moedawg140 on Tue Nov 05, 2013 2:14 pm, edited 1 time in total.

User avatar
CPJ LB
Posts: 1026
Joined: Sat Aug 28, 2010 4:06 pm
Car: 12 G37X Sedan- stealthy modded
14 Altima 2.5
08 Tahoe
06 M35 S (gone)
14 Versa 4dr (gone)
Location: CA 2 CT

Post

hey Moedawg,

are you in southern cali?? great work man...I'll be a customer of yours if you plan on doing installs :biggrin:

I do a lot of mods, but I'm not too handy with electrical systems :tisk:

I'm sure you'll get a good amount of folks on the forum.....

User avatar
moedawg140
Posts: 175
Joined: Sat Jan 23, 2010 8:47 pm
Car: 06 M35 S (Adv. Tech)
LI Quad
G37 BBK with H&R DRS
(15mm F, 10mm R)
Focal 165KRX2 (F)
Infinity Kappa 63.9i (R)
Alpine Type-X 10"
JL HD900/5 (sub chnl.)
RF CPCD10-03
Morimoto 4,300K H11

Post

^^^ Thanks Anthony! And yes, I live in So. Cal, not too far from you. I actually saw your car (before I joined the forum) parked at a local Infiniti dealership, and I just remember saying to myself "Man, that is one nicely done M!" Yeah, you can be a customer of mine, why not? Anyone else who needs the System installed (Front and/or Rear System) can let me know as well, and I'll make sure to hook you up. I'll PM you details about everything. :dblthumb:

User avatar
CPJ LB
Posts: 1026
Joined: Sat Aug 28, 2010 4:06 pm
Car: 12 G37X Sedan- stealthy modded
14 Altima 2.5
08 Tahoe
06 M35 S (gone)
14 Versa 4dr (gone)
Location: CA 2 CT

Post

moedawg140 wrote:^^^ Thanks Anthony! And yes, I live in So. Cal, not too far from you. I actually saw your car (before I joined the forum) parked at a local Infiniti dealership, and I just remember saying to myself "Man, that is one nicely done M!" Yeah, you can be a customer of mine, why not? Anyone else who needs the System installed (Front and/or Rear System) can let me know as well, and I'll make sure to hook you up. I'll PM you details about everything. :dblthumb:


Nice!! small world isn't it :biggrin:

cool man...thanks, I'll check for PM's.

User avatar
Ilya
Moderator
Posts: 9805
Joined: Fri Apr 23, 2010 11:20 pm
Car: 2011 M56x but I spend a lot of time on my 2015 Kawasaki Vulcan S. Former owner of a 2007 M35x. Also take care of my wife's 2016 QX60.
Location: Charlotte, NC
Contact:

Post

I happen to be online/checking the forum today, so I will add this to the FAQ thread.

User avatar
moedawg140
Posts: 175
Joined: Sat Jan 23, 2010 8:47 pm
Car: 06 M35 S (Adv. Tech)
LI Quad
G37 BBK with H&R DRS
(15mm F, 10mm R)
Focal 165KRX2 (F)
Infinity Kappa 63.9i (R)
Alpine Type-X 10"
JL HD900/5 (sub chnl.)
RF CPCD10-03
Morimoto 4,300K H11

Post

CPJ LB wrote:Nice!! small world isn't it :biggrin:

cool man...thanks, I'll check for PM's.
It is definitely a small world. About a decade ago, I was on a National Wrestling team, touring Japan, and I heard my name being called in a room - the person calling my name was one of my past opponents from California...he was there as well with a separate team! :crazy:
IlyaKol wrote:I happen to be online/checking the forum today, so I will add this to the FAQ thread.
Thanks Ilya, I appreciate it.

kmiles
Posts: 317
Joined: Sun Mar 27, 2011 2:59 pm
Car: 2015 Q70 3.7 AWD - Hermosa Blue
Sold - 2007 M35x

Post

Moedawg - thanks for this great write-up. It inspired me to buy and do the install myself. I wanted to add a couple of notes that might help others, based upon experience with my 2007 M35x:

Installing the lamp: I found it fit a lot tighter by using the thinnest and smallest rubber gasket that is included with the set. They give you a full assortment of gaskets, no need to order any extra ones.

Built-in resistance: there is a plastic cap on the line where you can install the included 5amp fuse to turn on the built-in resistance. I needed to install it, as when fully powered, my blinkers went into hyperblink without the fuse in place, and blinked normally with the fuse in line.

White light Auto-dim: if you connect to the parking light, the auto-dim would not work for me as the parking light is on when the headlights are on, so they were on dim all of the time. At first I thought the auto-dim was broken. My main reason for purchasing these was to get the DRL (Day-time Running Light) feature. In order to get the dim to connect correctly, I found the low beam positive lead at the headlight connector. Whether you have standard or HID headlights, the wire is the same. On the connector it is position #8. It is a Red wire on the RH (passenger side) and Red with a blue or black strip on the LH (drivers side). Looking at the connector, the x represents the locking tab on top:

x
1 2 3 4
5 6 7 8

DRL: I wired it from the fuse box that is down below the battery and against the firewall (called the IPDM E/R) and used the fuse tap recommended above to connect to fuse #84 (10amp Washer Motor circuit) which only comes on when the car is in acc/run mode.

Finally, I recommend testing it all both with the engine running and the engine off and in the accessory position. I didn't find the issue with the hyperblinking until I had the engine running. It does help to have two people for the testing, to ensure the dimming is working properly.

User avatar
moedawg140
Posts: 175
Joined: Sat Jan 23, 2010 8:47 pm
Car: 06 M35 S (Adv. Tech)
LI Quad
G37 BBK with H&R DRS
(15mm F, 10mm R)
Focal 165KRX2 (F)
Infinity Kappa 63.9i (R)
Alpine Type-X 10"
JL HD900/5 (sub chnl.)
RF CPCD10-03
Morimoto 4,300K H11

Post

Awesome job getting the System installed, kmiles! I'm glad the write-up was able to help you out with the installation.

Thank you for the added notes as well.

I seriously think the light sockets (front and rear turn signals) are not the exact same size, as noted when I had to shave off some of a rear socket just to get a V3 Triton bulb to fit - no way any size rubber gasket would fit! It is always good to check what is the best fit, using the included rubber gaskets if you want the fit to be as snug and tight as possible.

I was debating as I was creating the write-up if I should explain the fuse, the fuse holder, and how it relates to the resistance (if the fuse is out of the holder or breaks, hyperflash will result). I did not include this for 2 reasons: 1) The 5 amp fuse is explained on the website/directions, and 2) The fuse does not need to be touched (was in the holder from factory by default [on all of my Systems]), just install the System, and all is well!

As for connecting the Dim Wire to the headlight connector low beam wire, your note reaffirms that the installer should make sure to probe and test the wires to make sure they are tapping into the correct one (as both of my low beam wires are RED with a black stripe). Steps 6 and 7 in the write-up explains how to connect the Dim Wire (and how to not connect it if you do not want that function).

Thanks for adding where you installed the fuse tap for DRL capability. You can always go back to manual mode if you decide later down the road that you want the lights to be more discrete.

Please post some pictures of the System if you can. Here is a How To - Post Your Images in Threads, just in case you need it: howto-post-your-images-in-threads-t573706.html

User avatar
Ilya
Moderator
Posts: 9805
Joined: Fri Apr 23, 2010 11:20 pm
Car: 2011 M56x but I spend a lot of time on my 2015 Kawasaki Vulcan S. Former owner of a 2007 M35x. Also take care of my wife's 2016 QX60.
Location: Charlotte, NC
Contact:

Post

Quick question to the guys who've done this...

If you turn the lights to 'off' on the stalk by the steering wheel, do these go out as well? Or do they stay on? This will be a deal breaker for me as I often take a nap in my car between work and school (have 40 minutes to kill) and don't want any lights on as to not attract attention while I'm sleeping off in the back of the lot.

User avatar
moedawg140
Posts: 175
Joined: Sat Jan 23, 2010 8:47 pm
Car: 06 M35 S (Adv. Tech)
LI Quad
G37 BBK with H&R DRS
(15mm F, 10mm R)
Focal 165KRX2 (F)
Infinity Kappa 63.9i (R)
Alpine Type-X 10"
JL HD900/5 (sub chnl.)
RF CPCD10-03
Morimoto 4,300K H11

Post

IlyaKol wrote:Quick question to the guys who've done this...

If you turn the lights to 'off' on the stalk by the steering wheel, do these go out as well? Or do they stay on? This will be a deal breaker for me as I often take a nap in my car between work and school (have 40 minutes to kill) and don't want any lights on as to not attract attention while I'm sleeping off in the back of the lot.
Hi Ilya,

As I mentioned in the write-up, the V3 Triton is designed to be used manually or as a DRL. Hopefully the response below will more explicitly explain the V3 Triton's capabilities.

DRL Wired: If you wire it up as a DRL, the V3 Triton will turn on when the ignition is set to the ACC and/or ON position (depends on how you wire it), and will turn off when the ignition set to the OFF position/and additionally the time it takes for everything to fully turn off (i.e. headlights to turn off).

Manually Wired: If you wire it up manually, the V3 Triton will turn on when you turn the signal stalk to the parking lights position, and will also turn on when you turn the signal stalk to the headlights position (automatic position [V3 Triton only turns on when the headlights automatically turn on when it's dark] and manual position), as any of the three positions will turn on the V3 Triton regardless of the ignition being set to the OFF, ACC, or ON positions. The V3 Triton will turn off when the signal stalk is set to the off position.

I assume that you will have the car on the entire time you are in the car (I did not read that you had the car set to the OFF, ACC, or ON position), so I will answer your question in that regard. You will need to wire the V3 Triton so it can be used manually (the write-up explains/shows how to do this) so you will have full control of turning on and off the V3 Triton. Make sure to not wire the V3 Triton as a DRL, as you will not be able to manually turn on and off the V3 Triton via signal stalk. Please take a look at the posted videos in the write-up as well to see how the V3 Triton operates (as shown, I turn the V3 Triton on and off while the car is set to the OFF, ACC and ON positions, because I wired the V3 Triton to be operated manually).

Good luck with your installation if you decide to purchase the V3 Triton.

User avatar
Ilya
Moderator
Posts: 9805
Joined: Fri Apr 23, 2010 11:20 pm
Car: 2011 M56x but I spend a lot of time on my 2015 Kawasaki Vulcan S. Former owner of a 2007 M35x. Also take care of my wife's 2016 QX60.
Location: Charlotte, NC
Contact:

Post

Thanks Moe. I saw the mention of manual, but for some reason I thought that was via some 'secondary' switch inside the car lol. My bad.

Yeah, since it gets cold in NY, I usually have the car running with the window cracked while I nap 30-40 minutes between work and class.

I may end up picking this up. Thanks.

User avatar
moedawg140
Posts: 175
Joined: Sat Jan 23, 2010 8:47 pm
Car: 06 M35 S (Adv. Tech)
LI Quad
G37 BBK with H&R DRS
(15mm F, 10mm R)
Focal 165KRX2 (F)
Infinity Kappa 63.9i (R)
Alpine Type-X 10"
JL HD900/5 (sub chnl.)
RF CPCD10-03
Morimoto 4,300K H11

Post

No worries, Ilya. There is no secondary switch or additional button that I installed regarding operation of the V3 Triton. Everything that is shown (parts to use and method of installation) is shown in the pictures and explained completely. I want to be clear: I did not omit anything or add anything that has not been shown in the write-up.

If you do purchase and install the V3 Triton, I'm sure you'll love it. However, I honestly feel that the front switchbacks need the V3 Triton rear turn signals as well so the front and rear flow blissfully. I also feel this way if you first purchase and install the V3 Triton rear turn signals, albeit slightly less so.

Please let us know what you decide to finally do (pictures would be nice if you can). Thanks.

User avatar
WillV
Posts: 155
Joined: Fri May 06, 2016 10:21 am
Car: 2006 M35 Moonlight White/Tan Interior
Location: Florida

Post

Moedawg, I wish you were in FL! I'd have you do this for me, 2 years later! Great work, I will be doing this in the future for sure. And I guess, per your (very correct, IMO) logic, I will be doing the back ones as well :)


Return to “Infiniti M35 and M45 Forum”