This is awesome something I want to do!
Im also interested buying parts from you

Air Intake duct mod for better mpg
Re: Air Intake duct mod for better mpg
Based on xtrailmighty's recommendations, I also did this mod and it is just great. Mileage seems to be up around 1.5 to 2 MPG depending on the driving conditions. But the feel is simply great. This is how it should be from factory.
-
lou from ny

- Posts: 145
- Joined: Sun May 03, 2009 5:49 am
Re: Air Intake duct mod for better mpg
for those who have done the mod, HOW are you doing it without the part??

Re: Air Intake duct mod for better mpg
I second this. What did you guys do?lou from ny wrote:for those who have done the mod, HOW are you doing it without the part??
Also, has anyone done this on a 1st gen Rogue?
Re: Air Intake duct mod for better mpg
The valve cover hose part?darylzero wrote:I second this. What did you guys do?lou from ny wrote:for those who have done the mod, HOW are you doing it without the part??
Also, has anyone done this on a 1st gen Rogue?
I count two people that have done it - one is the original poster that machined his part. The other post stated they printed it on a 3D printer (so I assume some sort of plastic).
If someone did up the file for the 3D printer, I assume everyone could get it printed out. I know even my local library has several 3D printers. The downside is I do not know enough about the plastic used and whether it is strong enough for this purpose (heat, etc.).
Re: Air Intake duct mod for better mpg
I do not recommend using plastic for the part (at least the one that is used with 3D printers).
I started noticing a few cracks, probably due to the heat under the hood. I managed to stop them by applying high strength epoxy all over the part but this is not the ideal solution. Yes it will work but more a band aid that a permanent fix.
The best way to go is to have the part made of either high strength plastic or have it machined.
But for those who have the opportunity to try it, you will not be disappointed.
-
followingnfront
- Posts: 1084
- Joined: Sat Jan 26, 2013 3:32 pm
- Car: 2017 Maxima S
Re: Air Intake duct mod for better mpg
Ill buy it from ya too, OP
Re: Air Intake duct mod for better mpg
anyone else besides OP have pics of their setup? Would really like to see a 1st gen Rogue with this.
Re: Air Intake duct mod for better mpg
My mod was changing from stock air filter to a K&N filter, after the engine re-calibrated itself to allow for the extra air flow I saw an 1 MPG increase and better engine performance. If you like the stock air filter, you can get them for $13.00 and change right now on Ebay. The only difference I see is the stock is yellow while the ATM is white.
Regards,
Dan
Regards,
Dan
-
ImStricken06

- Posts: 5052
- Joined: Wed Dec 07, 2011 8:45 am
- Car: 2008 Rogue(sold)
2013 Santa Fe
2016 Sorento - Location: Within Range
- Contact:
Re: Air Intake duct mod for better mpg
what are you talking about? "after the engine re-calibrated itself, to allow for the extra airflow" ??? lmfao your engine is always adjusting for a multitude of variances; altitude(air density), humidity, etc. its doing it every second, of every mile. your engine didnt even notice the "extra airflow". nor will it really adjust for it, because the timing is designed to be advanced or retarded based upon throttle input(variable valve timing & control). your engine is designed to take in only so much air, and only so much fuel depending on variances already pre-programmed in the ECU(those are called maps). your filter didnt change the MAPs. i run K&N's and they service one purpose: not having to buy filters. thats it. if you drive over 100,000 miles, they should save you money over paper filters. otherwise, they dont change your engines performance. if it did, even a fraction- you'd need exhaust work to vacate the "extra air flow" lol.danrog1 wrote:My mod was changing from stock air filter to a K&N filter, after the engine re-calibrated itself to allow for the extra air flow I saw an 1 MPG increase and better engine performance. If you like the stock air filter, you can get them for $13.00 and change right now on Ebay. The only difference I see is the stock is yellow while the ATM is white.
Regards,
Dan
and no, you didnt see any mpg differences. mpg's are simply to erratic to compare; with an end result of 1. you'd need to dyno test the vehicle under controlled conditions, in order to actually prove a single MPG difference.
Re: Air Intake duct mod for better mpg
ImStricken06, How about 2 and 1/2 mpg and some duct tape lol. I have been using K&N's for over 20 years and have seen an improvement in gas millage and engine performance. I use them in all my vehicles. When I replaced my stock Rogue filter at 6,000 miles, very dirty, with the K&N I saw an improvement in gas and engine performance 1 mpg, probably more, I was being very conservative. Does air flow make a difference I think so, less restricted air flow will make a difference. My experience with paper filters has been very negative, they become very restricted in a short period of time. The air and gas flow can only be calibrated for best performance as long as there is a good supply of both, air and gas. I found an all round improvement to be in town, hwy and mountain driving with the K&N over the stock filters. Yes you never have to buy a new one, just keep it clean, much cheaper than changing a paper filter every 5,000 to 6,000 miles of driving. The modern engine is a thing of electronic marvels, they control air, gas, intake and exhaust valves among other things I don't pretend to understand. I just go by the way the engine sounds and how much gas I use in miles I drive and that is manually computed from tank to tank, not the trip meter. I don't pretend to be a master mechanic, just a drive by the seat mechanic, lol. You could check K&N's test results, if you can believe them.
Regards,
Dan
Regards,
Dan
Re: Air Intake duct mod for better mpg
Has anyone tried a performance OBDII chip and if so what kind of gas millage and engine performance did you achieve?
thanks,
Dan
thanks,
Dan
-
whizkidtn
- Posts: 52
- Joined: Sun Dec 28, 2014 3:36 pm
- Car: 2014 Nissan Rogue SL (AWD), Premium package
- Location: Knoxville, TN
Re: Air Intake duct mod for better mpg
That 2.5L engine can use ALL the help it can get!
Re: Air Intake duct mod for better mpg
Some of you asked for pics of the setup. Here is mine and the 3D printed part


For those interested, here is the link to the 3D file I made. Feel free to download and modify to your needs/liking.
https://dl.dropboxusercontent.com/u/500 ... dapter.stl
This is the second try with a 3D printed part as the first one ended up cracking. It was also shallow. Make sure you ask the printing guy to make it full plastic and not empty or shallow or it will not withstand the heat under the hood. It's a little more expensive but worth it. I also chose ABS as type of plastic used.
I went on a road trip from Seattle to San Diego and it held up great. If you get the right type of plastic, you should be ok too.
Give it a try and let us know if it worked for you guys.
---
Re: Air Intake duct mod for better mpg
Hey xtrailmty, do you have the CAD drawing or whatever you used still? If you could post it or the dimensions would be great!
Thanks
Thanks
-
followingnfront
- Posts: 1084
- Joined: Sat Jan 26, 2013 3:32 pm
- Car: 2017 Maxima S
Re: Air Intake duct mod for better mpg
I'm still interested in this... OP, can you print a bunch of these out and make a little "Nicoclub kit"? I'll buy it
Re: Air Intake duct mod for better mpg
hi there guys, reporting back, well the mod seems to be great at this point, we did this mod to a friends rogue and the mpg changed about 2-3mpg too so i guess we can confirm.
-
phmichel

- Posts: 260
- Joined: Tue Jun 24, 2014 3:00 pm
- Car: 2013 Nissan Rogue S AWD
2017 Nissan Quest SV - Location: NW Oregon
Re: Air Intake duct mod for better mpg
xtrailmty - Can you tell me what the OD is on the intake to valve cover adapter you made?? You said you used a 5/8" hose to go from the intake to the valve cover. What is the dimension for the air intake opening after after you remove the resonator on top of the engine?xtrailmty wrote:hi there guys, reporting back, well the mod seems to be great at this point, we did this mod to a friends rogue and the mpg changed about 2-3mpg too so i guess we can confirm.
Thanks..
Re: Air Intake duct mod for better mpg
let me check my notes.
Re: Air Intake duct mod for better mpg
looks really great my friend, did you notice any difference like mine?.Meynardo wrote:Some of you asked for pics of the setup. Here is mine and the 3D printed part
---
-
phmichel
- Posts: 260
- Joined: Tue Jun 24, 2014 3:00 pm
- Car: 2013 Nissan Rogue S AWD
2017 Nissan Quest SV - Location: NW Oregon
Re: Air Intake duct mod for better mpg
I recently did this mod on my 2013 "S" with off the shelf parts for less than $15. No joke. Here's what I did:
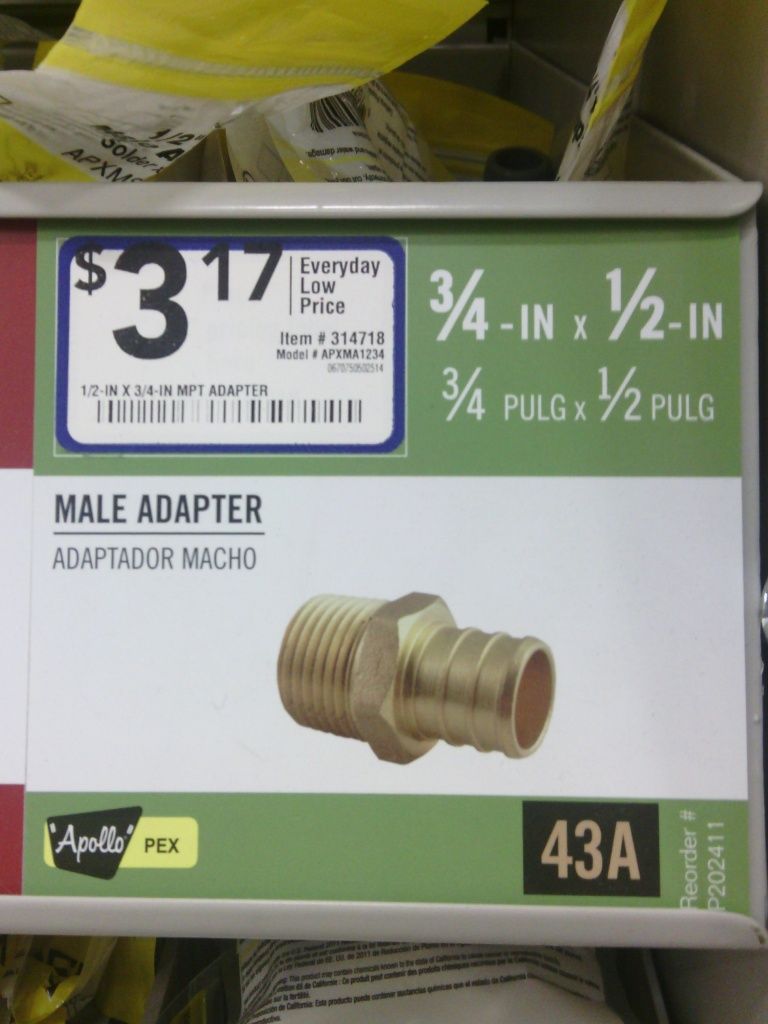
Got these at my local Lowes Home improvement. IMPORTANT NOTE: - I used the 1 1/4" version of the reducer. 1 1/2 is too big:


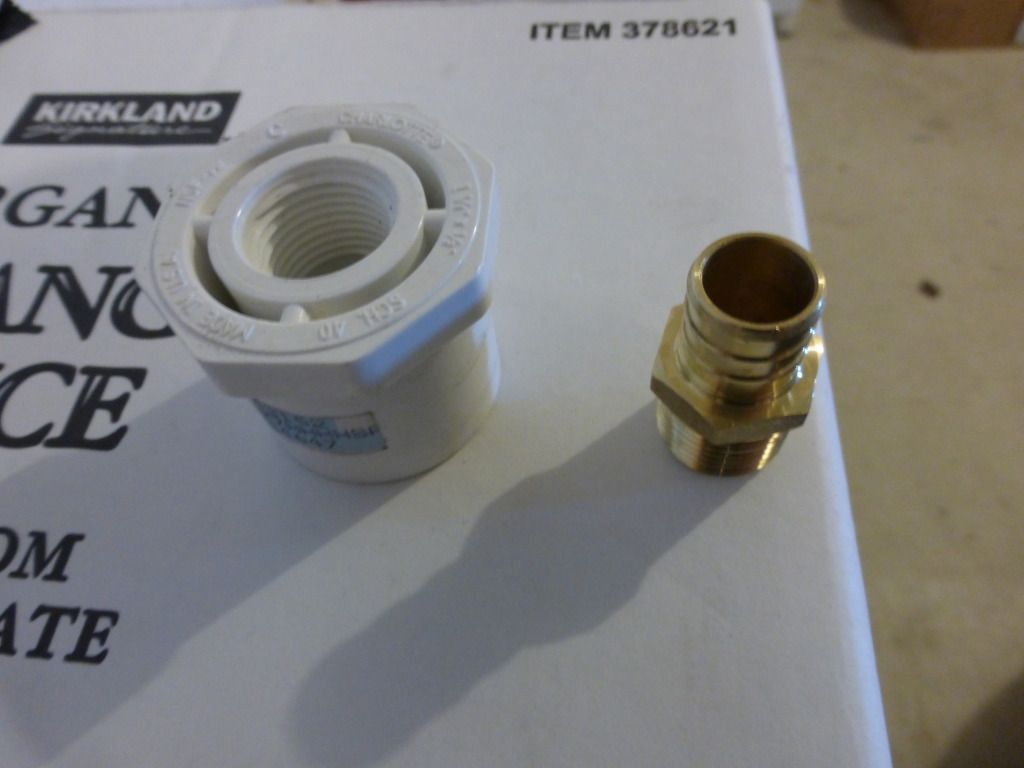
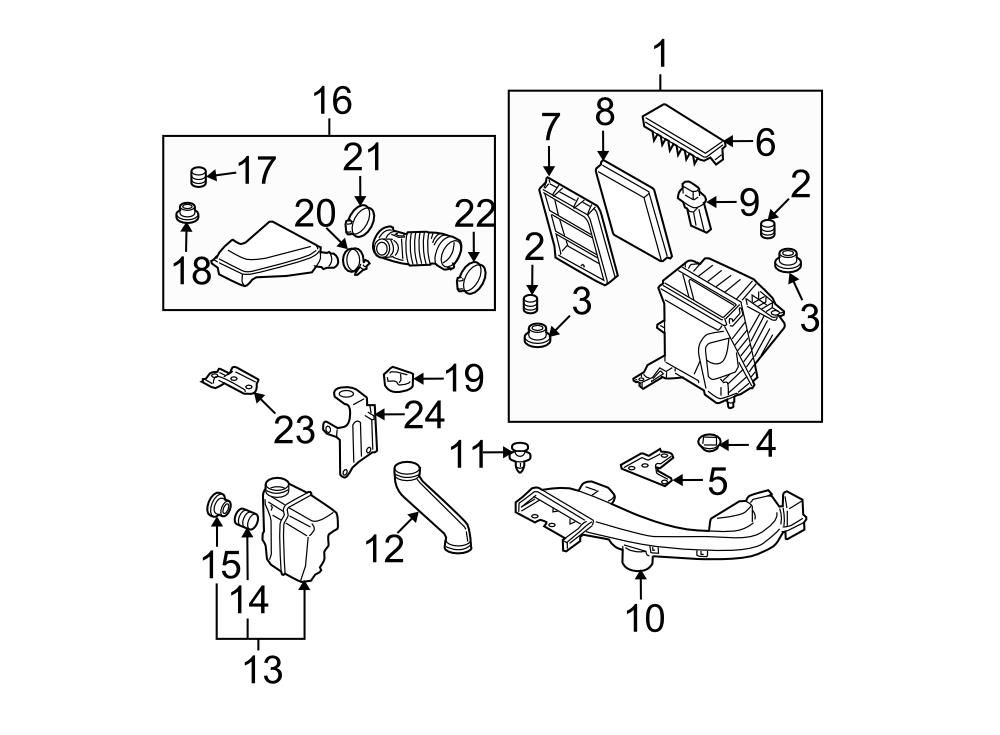
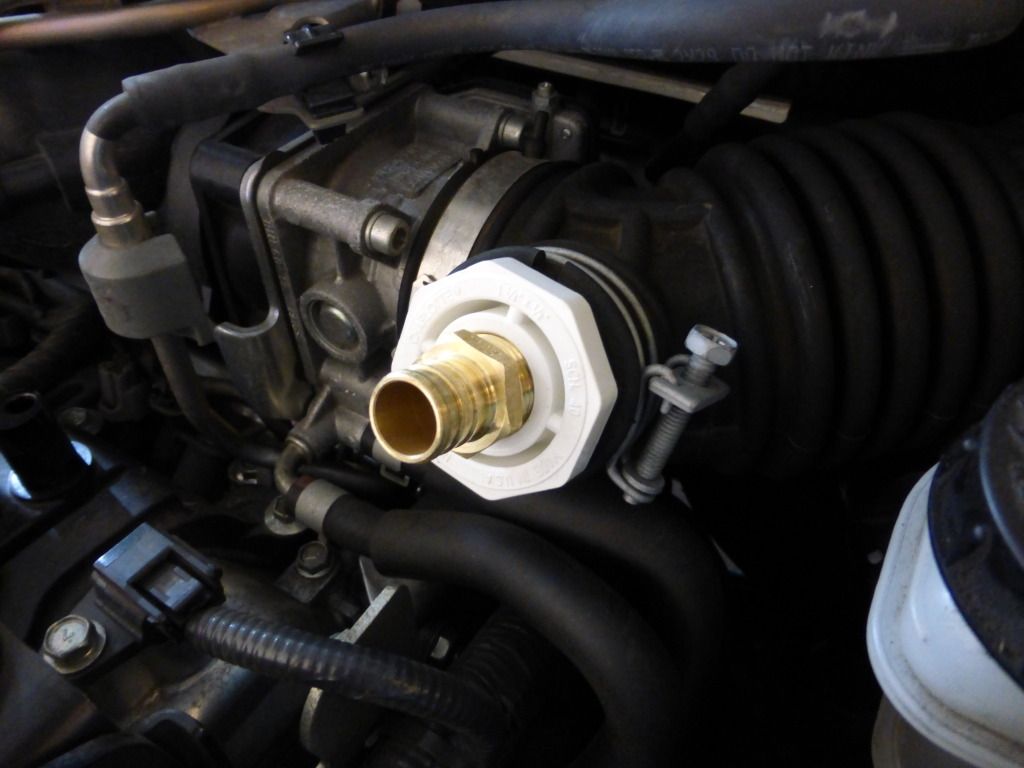
Pulled the resonator from the top of the engine (item #18 on schematic below). Screwed the 3/4" brass hose adapter into the PVC reducer. Sprayed a little silicone spray on the outside of the reducer and it fit perfect. The existing crankcase vapor hose is approx 3/4" so it fits the adapter just fine (but see my technical notes at the bottom of my post):


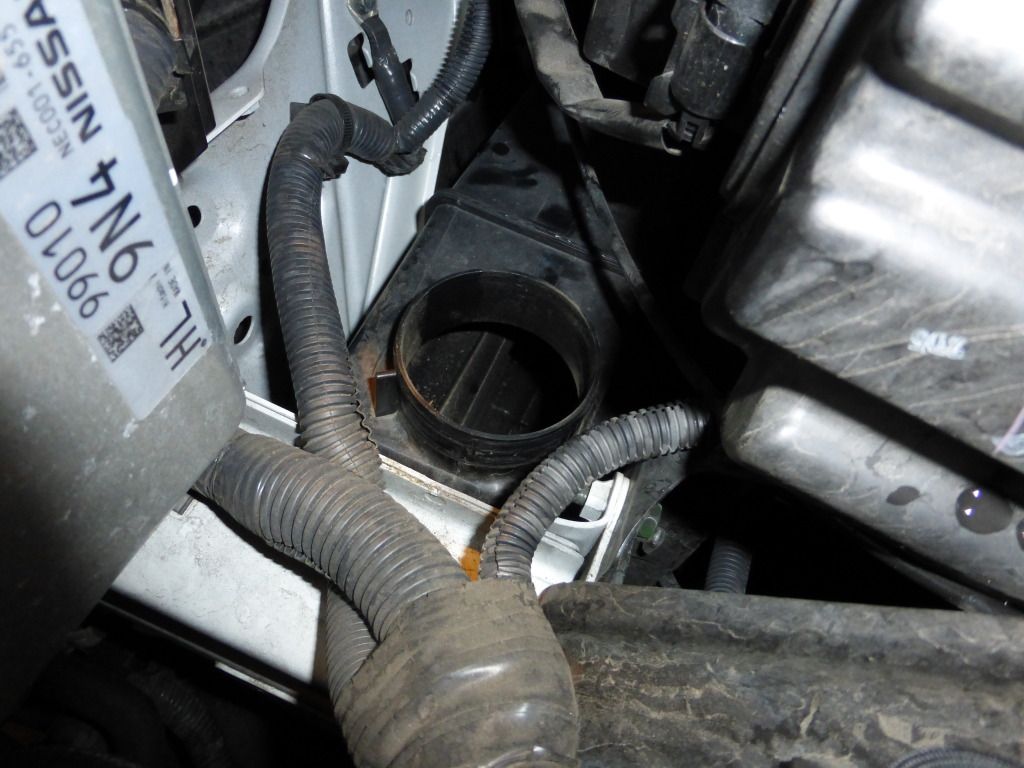
I pulled the tube from the main air intake to the lower resonator (item # 12):


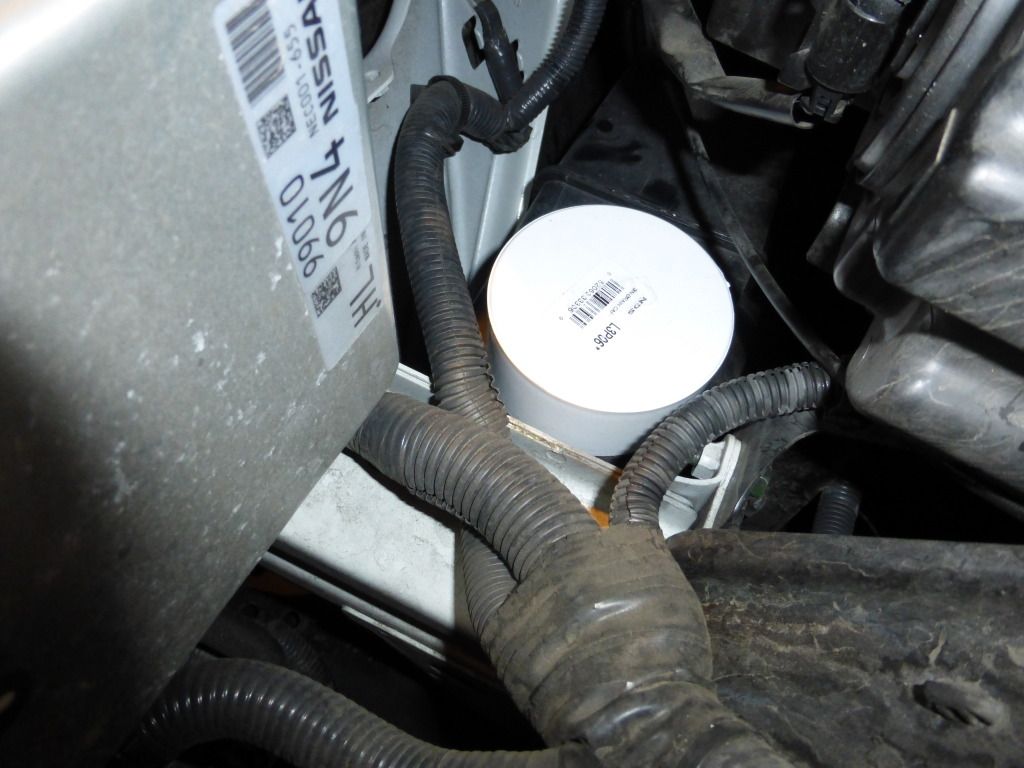
I put a cap on the lower resonator opening, but that's not really necessary (so I'm not including it in the cost of parts):

Technical Notes:
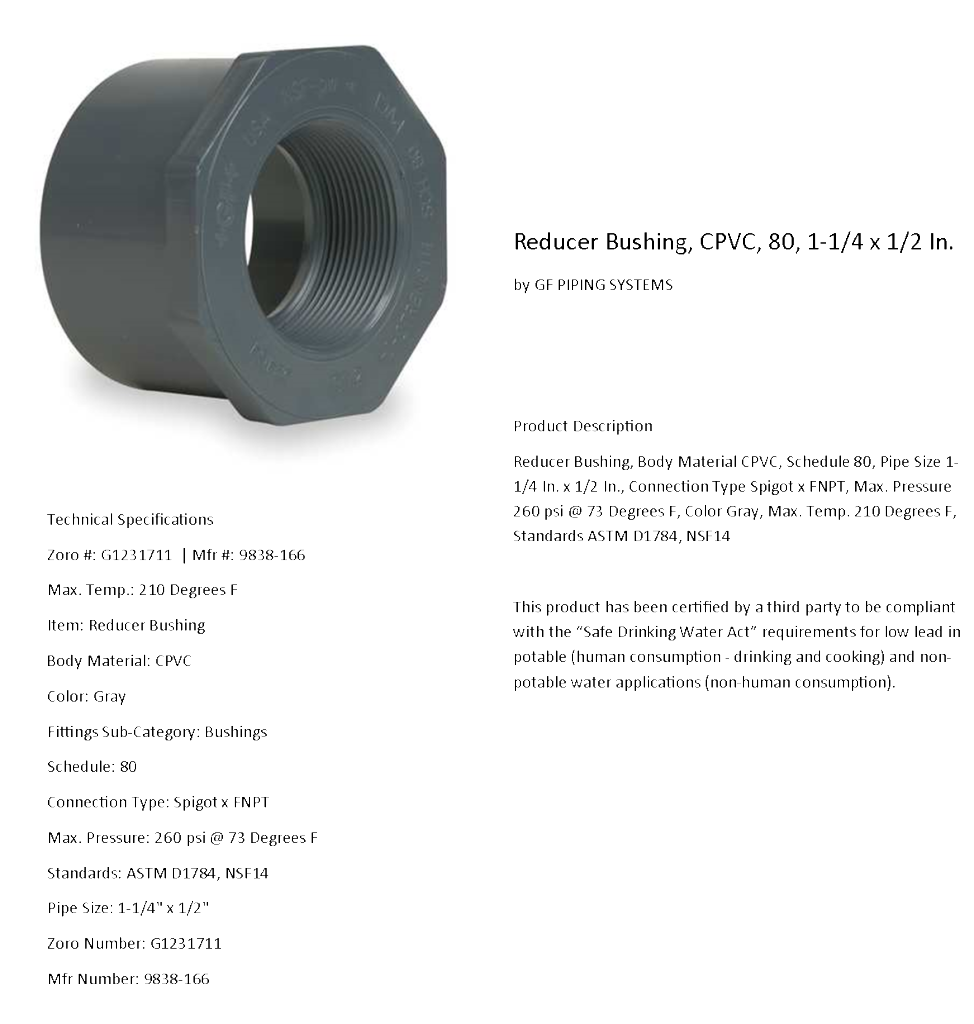
1. The plastic bushing I initially used is standard PVC. This is rated for water only and a max temp of 140dF. I tried to find one made of CPVC which is designed to carry solvents and is rated at 210dF but was able to at the time. I have been running the standard PVC version for a week as is with no issues. I just got back from a 2 hour trip to the Oregon coast. The bushing was cool to the touch after I shut the engine off. However - long term (especially in summer and under constant exposure to petroleum vapor) I want to use a CPVC version. I have ordered this one for $8.74 (+ shipping) from zoro.com:

2. When I replace the PVC reducer bushing with the CPVC version, I will also replace the existing crankcase ventilation hose with a straight piece (8-10") of 3/4" heater hose. Less strain at the hose adapter.
3. I originally taped off the round duct on the underside of the main intake tube (item #10) with duct tape, but then took it off. The main intake opening at the hood is rather small and leaving that lower duct open gives plenty of air available.
4. The lower resonator box is really not needed, so if you do this mod and it works for you, you could just remove the box entirely. It's only held by one bolt to the unibody rail.
5. After a week with this setup I am seeing a mileage improvement of at least 2-3 mpg overall. Not bad for an investment of less that $15 (using the CPVC reducer bushing).
Disclaimer:
This post is for information only. You are responsible for your own safety and that your vehicle meets local and federal emissions standards and applicable laws.
Got these at my local Lowes Home improvement. IMPORTANT NOTE: - I used the 1 1/4" version of the reducer. 1 1/2 is too big:
Pulled the resonator from the top of the engine (item #18 on schematic below). Screwed the 3/4" brass hose adapter into the PVC reducer. Sprayed a little silicone spray on the outside of the reducer and it fit perfect. The existing crankcase vapor hose is approx 3/4" so it fits the adapter just fine (but see my technical notes at the bottom of my post):
I pulled the tube from the main air intake to the lower resonator (item # 12):
I put a cap on the lower resonator opening, but that's not really necessary (so I'm not including it in the cost of parts):
Technical Notes:
1. The plastic bushing I initially used is standard PVC. This is rated for water only and a max temp of 140dF. I tried to find one made of CPVC which is designed to carry solvents and is rated at 210dF but was able to at the time. I have been running the standard PVC version for a week as is with no issues. I just got back from a 2 hour trip to the Oregon coast. The bushing was cool to the touch after I shut the engine off. However - long term (especially in summer and under constant exposure to petroleum vapor) I want to use a CPVC version. I have ordered this one for $8.74 (+ shipping) from zoro.com:
2. When I replace the PVC reducer bushing with the CPVC version, I will also replace the existing crankcase ventilation hose with a straight piece (8-10") of 3/4" heater hose. Less strain at the hose adapter.
3. I originally taped off the round duct on the underside of the main intake tube (item #10) with duct tape, but then took it off. The main intake opening at the hood is rather small and leaving that lower duct open gives plenty of air available.
4. The lower resonator box is really not needed, so if you do this mod and it works for you, you could just remove the box entirely. It's only held by one bolt to the unibody rail.
5. After a week with this setup I am seeing a mileage improvement of at least 2-3 mpg overall. Not bad for an investment of less that $15 (using the CPVC reducer bushing).
Disclaimer:
This post is for information only. You are responsible for your own safety and that your vehicle meets local and federal emissions standards and applicable laws.
-
phmichel
- Posts: 260
- Joined: Tue Jun 24, 2014 3:00 pm
- Car: 2013 Nissan Rogue S AWD
2017 Nissan Quest SV - Location: NW Oregon
Re: Air Intake duct mod for better mpg
Trying again with different images location:
I recently did this mod on my 2013 "S" with off the shelf parts for less than $15. No joke. Here's what I did:
Got these at my local Lowes Home improvement. IMPORTANT NOTE: - I used the 1 1/4" version of the reducer. 1 1/2 is too big:
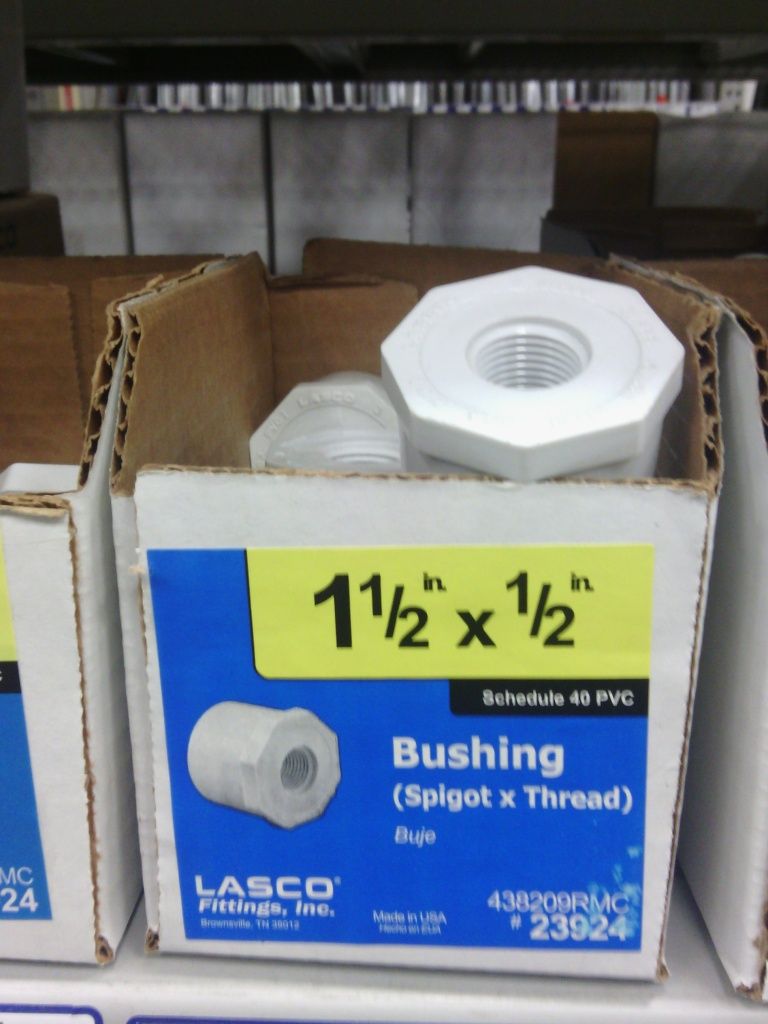
Pulled the resonator from the top of the engine (item #18 on schematic below). Screwed the 3/4" brass hose adapter into the PVC reducer. Sprayed a little silicone spray on the outside of the reducer and it fit perfect. The existing crankcase vapor hose is approx 3/4" so it fits the adapter just fine (but see my technical notes at the bottom of my post):

I pulled the tube from the main air intake to the lower resonator (item # 12 from schematic):
I put a cap on the lower resonator opening, but that's not really necessary (so I'm not including it in the cost of parts):
Technical Notes:
1. The plastic bushing I initially used is standard PVC. This is rated for water only and a max temp of 140dF. I tried to find one made of CPVC which is designed to carry solvents and is rated at 210dF but was not able to find it at the time. I have been running the standard PVC version for a week as is with no issues. I just got back from a 2 hour trip to the Oregon coast. The bushing was cool to the touch after I shut the engine off. However - long term (especially in summer and under constant exposure to petroleum vapor) I want to use a CPVC version. I have ordered this one for $8.74 (+ shipping) from zoro.com:
2. When I replace the PVC reducer bushing with the CPVC version, I will also replace the existing crankcase ventilation hose with a straight piece (8-10") of 3/4" heater hose. Less strain at the hose adapter.
3. I originally taped off the round duct on the underside of the main intake tube (item #10) with duct tape, but then took it off. The main intake opening at the hood is rather small and leaving that lower duct open gives plenty of air available.
4. The lower resonator box is really not needed, so if you do this mod and it works for you, you could just remove the box entirely. It's only held by one bolt to the unibody rail.
5. After a week with this setup I am seeing a mileage improvement of at least 2-3 mpg overall. Not bad for an investment of less that $15 (using the CPVC reducer bushing).
Disclaimer:
This post is for information only. You are responsible for your own safety and that your vehicle meets local and federal emissions standards and applicable laws.
I recently did this mod on my 2013 "S" with off the shelf parts for less than $15. No joke. Here's what I did:
Got these at my local Lowes Home improvement. IMPORTANT NOTE: - I used the 1 1/4" version of the reducer. 1 1/2 is too big:
Pulled the resonator from the top of the engine (item #18 on schematic below). Screwed the 3/4" brass hose adapter into the PVC reducer. Sprayed a little silicone spray on the outside of the reducer and it fit perfect. The existing crankcase vapor hose is approx 3/4" so it fits the adapter just fine (but see my technical notes at the bottom of my post):
I pulled the tube from the main air intake to the lower resonator (item # 12 from schematic):
I put a cap on the lower resonator opening, but that's not really necessary (so I'm not including it in the cost of parts):
Technical Notes:
1. The plastic bushing I initially used is standard PVC. This is rated for water only and a max temp of 140dF. I tried to find one made of CPVC which is designed to carry solvents and is rated at 210dF but was not able to find it at the time. I have been running the standard PVC version for a week as is with no issues. I just got back from a 2 hour trip to the Oregon coast. The bushing was cool to the touch after I shut the engine off. However - long term (especially in summer and under constant exposure to petroleum vapor) I want to use a CPVC version. I have ordered this one for $8.74 (+ shipping) from zoro.com:
2. When I replace the PVC reducer bushing with the CPVC version, I will also replace the existing crankcase ventilation hose with a straight piece (8-10") of 3/4" heater hose. Less strain at the hose adapter.
3. I originally taped off the round duct on the underside of the main intake tube (item #10) with duct tape, but then took it off. The main intake opening at the hood is rather small and leaving that lower duct open gives plenty of air available.
4. The lower resonator box is really not needed, so if you do this mod and it works for you, you could just remove the box entirely. It's only held by one bolt to the unibody rail.
5. After a week with this setup I am seeing a mileage improvement of at least 2-3 mpg overall. Not bad for an investment of less that $15 (using the CPVC reducer bushing).
Disclaimer:
This post is for information only. You are responsible for your own safety and that your vehicle meets local and federal emissions standards and applicable laws.
Re: Air Intake duct mod for better mpg
Thank you for providing that writeup - you and the original poster really help out those of us that are looking for something "plug and play"!
-
phmichel
- Posts: 260
- Joined: Tue Jun 24, 2014 3:00 pm
- Car: 2013 Nissan Rogue S AWD
2017 Nissan Quest SV - Location: NW Oregon
Re: Air Intake duct mod for better mpg
UPDATE:
So I've been running this mod for almost 1k miles. I decided to UNINSTALL the mod to the upper intake tube. I reinstalled the stock resonator and PCV hose setup. Why?
The whole point of this mod would be to improve the laminar flow of air into the engine. Disconnecting the tube to the lower resonator at the front intake makes sense because in the stock configuration you are passing all the intake air over a 3" hole leading to, basically, a vacuum. In theory, this would slow down the air speed and create turbulence. I left this mod in place and taped off the 3" hole at the upper intake the led to the lower resonator.
The upper resonator situation is different. This is not a vacuum. The PCV valve vents into this resonator, then into the intake tube. A hose connecting the PCV directly into the air intake runs unfiltered crankcase gases and blow-by into the intake. I think this would result in the throttle body getting dirty a lot quicker than the stock setup. Even though it looks like there are no baffles or a filter in the upper resonator, the gasses will circulate in the resonator and deposit a significant portion of the oil on the inside surface. Since the original setup does not create a vacuum, I see no reason to eliminate it.
In 1k miles I have seen a confirmed increase in overall MPG of 1-2 MPG with this setup, but I attribute that solely to disconnecting the lower resonator and improving airflow. I also run a K&N filter and I think that helps as well. If anyone has been running this setup for longer I would appreciate hearing from you, especially if you have inspected or cleaned your throttle body. Thanks everyone...
Re: Air Intake duct mod for better mpg
i have about 6000 miles with this mods and long trips(about 600 miles) and checked my throttle body without any sign of dirt inside. Also my mpg are really good after i did this mod. I still have the stock filter no kn or something else.
-
phmichel
- Posts: 260
- Joined: Tue Jun 24, 2014 3:00 pm
- Car: 2013 Nissan Rogue S AWD
2017 Nissan Quest SV - Location: NW Oregon
Re: Air Intake duct mod for better mpg
Thanks xtrailmty. By all means run it if it works. Yours is a 2015 and by the schematic you posted the PCV does NOT vent into the upper resonator, so a vacuum would be created there on your model. Plus it looks like the lower resonator is much smaller and you had other ducts and gating to seal and tape off. I think the big difference in both cases is made in improving the air speed and reducing turbulence from the outside to the air filter.xtrailmty wrote:i have about 6000 miles with this mods and long trips(about 600 miles) and checked my throttle body without any sign of dirt inside. Also my mpg are really good after i did this mod. I still have the stock filter no kn or something else.
Lets compare notes after a few months and see what our real-world mileage changes are, and if anything else comes up...
-
04pathse
- Posts: 776
- Joined: Sun May 02, 2010 2:55 pm
- Car: 2004 Nissan Pathfinder SE
2008.5 Mazda Mazdaspeed 3
Re: Air Intake duct mod for better mpg
I have been doing 3D printing for a few years now and the adapter printed in nylon is the best choice as it is very high strength, is resistant to heat and chemicals.
If anyone is interested in an adapter printed in nylon send me a private message.
Here is one I just printed, It is made to the specs that was provided in the file that was posted a few months ago.

If anyone is interested in an adapter printed in nylon send me a private message.
Here is one I just printed, It is made to the specs that was provided in the file that was posted a few months ago.
Re: Air Intake duct mod for better mpg
Looks really good.04pathse wrote:I have been doing 3D printing for a few years now and the adapter printed in nylon is the best choice as it is very high strength, is resistant to heat and chemicals.
If anyone is interested in an adapter printed in nylon send me a private message.
Here is one I just printed, It is made to the specs that was provided in the file that was posted a few months ago.
Glad you could use the file I made. Mine is still going strong even after summer trips down south.
You should like the result.
-
04pathse
- Posts: 776
- Joined: Sun May 02, 2010 2:55 pm
- Car: 2004 Nissan Pathfinder SE
2008.5 Mazda Mazdaspeed 3
Re: Air Intake duct mod for better mpg
Thanks, but I don't own a Rogue...
Let me know if the one you have fails on you.
Let me know if the one you have fails on you.
Re: Air Intake duct mod for better mpg
I see in your signature you have a pathfinder. Even with a different engine, isn't that the same principle?04pathse wrote:Thanks, but I don't own a Rogue...
Let me know if the one you have fails on you.
Find Your Forum!