2014 External Ground Lighting Kit
-
JB'sTitanXD

- Posts: 228
- Joined: Tue Mar 18, 2014 4:35 am
- Car: 2017 Titan XD Cummins
- Location: Kansas City, MO
2014 External Ground Lighting Kit
Anyone have this one their 14 Rogue? Can you post pics? I am thinking about buying the kit and installing myself since its a cheap add-on and easy for DIY. dont think its worth paying 300+ for the dealer to do it.
-
JB'sTitanXD
- Posts: 228
- Joined: Tue Mar 18, 2014 4:35 am
- Car: 2017 Titan XD Cummins
- Location: Kansas City, MO
Re: 2014 External Ground Lighting Kit
Went ahead and ordered the kit and the accessory connectors. Cost was 230 shipped for everything. Hopefully someone can post pictures when they get a chance.

Re: 2014 External Ground Lighting Kit
I thought about ordering that kit but here's a few things. on ebay it's $165 and probably the best deal where I could find. Instead of that kit I ordered illuminated kick-plates and fog lights which I'm going to connect the same way as I used to have on my '08 Rogue. Also this kit in my opinion is more useful than nissan's ground kit:
http://www.carid.com/universal-led-ligh ... 60746.html
http://www.carid.com/universal-led-ligh ... 60746.html
-
JB'sTitanXD
- Posts: 228
- Joined: Tue Mar 18, 2014 4:35 am
- Car: 2017 Titan XD Cummins
- Location: Kansas City, MO
Re: 2014 External Ground Lighting Kit
yea i looked at a few other kits. i prefer OEM. that price included 2 of the accessory connectors needed to install if you dont want to slice into the cars harness. i have heard that most of the nissans dont like the harness being slice into.
Re: 2014 External Ground Lighting Kit
Even with OEM you still have to splice the wires. When I installed oem kick-plates on my '08 Rogue I had to splice the wires in bcu. Check this thread out because I believe the same applies to your ground kit:
illuminating-kick-plates-t563663.html
illuminating-kick-plates-t563663.html
-
JB'sTitanXD
- Posts: 228
- Joined: Tue Mar 18, 2014 4:35 am
- Car: 2017 Titan XD Cummins
- Location: Kansas City, MO
Re: 2014 External Ground Lighting Kit
nope, the only tapping is to the accessory connectors unless you decided not to spend the money on them and just splice the connector nissan left to plug the accessory connectors into. Here are the instructions that I will be using for the install: https://www.nissan-techinfo.com/asistgc ... C1UG10.PDF
-
JB'sTitanXD
- Posts: 228
- Joined: Tue Mar 18, 2014 4:35 am
- Car: 2017 Titan XD Cummins
- Location: Kansas City, MO
Re: 2014 External Ground Lighting Kit
anyone have night pictures of a external light kit on any kit of nissan?
Re: 2014 External Ground Lighting Kit
Any way you can document your DIY for the rest of us? I want to do this mod, but I'm a little nervous after reading the installation instructions.
-
JB'sTitanXD
- Posts: 228
- Joined: Tue Mar 18, 2014 4:35 am
- Car: 2017 Titan XD Cummins
- Location: Kansas City, MO
Re: 2014 External Ground Lighting Kit
sure i think i can do that, gonna cost ya! j/k haha
Re: 2014 External Ground Lighting Kit
Hey, if it saves me a few hours of Nissan labor I could send a little something your way, you know, for the effort.JB'sRogue wrote:sure i think i can do that, gonna cost ya! j/k haha
-
JB'sTitanXD
- Posts: 228
- Joined: Tue Mar 18, 2014 4:35 am
- Car: 2017 Titan XD Cummins
- Location: Kansas City, MO
Re: 2014 External Ground Lighting Kit
iam just playing around. i am hoping someone with them already on their rogue will tune in and post some night photos. I am not concerned about doing the wiring. I wired some LEDs in the bed of my truck for lighting. I had wired them so when you would unlocked the door with the keyfab they light up or could be manually turned on with the cargo bed lighting switch.


-
dsouzb
- Posts: 14
- Joined: Sat Mar 29, 2014 10:59 pm
- Car: Saharan Sun 2014 Rogue SL AWD + Premium Beige Interior, Remote Start, Interior Accent Lighting, Moonroof deflector, splash guards, all season mats, cargo mat, bumper guard
Re: 2014 External Ground Lighting Kit
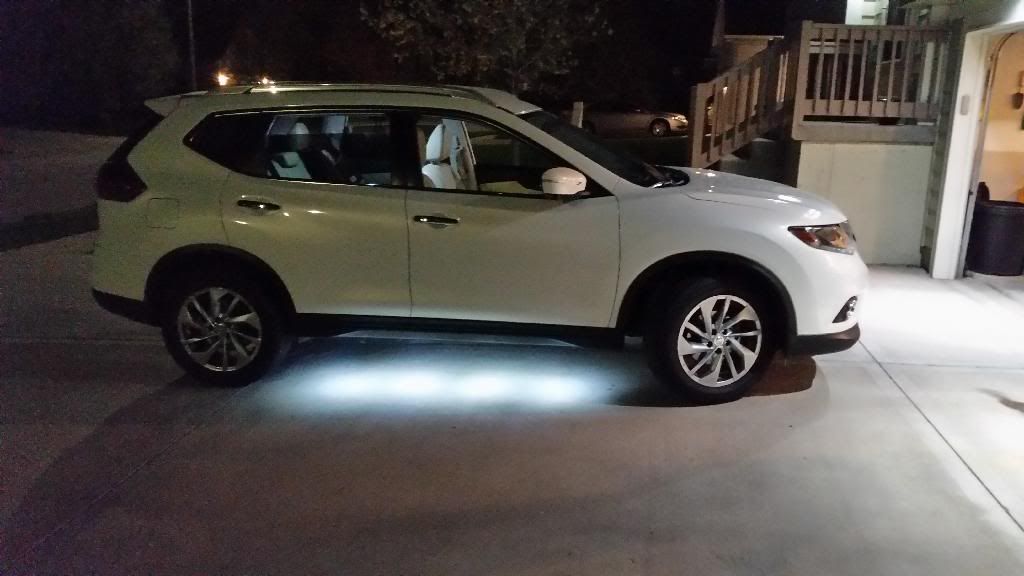
I got my external ground lighting done at the dealership. I even got the internal mood lighting installed (20 settable colors). :-)) Pimped out man. Dealer did the external ground lights for $300 labor and installation included. The lights look just like the stock photo of the Rogue with external ground lighting. Four led lights light the area between the front and rear wheels. It's a pretty cool effect. I'm not a DIY person so got it done at the dealership.
-
JB'sTitanXD
- Posts: 228
- Joined: Tue Mar 18, 2014 4:35 am
- Car: 2017 Titan XD Cummins
- Location: Kansas City, MO
Re: 2014 External Ground Lighting Kit
Post some pics tonight if you can. What colors does the mood change to? Think there is 20 colors
Re: 2014 External Ground Lighting Kit
Yesterday I was installing led kick plates and I ran into a problem. None of the color wires in accessory connectors on both sides match the instruction. So I believe in your case with ground kit the same story. You will need to adapters for both sides:
Driver side:
http://www.leeparts.com/nissan_rogue_t3 ... ector.html
Passenger side:
http://www.leeparts.com/nissan_altima_l ... ector.html
Driver side:
http://www.leeparts.com/nissan_rogue_t3 ... ector.html
Passenger side:
http://www.leeparts.com/nissan_altima_l ... ector.html
-
JB'sTitanXD
- Posts: 228
- Joined: Tue Mar 18, 2014 4:35 am
- Car: 2017 Titan XD Cummins
- Location: Kansas City, MO
Re: 2014 External Ground Lighting Kit
hmm...I have 2 of the accessory connectors in hand, came in the mail today. I have verified all the wires are there. Just waiting for the LEDs and Console Module which will be here mon or tues. i will get the install done thurs or fri. Did some investigating today and pulled some of the interior apart and took pictures. I am guessing install is going to take 1-2 hours tops.
-
dsouzb
- Posts: 14
- Joined: Sat Mar 29, 2014 10:59 pm
- Car: Saharan Sun 2014 Rogue SL AWD + Premium Beige Interior, Remote Start, Interior Accent Lighting, Moonroof deflector, splash guards, all season mats, cargo mat, bumper guard
Re: 2014 External Ground Lighting Kit
Probably just 6 to 10 different visible colors, the rest are a shade different or perhaps just dimmer or brighter versions of the basic color spectrum. Color is changed with a wheel that's mounted inside the storage box. It can be set to stay on constantly or work with the dome light dimmer.
Haven't looked into how to post pictures yet... but will do that at some point eventually.
Haven't looked into how to post pictures yet... but will do that at some point eventually.
JB'sRogue wrote:Post some pics tonight if you can. What colors does the mood change to? Think there is 20 colors
-
JB'sTitanXD
- Posts: 228
- Joined: Tue Mar 18, 2014 4:35 am
- Car: 2017 Titan XD Cummins
- Location: Kansas City, MO
Re: 2014 External Ground Lighting Kit
there is a thread on here that shows ya how to post pics. not sure where its at. if you could post pictures or the ground lighting and mood lighting that would be awesome.
I should be getting my ground lighting today
I should be getting my ground lighting today
-
JB'sTitanXD
- Posts: 228
- Joined: Tue Mar 18, 2014 4:35 am
- Car: 2017 Titan XD Cummins
- Location: Kansas City, MO
Re: 2014 External Ground Lighting Kit
Printed the instructions and ready to rock this install out.
-
JB'sTitanXD
- Posts: 228
- Joined: Tue Mar 18, 2014 4:35 am
- Car: 2017 Titan XD Cummins
- Location: Kansas City, MO
Re: 2014 External Ground Lighting Kit
everything showed up so i might get this done tonight and build a new thread for the DIY
-
Rogue One

- Administrator
- Posts: 7944
- Joined: Tue Jun 14, 2011 10:15 pm
- Car: 2011 Nissan Rogue SL
2012 Nissan Rogue SL
2022 Honda Pilot SE
2025 Honda CR-V Sport L - Location: Florida, USA
Re: 2014 External Ground Lighting Kit
JB'sRogue wrote:there is a thread on here that shows ya how to post pics. not sure where its at. if you could post pictures or the ground lighting and mood lighting that would be awesome.
I should be getting my ground lighting today
-
JB'sTitanXD
- Posts: 228
- Joined: Tue Mar 18, 2014 4:35 am
- Car: 2017 Titan XD Cummins
- Location: Kansas City, MO
-
JB'sTitanXD
- Posts: 228
- Joined: Tue Mar 18, 2014 4:35 am
- Car: 2017 Titan XD Cummins
- Location: Kansas City, MO
Re: 2014 External Ground Lighting Kit
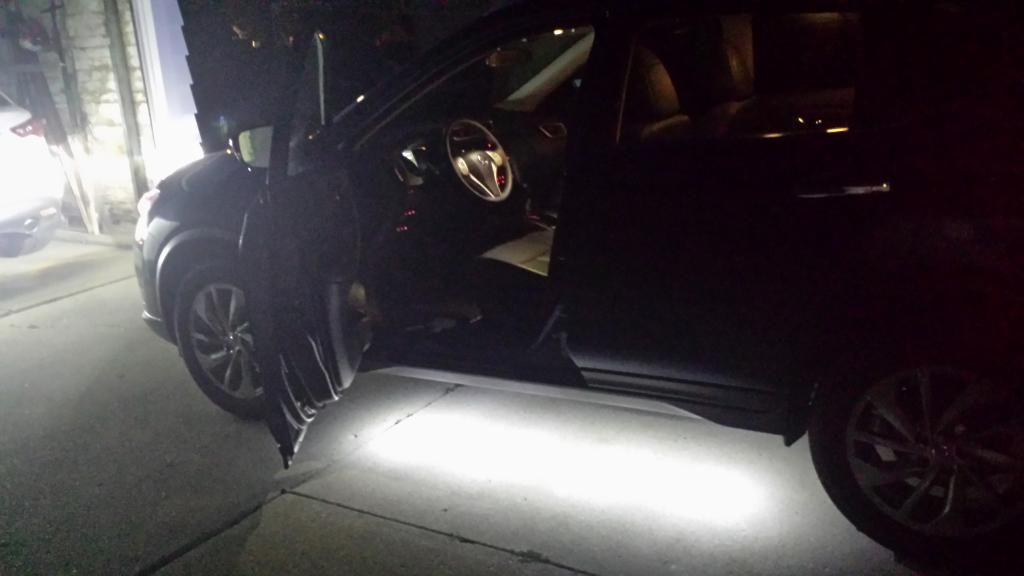
anyways...here is the finished product. DIY to come soon, i have to put it together still.

 Re: 2014 External Ground Lighting Kit
[URL=https://forum-attachments.sfo2.di ... .jpg[/img][/url]
After someone posted the coupon for the online Nissan store I decided to buy the ground kit. All told with the 2 connectors it was about $200.
Installed the ground kit this weekend, it went really smoothly. Many thanks to JB whose tutorial I used to complete this.
Nothing much new to report, I was able to remove the sides without breaking any clips. I started at the rear end and pulled out and down and the rest of them came out relatively easy.
If you are using the Nissan instructions, don't be intimidated by the wiring as I was, I finally just followed JB's instructions and it was a piece of cake.
Re: 2014 External Ground Lighting Kit
After adding ground kit back in May I thought something is missing so I decided to add door logos...what a pain to run the wires throw doors:facepalm: :


-
JB'sTitanXD
- Posts: 228
- Joined: Tue Mar 18, 2014 4:35 am
- Car: 2017 Titan XD Cummins
- Location: Kansas City, MO
Re: 2014 External Ground Lighting Kit
Glad the write helped, the install is easy and its almost plug and play.beelove wrote:[URL=http://s1077.photobucket.com/user/blove ... 4.jpg.html]
After someone posted the coupon for the online Nissan store I decided to buy the ground kit. All told with the 2 connectors it was about $200.
Installed the ground kit this weekend, it went really smoothly. Many thanks to JB whose tutorial I used to complete this.
Nothing much new to report, I was able to remove the sides without breaking any clips. I started at the rear end and pulled out and down and the rest of them came out relatively easy.
If you are using the Nissan instructions, don't be intimidated by the wiring as I was, I finally just followed JB's instructions and it was a piece of cake.

Re: 2014 External Ground Lighting Kit
That is pretty cool Leo. How did you do that?Leo2005 wrote:After adding ground kit back in May I thought something is missing so I decided to add door logos...what a pain to run the wires throw doors:facepalm: :
Re: 2014 External Ground Lighting Kit
When you buy door logos (ebay for example) you will get a drill with that too. Drill a hole in plastic at the bottom of the door. Install the light and run the wires from each light of each door to the accessory panel where you get the power to the door switches. That's it. The hardest part is to run the wires throw the doors then throw the panels is pretty easy.darylzero wrote:That is pretty cool Leo. How did you do that?