Two weeks ago, I replaced the valve cover gaskets and spark plug gaskets on my I30 because they were hemorrhaging oil pretty badly. This job is fairly easy, I'd give it a 2.5 out of 5 in difficulty. It requires a lot of patience and I highly recommend labeling hoses and electrical connectors for a flawless one shot one kill start up. I suggest you set aside at least 5 hours to do both valve covers. I'm sure it can be done in a lot less time but why rush when you're not getting paid to do it fast. I ended up going to the parts store to buy some replacement rubber hoses due to dry rot and also a new PCV valve because they are so cheap, albeit important to a car's performance.
Remove the airbox and intake hose from throttle body. Disconnect the throttle cables and then the two 10mm bolts that holds the throttle cable bracket on the intake manifold. Remove the two 12mm nuts securing the part on top of the intake close to the IACV. I have no idear what its called. Remove the IACV, and the four connectors that go to it, to get to the two 12mm EGR bolts(not actually the valve but an inlet from the EGR valve to the intake) at the front and right side of the intake if you're facing it from the drivers side fender.
There are only two 12mm bolts and two 12mm nuts that you can actually see securing the upper intake. Then there are two more 12mm bolts that you'll have to feel with your hands on the side of the intake by the firewall. These two 12mm bolts secure the side of the intake to two brackets.
Thats 6 total bolts and nuts plus the two EGR bolts for a total of eight that you have to remove in order to take the upper intake off.
There is a U shaped rubber hose that is hard as hell to remove right behind the EGR inlet and another hose in front of that. Make sure you have some spray lube and long needle nose pliers to get to the clamps and to help you remove stuck rubber hoses. There is also a coolant line that goes underneath the throttle body and connects to the throttle body. I had to replace this hose because it was so swollen I couldn't remove the snap clamps.
I bought worm gear clamps to replace those(I forgot to tighten the side that is not attached to the throttle body and it causes a huge coolant leak that was hard as hell to see). Make sure you tighten those clamps. Those three hoses are pretty much the only ones holding the intake down. Once they're off, lift up on the intake and remove. The gasket is rubber so it stays.
Make sure you cover up the lower intake to prevent foreign materials from falling in. You don't have to remove the coil packs to remove the intake but you have to disconnect the connectors(rear bank). It is easy to remove the coil packs so I went ahead and did so. Be careful, or you might leave a boot in one of the spark plug holes, which I did. Now just remove the 10mm bolts all around the valve cover and lift it off.
I bought a Fel Pro kit at Autozone for $52 and it comes with everything. The gasket on the rear bank was so dry it cracked into a bunch of pieces. Be careful removing the spark plug gaskets in the valve cover. I used a small pry bar to pry it out. Make sure you pay attention to which end goes up so you don't install them upside down. I used a dead blow hammer to gently tap them into the valve cover. I also used super glue to glue the gasket into the valve cover because it kept falling out while I tried to put it back on the head. Just put a small drop in the corners and everything 3 or 4 inches around the valve cover and let it dry. This will make your life so much easier, especially on the front one because the damn wiring harness is a b... to get the valve cover under while trying to hold the gasket in place.
Make sure you clean the head where the gasket is gonna sit to provide a good seal. Hand start the bolts around the valve cover and tighten it from the inside towards the outside. Try not to overtighten. I use my Craftsman 19 volt impact driver because it is fast as hell and provides perfect torque for the valve covers.
Now is the time to put the intake back on. Make sure you reinstall the three hoses back on the intake. The two by the EGR inlet are tricky. The coolant line to the throttle body isn't too bad.
Once the three hoses are tightened, try to get the EGR inlet bolts started and then sit the intake onto the lower intake. Tighten the two 12mm bolts first and then the two 12mm studs last. I didn't have a torque wrench but I just snugged them because it is aluminum. I think it is about 20 ft/lbs, which is very light so don't go crazy. The rest is easy, just put all the brackets, IACV, hoses, and connectors back together.
The front valve cover is a piece of cake. You do have to remove the coil packs to remove the valve cover.
Remove all the 10mm bolts holding all the brackets and wiring harness on top of the intake in order to remove the intake.
Notice the blue tape labeling the connectors and hoses for easy reassembly.
This is the bracket holding the PCV hose and another vacuum line. I replaced the PCV while everything was apart.
These are the two hoses by the EGR inlet that I was talking about, they suck.
See the long hose underneath the intake, that is where you have to disconnect the U shaped hose and the other rubber hose. It is right next to the EGR inlet.
Notice the two brackets, thats where the two 12mm bolts you have to feel for attach to the side of the intake. Also, note the dreadful U shaped hose right by the EGR inlet.
Notice the IACV and the new and old spark plug gaskets and also the old, broken valve cover gasket.
Modified by Evil I 30 at 6:10 AM 4/28/2009
Modified by Evil I 30 at 6:16 AM 4/28/2009
Modified by Evil I 30 at 6:26 AM 4/28/2009
Valve cover gasket job on I30 Very Thorough Write Up and A Lot Of Pics

Re: Valve cover gasket job on I30 Very Thorough Write ... (Evil I 30)
Very nice write up! I'll let the atricle team know to convert this. Also added to the how-to thread.
Would you like a custom title (below your user name) for your effort?
Would you like a custom title (below your user name) for your effort?
Re: Valve cover gasket job on I30 Very Thorough Write ... (maxhopper97)
Sure, that would be great. I will go back and use photoshop to highlight important bolts, brackets, hoses, etc. that are necessary to remove the upper intake so that it'll be easier to understand.maxhopper97 wrote:Very nice write up! I'll let the atricle team know to convert this. Also added to the how-to thread.
Would you like a custom title (below your user name) for your effort?
Re: Valve cover gasket job on I30 Very Thorough Write ... (Evil I 30)
Just let me know what you'd like your custom title to be. You can either post it or send me an email (click my user name to get my email).
-
Sentientbydesign

- Posts: 5993
- Joined: Wed Feb 02, 2005 8:21 am
- Car: 03 Evo VIII - 330 AWHP
05 Subaru Legacy GT Stg 2 - Sold
05 G35 6MT Coupe - 278 WHP - Sold
04 WW Evo VIII - 302 AWHP - Ex's
96 I30 - Sold - Contact:
Re: Valve cover gasket job on I30 Very Thorough Write ... (Evil I 30)
Were you still going to photoshop the specific areas? I'd like to convert this into an article as it has some very important information, but the easier it is to follow, the better.Evil I 30 wrote:
Sure, that would be great. I will go back and use photoshop to highlight important bolts, brackets, hoses, etc. that are necessary to remove the upper intake so that it'll be easier to understand.
Also, I used to have a 4th gen. How many miles on this one? Did you clean out the intake before remounting it?
Re: Valve cover gasket job on I30 Very Thorough Write ... (Sentientbydesign)
I finally got around to adding the pics with discriptions to this article. My car has 233,000 plus miles on it. It runs great except for a slight miss here and there, I believe it might be a faulty TPS sensor.
Re: Valve cover gasket job on I30 Very Thorough Write ... (Evil I 30)
You did a Great Job Nice Pictures and how-2-do it too
-
NutriaforBreakfast
- Posts: 1316
- Joined: Wed Sep 26, 2007 1:41 pm
- Car: Nissan Maxima 1995 VQDE engine
Re: Valve cover gasket job on I30 Very Thorough Write ... (Evil I 30)
Hey this looks fantastic!
I would like to add for anybody else when they do this job toclean out the EGR tube which connects to the back of the plenum/upper intake. Mine was very clogged when I changed my valvecovers. It's not easy unhooking it, but the engine needs to breathe.
And that throttle body hose is a problem. Mine started leaking afterabout a week and I had to take a lot of stuff off of it to fix. I would recommend the best hose clamp you can buy for it.
Those plenum brackets are tough to get your hands in to work on.I used a 2 x 6 to lay on the engine hood to get leverage
Re: Valve cover gasket job on I30 Very Thorough Write ... (NutriaforBreakfast)
You're right about the EGR inlet, I had to stab the hard carbon with a small screwdriver to clear out the hole. It ran a lot better afterwards, but it must have clogged up again since then. Its also a great idea to clean the IACV while you do this job.
-
NutriaforBreakfast
- Posts: 1316
- Joined: Wed Sep 26, 2007 1:41 pm
- Car: Nissan Maxima 1995 VQDE engine
Re: Valve cover gasket job on I30 Very Thorough Write ... (Evil I 30)
I has the miss too. My mechanic figured out it was a bad coil.
Re: Valve cover gasket job on I30 Very Thorough Write ... (NutriaforBreakfast)
I need to take a look at my EGR valve, tubes, and hoses. Can I get to all that by just removing the throttle body, or does the intake manifold (collector) have to come off, too?
-
NutriaforBreakfast
- Posts: 1316
- Joined: Wed Sep 26, 2007 1:41 pm
- Car: Nissan Maxima 1995 VQDE engine
Re: Valve cover gasket job on I30 Very Thorough Write ... (jdjohn)
You cant see all the EGR hose connections just removing the throttlebody. Its better if you remove the plenum too.
-
loystock
- Moderator
- Posts: 2072
- Joined: Sun Sep 21, 2003 9:12 pm
- Car: 10 Honda Pilot
97 Infiniti Q45
03 Infiniti Q45
97 Infiniti I30
06 Infiniti M35 Sports
04 G35 & 99 I30-RIP - Location: San Jose, CA
Re: Valve cover gasket job on I30 Very Thorough Write ... (Evil I 30)
Great write up, especially now that I can see the images.
Re: Valve cover gasket job on I30 Very Thorough Write Up and
New to the club. Tons of useful info and experience in here!
This is a great post! I have the FSM, which makes the job look like a breeze .... but when I look under the hood, I put it off, close 'er back up, and replace the cardboard under the car. This gives me the courage to give it a shot.
Thanks .... I hope!
I note the reference to removing coolant hoses. I presume that the radiator should be drained before starting. Is that correct?
-
tigersharkdude

- Posts: 2636
- Joined: Mon Mar 12, 2007 7:14 am
- Car: 1999 Nissan Maxima
- Location: Nashville, TN
Re: Valve cover gasket job on I30 Very Thorough Write Up and
Nice write-up dude. I will be using it before long. My rear valve cover gasket took a dump
Re: Valve cover gasket job on I30 Very Thorough Write Up and
Four years after it's creation this walk-through is still a great help and time saver!!! Thank you very much for the help with repairing just one oil leak for my new student driver.
Re: Valve cover gasket job on I30 Very Thorough Write Up and
I have a leak coming out from the rear valve cover and I am sure that my gasket had gone bad. I tried to remove the intake manifold but was unsuccessful. I have removed all screws and bolts holding the intake but I couldn't find the two 12mm EGR bolts that you mentioned here. FYI, my intake manifold is different from the ones stated here or in those found on youtube videos. Here is a link of the kind of intake manifold that is found in my engine. http://www.zerotohundred.com/newforums/ ... ngine.htmlEvil I 30 wrote:Two weeks ago, I replaced the valve cover gaskets and spark plug gaskets on my I30 because they were hemorrhaging oil pretty badly. This job is fairly easy, I'd give it a 2.5 out of 5 in difficulty. It requires a lot of patience and I highly recommend labeling hoses and electrical connectors for a flawless one shot one kill start up. I suggest you set aside at least 5 hours to do both valve covers. I'm sure it can be done in a lot less time but why rush when you're not getting paid to do it fast. I ended up going to the parts store to buy some replacement rubber hoses due to dry rot and also a new PCV valve because they are so cheap, albeit important to a car's performance.
Remove the airbox and intake hose from throttle body. Disconnect the throttle cables and then the two 10mm bolts that holds the throttle cable bracket on the intake manifold. Remove the two 12mm nuts securing the part on top of the intake close to the IACV. I have no idear what its called. Remove the IACV, and the four connectors that go to it, to get to the two 12mm EGR bolts(not actually the valve but an inlet from the EGR valve to the intake) at the front and right side of the intake if you're facing it from the drivers side fender.
There are only two 12mm bolts and two 12mm nuts that you can actually see securing the upper intake. Then there are two more 12mm bolts that you'll have to feel with your hands on the side of the intake by the firewall. These two 12mm bolts secure the side of the intake to two brackets.
Thats 6 total bolts and nuts plus the two EGR bolts for a total of eight that you have to remove in order to take the upper intake off.
There is a U shaped rubber hose that is hard as hell to remove right behind the EGR inlet and another hose in front of that. Make sure you have some spray lube and long needle nose pliers to get to the clamps and to help you remove stuck rubber hoses. There is also a coolant line that goes underneath the throttle body and connects to the throttle body. I had to replace this hose because it was so swollen I couldn't remove the snap clamps.
I bought worm gear clamps to replace those(I forgot to tighten the side that is not attached to the throttle body and it causes a huge coolant leak that was hard as hell to see). Make sure you tighten those clamps. Those three hoses are pretty much the only ones holding the intake down. Once they're off, lift up on the intake and remove. The gasket is rubber so it stays.
Make sure you cover up the lower intake to prevent foreign materials from falling in. You don't have to remove the coil packs to remove the intake but you have to disconnect the connectors(rear bank). It is easy to remove the coil packs so I went ahead and did so. Be careful, or you might leave a boot in one of the spark plug holes, which I did. Now just remove the 10mm bolts all around the valve cover and lift it off.
I bought a Fel Pro kit at Autozone for $52 and it comes with everything. The gasket on the rear bank was so dry it cracked into a bunch of pieces. Be careful removing the spark plug gaskets in the valve cover. I used a small pry bar to pry it out. Make sure you pay attention to which end goes up so you don't install them upside down. I used a dead blow hammer to gently tap them into the valve cover. I also used super glue to glue the gasket into the valve cover because it kept falling out while I tried to put it back on the head. Just put a small drop in the corners and everything 3 or 4 inches around the valve cover and let it dry. This will make your life so much easier, especially on the front one because the damn wiring harness is a b... to get the valve cover under while trying to hold the gasket in place.
Make sure you clean the head where the gasket is gonna sit to provide a good seal. Hand start the bolts around the valve cover and tighten it from the inside towards the outside. Try not to overtighten. I use my Craftsman 19 volt impact driver because it is fast as hell and provides perfect torque for the valve covers.
Now is the time to put the intake back on. Make sure you reinstall the three hoses back on the intake. The two by the EGR inlet are tricky. The coolant line to the throttle body isn't too bad.
Once the three hoses are tightened, try to get the EGR inlet bolts started and then sit the intake onto the lower intake. Tighten the two 12mm bolts first and then the two 12mm studs last. I didn't have a torque wrench but I just snugged them because it is aluminum. I think it is about 20 ft/lbs, which is very light so don't go crazy. The rest is easy, just put all the brackets, IACV, hoses, and connectors back together.
The front valve cover is a piece of cake. You do have to remove the coil packs to remove the valve cover.
Remove all the 10mm bolts holding all the brackets and wiring harness on top of the intake in order to remove the intake.
Notice the blue tape labeling the connectors and hoses for easy reassembly.
This is the bracket holding the PCV hose and another vacuum line. I replaced the PCV while everything was apart.
These are the two hoses by the EGR inlet that I was talking about, they suck.
See the long hose underneath the intake, that is where you have to disconnect the U shaped hose and the other rubber hose. It is right next to the EGR inlet.
Notice the two brackets, thats where the two 12mm bolts you have to feel for attach to the side of the intake. Also, note the dreadful U shaped hose right by the EGR inlet.
Notice the IACV and the new and old spark plug gaskets and also the old, broken valve cover gasket.
Modified by Evil I 30 at 6:10 AM 4/28/2009
Modified by Evil I 30 at 6:16 AM 4/28/2009
Modified by Evil I 30 at 6:26 AM 4/28/2009
Re: Valve cover gasket job on I30 Very Thorough Write Up and
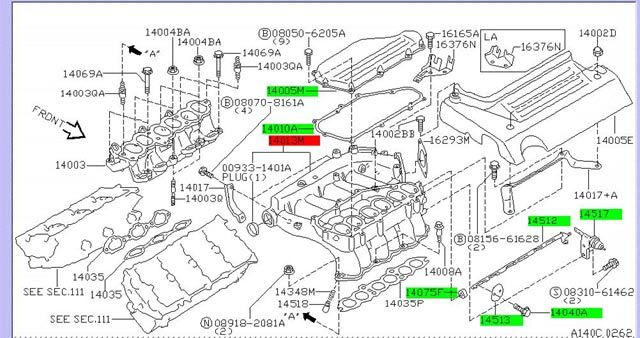
Welcome to NICO.gonit wrote:I have a leak coming out from the rear valve cover and I am sure that my gasket had gone bad. I tried to remove the intake manifold but was unsuccessful. I have removed all screws and bolts holding the intake but I couldn't find the two 12mm EGR bolts that you mentioned here. FYI, my intake manifold is different from the ones stated here or in those found on youtube videos. Here is a link of the kind of intake manifold that is found in my engine. http://www.zerotohundred.com/newforums/ ... ngine.html
You have what is referred to as a MEVI (Middle Eastern Variable Intake). You probably do not have an EGR valve on your vehicle. There is a bracket (part # 14017) on the lower rear of the manifold that is probably what you are missing.
Here is a picture of your manifold and the location of all the bolts.
Re: Valve cover gasket job on I30 Very Thorough Write Up and A Lot Of Pics
I am not able to see the pictures.