
First of all, this a job to be done sooner, not later. My scenario: I purchased this car a couple weeks ago in "not running but shouldn't take much" condition. The car has 247,xxx mi on it. I'm the third owner, the first being a middle aged business man who drove it approx 150 mi a day to work and back, and the second being a dumb kid who had it for about 4 months and killed it. Basically he went out and tried to be a "mad tyte drifter" with a stock car, and worse, original 240k mi timing chain guides.
If you do this job sooner rather than later you will save yourself a bunch of work. If you wait until things actually fall apart inside, then you will have to drop the oil pan besides doing the regular timing chain replacement, not fun. I don't have pics of the pan removal (I did it, but forgot pics ), but I will include instructions in the writeup.
Parts definitely required: (borrowed from Greg's thread) Chain [13028-8B000]Tensioner [13070-40F06]Tensioner Guide [13091-40F03]Straight Guide [13085-40F10]The Two O-Ring Seals [15066-5E500] & [15066-40F11]Front Seal [13510-53J10]
I recommend buying a complete timing kit, including the sprockets. They can be had very reasonably from ebay or cheapo auto parts places. You can go ahead and get factory parts if you want, but they'll be more expensive,and after all, it is a SOHC KA .
Recommended parts: Cam Gear [13024-40F00]Crank Gear [13021-53J00]
Other supplies: If the engine is run very long after the guide is demolished you will need a new front timing cover because the loose chain will wear through the cover into the water jacket, introducing coolant into your oil, and the rest of your engine. If this happens you will need a few oil filters and a few gallons of oil to flush the oil system. (Mine was in this condition.)Oil filter(s) (depending on situation)Oil (might as well buy it by the gallon if you have to flush it)Silicone gasket maker.Coolant/water
Tools: (Borrowed from Greg again, I also used a few others)Assortment of Metric Sockets including 27mm For Crank PulleyAssortment of Metric WrenchesAssortment of Metric Allen WrenchesChannel Locks (Adjustable Groove Pliers)Phillips #1 & #2 Screwdrivers ¼" Bladed (Flat-Tip) ScrewdriverLong Breaker BarTorque WrenchClaw HammerOil Filter WrenchCatch Pan18" Motorcycle Bungee with hooks6" 3-Arm Puller Long Bar (Floor Jack Handle/Hoist Handle)Flexplate tool (Automatic Transmission Only)
My additional listFloor jackJackstands1/2" Impact driver
On to the writeup!
First of all, position the car in a place where you can work on it as conveniently as possible. I have mine on the lift in my shop, but you can do it pretty much anywhere as long as you have it on a good surface (I wouldn't do it on dirt/gravel unless I absolutely had to). If you have to drop the pan you will definitely need concrete or asphalt.
Begin by disconnecting/removing the battery. Drain the oil and the coolant. Then remove the intake piping. Loosen the clamp at the throttle body (10mm), remove the breather line from the valve cover (squeeze clamp), and the two lines on the pass side of the intake piping about 6-8" ahead of the t/b. Remove the two plugs at the MAF and unclip the top of the airbox. There is also a hose going into the back of the airbox, loosen the clamp and remove it. There are two screws, one on the fan shroud and one on the radiator support (both 10mm). Remove them and then remove the entire intake piping/MAF/top of airbox.
Next remove the valve cover. It is held on with 8 10mm bolts. There is also a bolt/screw on the front pass side that connects the wire harness support, remove it too.
A pic showing the engine at this point.
Next remove the fan shroud. The lower shroud has a little clip on each side, squeeze it and move it toward the rear of the vehicle. The lower shroud will just fall off then. Then remove the hoses/wires running across the top of the shroud. The two hoses that go to the charcoal canister remove and lay over on the pass side of the engine bay. The wires go to the coil etc. Unclip them and lay them to the pass side as well. The other 2 hoses I just unclipped from the shroud and layed up over the top of the engine. Go ahead and remove the upper radiator hose (10mm). Now remove the 2 bolt/screws at the top of the shroud and lift it out.
Now remove the fan/fan clutch. It's held to the waterpump with 4 small nuts w/ washers. They're a major pain, and prone to drop/lose after you get them off. I held a small magnet near them while removing them to avoid that.
Here's a pic at this point.

Now remove the lower radiator hose (10mm) and lift the radiator out. If you have an automatic equipped car there should be trans cooler lines to the radiator that will need removed as well. Now proceed to remove all the belts. The tensioner for the p/s belt will need to be removed, as will the p/s pump (don't remove the lines, just take it off and zip tie it out of the way) and p/s pump bracket. The alternator doesn't have to come out, but the top bracket has to be removed.
Here's a pic of the p/s pump zip tied off to the side.

P/s pump bracket removal. There's a 10mm bolt behind here that you need access to.

You can also remove the distributor at this point. Just take out the two 12mm bolts that hold the distributor down and remove the two bolts holding the wiring brackets on. Then unplug it and remove.
Here's a pic at this point.
If you have to drop the pan, now is as good a time as any. Raise the front of the car up and support it firmly (Jackstands). Make sure the parking brake is on etc. Remove the nuts (one per) on the motor mounts (lower). Remove the engine to trans brackets, one per side, both held on with a mixture of 14mm nuts and bolts. Now place a floor jack under the front edge of the transmission, I used a long 4x4 (with the car on the lift) but if your's is low (remember, the higher the better) just use a small block, and jack the engine/trans up as high as they will go without beginning to raise the entire vehicle. Now remove all the oil pan bolts (iirc there's 10 of 'em, 10mm). Pry the pan down. Once it's down (setting on the x member) you'll have to remove the oil pickup tube. It's a pain. Two 12mm bolts on the flange of the pickup and one 10mm bolt holding the support to the crank girdle on the drivers side. Once the pickup is unbolted (just let it fall into the pan) you should be able to work the pan out to the front. You may experience clearance issues with the sway bar. If you do, just unbolt the brackets and let it hang down. Clean out the pan (It'll be full of all kinds of crap, depending on how far the destruction of guides/tensioner/chain etc had gone) and reinstall it (using RTV). Installation is reverse of removal, be sure to clean up the oil pickup too, and don't forget to re-install it, or your engine will die a quick and painful death! If you want, you can save the installation of the pan until after you've r&r'd the timing cover, because the front two oil pan bolts go into the timing cover, but that's up to you. The engine can be lowered back into place while the pan is removed with no problems, so if you want to save the pan install until the timing chain job is done you can do that. Enough with the pan, back to the timing chain!
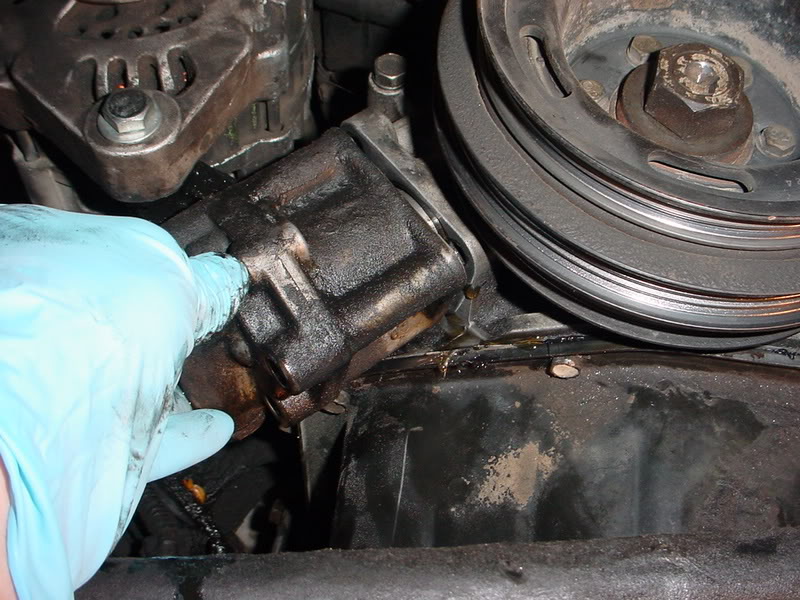
After the distributor is out, you can go ahead and remove the oil pump. It's located on the lower pass side of the timing cover.
Here's a pic of the oil pump.

It's held on with four 12mm bolts. Remove them and it will drop right out, with a little rotating. After the oil pump is out, remove the oil pump/dist drive spindle. It follows the gear on the crank, so it needs rotated slightly to remove.
Here's a pic of the spindle installed

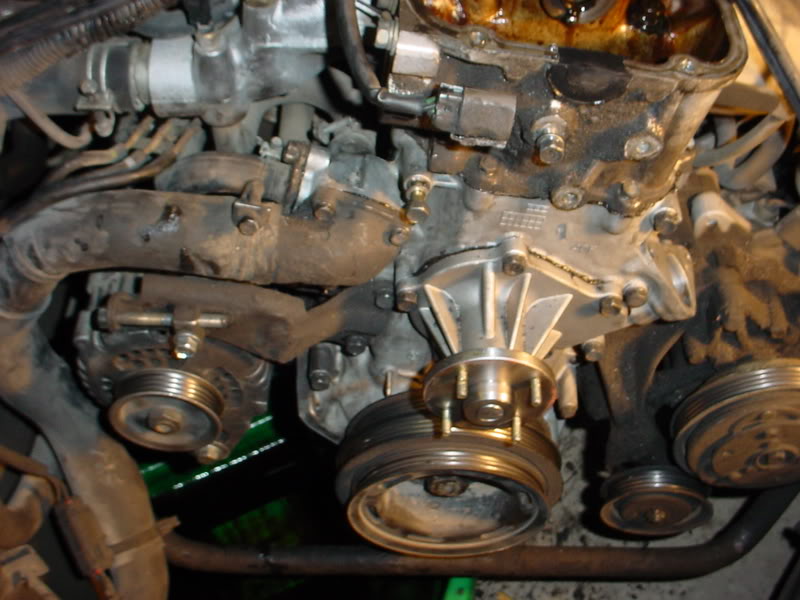
Now remove the thermostat housing, three 12mm bolts holding it on. I left it connected to the hose and just swung it out of the way. Now remove the coolant box/elbow thing (three 10mm bolts) and the coolant nipple (two 12mm bolts), you can leave them connected to their respective hoses and just move them out of the way. There's a coolant hose attached to the back side of the timing cover directly behind the thermostat, unclamp it (8mm) and pull it loose. You can remove the water pump or not, depending on wether or not you plan on replacing it (as easy a time as any to do it).
If you're working on an engine that was more or less intact (no guide carnage or anything) and the timing is still on, go ahead and rotate the engine to top dead center (tdc) with the crank pulley bolt. Now you need to remove the pulley. I used an impact gun,
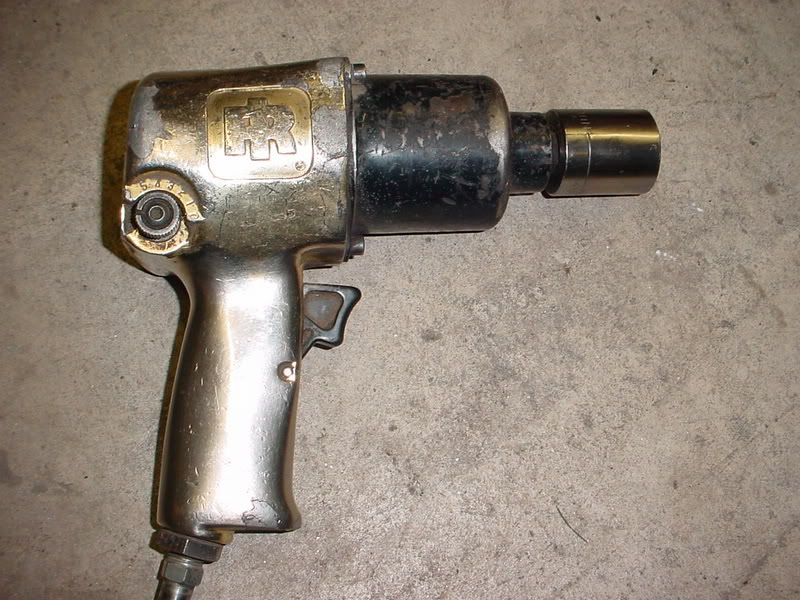
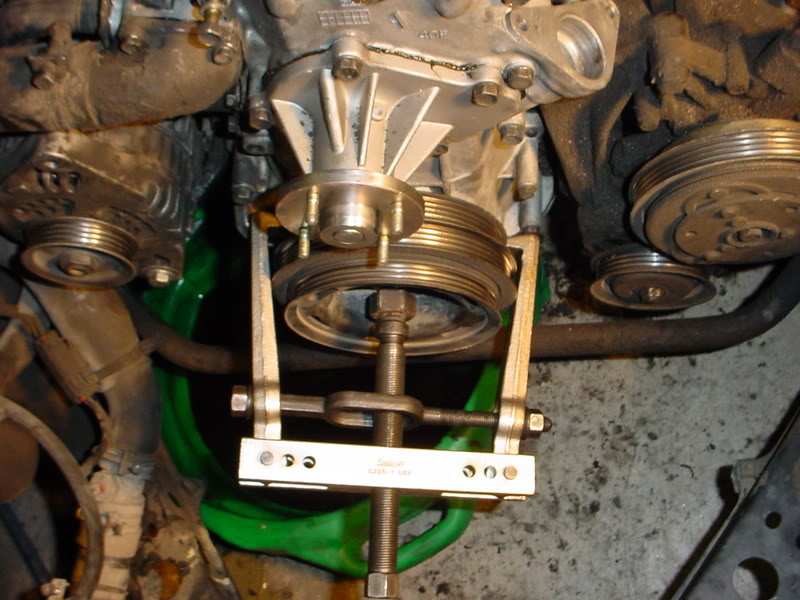
but if you don't have one, put the car in 5th gear (rear tires must be firmly on the ground and parking brake engaged) and use a 27mm socket and driver/breaker bar to loosen the bolt. Take the bolt out and take the washer off of it, and thread it a short way back into the crank snout. Then use a puller to remove the pulley. DO NOT use a puller without the crank bolt installed! The puller will mess up the threads in the crank snout!!
Pic of removing the pulley w/ puller.
Now you should be able to remove all of the timing cover bolts and remove the cover. There is an assortment of 10 and 12mm bolts holding the cover on. There are four 10mm bolts on top from the head into the cover (one is behind that p/s bracket that you removed). There are two 10mm bolts from the front of the oil pan up into the timing cover (for those who didn't have to remove the pan). There's also one 10mm bolt hiding behind where the oil pump mounts, don't miss it! Most of the rest are 12mm and pretty easy to find. When you remove the cover there will be some coolant that spills down into the pan. Don't worry about it, just be sure to drain it well.
A pic with the cover off (new parts installed, forgot to take before pics)

Stuff a couple paper towels into the front of the pan to prevent anything from falling into there!
A pic with the chain, tensioner and guide removed.

Remove the chain by removing the cam bolt and sliding the cam sprocket off the cam. Then remove the guide and tensioner (metric allen head bolts, can't remember the size!). The tensioner actuator is held on with two 10mm bolts, take it off and replace it. Make sure you don't let the plunger and spring fall down into the pan, put those rags in there! Now, if you got a complete timing set (sprockets included, my recommendation) you'll have to pull the gear and sprocket off of the crank. It's not much fun, use the puller and dont forget the bolt in the front of the crank.
Pick of gear/sprocket removal.
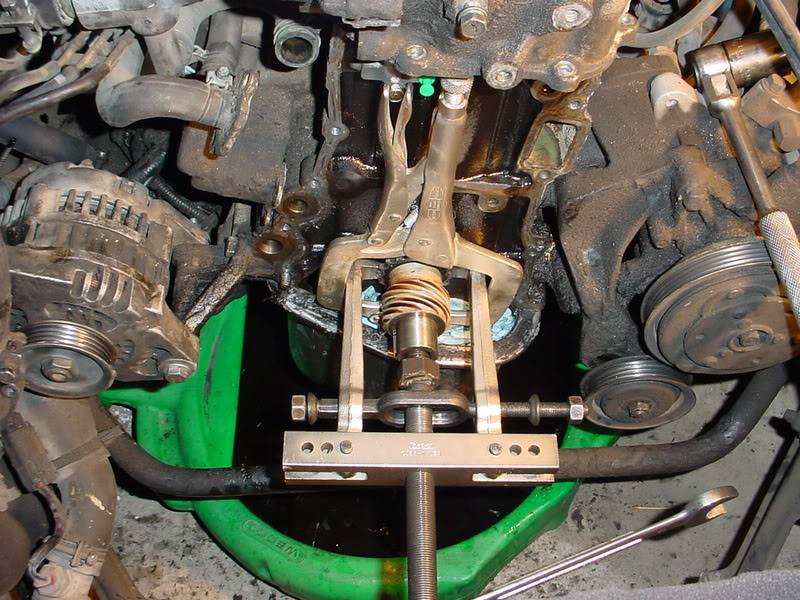
The large vice grip is on there to keep the jaws tightly engaged on the sprocket. Make sure you don't place the jaw behind the woodruff key, you don't want to be trying to pull that out too! Now you're pretty much ready to install everything. The position of the engine may have changed a little when you were breaking the crank and cam bolts loose. TDC is approx when the woodruff keys on the crank are pointing straight up, and when the dowel on the cam is straight up. Install the crank sprocket and oil pump/dist drive gear (make sure you put it on the right way). The sprocket has a small timing mark on on of the teeth, that side faces away from the block. The drive gear has a shoulder on it, the shoulder faces toward the block. I installed them by first heating them (not absolutely necessary, but makes it a little easier) by putting them in a pot of water and heating them for awhile. I then used a very large diameter deep drive socket and a hammer to slide them on. They will seat tightly against the shoulder on the crank, you'll feel it when they're all the way on. The timing mark on the crank sprocket should face at about 5 0'clock when the engine is at tdc.
Here's a pic.

Now take the timing chain. You'll notice that it has two special links (either darker than the others or lighter, I've seen both). One of these links lines up with the timing mark on the crank sprocket, the other with the timing mark on the cam sprocket.
A pic of the cam sprocket in proper tdc position.

You'll have to get the chain properly positioned on the gears before installing the cam gear, as there's not enough slack in the chain to do it otherwise. Get the marks aligned with the special links on the chain and then install the cam gear. You'll have to run the bolt on to keep it in place, DO NOT forget to tighten this bolt later!!! (< Bad experience)
Now you can go ahead and install the guide (drivers side) and tensioner (pass side) with their respective allen head bolts. Then install the tensioner activator, and remove the little pin that holds the plunger in.
Things should look like this.
Now prep the timing cover for installation. Replace the front crank seal with the one provided with the timing kit, and clean/prep all the gasket surfaces. Use silicone on all gasket surfaces and install. It will be tight if you're doing this with the oil pan on, and it may be necessary to bend the front edge of the pan down slightly to provide the clearance needed. Make sure you don't kink it or bend it significantly. Get the cover on and install all the bolts except the two 12mm bolts that hold the alternator bracket on. Now go ahead and install all those coolant things on the pass side, all require silicone. Good time to replace the thermostat too.
Pic of progress at this point
You can now install the alternator bracket and put the alternator back into place. Time for the oil pump/dist shaft install.
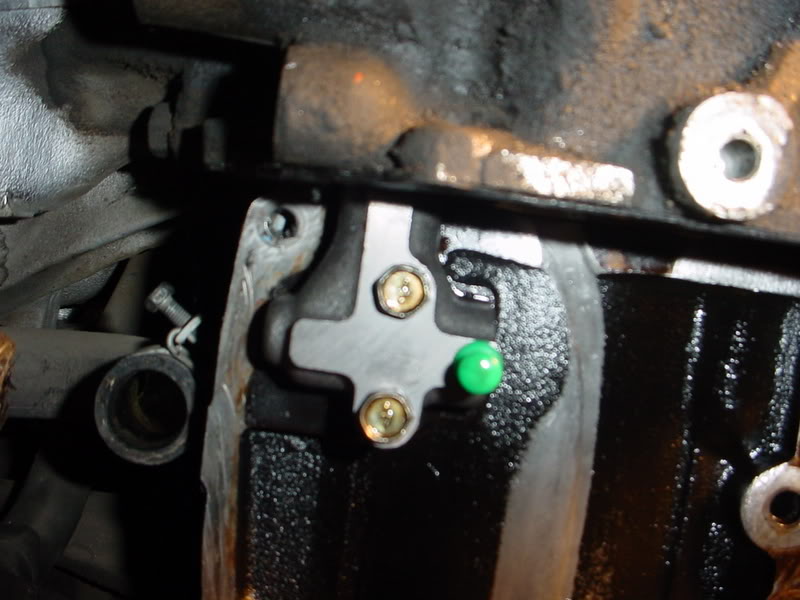
A pic of the distributor end of the shaft.
It's a little over-flashed, but you can see that it's a star shaped shaft with a half moon protrusion in the end. When installed (at tdc) you want the half moon to face directly forward. So in that pic, visualize that the left side of the pic is towards the front of the car, that's how you want it. From the oil pump end the shaft is ground into a straight slot which should face straight up and down when properly installed at tdc.
Pic of the shaft installed, front of the engine to the right.
Now install the pump (you can align the slot in the pump using a screwdriver) using the fiber gasket supplied with your timing kit. The distributor can also be installed now. The rotor should point to roughly 4:30 (#1 terminal on the cap). If you took the plug wires off, you can install them now. Firing order is 1,3,4,2 and the rotor turns counter clockwise.
You can now install the crank pulley and torque the bolt. Torque the cam bolt now as well. Now everything is pretty much a matter of reinstalling everything. If I think of anything of special importance I'll add it later.