The endlinks did take a bit of re-engineering to get them the way I wanted. The car is to be a daily driver in a northern climate with salted roads; any aftermarket parts that get put on it will need to last a long time without needing constant maintenance. This post describes what I did, to seal these endlinks up to keep dirt/grit off of them, and allow them to do their job better and last longer.
Here are the Racingline links the way they're provided. These are the stainless version.
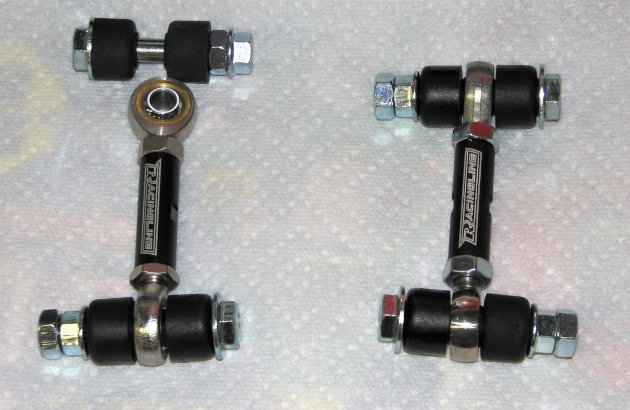
The length is adjustable. The shortest setting matches the length of the stock endlinks; longer settings would be useful for cars that are lowered, to keep the sway bar horizontal.
The instructions say to tighten the bolts, so that the poly bushings compress and act as a seal for the heim (rod-end) joints. Some problems that I see with this design are:
- This type of poly bushing wasn't designed to be used this way (as a seal). Although the makers of polyurethane bushings claim high resilience, I expect that over time, the surface of the bushing against the heim joint will gradually get chewed up by the angular motion of the endlink, which will leave the heim joint open for dirt and grit to get in.
- When the poly is so heavily compressed against the heim joint (at least until it gets chewed up enough), it's putting angular stress on the joint's threaded base, which might cause fatigue and eventual breakage of the metal (which is probably more of a concern with stainless than with regular steel).
- According to the supplied instructions, you put both of the nuts on one side of the mounting surface, and the poly bushing on the other. If the poly can compress enough to allow for the needed angular movement of the heim joint, it can also allow the bolt to flop up and down within the mounting hole from the forces exerted by the sway bar, chewing up the paint on the mounting surface, which will then allow rust to occur. This motion also reduces the effectiveness of the sway bar.
For sealing joints like this, there are a couple types of seals on the market. I chose a boot that completely covers the rod-end joint, made by Seals-It http://www.sealsit.com/rodendboots.asp, part number RERS-2.
Endlink, meet boot. Boot, meet endlink.
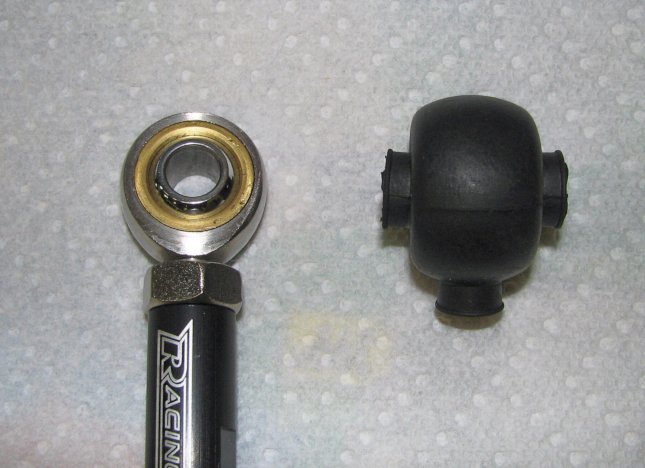
To put the boots on, the whole rod-end joint goes into the boot through one of the side holes. A tiny bit of grease helps it go in. I used the closed end of a small ignition wrench to help pry the hole of the boot over the top of the heim joint.
Here are the boots placed onto the four heim joints.

The rest of the hardware took some trial and error to come up with the best combination. Here's a picture of the final assemblies I ended up with, showing the "stack" of items in order:
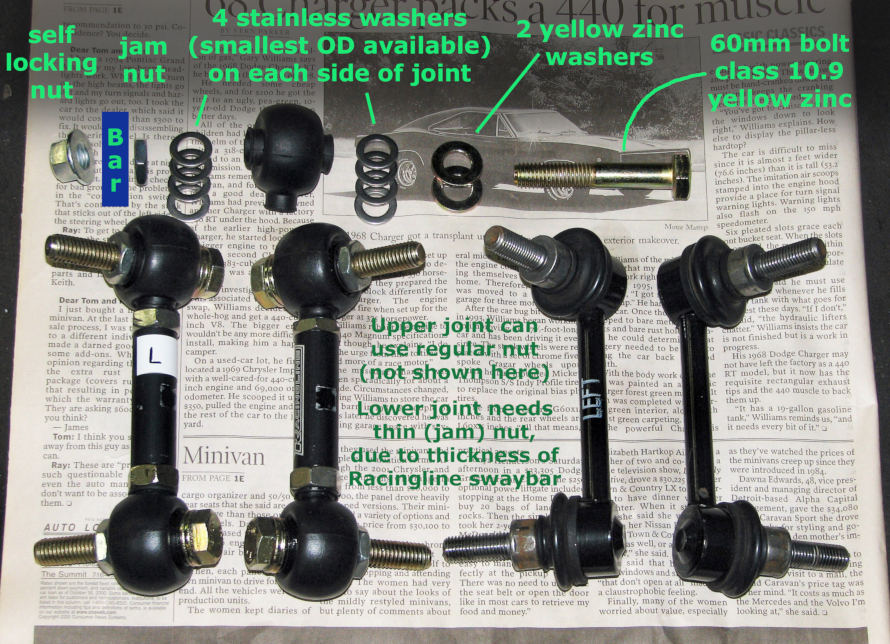
- Most importantly, something is needed as a solid spacer on either side of the heim joints. The main thing is to keep the outside diameter as small as possible, so that the movement of the joint isn't restricted, and also to avoid having the holes of the boots overly stretched for long-term use. For this "spacer" function, I ended up using stainless washers with 0.39" ID and 0.63" OD, from McMaster-Carr, with 4 of them on each side of the heim joint. These washers' inside diameter is so snug to the bolts' diameter that I had to test each washer and sort them according to whether they fit on the bolts; out of the package of 100, about half of them slid onto the bolts OK. The washers' OD was still a bit larger than I'd like, but I checked with Seals-It and they say that the boots won't be hurt when installed over spacers of this diameter.
- For a bolt, I tried several different lengths of M10 class 10.9 bolts, with yellow zinc plating for (slightly) better corrosion resistance than regular zinc. The final size I ended up using was 60mm. The original (class 8.8) bolts from Racingline were 65mm. This makes sense - Racingline uses 65mm bolts and has two nuts on the outside, while I use 60mm bolts and have one nut on the outside. As a result, the heim joint is in about the same place with my hardware as it is with Racingline's. For an application like this, with some pretty significant shear loads on a bolt that's only 10mm, I'm much more comfortable with 10.9 than with 8.8; the 10.9 bolts are around 40% stronger.
- Initially I was planning to also include 1 or 2 polyethylene washers in the stack, to provide a bit of resilience and help seal out water. However, the first time I torqued the jam nut (without all that much torque), these plastic washers deformed and squeezed part-way out of the assembly. So I got rid of them.
- For other washers, to fill out the remaining space up to the bolt length, I have a couple of yellow zinc washers under the bolt head. These are still pretty small OD, just big enough to act as a stop when using a socket to tighten the bolt. The total stack of washers plus the heim joint is just enough to cover up the unthreaded portion of the bolt.
- Due to the thickness of the Racingline sway bar, on the bottom end of each link, there's not room for 2 full-size nuts. The bolts just don't have enough thread, regardless of what length bolt you get. To save space, I used a jam nut as the inside nut. It's only class 4, but its threads really only need to be strong enough to moderately tighten the washer stack. After final assembly, it's only acting as another spacer.
- On the top ends of the links, there is room for a full-sized inner nut instead of the jam nut. I went ahead and used a full-sized nut there, to keep the endlink closer to 90 degrees.
- For the outer nut, I used a self-locking (oval thread) class 10 flanged nut. I was originally going to use nylock nuts, but anti-seize will be put on the final assembly and it probably will reduce the nylocks' effectiveness.
On the center section of the endlinks, I used a heavy coating of threadlocker, both to keep things from coming apart, and (hopefully) to keep water away (well, somewhat) from the contact points between the aluminum and stainless. As I understand it, these metals, although "non-corroding" on their own, can sometimes still tend to have galvanic corrosion if they're in contact with each other, depending on the exact alloys and what chemicals are present in the environment. This'll be the first time I try to use these metals together on a winter car.
The first step of assembly was to do an initial temporary assembly of everything, without any grease (residual grease cleaned off the heim-joint threads with solvent), to get the center sections assembled with the threadlocker, tightening the lock nuts on the center sections, with the two heim joints at the proper angle relative to each other. Because both stainless and aluminum are "inactive" metals, I used Permatex Surface Prep before applying the threadlocker. This also meant that there was very limited time to get things assembled and the joints at the proper angles before the threadlocker sets (only 5 minutes). The first one really set up fast (and got warm from the reaction), but I was able to get it assembled on the car in time (just barely). On the second one, I used a bit less of the stuff, and it was more forgiving.
The second step was to take them back off the car and fill the boots with grease. I used a grease gun with a hypodermic needle to put the grease into the boots, through their existing holes. With this hypodermic needle, it's easy to puncture through the rubber accidentally; this happened on one of the upper boots where I wasn't careful and pushed the needle out through the other side. I can't find the hole afterward, and grease doesn't squeeze out anywhere, so I'm hoping it's OK; the threadlocker is already on, so it's too late to take things apart and start over. I used just enough grease that if you push the boot in to expose the stainless washers, the boot gently springs back to cover up the washers again.
The final step is the final torquing and assembly onto the car. The torque values I used are:
- Center-section lock nuts, 34 N•m (for aluminum center section)
- Jam nut, 20 N•m (low torque for class 4 nut)
- Outer self-locking nut, 60 N•m (various published torque specs for M10 10.9 range from 61 to 75 N•m dry)
With everything installed and tightened down, there's no binding - I can easily swivel the center section of each endlink left-right by 30 degrees or so when the suspension is in full droop position. It can swivel even more when the car's weight is on the wheels and the suspension is in its normal position. I haven't checked things in the full-bump position (didn't want to remove the springs just to test this), and am just crossing my fingers that the endlink joints are happy in that position as well.