This customer wanted me to flush/angle a Race Technology Dash2 cluster into his S13 OEM cluster housing. He contacted the company, and Race Technology recommended a 12 degree viewing angle for the best viewing. So he wanted me to "kick" the bottom back to get close to the recommended angle. He also wanted his single 52mm air/fuel gauge flanking the left side of the Dash 2.


First I make the main plate. I have a template I use to make the rough cut. Simply trace it onto a piece of 1/4" MDF. This particular MDF has a veneer on it, but it doesn't matter. Plain 1/4" MDF is sometimes hard to find. I use MDF because it has very little amount of flex to it... it's very rigid.


I use 1/4" material because it perfectly sandwiches between the front black trim of the cluster and the rear white housing of the cluster. This is a pic of my gauge plate pressed into the back of the front cluster trim. You can see how it sits down flush with where the back white housing clips into. There is some trimming that needs to be done to get it to sit in there perfectly flush.. but not that much.


Next up will be gutting the front black cluster trim so it's completely open.
First I rough cut the opening in the front trim. I like to use a air powered die grinder.

Then I get it real close with 80 grit sandpaper. It's pretty much exact. The back edge needs to be perfect since it's going to butt up against my plate. So I have to make sure it's true and flat all the way across. Then the leading edge, where I have sanded a 1" white band all the way around, also needs to be perfect... because well, this will be what you see.


Time to hack up some more stuff. The back of the OEM cluster, which is actually the cluster, needs some major modification. After removing all of the guts, circuit boards, gauge faces etc:


I then knock down the high spots on the back of it with a 3" air sander loaded with a 24 grit pad. This is simply so I can run it through a scroll saw:

Scroll saw time:


This is with the plate sandwiched between the front trim and back housing. It's a perfect fit and snaps back together with zero movement of the plate. I take great care to utilize the OEM housings. That way I know it will bolt right back in the way it came out:


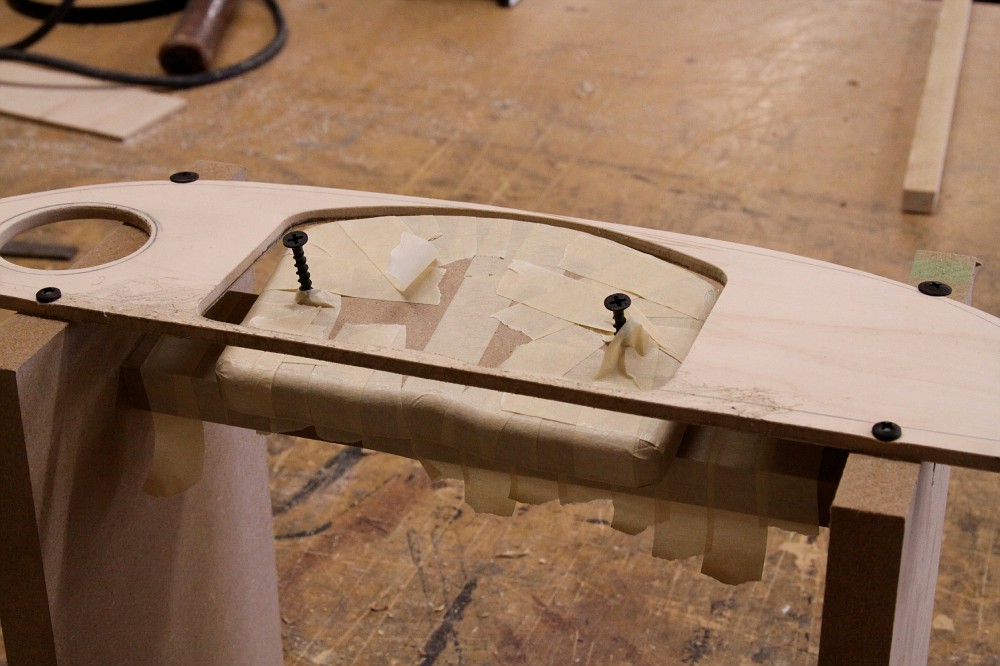
Time to get down to the meat of this. I traced the outer edge of the Dash2 onto the plate. Using a jigsaw, I carefully cut out the opening for the Dash2 and then used a hole saw for the 52mm gauge. I like my gauges to be perfectly fit in my plates... they will pressure fit in and stay without any sort of mounting. However, I obviously will mount them for the final product unless the customer specifies they need them not mounted. So I use a hole saw that is slightly undersized, then use a drum sander on a die grinder to get it perfect.

Next up, this is where it comes in handy to have "the skills to pay the bills". Since the Dash2 needs to be angled back at the bottom, I need to make some sort of "cup" for it to sit in and have a nice cosmetically finished look. So I will fiberglass a cup that will be attached to the plate. There a lot of things to take into account when using fiberglass this way. It takes practice and a lot of careful planning.
First is to make a plug that will give me my inner shape of the cup. In this case I want it to have the same shape as the overall shape of the Dash2... only slightly larger. So I made it out of 3/4" MDF. I also used a router on the edges to make it easier to remove the plug once the fiberglass has dried... you'll see what I mean later:


The tough part of this project is the "jig". This is how I will actually form the cup. In a nutshell, I will lay stretchable material over the plate and press the plug into it and secure the plug. I will then stretch the material tight to get rid of all of the wrinkles and soak it with resin to make the material hard.


So now that I have my angle and location of the plug where I want it, I can take it back out and get ready to cover the pieces in masking tape.

So I cover the bar that the plug attaches to with masking tape. I don't want the fiberglass to stick to this since this is simply part of the jig.

I also wrap the plug since it has to be removed once the resin dries:

You can now see how nothing will stick these pieces:
For small projects, I use grill cloth as my material. It's very stretchable and easy to work with.

Attach the plug over the grill cloth:

So now I need to make sure I have a place to stretch the material to and be able to secure it with an air trim stapler. I could simply staple it to the plate, but then I would have to go back and fill all of the staple holes. So I put "nailers" where I didn't have a place for staples:

This is with the material stretched and ready for resin. All that matters is that the area that gets the resin is tight and without wrinkles. Which is only the part behind and around the plug.


This is after resin, which it's only down inside the cup and right up to the edge of the plate. I want to make sure the cup is attached to the plate, so I make sure to get plenty of resin where the cup meets the plate. So I applied resin from the front and back with a small 1/2' paint brush.

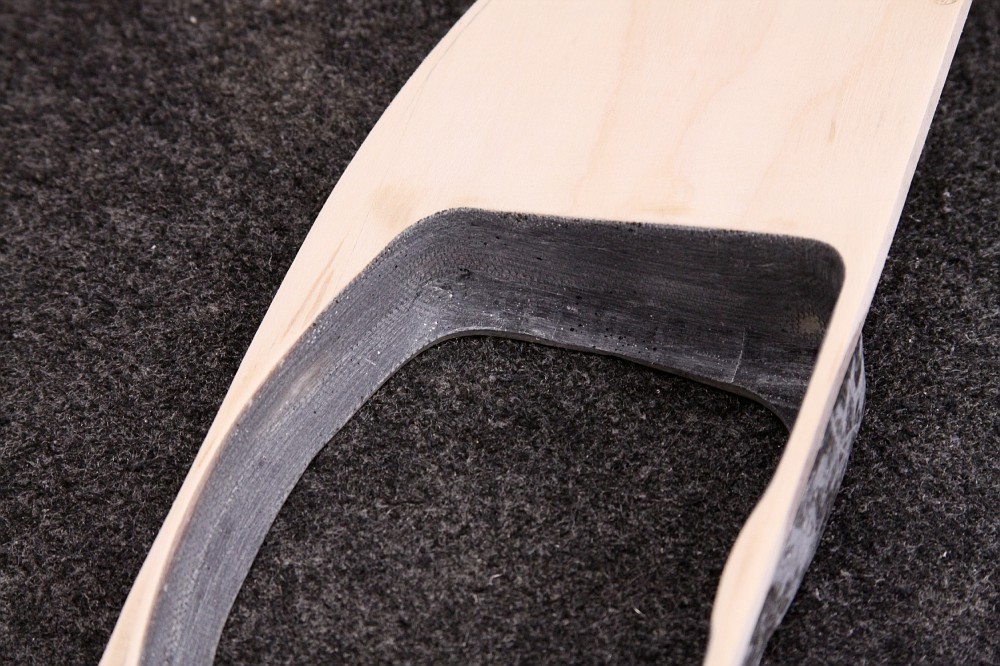
I added some fiberglass mat to the backside where I could get access to. It was impossible to get every where since the jig is in the way. But I wanted to get at least a little where I could. This adds needed strength before I separate it from the jig. After the resin dried, I rough cut away the material and unbolted it from the jig:


I rough sanded the backside down with 24 grit on my air sander. Then I added fiberglass mat to the whole thing on the backside:

Next up is to pop the plug out. I also trimmed the material closer to the edge:

This is after removing the plug and rough sanding with 80 grit by hand:


A quick test fit to make sure everything is on track:


Another test fit with the actual Dash2:


Time for the finishing work. I first spray a texture coat to help fill in any deep scratches or weird spots. I sand that with 120, 180 and ending with 220 grit. Since the finished product will have a textured finish, there is no reason to go any finer than 220 grit.


I then spray texture again for the final look. The texture coating by SEM is not a final paint though. You still need to spray your desired color over it. I usually use either SEM Satin Black or SEM Landua Black. In this case I used the later.


With everything assembled back together except for the front clear plastic... which I am going to polish.


The last thing is to polish the plastic front. This is an option when having me build a cluster.
I first go through a process of wet sanding it front and back with 1200, 1500 and then 2000 grit.


I finish it off by polishing it with 4 different compounds made by Pinnacle. I use an air powered 3" polisher with different softness of pads as I work my way to the fine polish:

Finished product ready to ship out: