Congratulations on your hood and spoiler.
I'm putting some "under plenum" pictures in this post as there are a couple of small tricks that I learned that may help with this operation.
The first picture shows how close the cross bank water hoses are connected. I found I could put some hose lubricant on those cross bank coolant hoses, them measure the clearance needed between the heads to RTV seal the hoses bases to the heads.
Note that I left the hose clamps loose until after the RTV or (Gaskets for a Phase II G50?) have been sealed when the hose base is secured to the head. Some hose "rubber lubricant" will allow the hose to move at the connection ares to get the closest adjustment.

The next picture shows the hose bases completely secured and cross head hose clamps are tightened for completion. Also in this picture you can see where the heater hoses connect to the under plenum coolant delivery pipes. Once the hose bases were fully connected to the heads and bolts torqued according to spec, the hose clamps were then fully tightened.

At this point, I had started a hose for coolant that connects to the throttle body. For the intake runner to plenum seals, I had a challenge getting all of the seals in place while trying to install the plenum with minimal help. I found a small drop of rubber to metal adhesive on the bottom side of the seal was just enough to keep it in place while the plenum was being seated. While it makes the seals stay put -- it is not so much to prevent the seals from being removed at some future date with minimal effort.

The next picture shows the plenum all ready for installation as a complete assembly. The tricky part of installing the plenum as an assembly is connecting the 3-way rubber hose that connects to the under plenum pipe, the IACV, and the "vacuum pipe to nowhere". I call this the "vacuum pipe to nowhere" because it just dead ends under the plenum. I understand the pipe is for arresting vacuum pressure fluctuations that could occur between the other two connections connections on the 3-way hose.

Connecting the 3-way vacuum hose to the "vacuum pipe to nowhere" was one of the more challenging parts of the plenum installation. Since it is a vacuum line, I used an OEM style vacuum hose clamp that I could pinch the clamp open with my bare fingers for fitting the bottom part of the 3-way hose to the black "vacuum tube to nowhere" as shown in the following picture.
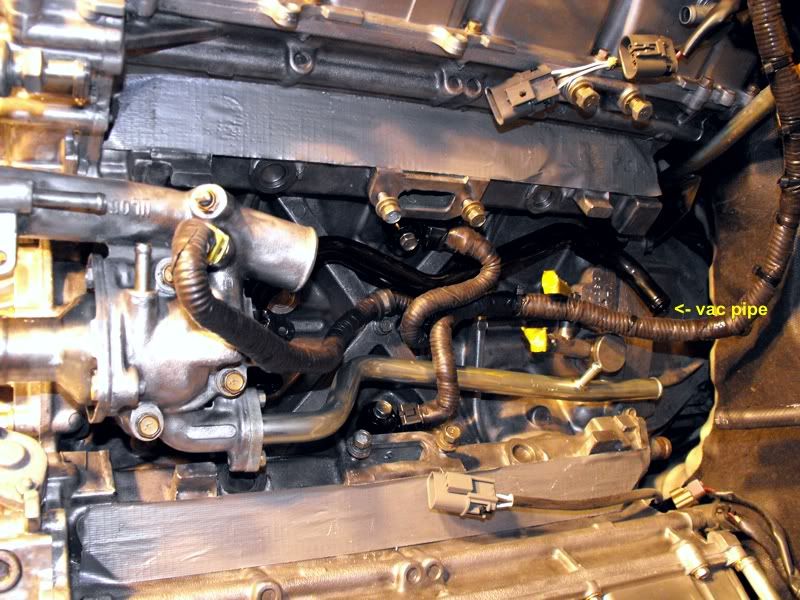
Note: I see O2 sensors are listed in the opening post. The engine compartment O2 sensors will be the easiest to replace with the plenum removed. Also I would consider leaving the hood off until you finished the under plenum job. There are some connections at the rear of the engine compartment like the 3-way vacuum hose and O2 sensors that I believe will be easier to access if the hood has been removed. Though I didn't remove the hood when I performed the maintenance job, I could see how removing it will improve access. You can see the new O2 sensor plugs resting on the right and left sides just above the silver duct tape that I used to cover the intake ports in the picture below.