Project Lilia Uber ("BUILD THREAD")

-
xharobikeslifex

- Posts: 102
- Joined: Thu May 31, 2007 8:44 pm
- Car: 1990 240sx
- Location: Shawnee
Re: (Producer)
At the rate Im going i'm gonna pass the $10,000 aftermarket "marker". lol Just the engine and transmission alone i'll probably have over $2000 in parts invested.Producer wrote:This thing is so bad a** your going to get 4 guys in black suits to arrive on start up from "nissan" and they will seize it and hand you a check for 10,000
and give you a gag order

Okay finally got my gaskets in for my transmission I decided to replace the front trans cover gasket. Since i'm going to replace the pivot ball I removed that first with a 17mm deep socket.

Then got a 12mm socket with a 3/8 extension and loosened all of the front trans cover bolts.

Once all the bolts was removed getting the cover off with my hands was unsuccessful so I used a putty knife and a hammer to seperate it.

Heres a pic of it finally off.

Old gasket vs new gasket.

Cleaned out the cover and don't forget to put this metal seal back on before you slap the cover on. Also don't forget to scrape off the old gasket residue. Tighten the cover bolts to 12-15 ft lbs.

Nismo pivot ball vs OEM.

Hand tighten the pivot ball use a 17mm deep socket and then torque down to 14-25 ft lbs.

COMPLETE

Next is the transmission gear box gasket.

Scrape the old gasket and place it like so...

And bolt and torque the 12mm bolts down to 10-13 ft lbs.

Okay Greddy Pulley Kit Installation, so since I cant read japanese, I decided to do some researching and well the picture pretty much explains it all for the alternator pulley.

Place spacer that should have came with the kit on FIRST and use a 17mm deep socket and gently tap the spacer all the way in.

Like so....

Then Install the pulley I used painters tape on the outer edge of the pulley, so that I wouldnt damage the pulley. I then placed a board, so that I can hammer and seat it in place.

Installed woot woot! I just hand tightened the pulley nut for now until I can figure out what its torqued two? I'm thinking about just torquing it to 35 ft lbs...

Heres a side view picture.

Water pump pulley and supplied bolts

Place on like so and torque the 10mm bolts to 4.6-6 ft lbs
I would do the Power steering but I'm waiting for my non hicas p/s bracket/pump to arrive. So to be continued......
Last edited by xharobikeslifex on Wed Sep 08, 2010 11:51 am, edited 1 time in total.
-
xharobikeslifex
- Posts: 102
- Joined: Thu May 31, 2007 8:44 pm
- Car: 1990 240sx
- Location: Shawnee
Re: (el OCHO)
Thanks man things seem to be flowing the way I want it to go so far.
But anyways onto the build thread!

Replaced the rear oil seal on my transmission everytime I do an sr swap this seal always drips transmission fluid about time I did the right thing and replace it haha.

So here is where the rear oil seal is located this often gets hard and doesn't want to seal properly thus me changing it.

So a seal puller would be nice but I didn't have one so instead I used some leverage!

I then put the new seal into place and used a 36mm socket to seat it in place by lightly tapping it with a hammer.

Hella seated brah

Me and my buddie wesly got creative and figured out a way to hold the alternator pulley without it spining. I'm sure there is an easier way. but we like to think outside of the box haha. we grabbed my old belt and clamped it to the pulley with vise grips. Then we got some huge pliers to clamp over the belt, so the pulley wouldn't get scratched. As he was holding on to dear life I went ahead and torqued it to 45 ft lbs, I never did figure out the actual torque spec for the alternator pulley but since the power steering pulley is 50 ft lbs I figured it was in the same ball park.
The Beginning of the legendary S15 CONVERSION!

What can possibly be in this box? hmmm


S15 RADIATOR SUPPORT WHAT! ya boi I'm going S15 front on this build.

Okay removing the s13 radiator support.. remove on both sides the 14mm bolts

Then remove the horn brackets with a 10mm socket

Now using a power drill and a steel braided wheel. Grind off the primer to bare metal to locate the spot welds there will be a total of about 50 spotwelds 25 on the left and 25 on the right fun stuff. And they are all located....

Side of the headlight mount.

Bottom of the headlight mount.

Quite a few located by the rails.

2x located on the side of the rail.

And finally 2x underneath the rails... It helps to look at the s15 radiator support and then look at your s13 radiator support there quite indentical so the spotwelds should be in the same general area.

I used a spot weld drill bit to obviously remove the spot welds I had previously located.

And I used a combination of an air hammer and a wood chisel to remove the radiator support from the chassis.


Even if you missed some spot welds the air chisel can zip right through them, but I'd be careful doing it you might zip through other parts of the chassis that you don't want to.

Ahh It's finally almost out

After It's all loose and ready to come out the last thing you need to do is remove the 4x bolts on the tension rods on the bottom of the radiator support 2x bolts on each bracket, I used a 14mm socket and an impact to loosen them lowered the vehicle and then proceeded to loosen it all the way with a regular socket wrench.


And yourrrrr OUT! This was super super easy to do compared to the firewall....

Old s13 radiator support just chilling... Saying wtf mate?

I mocked up the S15 radiator support everything seemed to align great and then I noticed an issue my S13 tension rods wont reach the radiator support... hmmm I may have to get clever on this one or get some S14 ones since those might be slightly longer.

To be continued...
But anyways onto the build thread!
Replaced the rear oil seal on my transmission everytime I do an sr swap this seal always drips transmission fluid about time I did the right thing and replace it haha.
So here is where the rear oil seal is located this often gets hard and doesn't want to seal properly thus me changing it.
So a seal puller would be nice but I didn't have one so instead I used some leverage!
I then put the new seal into place and used a 36mm socket to seat it in place by lightly tapping it with a hammer.
Hella seated brah
Me and my buddie wesly got creative and figured out a way to hold the alternator pulley without it spining. I'm sure there is an easier way. but we like to think outside of the box haha. we grabbed my old belt and clamped it to the pulley with vise grips. Then we got some huge pliers to clamp over the belt, so the pulley wouldn't get scratched. As he was holding on to dear life I went ahead and torqued it to 45 ft lbs, I never did figure out the actual torque spec for the alternator pulley but since the power steering pulley is 50 ft lbs I figured it was in the same ball park.
The Beginning of the legendary S15 CONVERSION!
What can possibly be in this box? hmmm
S15 RADIATOR SUPPORT WHAT! ya boi I'm going S15 front on this build.
Okay removing the s13 radiator support.. remove on both sides the 14mm bolts
Then remove the horn brackets with a 10mm socket
Now using a power drill and a steel braided wheel. Grind off the primer to bare metal to locate the spot welds there will be a total of about 50 spotwelds 25 on the left and 25 on the right fun stuff. And they are all located....
Side of the headlight mount.
Bottom of the headlight mount.
Quite a few located by the rails.
2x located on the side of the rail.
And finally 2x underneath the rails... It helps to look at the s15 radiator support and then look at your s13 radiator support there quite indentical so the spotwelds should be in the same general area.
I used a spot weld drill bit to obviously remove the spot welds I had previously located.
And I used a combination of an air hammer and a wood chisel to remove the radiator support from the chassis.
Even if you missed some spot welds the air chisel can zip right through them, but I'd be careful doing it you might zip through other parts of the chassis that you don't want to.
Ahh It's finally almost out
After It's all loose and ready to come out the last thing you need to do is remove the 4x bolts on the tension rods on the bottom of the radiator support 2x bolts on each bracket, I used a 14mm socket and an impact to loosen them lowered the vehicle and then proceeded to loosen it all the way with a regular socket wrench.
And yourrrrr OUT! This was super super easy to do compared to the firewall....
Old s13 radiator support just chilling... Saying wtf mate?
I mocked up the S15 radiator support everything seemed to align great and then I noticed an issue my S13 tension rods wont reach the radiator support... hmmm I may have to get clever on this one or get some S14 ones since those might be slightly longer.
To be continued...
Last edited by xharobikeslifex on Wed Sep 08, 2010 11:54 am, edited 1 time in total.
-
240life
- Posts: 1313
- Joined: Mon Sep 24, 2007 6:02 am
- Car: 1993 Nissan 240SX S13 Coupe SR20DET blacktop
- Location: ME
- Contact:
Re: (xharobikeslifex)
coming along nicely....you still got the old frame rails still. I could pay pal you on Friday to ship the Driver-side .
-
xharobikeslifex
- Posts: 102
- Joined: Thu May 31, 2007 8:44 pm
- Car: 1990 240sx
- Location: Shawnee
Re: (240life)
yes I still have the driver side rails and friday would be fine for me to get it sent out to you send me an email with your address zip city and state [email protected]
-
Didderson

- Posts: 2567
- Joined: Sat Mar 18, 2006 4:05 pm
- Car: 1990 Nissan 240SX FB
'88 Nissan Hardbody pickup
'74 Datsun Z - Location: Nor-Phillerdelph
- Contact:
Re: (xharobikeslifex)
Man you have some crazy welding skills. I'm sure some drifter guy would love to buy that front s13 support lol.
Can't wait to see what's up next. Always great info in here
Can't wait to see what's up next. Always great info in here
-
xharobikeslifex
- Posts: 102
- Joined: Thu May 31, 2007 8:44 pm
- Car: 1990 240sx
- Location: Shawnee
Re: Project Silvia (
Welp Now only working one job  I decided to attend summer school at jccc this year, so don't expect alot of updates. I have set a new goal and thats by the end of december 2010, I plan to have my car ready for paint. Here is my mental time line 1st Finish engine and transmission 2nd s15 conversion/sideskirts+rear bumper 3rd roll cage/fuel cell 4th suspension/wheels

Tension Rod Dillemma with S15 Radiator support

So this is a pic of s14 tension rod "on top" vs s13 tension rod "on bottom" The main difference is that the s14 tension rod is longer, and will reach to the s15 radiator support.

The S14 tension rod "left" will bolt up with no problem to the s15 radiator support, but the S13 tension rod "right" would have to be modified if I decided to use the s13 tension rod

If I went with the S14 tension rod "top" then I would have a problem with bolting it to the frame rail because it's shorter than the s13 tension rod "bottom"

S13 tension rod to s13 frame rail "obviously no problems."

S14 tension rod to s13 frame rail shorter thus not reaching to the other bolt hole. In the end I will most likely have to modify either the s13 or s14 tension rod either way to make it work with the s15 radiator support.

I decided to spray some rustroleum where ryan welded at, so that it wont rust over a period of time.


Plus it's probably a good idea to spray some in this area before I have him weld these brackets back on.

I decided to replace all my freeze plugs, You have to be very careful doing this normally this is done when rebuilding the engine. As you can tell, I popped my first plug right into my engine dammit.

Sooooo... I decided to remove my valve cover, so that It would be easier for me to take out some freeze plugs. I started by removing the coil packs with a 10mm socket wrench.

Then remove all 13x 10mm bolts holding the valve cover in place, I started with the middle bolt first then proceeded to work my way around the valve cover. "Remember don't forget to have a ziplock bag in hand for all the bolts"

I then removed this hose that connects to the pvc valve, I believe thats what it's called.

Then give it a tug to break the gasket seal and remove the valve cover.

OMFG! This is absolutely unacceptible, I really want to rebuild my engine although it is currently not on my top things to do, so what i've decided to do is simply. Do what I had intended to do FIRST then go back and see if it's in my budget/time to rebuild it or not. Sooooo moving on...

I managed to find the freeze plug, I accidently popped into my engine.

What you want to do is SLOWLY tap one corner of the free plug with a flathead screwdriver and hammer until it looks like this.


Then use a combination of needle nose pliers and normal pliers to pry out the freeze plugs.


Once the freeze plug is out clean the surface area where your going to put the new freeze plug in and use a combination of a 21mm socket and hammer to "seat" the new freeze plug in.

In order to get to one of the exhaust side freeze plugs I needed to tap out the oil tube, I used a large flat head and a hammer to tap it out.

Moved on to install my Nismo motor mounts.

The Nismo mounts did not come with the brackets that are on the OEM ones, so you need to remove the brackets that are on the OEM mounts and install them to your Nismo mounts.

"Instake side" bracket installed on the Nismo mount.

Nismo mount "intake side" installed onto the motor mount bracket, you need a 14mm wrench.

Nismo mount installed "exhaust side" onto the motor mount bracket, you need a 14mm wrench.


ATI Super Damper Install! First I just used the supplied bolts to just hand tighten the p/s pulley to the crank pulley.

Then thoroughly clean your crankshaft and apply a small amount of antiseize.

Theres only one way to put the pulley on and unlike the OEM crank pulley the ATI crank pulley is a tight fit, so to get it started I used a rag on the pulley then placed a board and hammered it till it was on securely.

Then used the impact gun to completely "seat" the pulley in place, I used a 27mm socket btw.

Then I threw the new belt on thus concluding my day.
Tension Rod Dillemma with S15 Radiator support
So this is a pic of s14 tension rod "on top" vs s13 tension rod "on bottom" The main difference is that the s14 tension rod is longer, and will reach to the s15 radiator support.
The S14 tension rod "left" will bolt up with no problem to the s15 radiator support, but the S13 tension rod "right" would have to be modified if I decided to use the s13 tension rod
If I went with the S14 tension rod "top" then I would have a problem with bolting it to the frame rail because it's shorter than the s13 tension rod "bottom"
S13 tension rod to s13 frame rail "obviously no problems."
S14 tension rod to s13 frame rail shorter thus not reaching to the other bolt hole. In the end I will most likely have to modify either the s13 or s14 tension rod either way to make it work with the s15 radiator support.
I decided to spray some rustroleum where ryan welded at, so that it wont rust over a period of time.
Plus it's probably a good idea to spray some in this area before I have him weld these brackets back on.
I decided to replace all my freeze plugs, You have to be very careful doing this normally this is done when rebuilding the engine. As you can tell, I popped my first plug right into my engine dammit.
Sooooo... I decided to remove my valve cover, so that It would be easier for me to take out some freeze plugs. I started by removing the coil packs with a 10mm socket wrench.
Then remove all 13x 10mm bolts holding the valve cover in place, I started with the middle bolt first then proceeded to work my way around the valve cover. "Remember don't forget to have a ziplock bag in hand for all the bolts"
I then removed this hose that connects to the pvc valve, I believe thats what it's called.
Then give it a tug to break the gasket seal and remove the valve cover.
OMFG! This is absolutely unacceptible, I really want to rebuild my engine although it is currently not on my top things to do, so what i've decided to do is simply. Do what I had intended to do FIRST then go back and see if it's in my budget/time to rebuild it or not. Sooooo moving on...
I managed to find the freeze plug, I accidently popped into my engine.
What you want to do is SLOWLY tap one corner of the free plug with a flathead screwdriver and hammer until it looks like this.
Then use a combination of needle nose pliers and normal pliers to pry out the freeze plugs.
Once the freeze plug is out clean the surface area where your going to put the new freeze plug in and use a combination of a 21mm socket and hammer to "seat" the new freeze plug in.
In order to get to one of the exhaust side freeze plugs I needed to tap out the oil tube, I used a large flat head and a hammer to tap it out.
Moved on to install my Nismo motor mounts.
The Nismo mounts did not come with the brackets that are on the OEM ones, so you need to remove the brackets that are on the OEM mounts and install them to your Nismo mounts.
"Instake side" bracket installed on the Nismo mount.
Nismo mount "intake side" installed onto the motor mount bracket, you need a 14mm wrench.
Nismo mount installed "exhaust side" onto the motor mount bracket, you need a 14mm wrench.
ATI Super Damper Install! First I just used the supplied bolts to just hand tighten the p/s pulley to the crank pulley.
Then thoroughly clean your crankshaft and apply a small amount of antiseize.
Theres only one way to put the pulley on and unlike the OEM crank pulley the ATI crank pulley is a tight fit, so to get it started I used a rag on the pulley then placed a board and hammered it till it was on securely.
Then used the impact gun to completely "seat" the pulley in place, I used a 27mm socket btw.
Then I threw the new belt on thus concluding my day.
Last edited by xharobikeslifex on Wed Sep 08, 2010 11:56 am, edited 1 time in total.
-
h-eater240

- Posts: 755
- Joined: Wed Jul 18, 2007 7:21 am
Re: Project Silvia (
so much work into this!!!! I read it from page 1 to current and updated post, (it was a lot of reading) but i love the work you are doing to this and it's definitely going to pay off man. Can't wait to see this finished.
Also could i ask for a part of you?
on the clip you ordered, i need the bracket/boot thing that bolts to the chassis that keeps dust and what not out of the cabin. My friend just picked up an SR coupe and it's got a e-cutout right underneath the transmission and exhaust fumes smother the interior. It's a hard part to come by but i saw it in the pics. and i'll make an offer on it.
Let me know if you can ship that to me, 23321
Email me so i don't clutter your build thread.
[email protected]
thanks dude
-rick
-
xharobikeslifex
- Posts: 102
- Joined: Thu May 31, 2007 8:44 pm
- Car: 1990 240sx
- Location: Shawnee
Re: Project Silvia (
Hey thanks man I would update, but as of right now it's temporarly on hold due to college bills I have to payh-eater240 wrote:so much work into this!!!! I read it from page 1 to current and updated post, (it was a lot of reading) but i love the work you are doing to this and it's definitely going to pay off man. Can't wait to see this finished.
-rick
-
Skyline_BNR34
- Posts: 72
- Joined: Sat Aug 14, 2010 12:39 am
- Car: 2003 Nissan Sentra SE-R Spec-V
- Location: Raleigh, NC
Re: Project Silvia (
The only thing I notice that you did wrong with this build during the firewall swap was you did nothing to support the car. You cut out the firewall you should have put support braces in the engine bay and interior to keep everything perfectly square.
I'm sure you didn't screw anything up while doing the swap, but you could have seriously screwed up the straightness of the body. Especially since you took out a huge structurally supportive item in the car.
Looks good though, can't wait to see it fully finished.
I'm sure you didn't screw anything up while doing the swap, but you could have seriously screwed up the straightness of the body. Especially since you took out a huge structurally supportive item in the car.
Looks good though, can't wait to see it fully finished.
-
xharobikeslifex
- Posts: 102
- Joined: Thu May 31, 2007 8:44 pm
- Car: 1990 240sx
- Location: Shawnee
Re: Project Silvia (
Ya I was aware of something like that. I figured since the car was on jack stands it would be as though in an assembly line. Plus I made sure not to remove the subframe during the process. I'm not saying doing this method will work all the time i'm just saying thats what i went about it and thankfully did not have any issues. Everything lined up pretty wellSkyline_BNR34 wrote:The only thing I notice that you did wrong with this build during the firewall swap was you did nothing to support the car. You cut out the firewall you should have put support braces in the engine bay and interior to keep everything perfectly square.
I'm sure you didn't screw anything up while doing the swap, but you could have seriously screwed up the straightness of the body. Especially since you took out a huge structurally supportive item in the car.
Looks good though, can't wait to see it fully finished.
Re: Project Silvia (
can we has update?!?! jebus last update was end of april.
And I swear to god if you have given up I'm going to punch you in the baby maker.
And I swear to god if you have given up I'm going to punch you in the baby maker.
-
xharobikeslifex
- Posts: 102
- Joined: Thu May 31, 2007 8:44 pm
- Car: 1990 240sx
- Location: Shawnee
Re: Project Silvia (
Haha well then one update coming right up!CRyan wrote:can we has update?!?! jebus last update was end of april.
And I swear to god if you have given up I'm going to punch you in the baby maker.
Removing the Side Mirrors

First Remove this trim piece to uncover Bolts

Then Remove the 3x 12mm bolts with a 3/8 racthet and 3/8 ext.

Before pulling out the side mirrors when the bolts are removed don't forget to disconnect the connector inside the door panels

As well as any plastic pieces holding the wires to the door.

Then finally you can remove the mirrors.
Removing the Doors

First thing I did was remove the plastic piece holding the wire to the chassis of the vehicle.

I then pulled the rubber grommet out and snaked the door connector out.


Open the door and remove the pin as shown in this pic by taping the bottom with a hammer and prying it out with some pliers.

Then Finally remove the 2x bolt hinges thats holding the door to the frame. There's 2x bolts on top and 2x bolts on bottom.
Use a 14mm socket with an extension.

Now finally the doors should come off with ease, but be careful there pretty damm heavy.
Removing the Quarter Windows

First remove the 10mm bolt inside the vehicle.

Then it should come right out! haha j/k I used a windshield remover kit I bought from harbor freight all I did was wedge a wire and began sawing all around the window until it was loose to remove. Sorry 4 not taking pics it was difficult to take pics while doing it.


I did notice that my 180sx windows turned out to be 240sx windows with a 180sx sticker fooled me for a lil bit until i rubbed against the window and felt a slight incline on the 180sx part haha ooo well.


Now these pictures are more for my reference, but I simply removed the rest of the chassis harness, so it wouldn't get in the way when it comes time to paint this bad gurl. As you can see from the pictures I started from the driver side and worked my way around to the passenger
Rear Seat Bracket Removal


The Process is the same like the firewall. First I used a steel braided wheel to sand down the paint to locate the spotwelds, I then marked the spotwelds with a permanent marker and began drilling them out with a spotweld drill bit. After all the spotwelds were removed I then used a combination of a wood chisel and hammer/ air hammer to remove the brackets.


After an hour or 2 this is what you end up removing.


Here's photos of what it looks like without the rear seat brackets. Oh it's sure going to be fun filling all those holes when it comes time to prep the car.

But in the end it's worth it. It's the little things that count that will make this car stand out then others.
Last edited by xharobikeslifex on Wed Sep 08, 2010 11:58 am, edited 1 time in total.
-
xharobikeslifex
- Posts: 102
- Joined: Thu May 31, 2007 8:44 pm
- Car: 1990 240sx
- Location: Shawnee
Project Lilvia
I received my parts I sent off to go get powder coated from "Bone Head Performance" the other day. Let me know what you people think of the color I chose.
Valve Cover: Anodized Red W/ Polish Lettering
CAS Cover: Anodized Blue
Injector Caps: Anodized Red
Valve Cover Washers, Brackets, and etc: High Gloss Black
I also ordered Stainless Steel Valve Cover Bolt Kit from them as well.


Valve Cover: Anodized Red W/ Polish Lettering
CAS Cover: Anodized Blue
Injector Caps: Anodized Red
Valve Cover Washers, Brackets, and etc: High Gloss Black
I also ordered Stainless Steel Valve Cover Bolt Kit from them as well.
Last edited by xharobikeslifex on Wed Sep 08, 2010 11:59 am, edited 1 time in total.
-
xharobikeslifex
- Posts: 102
- Joined: Thu May 31, 2007 8:44 pm
- Car: 1990 240sx
- Location: Shawnee
Re: Project Lilvia
Yesturday Derek and I knocked out a few things I had to put on my engine.
RAS Installation

First thing was tackling the HKS RAS. In this pic Derek is figuring out which RAS goes on which side. If i'm not mistaken they only go on one way, so don't get worried if you might of installed them incorrectly.

Now begin to loosen the cam bolts in alternating order.

Refer to your fsm for the procedure.

Once you have loosen and removed the bolts Install the RAS as shown

This pic was suppose to be the 2x washers we added on the two bolts on the intake side, so the oil squirters would be level, but I failed in showing which two bolts it was.

In Order to get to one camshaft bracket bolt we had to remove the bracket that was above the timing chain.

Now torque down the camshaft bolts by refering to the fsm

HKS RAS Installed and torqued down. Note on the exhaust side the baffle plate is deleted.
Valve Cover Installation.

Put on both new valve cover gasket and spark plug well gasket.


Make sure you scrape off all of your old gasket with a razor blade and clean off any debris or oil by using a towel with brake parts cleaner sprayed onto it.

With a Wave of the hand the valve cover should magically appear onto the head. Don't forget to use the grey type of gasket sealer on the "half moons" there should be two in the front and two in the rear. Refer to the FSM for torquing the valve cover down correctly.

Derek installing the NGK Iridium IX Spark Plugs with a heat range of 7 don't forget to anti-seize them before you tighten them.


Use the sealer tape and thread it around the threads and get a 19mm wrench and tighten it snugly to the valve cover.

"This is fo my homies" (Derek Fint.)

I got rid of my oem CAS cover and purchased a circuit sports CAS cover powder coated Candy Blue.

Added a Nismo Oil cap and removed the bolts to the coil packs.


Circuit Sports Grounding Plate was then Installed.

Anodized Red Injector caps Installed. Even though now I plan to buy a HKS Fuel rail.


And finally the 2x brackets installed on the front of the Valve Cover, and a new oil dump tube was put on as well.

I'm effy on the CAS cover I'm thinking about wrapping it in gold film like Dereck did on his "whip" But overall I don't find it looking that bad. Ahhh I Cant wait to get and install my turbo setup!
RAS Installation
First thing was tackling the HKS RAS. In this pic Derek is figuring out which RAS goes on which side. If i'm not mistaken they only go on one way, so don't get worried if you might of installed them incorrectly.
Now begin to loosen the cam bolts in alternating order.
Refer to your fsm for the procedure.
Once you have loosen and removed the bolts Install the RAS as shown
This pic was suppose to be the 2x washers we added on the two bolts on the intake side, so the oil squirters would be level, but I failed in showing which two bolts it was.
In Order to get to one camshaft bracket bolt we had to remove the bracket that was above the timing chain.
Now torque down the camshaft bolts by refering to the fsm
HKS RAS Installed and torqued down. Note on the exhaust side the baffle plate is deleted.
Valve Cover Installation.
Put on both new valve cover gasket and spark plug well gasket.
Make sure you scrape off all of your old gasket with a razor blade and clean off any debris or oil by using a towel with brake parts cleaner sprayed onto it.
With a Wave of the hand the valve cover should magically appear onto the head. Don't forget to use the grey type of gasket sealer on the "half moons" there should be two in the front and two in the rear. Refer to the FSM for torquing the valve cover down correctly.
Derek installing the NGK Iridium IX Spark Plugs with a heat range of 7 don't forget to anti-seize them before you tighten them.
Use the sealer tape and thread it around the threads and get a 19mm wrench and tighten it snugly to the valve cover.
"This is fo my homies" (Derek Fint.)
I got rid of my oem CAS cover and purchased a circuit sports CAS cover powder coated Candy Blue.
Added a Nismo Oil cap and removed the bolts to the coil packs.
Circuit Sports Grounding Plate was then Installed.
Anodized Red Injector caps Installed. Even though now I plan to buy a HKS Fuel rail.
And finally the 2x brackets installed on the front of the Valve Cover, and a new oil dump tube was put on as well.
I'm effy on the CAS cover I'm thinking about wrapping it in gold film like Dereck did on his "whip" But overall I don't find it looking that bad. Ahhh I Cant wait to get and install my turbo setup!
-
xharobikeslifex
- Posts: 102
- Joined: Thu May 31, 2007 8:44 pm
- Car: 1990 240sx
- Location: Shawnee
Re: Project Lilia Uber ("BUILD THREAD")
Finally managed to update all of my photos to the new layout on Nico! Now it looks like a build thread once again. 
-
ciscos13

- Posts: 149
- Joined: Wed May 05, 2010 4:53 pm
- Car: 89' 240sx hatch, s13 sr
- Location: Phoenix, AZ
Re: Project Lilia Uber ("BUILD THREAD")
coming out nice.... very nice...
-
xharobikeslifex
- Posts: 102
- Joined: Thu May 31, 2007 8:44 pm
- Car: 1990 240sx
- Location: Shawnee
Re: Project Lilia Uber ("BUILD THREAD")
Havn't updated for a while because i've been saving my money for the turbo setup. I just got my GT3071R turbo from FRmotorsport custom made.
.63 A/R
4.00" inlet
Compressor Anti-surge
Compressor Polished
T3 Inlet, GT 3.0" V-Band Discharge


I threw my Turbo Blanket on it just to see how baller it will look.


I'm currently saving for my exhaust manifold, injectors, fuel rail, waste-gates, and other misc things. Stay Tuned!
.63 A/R
4.00" inlet
Compressor Anti-surge
Compressor Polished
T3 Inlet, GT 3.0" V-Band Discharge
I threw my Turbo Blanket on it just to see how baller it will look.
I'm currently saving for my exhaust manifold, injectors, fuel rail, waste-gates, and other misc things. Stay Tuned!
-
xharobikeslifex
- Posts: 102
- Joined: Thu May 31, 2007 8:44 pm
- Car: 1990 240sx
- Location: Shawnee
Re: Project Lilia Uber ("BUILD THREAD")
Time for an UPDATE!
I decided to change the color of my valve cover... Anodized red is a hott color, but it has been played out. Here's a pic of what it looked like before.

Here's the new color choice BURNT TITANIUM!


Cleaned out the garage this is my work space. It's were all the magic happens

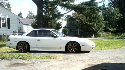
This is current pics of how the car sits


I sold my coupe and I spent every penny on getting everything exterior wise for the project here's a list of things that I purchased, oh and i'm awaiting for all of this stuff to arrive.
Origin 50-60mm rear over fenders
Origin 20mm S13-S15 conversion fenders
D-MAX Type III S15 front bumper
D-MAX Type III 180sx side skirts
D-MAX Type III 180sx rear bumper
180sx Kouki Tail lights
OEM S15 hood
S15 hood hinges
S15 head lights
Here's pics of what the seller sent me.


I decided to change the color of my valve cover... Anodized red is a hott color, but it has been played out. Here's a pic of what it looked like before.
Here's the new color choice BURNT TITANIUM!
Cleaned out the garage this is my work space. It's were all the magic happens
This is current pics of how the car sits
I sold my coupe and I spent every penny on getting everything exterior wise for the project here's a list of things that I purchased, oh and i'm awaiting for all of this stuff to arrive.
Origin 50-60mm rear over fenders
Origin 20mm S13-S15 conversion fenders
D-MAX Type III S15 front bumper
D-MAX Type III 180sx side skirts
D-MAX Type III 180sx rear bumper
180sx Kouki Tail lights
OEM S15 hood
S15 hood hinges
S15 head lights
Here's pics of what the seller sent me.
-
Conrad 2NR
- Posts: 21
- Joined: Mon Nov 23, 2009 4:47 am
- Car: 1991 180SX
- Location: Trinidad
- Contact:
Re: Project Lilia Uber ("BUILD THREAD")
Was this ever completed?
-
junkyard cams
- Posts: 5
- Joined: Mon Jan 16, 2012 10:27 pm
- Contact:
Re: Project Lilia Uber ("BUILD THREAD")
Lookin good man, keep it up