Hello all.
Short and sweet on introductions.
Simply put:
95 240 sx se
blank 302 block
Let's start this build.
goal: minimum of 450 wheel horsepower
Bought a 95 mustang gt 5.0 block.
Block has its stock crank and stock con rods/pistons
Throw those out; get rid of them. Weld up a sculpture with them.
Items bought for shortblock:
-Scat balanced forged steel 347 stroker crank
http://i.imgur.com/3T1urHi.jpg
(Not pictured: Scat forged steel con rods)
-Icon Racing forged aluminum pistons
http://i.imgur.com/05unNKS.jpg
One week at the machine shop for the following:
-Head deck
-Line bore
-.030 over bore/hone
-cyl. notching
-new oil galleys and core plugs
-cam bearings installed
-Probe chromoly girdle and arp main studs
http://i.imgur.com/Bs6BXbI.jpg
http://i.imgur.com/cqcURqF.jpg
Ring gap is going to be .020 top compression and .022 bottom compression. Filing each ring set to each cylinder.
More photos to follow.
Not another LS swap. (no seriously)
-
Boone_Timer88
- Posts: 10
- Joined: Sat Apr 25, 2015 4:32 pm
- Car: '95 240sx se se
-
Boone_Timer88
- Posts: 10
- Joined: Sat Apr 25, 2015 4:32 pm
- Car: '95 240sx se se
Re: Not another LS swap. (no seriously)
Started short block assembly.
Start by cleaning your crank, when I say clean your crank, I mean you clean your crank. You need a microfiber wrag to do this. Your shirt, your dandruff, your dog, cat, whatever will find a way to get on your journals. Then you gonna have a bad time.
http://imgur.com/3os8J6k
Clean your cly walls, set your studs if you are using main studs. I recommend them if youre goal is big power or future plans for big power. Clean it all. Use rubbing alcohol or brake parts cleaner and compressed air to clean your surfaces and blow out your oil galleys.
http://imgur.com/t1T3bkb
Remember how I said to clean the crank? Yea do it again, and again. Anything gets between the journals and the bearings; you're gonna have a bad time. Clean it again.
http://imgur.com/IYyNWml
So this bearing is an older one I pulled from the mains before the block was sent to the machine shop. Even when assembled in the factory, there's chances that a small blemish or bur or slag if the thrust bearing is welded and not a one piece get caught in the assembly oils and this happens. Those lines are scratches, they can cause a tight crank condition, which, in lamest terms, is a bad time. Inspect EVERY part you put in your lower end.
http://imgur.com/KmQYx8U
This is a new bearing, did a mention to wear gloves? No? DO IT. Oils from your hands can cause bad times. Did you just let a bead of sweat fall into the block? You better find it and clean that s*** up right now. Your bottom end must be perfect. So perfect that I personally do not trust machine shops with assembling it for me. This is what a good bearing looks like.
http://imgur.com/7WgpRNa
When you have everything cleaned twice you can now drop your main bearings into the block. Un less you're building a complete engine in a weekend you go out and buy some assembly lube, usually green and think. Lay a fair amount on your bearings.
http://imgur.com/2zUOvg3
I've packed in for the night.
More photos to follow Showing the dropped in crank and piston ring tech.
-
MeanGreenS13

- Posts: 3390
- Joined: Sat Aug 20, 2005 12:59 pm
- Car: 2011 Chevrolet Silverado 2500HD
- Location: Ocala, FL
- Contact:
Re: Not another LS swap. (no seriously)
Word to the wise spoken from vast amounts of experience with this... Absolutely make sure you get a block girdle and lifter valley girdle. DO NOT SKIMP IN THIS AREA! The 302 is very think in material in the lifter valley as well as the timing cover area and front of the engine. If you start making north of 400 at the crank and turning it 7k or more, you WILL have issues.
Competition Products makes a great lifter valley gridle and DSS Racing makes a good main girdle. Don't Skimp... I'm giving you warning now. For that power level you need to take these precautions. You may get away with it for a while but it will bite you eventually. It happened to me twice before I smartened up.
Good Luck
-
Boone_Timer88
- Posts: 10
- Joined: Sat Apr 25, 2015 4:32 pm
- Car: '95 240sx se se
Re: Not another LS swap. (no seriously)
First post shows the main girdle.
Next couple of days I get free I'll start putting my pistons together. When I get to the top end I'll be explaining how the lifter girdle works and why you need one.
Next couple of days I get free I'll start putting my pistons together. When I get to the top end I'll be explaining how the lifter girdle works and why you need one.
-
MeanGreenS13
- Posts: 3390
- Joined: Sat Aug 20, 2005 12:59 pm
- Car: 2011 Chevrolet Silverado 2500HD
- Location: Ocala, FL
- Contact:
Re: Not another LS swap. (no seriously)
I didn't bother to go through the image links. Surround your image links in image tags so the pictures show up. Makes it easier on everyone. When I am on my phone, I don't want to sit there and wait for it to load for 10 minutes lol
There isn't much to explain about the valley girdle. The 302 is very thin in the front case and valley. Less than 1/8" in places. As the cylinders fire, especially with aluminum heads and intake, the block twists and flexes around. With the material being as thin as it is, it causes small stress cracks until eventually this happens...
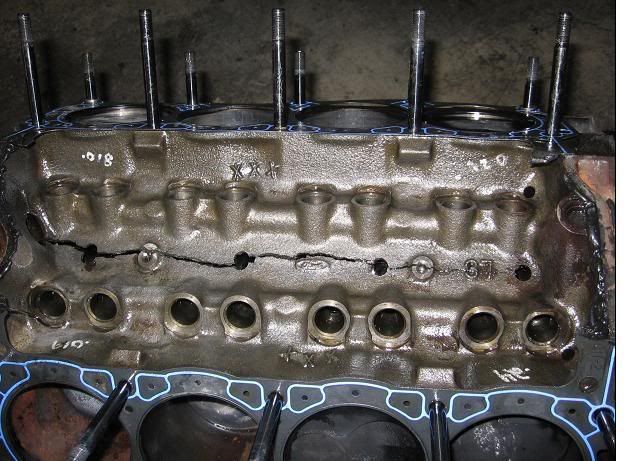
The XXX block is most prone to this. The YYY block (mexican block) has a higher nickle content and is a little stronger, but not by much. I love 302s, but this is one fatal flaw to them.
There isn't much to explain about the valley girdle. The 302 is very thin in the front case and valley. Less than 1/8" in places. As the cylinders fire, especially with aluminum heads and intake, the block twists and flexes around. With the material being as thin as it is, it causes small stress cracks until eventually this happens...
The XXX block is most prone to this. The YYY block (mexican block) has a higher nickle content and is a little stronger, but not by much. I love 302s, but this is one fatal flaw to them.
-
Boone_Timer88
- Posts: 10
- Joined: Sat Apr 25, 2015 4:32 pm
- Car: '95 240sx se se
Re: Not another LS swap. (no seriously)
Last night I was able to set 4 pistons before I needed to turn in. Like everything else involved with shortblock installation, keep everything clean!
I started by taking some pre filing measurements.

I am building a supercharged engine that requires a larger gap than a non blown system. Gaps being used are .020 top and. 022 bottom.
Using a hand file takes careful precision. File some, measure, file, measure. Use a feeler gauge on your rings when they're pushed into the cylinder. Repeat this process until you have the gap you need.

Starting from the bottom of the piston, spiral spacer ring (if you need one) oil control rings, and the compression rings. Refer to your ring instructions for how they are to be placed on the piston.

The placement of the gaps matter too, follow your instructions on this as well

It's hard to take a picture of the ring compressor in action while keeping the scary 90 degree sharp corners of the connecting rods away from the cylinder walls and crank journals. You need a good compressor for installing pistons. Tap them into the block with care, if the rings snag, don't force it, start over. I installed 4 pistons last night and I only swore at them 5 times. You crack a ring and you could ruin the entire build.

Shift starts soon. I'll try to get some images of the pistons going in as well as talk about clearances next post.
I started by taking some pre filing measurements.
I am building a supercharged engine that requires a larger gap than a non blown system. Gaps being used are .020 top and. 022 bottom.
Using a hand file takes careful precision. File some, measure, file, measure. Use a feeler gauge on your rings when they're pushed into the cylinder. Repeat this process until you have the gap you need.
Starting from the bottom of the piston, spiral spacer ring (if you need one) oil control rings, and the compression rings. Refer to your ring instructions for how they are to be placed on the piston.
The placement of the gaps matter too, follow your instructions on this as well
It's hard to take a picture of the ring compressor in action while keeping the scary 90 degree sharp corners of the connecting rods away from the cylinder walls and crank journals. You need a good compressor for installing pistons. Tap them into the block with care, if the rings snag, don't force it, start over. I installed 4 pistons last night and I only swore at them 5 times. You crack a ring and you could ruin the entire build.
Shift starts soon. I'll try to get some images of the pistons going in as well as talk about clearances next post.
-
Boone_Timer88
- Posts: 10
- Joined: Sat Apr 25, 2015 4:32 pm
- Car: '95 240sx se se
Re: Not another LS swap. (no seriously)
Not much to report on tonight. Place more pistons and checked their tolerances.
Sliced my fingers pretty good setting the oil control rings. Better than slicing your pistons.

Moving on; there is no such thing as a 'good ring compressor'. Even with this 'nice one' the rings can still pop out when you're tapping the piston down the cylinder.

So I mentioned being careful with 90 degree sharp corners on the rods going down to mate up with the crank. Do not scratch your crank, you will have a very bad time. Like having to take everything out, sending out the crank to be turned, then trying again with thicker bearings.
Check your torque specs and torque your rod caps when you have both rods attached to a journal.
Now check clearances, on fords, your clearances should be between .001 and .002 between the rod and the crank weights and .005-.007 between the two rods.


I'm tapped on cash for the next week. So I'll dump some photos of the car I'm gutting sometime this weekend while I save up for the top end materials.
P.S.
if you're storing a half built bare metal engine, soak it with wd-40 and bag it with a trash sack until ready to go again.
Happy building.
Sliced my fingers pretty good setting the oil control rings. Better than slicing your pistons.
Moving on; there is no such thing as a 'good ring compressor'. Even with this 'nice one' the rings can still pop out when you're tapping the piston down the cylinder.
So I mentioned being careful with 90 degree sharp corners on the rods going down to mate up with the crank. Do not scratch your crank, you will have a very bad time. Like having to take everything out, sending out the crank to be turned, then trying again with thicker bearings.
Check your torque specs and torque your rod caps when you have both rods attached to a journal.
Now check clearances, on fords, your clearances should be between .001 and .002 between the rod and the crank weights and .005-.007 between the two rods.
I'm tapped on cash for the next week. So I'll dump some photos of the car I'm gutting sometime this weekend while I save up for the top end materials.
P.S.
if you're storing a half built bare metal engine, soak it with wd-40 and bag it with a trash sack until ready to go again.
Happy building.
-
Boone_Timer88
- Posts: 10
- Joined: Sat Apr 25, 2015 4:32 pm
- Car: '95 240sx se se
Re: Not another LS swap. (no seriously)
Update for everyone following:
Removed all of the interior. Including but not limited to:
Seats
Center console
Pillar trim
Carpet (Dynamat carpet is stupid heavy)
Dash
Cluster
Rear seats
Rear seat belts
Rear seat trim.

All of this is pretty straight forward, non of the bolts have a nut on the underside you have to climb under and hold to remove. This cars interior is one of the easiest to deal with.
I have been halted by the air bag harness and computers. The bolts are t-50 tamper proof torx bolts. Buying a bit for them next couple of days. Car goes out for a cage in a week in a half.


If anyone has questions about their s14 interior just ask and I will help however I can.
You need 10, 12, and 14 mm sockets to completely dismantle your interior.
Removed all of the interior. Including but not limited to:
Seats
Center console
Pillar trim
Carpet (Dynamat carpet is stupid heavy)
Dash
Cluster
Rear seats
Rear seat belts
Rear seat trim.
All of this is pretty straight forward, non of the bolts have a nut on the underside you have to climb under and hold to remove. This cars interior is one of the easiest to deal with.
I have been halted by the air bag harness and computers. The bolts are t-50 tamper proof torx bolts. Buying a bit for them next couple of days. Car goes out for a cage in a week in a half.
If anyone has questions about their s14 interior just ask and I will help however I can.
You need 10, 12, and 14 mm sockets to completely dismantle your interior.
-
Boone_Timer88
- Posts: 10
- Joined: Sat Apr 25, 2015 4:32 pm
- Car: '95 240sx se se
Re: Not another LS swap. (no seriously)
Decided to finish my rotating assembly last night and ran into what appears to be a warped crank.
Have emails out to Scat and waiting their reply. Cars getting a cage installed and won't be back until end of May so bear with me as my post slow down some waiting on parts and materials to continue the build.
banks 4 and 8 are not agreeing with each other. Can torque one rod down and it slides back and forth with no issue however the other rod when asked to pair up in the journal won't mate up without force.
So there's up to three possible issues I'm having.
1) Crank warp
2) incorrect journal width
3) incorrect rod width
pictures to follow.
-
Boone_Timer88
- Posts: 10
- Joined: Sat Apr 25, 2015 4:32 pm
- Car: '95 240sx se se
Re: Not another LS swap. (no seriously)
Okay so did some troubleshooting step by step attack on this problem before giving up and taking it in. After much comparing and redundant installation attempts it finally dawned on me to check the rods themselves. Sure enough one rod is flipped. When you are installing rods onto a crank one face is flat and one has a chamfer on it to fit into the journal. The two flat faces of the rods are to sit touching each other and the chamfered sides rid up the walls of the crank weights. If my pistons were flat topped this wouldn't have been an issue. However with my reliefed pistons they need to be orientated in the banks a certain way.
So I'm off to the machine shop in the morning to have this corrected.

The arrow on the piston should be pointing to the front of my block. Whoops.
So I'm off to the machine shop in the morning to have this corrected.
The arrow on the piston should be pointing to the front of my block. Whoops.