
Noob/// How do I change the headlight Bulb in m y 2001 Pathfinder
-
brandon01gsr
- Posts: 1
- Joined: Thu May 29, 2008 9:50 am
- Car: 2001 Nissan Pathfinder
Noob/// How do I change the headlight Bulb in m y 2001 Pathfinder
I have had my 2001 Nissan Pathfinder for a few years now, and just received a FIX IT ticked from south carolinas finest. It's the drivers side. I have tried replacing it myself, and have ran into a hard struggle. I also have a 2002 Jeep Grand Cherokee, and the headlights were much easier to change than this. Am i doing this right? Am i supposed to take the airbox out? Please help, I need to replace this ASAP...
-
Buzzman
- Posts: 2070
- Joined: Fri Feb 02, 2007 2:35 pm
- Car: 2017 Mazda 6 GT
2023 Kia Stinger Elite V6 AWD.
Re: Noob/// How do I change the headlight Bulb ... (brandon01gsr)
You don't have to take the air box out. At least I didn't.What can fool you though is that there is a small wire clip that holds the lamp in place. It's easy to miss. Take out the clip and the bulb should pretty much fall out.Good luck.
Re: Noob/// How do I change the headlight Bulb ... (Buzzman)
I am having the same problem but with my 01 QX4 (same car, right?). My driver side HID bulb is out. I bought a new one, but have no idea how to get enough room to work. Wish it was on the passenger side, b/c I could just take out the battery.
Is moving the air box over the best option? Or do you really think it is doable without anything else. Please help
P.s. Everything I read says unhook battery before due to high voltage. I'm sure everyone knows that, but wanted to pass along the safety tip..
Is moving the air box over the best option? Or do you really think it is doable without anything else. Please help
P.s. Everything I read says unhook battery before due to high voltage. I'm sure everyone knows that, but wanted to pass along the safety tip..
Re: Noob/// How do I change the headlight Bulb ... (akelly76)
Update... I decide to remove the air box, which was actually pretty easy. Two nuts and Two screws. Also loosen the connection from the air box to the inlet hose? (not sure what the name of that is). I was careful of the hoses but it moved out of the way pretty easily.. That gave me room to get to the back of the light. Tips.... Pull off the connector on top of the bulb casing. Push out two wire clips. Then pull out. Replace bulb then put back...
Only drawback is now my headlights have a different shade of light (the new one is less blue... I think it has to do with the new bulb I purchased from NAPA and it not being one from the dealer. Probably will eventually change the passenger side, which should be pretty easy since all I have to do is remove the batter to begin work.
Hope this helps future car novices like myself...
-
Densetsu

- Posts: 557
- Joined: Wed Mar 12, 2008 5:50 am
- Car: 2004 Nissan Pathfinder Chinook
Prev: 2003 Nissan Pathfinder Chilkoot - Location: Edmonton, AB
Re: Noob/// How do I change the headlight Bulb ... (akelly76)
If one headlight goes out, I'll buy two and replace them both. Then put the second one in a plastic bag, then into my glove box.
For one, they'll match (not that that's a *huge* deal, but it's nice). More importantly, if I'm ever in the odd situation where both my lights burn out, at least I'll have one spare.
For one, they'll match (not that that's a *huge* deal, but it's nice). More importantly, if I'm ever in the odd situation where both my lights burn out, at least I'll have one spare.

Re: Noob/// How do I change the headlight Bulb in m y 2001 P
I know it is an old post...but i have tried countless times to take off the wiring harness and for some odd reason cant seem to figure out how to do that? do you guys recommend to take off the rubber cap prior to removing the wiring harness or otherwise. A snapshot would be great but would still appreciate any help thanks!!
Re: Noob/// How do I change the headlight Bulb in m y 2001 P
I Just did a whole headlight install so iv'e pulled everything last night and put it back in. here is some diagrams i drew up on my phone to try to explain. when i get home i can take some photos of the headlamp housing and show how it works.
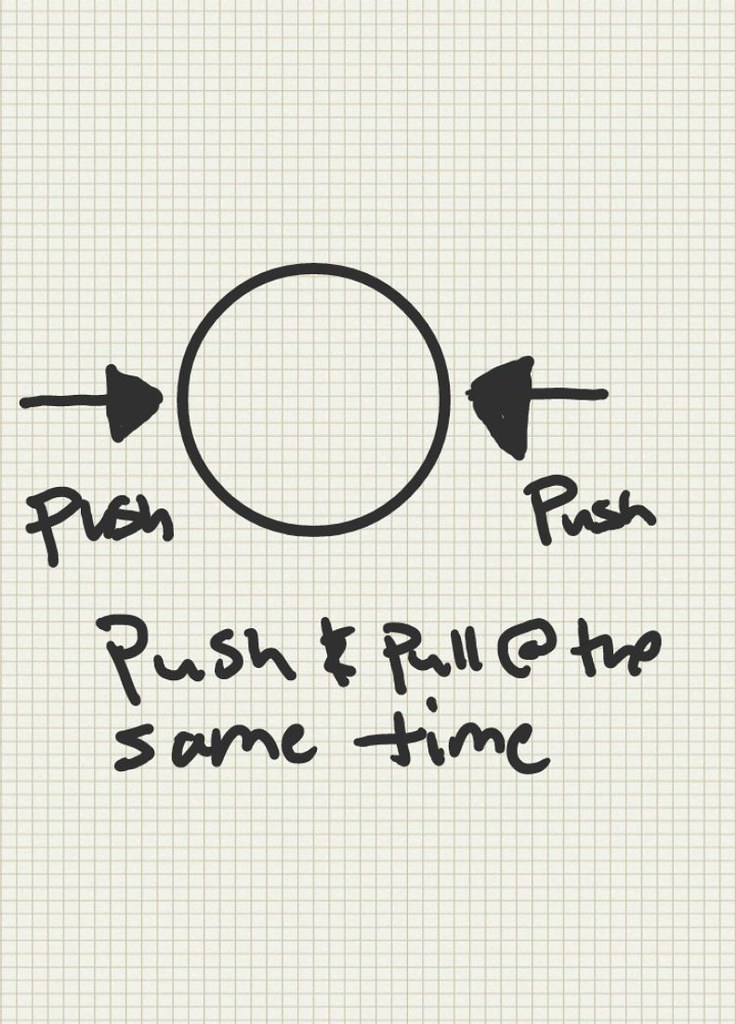
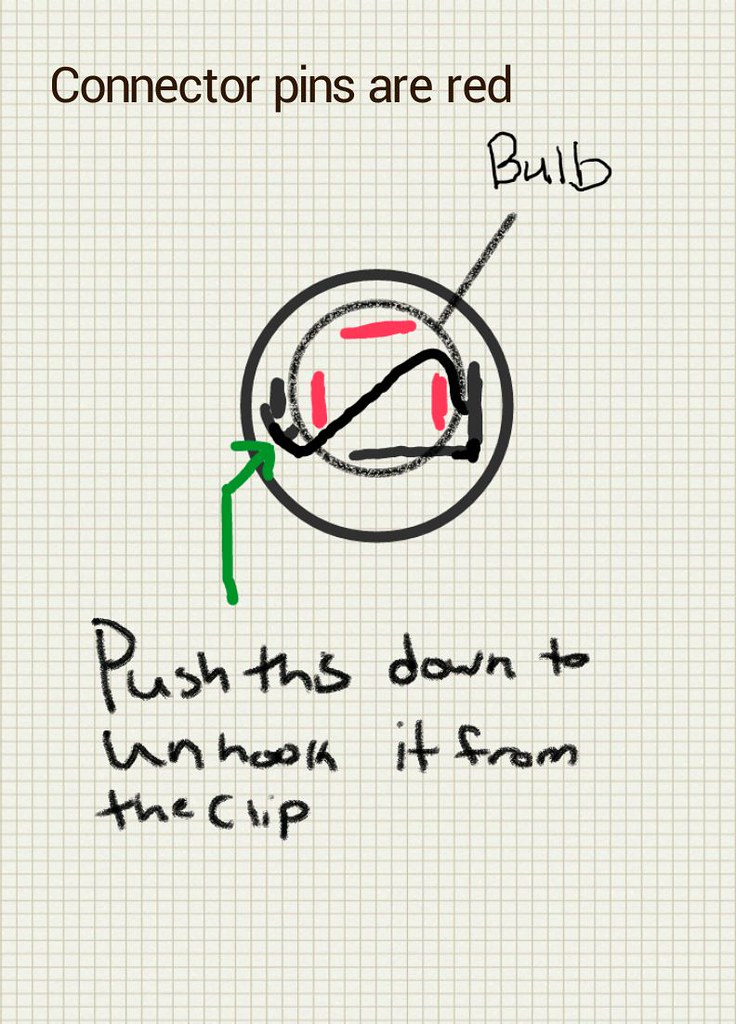
the main point is to press on the sides of the power connector and pull at the same time. once you unplug that then you will see the bulb still in the housing and the bulb prongs (flat metal pieces that supply the power from the connector you just pulled) in the housing there is a built in wire that goes across the bulb to hold it in and goes to the other side and locks under a tab. so find the end and push it down from under this tab and it will open like a door (it's on a hinge) then you will be able to pull the light bulb.
here are some quick drawings, let me know if you want me to take legit pictures, i have the whole housing on my shelf, and i can pull the connector out and try to gets some pic's of it (it will be dark pic's cuz it's hard to get good pic's on the camera in the engine, or headlamp areas)
here in the first pic is a view from the engine, meaning this is the end that sticks out of you headlight housing
this is a side view of how this system works
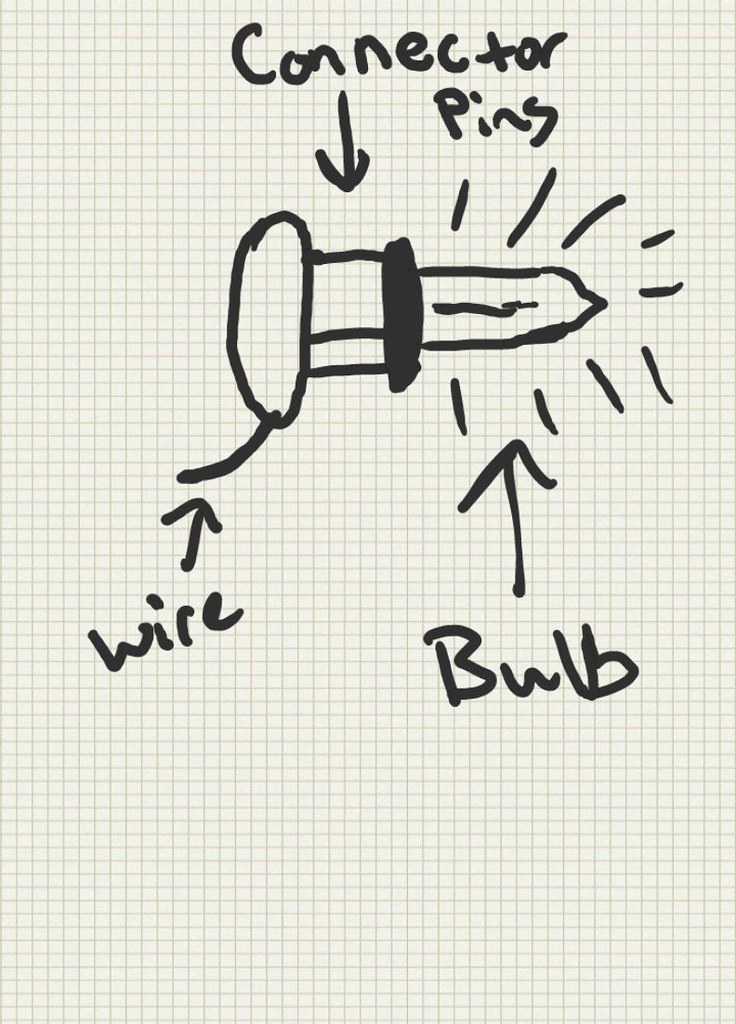
this is the same view as the first picture, just with the power connector off.
the main point is to press on the sides of the power connector and pull at the same time. once you unplug that then you will see the bulb still in the housing and the bulb prongs (flat metal pieces that supply the power from the connector you just pulled) in the housing there is a built in wire that goes across the bulb to hold it in and goes to the other side and locks under a tab. so find the end and push it down from under this tab and it will open like a door (it's on a hinge) then you will be able to pull the light bulb.
here are some quick drawings, let me know if you want me to take legit pictures, i have the whole housing on my shelf, and i can pull the connector out and try to gets some pic's of it (it will be dark pic's cuz it's hard to get good pic's on the camera in the engine, or headlamp areas)
here in the first pic is a view from the engine, meaning this is the end that sticks out of you headlight housing
this is a side view of how this system works
this is the same view as the first picture, just with the power connector off.
Re: Noob/// How do I change the headlight Bulb in m y 2001 P
awesome write up dude....appreciate it. Must say great visuals
-
Carolynlundberg
- Posts: 1
- Joined: Mon Feb 01, 2016 4:24 pm
- Car: 2001 Nissan Pathfinder 4x4
Re: Noob/// How do I change the headlight Bulb in m y 2001 Pathfinder
Yahoo, I changed both light bulbs last night. For your information, I am a woman who is not a mechanic but I hate to pay for DIY projects. The passenger high beam worked but the low beam did not; I have fog lights so I had the luxury of time to wait for parts online. That said, most online recommendations suggested that my problem was not the bulb but the switch because the light did work in high beam. I installed a new switch which was easy to install thank you YouTube and my Haynes manual. Unfortunately, it was not the switch. I bought two new bulbs (Murphy's law; do both).
I did not go from the backside because space is tight and finding the clip to remove the bulb in retrospect I think would have been very difficult.
My recommendations which are not provided accurately in Haynes or online are as follows:
1) Remove the grill
a) Remove two very small screws in the center of the grill at the top ledge near the hood latch (you will need a short, 90 degree screwdriver).
b) Squeeze two clips on either side of the grill (use pliers to squeeze and pull gently) and
one clip on the center vertical post
2) Remove the side/turn signal light
a) Pull and wiggle the assembly
b) Have the courage and tug HARD to extract the assembly from a push-pin holding the light assembly; it is not easy to extract but it will pop out and I do not agree with online sources that that push pin will break.
3) Remove the plastic strip under the light fixture; it is hiding a screw under the light.
a) First remove the single screw holding the plastic strip in place (it's next to the signal light you just removed)
b) I ended up just tugging to remove the strip; one side did pop off a small plastic black piece which I re-glued with super glue very easily. This is the most difficult part of the job! I welcome recommendations as I tried to slide the piece to remove and no such luck. The two white holding clips stayed on the vehicle which I removed after I removed the plastic cosmetic strip and ultimately just re-inserted them into the strip when re-installing the strip to reassemble the vehicle.
4) Three screws hold the light in place, remember the one under the light (it is about 8" recessed; I used a magnet at the end of unscrewing so as not to lose the nut; use a magnetic #10 socket on your socket wrench if you can.
5) Squeeze the black socket to remove the light fixture from the vehicle; it's ridiculously dirty!
6) Place the light fixture on a soft surface, remove the black rubber keeper (it has two pull tabs ( I also used a small flat head screw driver to help the pull tabs as my vehicle is old).
a) Once the black rubber housing is out; depress the wire clip on the bent end and push sideways; it will pull up easily to expose the bulb.
b) Wear a glove or grasp the housing of the old and new bulb as the oil on your skin can damage the new bulb.
c) Remove and replace the bulb; re-secure the wire holding clip,just push down and under the clip receiver.
7) Place the lamp at the vehicle, secure the socket till it clicks.
8) Reassemble starting with the screw UNDER the lamp; don't forget that one.
9) Do not forget to install the screw for the cosmetic plastic piece that goes under the lamp before you reinstall the signal side light or you will have to go back several steps.
Ensure that you have no leftover screws and congratulate yourself as I did; I have never done a headlight(s) before.
I have 221,000 miles and original headlights so I feel fortunate; great vehicle! Hope this has helped. Again,if I can do this most anyone can do this!
-
Buzzman
- Posts: 2070
- Joined: Fri Feb 02, 2007 2:35 pm
- Car: 2017 Mazda 6 GT
2023 Kia Stinger Elite V6 AWD.
Re: Noob/// How do I change the headlight Bulb in m y 2001 Pathfinder
@ carolynlundberg: Have to give you credit for the courage and fortitude to rip it all apart, but if you did all that just to change two light bulbs, then what you did was totally unnecessary.
I've had my 2002 Pathfinder since almost new, and have had to replace bulbs on several occasions.
The most I've ever had to do to give me some working space was to pull the battery out on the passenger side, and the airbox on the drivers side.
Now that I know how the bulbs come out, I don't even do that.
It's a bit tight for big hands, but changing bulbs is a ten minute job.
If you were replacing the whole headlight assembly, then that's a different story.
Cheers.
-
barnaclebob
- Posts: 249
- Joined: Tue Feb 10, 2015 2:55 pm
- Car: 2001 Pathfinder LE
2011 Altima SR
Re: Noob/// How do I change the headlight Bulb in m y 2001 Pathfinder
I've been able to change the drivers headlight with no disassembly but it involved a fair amount of cussing...
Re: Noob/// How do I change the headlight Bulb in m y 2001 Pathfinder
2003 QX4 with Xenon HID: the install is different, I did remove the battery to get at the right side bulb. The electrical connector rotates off, 1/8 of a turn counter-clockwise. And the wire-spring that holds the bulb in place (the external wire on the bulb faces down, twist to engage the key), hinges at the bottom, and runs up both sides of the bulb to a loops that clip under a catch at the top on either side. Push each loop in and out to side, I was not able to do it by hand, and eventually used needle-nose pliers and then it was quite easy.
The bulb that came out was a 'Philips Germany' D2R 35w, which had been in for a long time & use, as my GF uses the headlights as DRLs. I replaced it with the same Philips bulb from RockAuto (as there are fakes out there), as I had used the same bulb previously on the other side, and it was lasting well.
The bulb that came out was a 'Philips Germany' D2R 35w, which had been in for a long time & use, as my GF uses the headlights as DRLs. I replaced it with the same Philips bulb from RockAuto (as there are fakes out there), as I had used the same bulb previously on the other side, and it was lasting well.
Find Your Forum!