Ken's '91 Fastback Resto/KA-T Build

General discussion forum about the 240sx, and a great place to introduce yourself to the board!
User avatar
Jabberwocky
Posts: 159
Joined: Mon May 23, 2011 9:42 pm
Car: 08 Subaru WRX
Location: Taneytown, MD

Post

After nearly a four year hiatus, I am glad to not only be back on NICO but also starting a fresh build! Where have I been? It is a long, long story...but here it goes in a nutshell: 2004 I bought a '91 240sx coupe and joined this forum as 1991s13, but have since lost the email I used to start the account (admins, read as HELP me get it back ;) ). I had the car til '07, and in that time I added a body kit, had it painted, added a few minor bolt ons, and performed a 5 speed swap; then one dark cold night I ran it through a field of pine trees. Thought it was fixable until I removed the fenders/fender liners and found the driver's side frame rail was nearly rusted through right behind the strut and bent upwards from that spot forward. Here she was in her hayday...
Image
Got a DUI, license suspended 6 months, 5 years probation, kicked out of my house, and the money I was spending on the s13 and furthering my education was redirected toward legal fees and living in the real world. I then bought a lifted Infiniti QX4 that at the time I thought was unique and for some reason practical in a time where gas prices reached upwards of $3 a gallon for the first time, but it slowly fell apart the whole time I owned it. I would love to meet the people who modified all the parts to fit, they probably went on to work for Toyota...but I digress...
Image

I did what I had to do to get my proverbial ducks back in order. Fell in love, got engaged, that fell through (thankfully), and that brings me to my newest and what I believe to be my greatest love so far...
Image
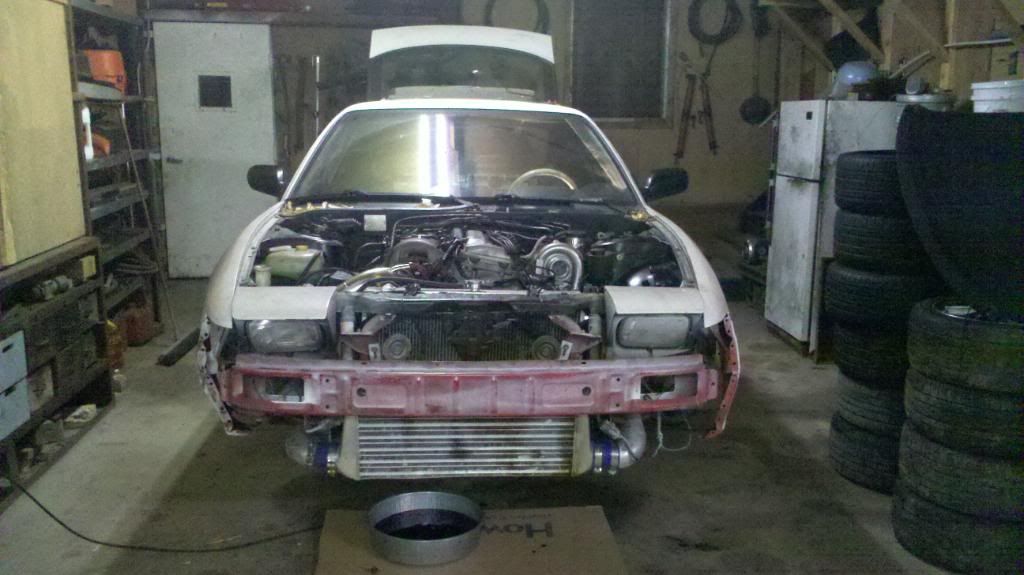
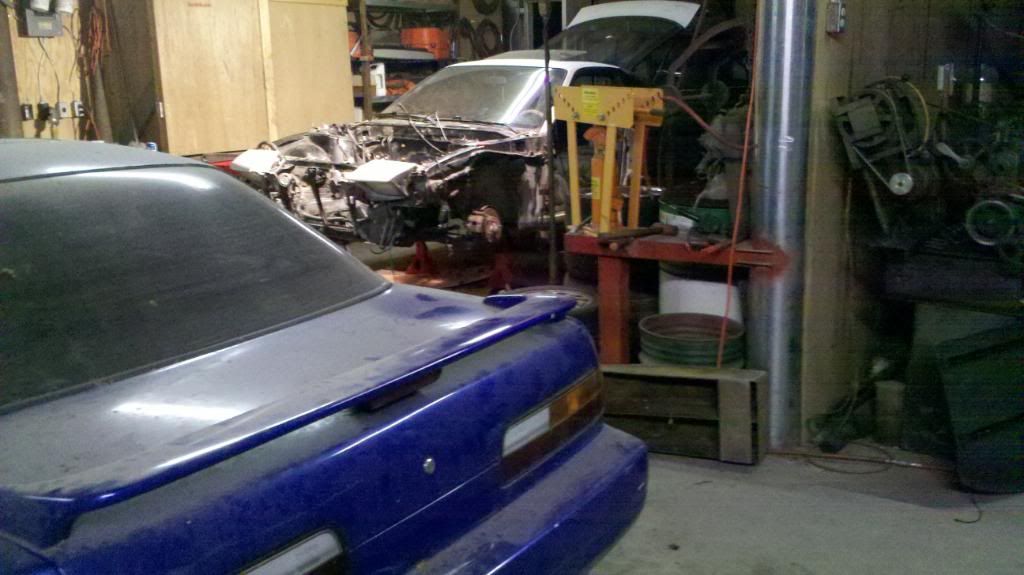
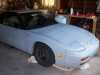
Ladies and gentlemen, meet Veronica! In those few years I spent...well, growing up...I kept buying KA-T parts here and there for a car I didn't own at that time, but knew I would have again some day. It all came full circle when I found this '91 fastback with a KA24DET for sale in Delaware. The body is not too shabby and the previous owner slapped together an affordable turbo setup, so between the parts I've been buying, what came with the car, and what was left of my original s13, I am VERY close to having everything necessary to finish building the s13 I have been dreaming about since '04. Okay, maybe not the one from my dreams because I believe Ivan from KA-T.org built that one already...but the best I can manage to afford right now.
Image
Image
Image
As soon as I got it home I went straight to tearing it down so I could go over the body and thoroughly check for structural problems. The carpet was gone, and shortly the grease smeared/oil soaked seats were thrown out as well. The dash is still in good shape, but the steering wheel was replaced with an eBay racing wheel. Not only was it mounted crooked, but it was white so it of course was also covered with greasy fingerprints.
Image
Image
Thankfully I have a parts car. Yanked that column and replaced it with mine.
Image
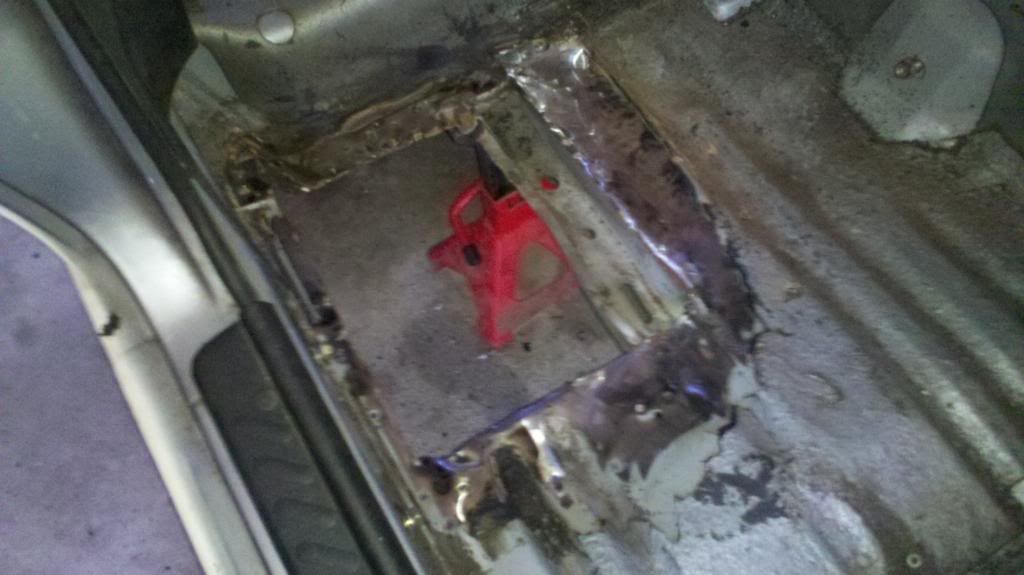
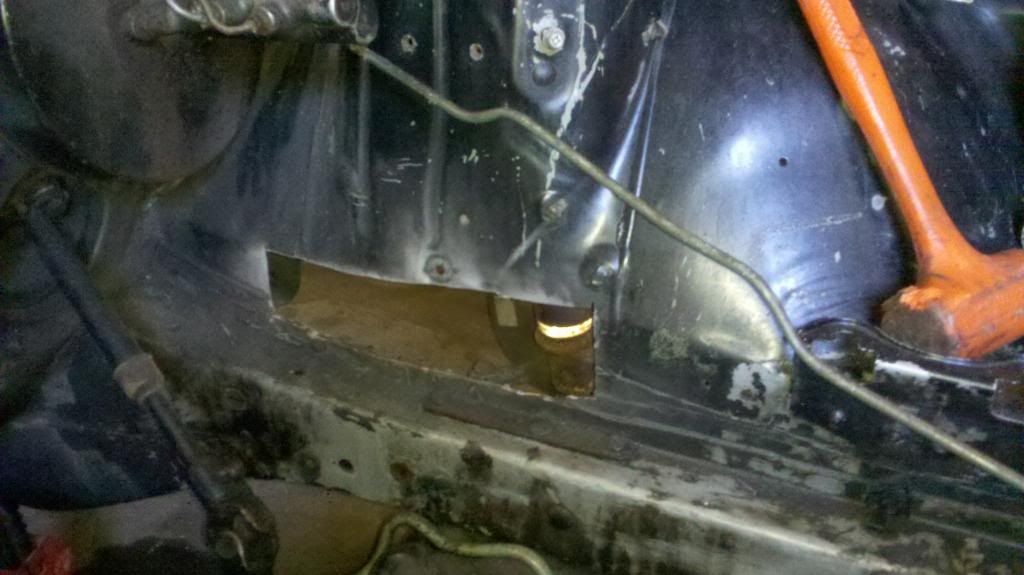
After pulling the passenger seat I found another pleasant surprise. A roughly 6"x6" section of the floor was rusted through, and the previous owner riveted what looked like a piece of tin foil over top of it to patch it up (you can see it in the above interior pics). I drilled out the rivets and cut around the rust so I have a clean hole to weld some sheet metal over eventually.
Image
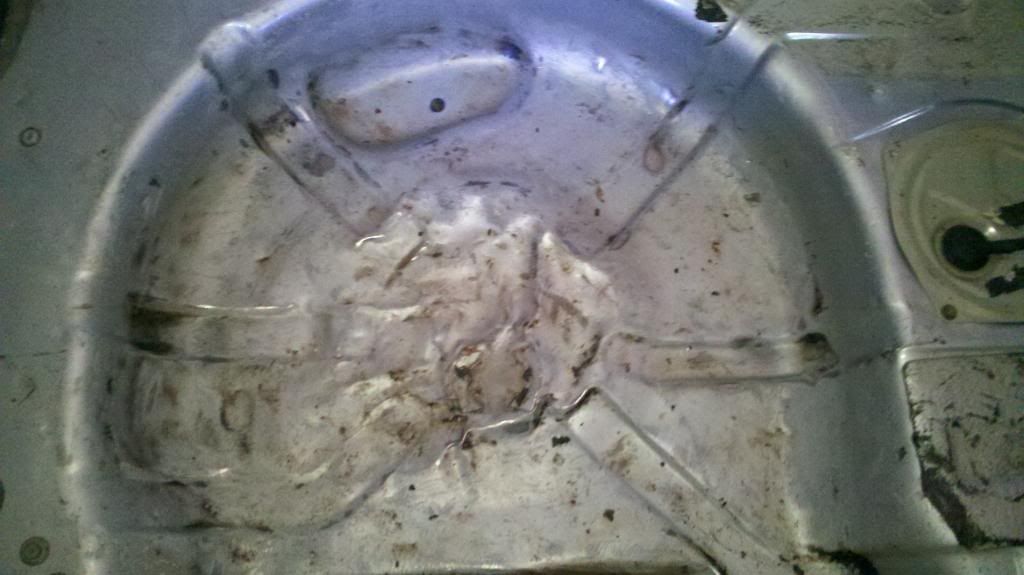
You may have noticed the doors were pulled, reason being they were mostly body puddy. The pair off of my old coupe are in great shape plus they have power windows/locks which I will wire up when Im ready to install them. The floor in the hatch had about an eighth of an inch of dirt stuck to it, so in the name of cleanliness and weight reduction I pressure washed it, took the wire wheel to it, and to finish it up before I paint it I am going to use scotch brite pads to remove the leftovers. After pressure washing some of the sound deadening insulation on the floor was peeling up, so I went ahead and used a chisel to scrape it all out. I was actually surprised how easy it came up. I took the wire wheel back over it to remove as much of the black tar residue that was left.
Image
Image
Image
The engine/transmission came out easily, thanks to the previous owners lack of a torque wrench. MANY bolts/nuts, including the exhaust manifold nuts, bellhousing bolts, and pretty much every hose clamp on the IC piping were barely finger tight. The car also did not have power steering, which I found was because it is missing the line from the pump to the steering rack. If I didn't have my parts car I would be upset. Some more pictures I took along the way...
Image
Image
Image
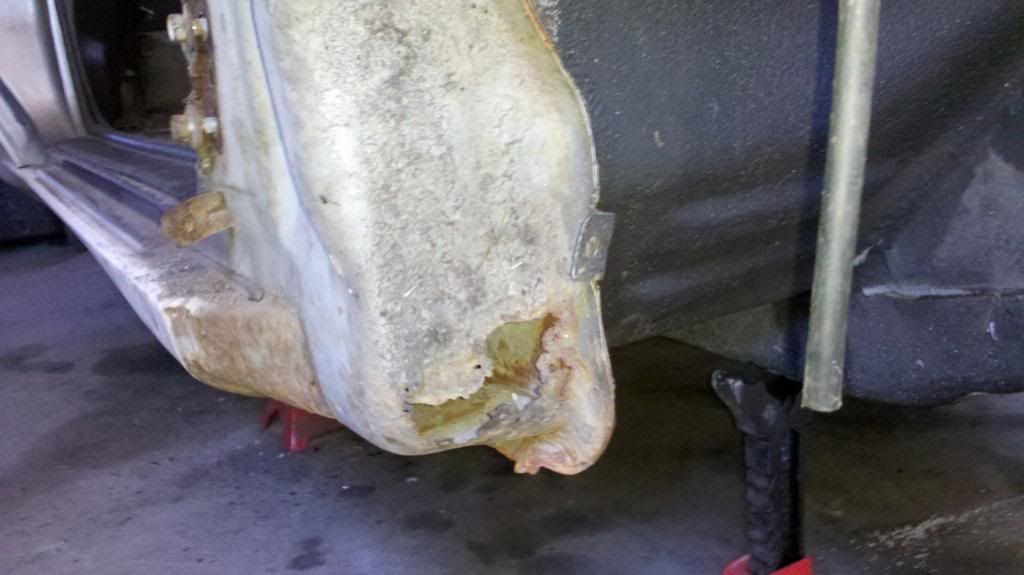
After pulling the engine and the front wheels I found what I was expecting, MORE RUST! In the lower back of the passenger side fender well there was a hole and, surprise surprise, the bottom of the driver side strut tower and a section of the frame underneath were ate out as well. Both this s13 and my old coupe were built in the same month of the same year in the same plant....saaame rust hole! I then cut out the rust and prepped the areas so I can eventually weld them back closed.
Image
Image
Image
Image
Now that I had the motor pulled and the interior stripped, I pushed her back outside to degrease and pressure wash the hatch and engine bay.
Image
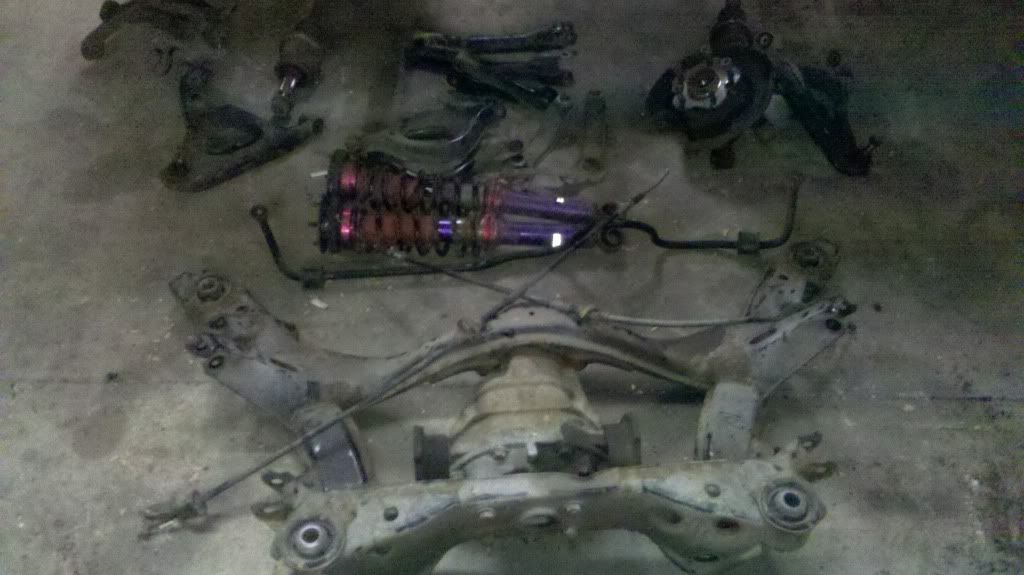
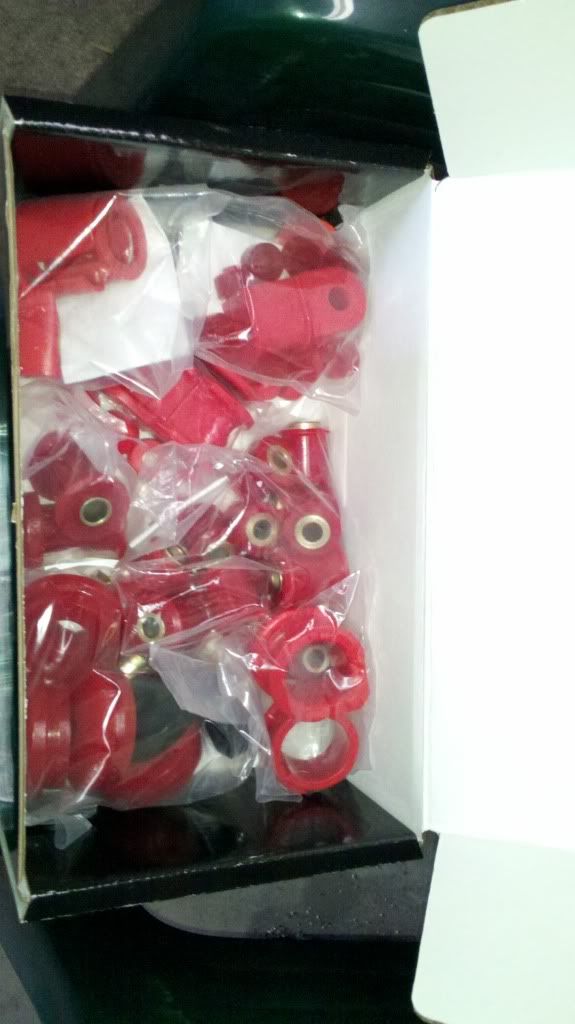
Back inside and sitting pretty (ugly) on stands, I dropped the rear subframe. Every bushing front and rear is going to be replaced with Energy Suspension polyurethane pieces, plus I wanted to drop it so its not in the way when I clean up the underbody and repaint it with 3M rubberized undercoating. This gave my father a reason to hook up the sandblasting cabinet that has been collecting dust for years now, so before replacing the bushings I am going to sandblast and paint the rear subframe. The car has Tanabe Sustec Pro coilovers as well, but they are showing their age. They will be scotch brited and painted as well.
Image
Image
Image

I've got a lot of work ahead of me, but as I mentioned I have been dreaming about this for years. I feel like I've been moving backward since I got the car because I've been tearing everything apart but she will come around. If you're wondering what Im going to put in it, I am building a KA with forged internals, fully built head, and a Precision 6031. Im looking to put down some respectable numbers, so you'll see more about the motor build in the near future.

I hope to keep this thread updated very often...since I have brought it home I have spent roughly 10-15 hours working on it every weekend. Keep checking back and leave me your feedback, thanks for checking it out!
Last edited by Jabberwocky on Mon Jun 20, 2011 9:58 am, edited 1 time in total.


User avatar
bigbadberry3
Posts: 2095
Joined: Sun May 17, 2009 6:19 pm
Location: USA

Post

It's like you stole the rust pictures from my car. Good start!

User avatar
SkyS13Walker
Posts: 76
Joined: Tue May 31, 2011 9:30 pm
Car: 1990 240sx Hatch-back
Location: New York

Post

I Like wat you doin and how you doin it.....Keep it up :BnB:

User avatar
240TKE128
Posts: 230
Joined: Fri Feb 06, 2009 9:05 am
Car: 1990 240sx HB

2011 subaru outback 2.5i limited
Location: Asheville, NC
Contact:

Post

Looks like my 90 fastback rust everywhere and the same shade of white/tar. Much Luck man.

User avatar
Jabberwocky
Posts: 159
Joined: Mon May 23, 2011 9:42 pm
Car: 08 Subaru WRX
Location: Taneytown, MD

Post

Thanks guys. Its not completely rusted out, really just those three spots. I was actually surprised at how clean the underbody is. It does have a sick paint job though...rattle can white, silver inside, and the front clip is red with more half a** black rattle can paint work. Look for an update soon, im going to start painting the hatch/engine bay tonight after work, and I just ordered BC stage 3 cams, dual springs, and stainless oversized valves :)

User avatar
Jabberwocky
Posts: 159
Joined: Mon May 23, 2011 9:42 pm
Car: 08 Subaru WRX
Location: Taneytown, MD

Post

Found some time to work on her this weekend. Finished painting the hatch and where the back seat used to be. I stopped at the bottom of where the back seat sits because when I put the new carpet in from there forward will be covered.
Image
Image

Then I dug the block and head out of a corner of the garage...
Image

Pulled the intake manifold off of my spare motor...
Image
Tore it apart and cleaned it up good with some acetone, then sprayed it with high temp...
Image
Under the hood Im going with a black/silver/lime green color scheme. Black block, silver head, green timing covers, green oil pan, black with green accent valve cover, green intake manifold. Hopefully next week I can put the intake mani back together minus the unneccessary emissions parts.

I ordered a rack of parts last week, so hopefully most will arrive in the next couple days. As soon as they're in I'll snap some pics and let you guys in on what I have planned with the engine.
Last edited by Jabberwocky on Sun Jul 31, 2011 10:30 pm, edited 1 time in total.

User avatar
bigbadberry3
Posts: 2095
Joined: Sun May 17, 2009 6:19 pm
Location: USA

Post

Nice work.

Heads up, carpeting sucks.

User avatar
Jabberwocky
Posts: 159
Joined: Mon May 23, 2011 9:42 pm
Car: 08 Subaru WRX
Location: Taneytown, MD

Post

Heres a pic of all the parts I've collected so far...
Image
New crank
Cometic top and bottom gasket kits
ARP head studs
BC dual valve springs and retainers
BC +.5mm intake & exhaust valves
BC stage 3 cams
Eagle H Beam connecting rods
Centerforce Dual Friction clutch
Top mount t3/t4 exhaust manifold
HKS SSQV BOV
Walbro 255 fuel pump
MSD 6A and Blaster 3
Tial Wastegate
Innovate LC1 wideband o2 sensor
30.5x12x3 FMIC

The ups and fed ex guys have been here every day for the last week and theres still more on the way...

Kingspade805
Posts: 10
Joined: Fri Jul 02, 2010 11:49 pm
Car: 1989 Nissan 240sx hatch

Post

Looks great! Hope to see it all work out for you!
I got my 89 piggy wit rust! I've been thinking of
Selling it cuz of the rust problem but I also want to resto/build it. Funds r not helping too!

nightsauce
Posts: 1074
Joined: Thu Jun 19, 2008 3:06 am
Car: 1991 Nissan 240SX S13 hatch RIP
1992 Nissan 240S S13 hatch :D
Location: Newark, NJ

Post

suscribed. :D

User avatar
Jabberwocky
Posts: 159
Joined: Mon May 23, 2011 9:42 pm
Car: 08 Subaru WRX
Location: Taneytown, MD

Post

Turbo is here! Precision 6031 59 trim .63 ar...

Image

Image

User avatar
mindovaanything
Posts: 157
Joined: Fri Aug 13, 2010 11:17 am
Car: S13 Hatch
Location: NYC

Post

I like where this is going

User avatar
Jabberwocky
Posts: 159
Joined: Mon May 23, 2011 9:42 pm
Car: 08 Subaru WRX
Location: Taneytown, MD

Post

The head is at the machine shop almost ready to go. I had everything except valve locks, so I ordered a set of Manley stainless steel locks and it will be finished when they get in the hands of the machine shop. Anyone in the MD/PA area Gunther's Machine Shop in Woodsboro, MD is worth checking out if you're looking for a good shop. Nice bunch of guys out there and they do good work fast.

Meanwhile, I painted the valve cover. Before painting I ground the NISSAN Twin Cam 16 Valve lettering off and smoothed it out with a flap wheel. Primed it, then used high temp Duplicolor spray paint and finished it with metal flake clear coat.

Imagev
Image
Image
Image

I also got a little bit of welding done.

Image
It isn't the prettiest bead, but it was a b**** trying not to burn thru the floorboard with my limited welding skills. Had to keep filling over where it was melting out. I used 16ga sheet metal to patch it. In the pic you can see the bead doesn't go the whole way around...this is because I was having a hard time getting the metal to bend in the shape I needed in the back and along the trans tunnel. I'd recommend using a slightly thinner sheet metal. I put 4 bolts along the spots I couldn't get to form and sealed it up, then sprayed it from the bottom side with rubberized undercoating.

Image

When I picked up the sheet metal I also grabbed 20ft of 2.75" tubing to build a 4pt cage to help tie the rear struts together, stiffen it up a little and allow me to use racing seats with harnesses mounted to the cage. More on this coming soon...

Next on the agenda is honing the cylinders, rebuilding the intake manifold minus some emissions, assembling the bottom end, bolting on the head and putting together the timing chain. :woot: It's starting to get fun...

User avatar
240sxAli4Life
Posts: 493
Joined: Mon Sep 27, 2010 7:08 pm
Car: 1990 S13 Hatch SOHC... SOLD :(
1993 S13 Hatch DOHC!! Super Sexy!!
Location: Florence, KY

Post

I cant wait to see more, looks like an excellent start to a great build! :dblthumb:

User avatar
240TKE128
Posts: 230
Joined: Fri Feb 06, 2009 9:05 am
Car: 1990 240sx HB

2011 subaru outback 2.5i limited
Location: Asheville, NC
Contact:

Post

Man it looks like you have gotten alot of work done already.

Mercury_Hg
Posts: 274
Joined: Fri Oct 01, 2010 9:36 pm
Car: 1993 240SX Coupe

Post

What color is your first 240?
What's the kit on it?

User avatar
Jabberwocky
Posts: 159
Joined: Mon May 23, 2011 9:42 pm
Car: 08 Subaru WRX
Location: Taneytown, MD

Post

Its daytona (350z) blue, and had a railworx front bumper with nismo side and rear skirts.

User avatar
Jabberwocky
Posts: 159
Joined: Mon May 23, 2011 9:42 pm
Car: 08 Subaru WRX
Location: Taneytown, MD

Post

Today was a sad day...

Image

I needed the rear subframe out of my old car because I destroyed one of the frame mount bushings on the car Im building's subframe before I knew that you can't find them anywhere (besides the rather expensive aluminum inserts). Since my old coupe is rusted up and the frame is bent I am planning on junking the whole thing, so I figured I would just flip the car and pull the rear out with the forklift.

Image

Before I flipped it I pulled off everything else I wanted to keep like the dash, doors, seats, wiring harness, etc. Yanked the rear out pretty quick, then flipped it back over. To make it easier to fit in the dump truck and haul to the scrap yard I smashed the roof in with a backhoe...it was quite depressing but there is nothing better than jammin Lamb of God's Ashes of the Wake while crushing a car with a backhoe lol.

Image

Now that I have the subframe I can proceed with sandblasting and painting all the parts, pressing in the new bushings and putting it all back together. Until next weekend...

User avatar
Jabberwocky
Posts: 159
Joined: Mon May 23, 2011 9:42 pm
Car: 08 Subaru WRX
Location: Taneytown, MD

Post

It has been a while, but even though I haven't been posting much I am still making progress. I finally got around to fixing the hole in the driver side strut tower/frame and the end of the passenger side frame rail that was rusted. The before pictures are above in an older post, but heres what it looks like now...

Image
Image

I welded 16 gauge steel in the strut tower, and to patch the frame and keep it solid I drilled through and bolted a piece of quarter inch steel over top the rusty spot. After I took the pics I covered the pieces I welded in with roofing sealer to seal it all up.

I am glad to say that I am finished with the bushings as well. After everything was disassembled I heated the old bushings with the torch until I could knock them out and use a flat screwdriver to peel the remaining rubber out of the holes. Then I used a sawzall to cut through the metal shell that surrounds the bushings and drove them out with a chisel. Now it was time to sandblast and paint everything, then press the new bushings in to complete the parts. Here it all is looking fresh and clean...

Image

While the rear was down I bought JGY's friction type LSD and installed it. It was quite simple to do, only taking about 15 minutes.

Image

In this picture you can see the JGY LSD installed. After it is on the shaft you pull a clip out of each side and the springs release locking the axles.

Image

I then put the rear subframe back under the car and installed the lower control arms (with new '89 Sentra ball joints) and sway bar. You can see in the second picture the inside of the fender well after I sprayed them with rubberized undercoating. I am very happy with how it turned out, I undercoated the front fender wells and transmission tunnel as well.

Image
Image

Did the front too of course...

Image
Image

All thats left up there is change the tie rod ends and put the coilovers and spindles back on, which I'll do later this week after I get the rotors turned. I have brake pads and stainless steel brake lines on the way, so when they get here the front and rear will be totally complete.

I also put a little work in on the roll cage yesterday. The front piece is ready to be welded to the floor, but I need a couple things before I can finish the back part. I will elaborate on that more when the time comes, this is what I have for now...

Image

Be back with more in the near future fellas.

User avatar
badbob2121
Posts: 1989
Joined: Sat Jan 16, 2010 9:23 am
Car: '92 Nissan 240SXS13 Hatch ELLIS JUAN
'12 Ford Mustang GT RTR
Location: St. Louis

Post

very, very nice..

User avatar
Caveit77777
Posts: 434
Joined: Sat Nov 07, 2009 7:02 pm
Car: 1996 240sx SE

Post

This is going to be good. Keeeeeeeeeeeep it up

User avatar
240TKE128
Posts: 230
Joined: Fri Feb 06, 2009 9:05 am
Car: 1990 240sx HB

2011 subaru outback 2.5i limited
Location: Asheville, NC
Contact:

Post

Love the update keep it up man.

User avatar
Jabberwocky
Posts: 159
Joined: Mon May 23, 2011 9:42 pm
Car: 08 Subaru WRX
Location: Taneytown, MD

Post

I found the time to tie up some loose ends over the weekend. Finally patched up the end of the passenger side frame rail that was rusted out...

Image

Then I ran a piece of 4 gauge wire under the car for the battery. I drilled through the floor of the hatch to run each cable down through a grommet and under, trying to keep it as clean and simple as possible. Here it is mocked up, I do not want to mount the battery box until I get the cage finished.

Image

Here is how I ran the cable back, I just zip tied it to the brake lines that run back the passenger side.

Image

When I patched the rust spots in the driver side frame and strut tower I cut out the hole where the hard brake line ran through and the holes the rubber line bracket bolted up to, so I had to redrill for the line and the bracket. I made a new line and brought it through a hole with a grommet, then drilled two holes for the bracket and used 7/16 bolts to stick it back on.

Image

Image

I sprayed the bracket with undercoating, then stuck the Stoptech Stainless brake lines on...

Image

I also painted the rear calipers/brackets, and am waiting for two new front calipers to come in. The rotors were just turned, and as soon as I get those calipers and throw some paint on them I can do the stainless lines on the back then install the rotors, calipers, and pads all the way around. Bleed the brakes and the brakes/suspension will be sewed up.

User avatar
240sxAli4Life
Posts: 493
Joined: Mon Sep 27, 2010 7:08 pm
Car: 1990 S13 Hatch SOHC... SOLD :(
1993 S13 Hatch DOHC!! Super Sexy!!
Location: Florence, KY

Post

Keep up the good work, cant wait to see that custom 4pt. cage when its done!

User avatar
The_caveman
Posts: 283
Joined: Sat Aug 20, 2011 7:05 am
Car: 93 nissan 240sx hatch(daily build)
1992 Coupe (drift build)
1990 240sx hatch(wrecked slut)
2008 hyundai sonota - girls car/reliable! i drive it better tho ;)

Post

This s*** is sick, makes me wish i had just put together my rust free coupe and did all that rust fixing to the hatch....my hatch has that same rust spot starting on the passenger side under the strut tower....wtf is with that

awesome build man

KAman19
Posts: 22
Joined: Mon Feb 14, 2011 9:24 pm
Car: 1989 s13 hatch ka24e
4-2-1 header, dual n1 catback knockoff
3in intake pipe

Post

looking good
i got some rust on the drivers side frame rail i need to take care of...

Mercury_Hg
Posts: 274
Joined: Fri Oct 01, 2010 9:36 pm
Car: 1993 240SX Coupe

Post

Jabberwocky wrote:Its daytona (350z) blue, and had a railworx front bumper with nismo side and rear skirts.
I'd forgotten that I'd asked you this!

Funny that I came back to the same color anyway :biggrin:.

EDIT: Awesome build so far!

User avatar
Jabberwocky
Posts: 159
Joined: Mon May 23, 2011 9:42 pm
Car: 08 Subaru WRX
Location: Taneytown, MD

Post

Thanks for all the feedback guys. If Im ever in the market for another shell I might make a road trip out of it and find one out west...it seems like on the east coast its impossible to find one without rust. Xcessive sells frame rail repair kits, if any of you with rust issues is looking...

http://www.xcessivemanufacturing.com/on ... =41&step=2

User avatar
Jabberwocky
Posts: 159
Joined: Mon May 23, 2011 9:42 pm
Car: 08 Subaru WRX
Location: Taneytown, MD

Post

The Thanksgiving holiday gave me a couple days off to get some more done. The brakes are finished, here you can see the new calipers and pads up front. Turned down the rotors and sprayed them with the gray rust inhibitor so they stay fresh until I get it on the road.

Image

Same in the back, except I reused the old calipers I had. The boots were in good shape and the pistons screwed back in the calipers easy so I threw some pads on them and let it go. I filled the reservoir up with Motul RBF600 and bled it all out, and got the brakes all sewed up. Heres the back, you can see I put the doors back on as well. Im about to start trying to figure out how to wire up the power windows/locks, which Im not really looking forward to.

Image

Now back to the cage...A few months ago I made the front piece to go behind the seats and across the roof. I took that and welded two pieces of solid tubing to it that the rear legs can slide on to. That way I can assemble and paint it outside of the car, then remove the rear pieces and bolt it back together inside the car. Easier fit, and I wont have to burn my headliner and such welding it together inside.

Image

And this is how it looks with the rear sections bolted on to those pieces:

Image

Image

Then welded the cross brace between the two rear legs, ground away all the slag and sprayed it with primer:

Image

Image

After the primer I let it dry and sprayed it with some Case IH bright aluminum paint the old man had sitting around collecting dust. Always nice when you can save money by finding old leftovers.

Image

I am very pleased with how it came out. Looks decent, functional, and I only paid roughly $100 for the tubing. All thats left is to put it back in the car and weld it in place, then when I get my seats measure where I need the harness bar and weld that on. I should have it in the car by the end of this week.

I ordered widebody quarter panels from Andy's Auto Sport and they arrived last week, only problem is they sent me a pair for a coupe and I have a fastback. Kind of funny when the only ones Andy's has advertised on their site are for the fastback. I got in touch with them, they have to get in touch with their supplier, and Ive been waiting to hear back. As soon as this issue is taken care of its on to some body work.

Image

User avatar
Jabberwocky
Posts: 159
Joined: Mon May 23, 2011 9:42 pm
Car: 08 Subaru WRX
Location: Taneytown, MD

Post

Welded the cage in earlier this week. You may notice in the picture taken through the back hatch I had to use a half inch shim on the driver side rear leg. I guess it twisted when we welded outside the car and would not sit even. Quick, easy fix though...

Image

Image

Image


Return to “240sx General Discussion”