Disclaimer:
I am not responsible for you getting hurt or messing up your car. Be safe and be careful.
The car:
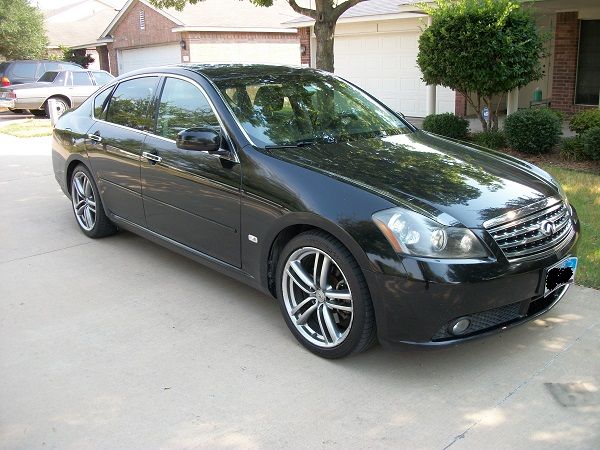
Tools:
1) 1/4" ratchet
2) Shallow 10mm socket for 1/4" ratchet.
3) 10mm nut-driver, or you can use the ratchet
4) Serpentine belt tool or you can use a 1/2" ratchet with a shallow 14mm socket.
5) Strap wrench or a set of oil filter pliers, or a very large pipe-wrench. You'll see what I'm talking about.
6) Small pry-bar or large flat-blade screwdriver.
Stuff you need that costs money:

1) Electromagnet for A/C compressor clutch: $99.50.
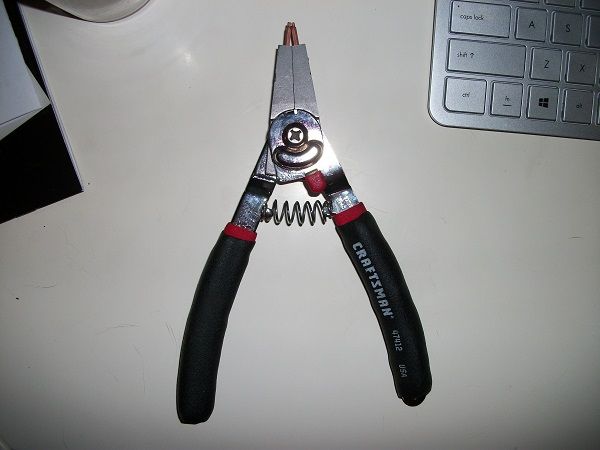
2) Craftsman snap ring pliers - $26.50. You actually need a larger pair than this as well to have the exact right tools, but I couldn't find one. This did work but the job was more difficult because of it.
3) Serpentine belt tool - $15.99 at Harbor Freight
4) (Optional) 6-pack Shiner Bock - $7.99
Infiniti quote to replace compressor - $1947.43
HOW TO:
I don't have photos for the easy stuff, so only do this if you have some mechanical knowledge. Also, the previous owner threw away all the decorative panels from inside the motor compartment of this car, so I don't have any idea how to remove those. I'm sure they are cheap-a**, snap-ins, so I'll leave that up to you. You need to remove the front left and right decorative panels.
1) Jack up the front of the car about 18 inches and secure with jack-stands.
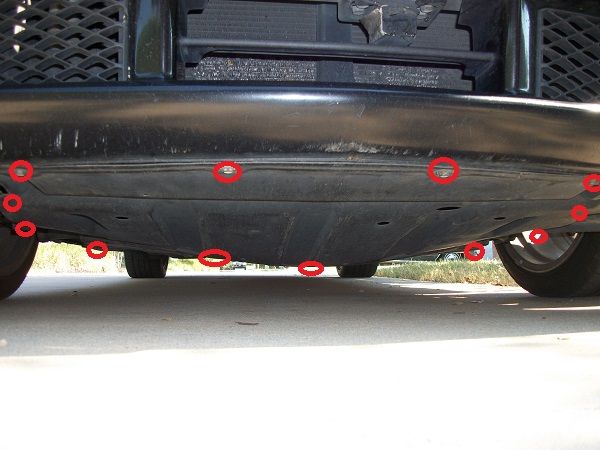
1b) Remove the plastic panel under the car that you remove to access your oil filter. It has about thirty 10mm bolts securing it to the bottom of the car. Seriously, though, I think it's 10-12 bolts.
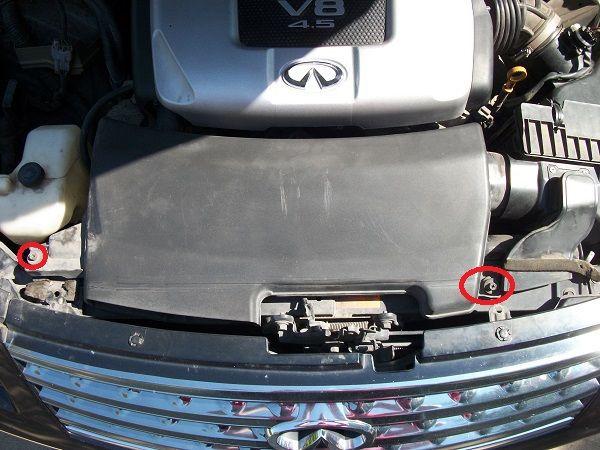
2) Remove the cold-air intake plenum from the top of the radiator. It is held on with two 10mm bolts.
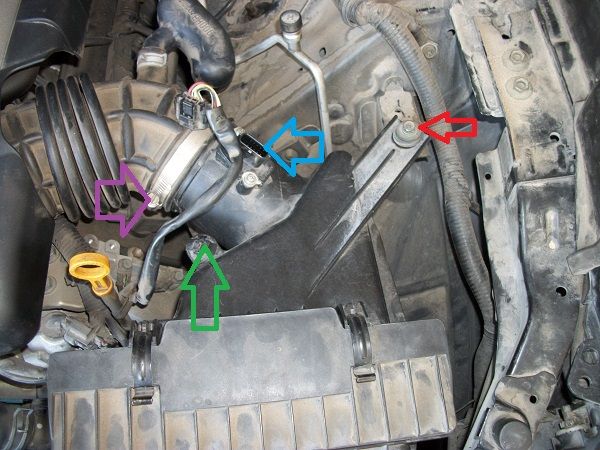
3) Unplug the Mass air flow sensor. See the blue arrow in the pic below.
4) Remove the 10mm fastener for the air box, shown with red arrow at top right in the pic below.
5) Loosen the air intake hose clamp shown with a purple arrow in the pic below.
6) You will have to remove the air-intake box, so you will need to disconnect the MAF sensor wire from the MAF sensor in the air intake box. You have to cut the ty-rap to do this. See the green arrow in the pic below. It's really irritating that the ty-rap can't be replaced by a normal ty-rap. I still have to source the kind Infiniti uses. There are some on the electric fan assembly, too, as you will see in a sec.
7) Pull up on the air-box and remove it from the car. It is pushed down into two ball-and-socket fasteners at the bottom, but they just snap in and out. You should have the view in the pic below. The red arrow shows the A/C compressor.
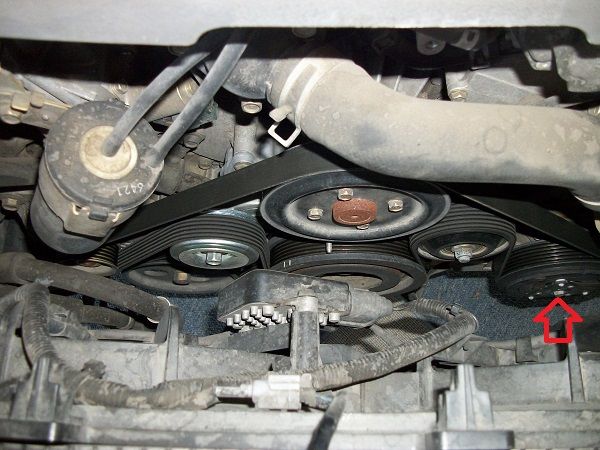
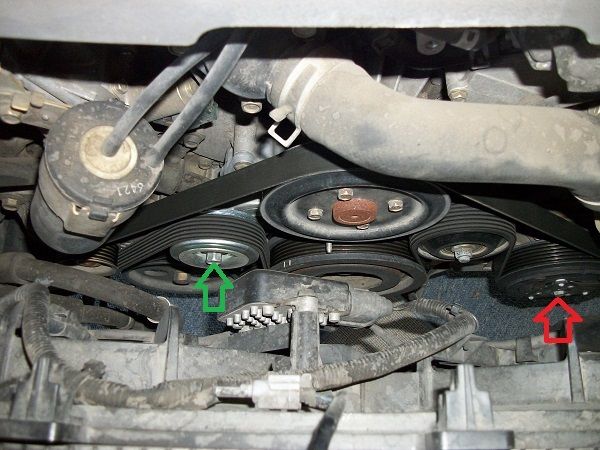
8) You need to remove the serpentine belt. I'm sorry that I did not take a photo on how the do this, but it's really easy. The map of the belt route is in your owner's manual, or you can use this pic for it. Basically, you use the serpentine belt removal tool or a large ratchet/breaker-bar with a shallow 14mm socket and turn clockwise on the bolt-head shown with the green arrow in the pic below. This moves the tensioner clockwise and slackens the belt for removal.
9) Drink a beer.
10) Remove the 10mm bolt in the center of the A/C compressor clutch. See the red arrow in the pic above. This bolt secures the A/C compressor clutch plate to the shaft of the compressor. You may need a strap wrench of large set of pliers to hold the plate while removing this bolt. The pulley is separate from it, so leaving the serpentine belt on before removal of the bolt does not help.
11) Remove the A/C compressor clutch plate. It should just come right off, so be careful and tilt it upward when it comes clear of the compressor shaft. There are air gap washers in there that need to remain in there. Don't drop one and lose it or you'll have to go source one.
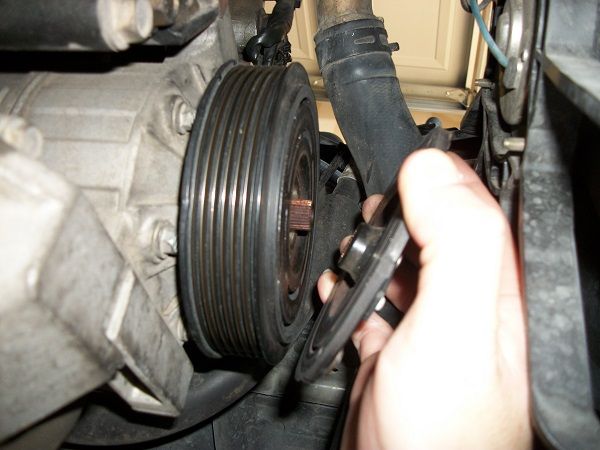
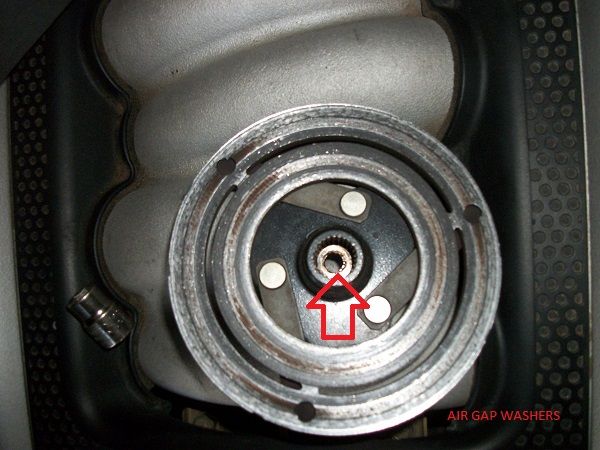
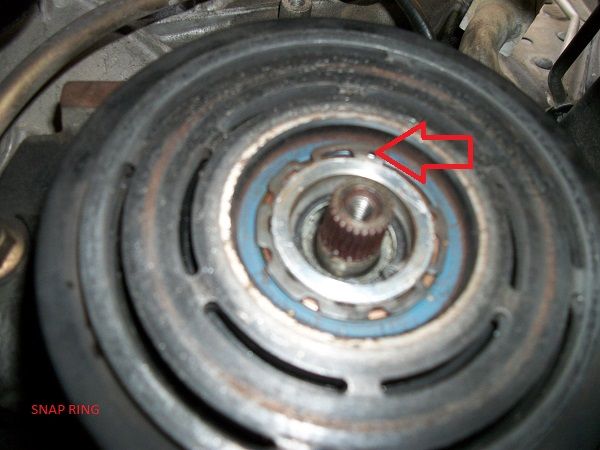
12) Now you have a view of the front of the A/C clutch "flywheel" or "serpentine pulley." Whatever it's really called. You'll see a snap ring on the front of it that secures the pulley to the body of the A/C compressor. Guess what, though. You can't get a pair of snap-ring pliers in there to get that off without taking the electric fan assembly out. Dammit.
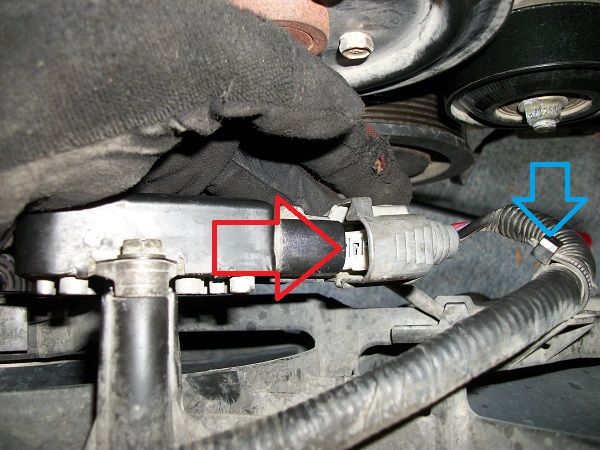
13) Unplug the electric fans at the ballast, which is located between the two fans. See red arrow in pic below.
14) Also unplug the little grey connector at the top of the fan assembly that I forgot to take a picture of. It's right in the center, right by the hood latch. (NO PIC)
15) Separate the electric fan power wire completely from the electric fan assembly by cutting the 4-5 ty-raps that secure it to the fan assembly. See blue arrow in pic for one of them. These are more of those stupid ty-raps I need to source so that I can replace them.
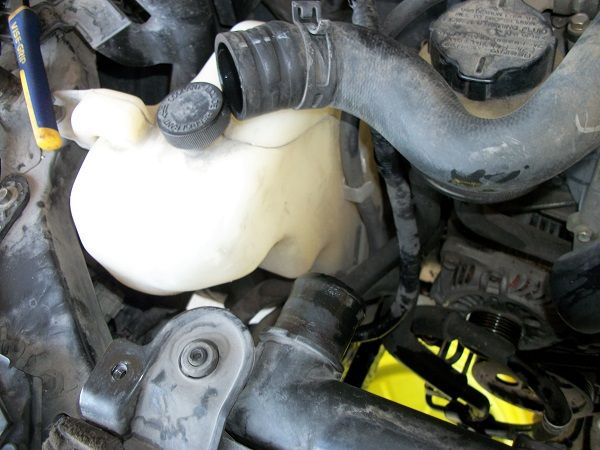
16) At this point, you have a choice to make. You can either just disconnect the radiator hose at the top passenger side of the radiator, or you can drain the radiator first with the drain plug. It's up to you. I was already here, so I figured I would just replace all the coolant/distilled water mixture in the radiator, so I drained it. If you just unplug the top hose without draining the radiator, you'll only lose about half of a quart of coolant. You have to disconnect this hose to get clearance to get the fan assembly out.
17) Remove the two 10mm bolts that hold the fan assembly to the radiator. Sorry, forgot to take a pic before removal, but the red arrows show you where they were.
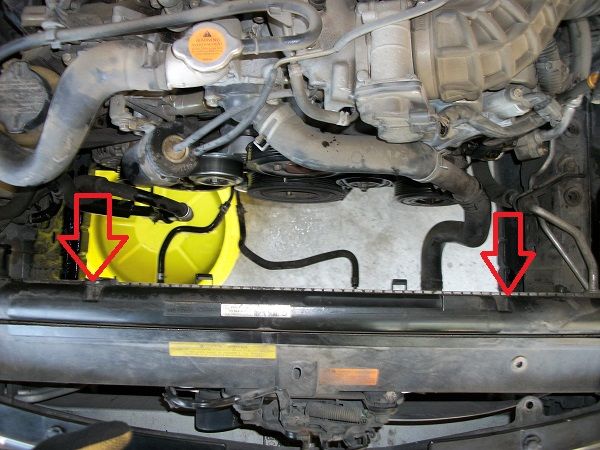
18) Get back under the front of the car and look at the bottom of the fan assembly. You'll see a hose that is tucked into a holder on the fan assembly. Move that hose out of the holder. Now you can lift the fan assembly out of the top of the car. Be careful not to contact the radiator when removing it. The picture above shows you what you should see after fan assembly removal. Now you have a little more room to work with at the face of the A/C compressor clutch.
19) Remove the snap ring that was pictured in #12. Use your fancy new snap-ring pliers. You will notice that you are pretty much rubbing the radiator with the handle of the snap ring pliers, so be very careful.
20) That snap ring is the only thing, theoretically, holding the pulley to the A/C compressor body, but if you live up North with the ice and salt, the pulley bearing might be held on with corrosion. For me, it came right off with a slight pry from the top and bottom. Be careful when prying on the pulley not to damage it.
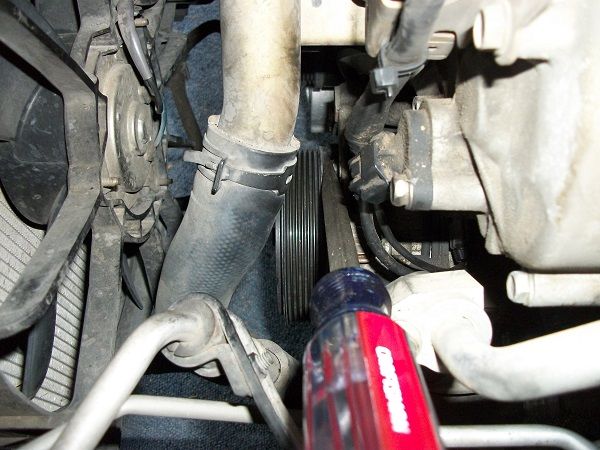
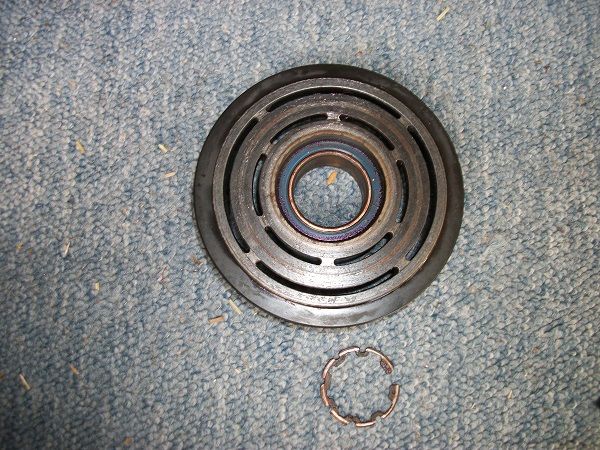
21) With the pulley removed, you now have a view of the electromagnet. Follow the power wire to the connector on top of the compressor and disconnect it. This was a pain in the a** to get to. I forgot to take a pic of it because I was getting pissed at this point. Little did I know that I was about to find out what pissed really was. Below is a pic of the electromagnet, which is held to the body of the compressor by only a snap-ring. A very big, very hard-to-get-to, very hidden-from-sight, piece-of-s***, of a snap-ring. You will learn to hate it.
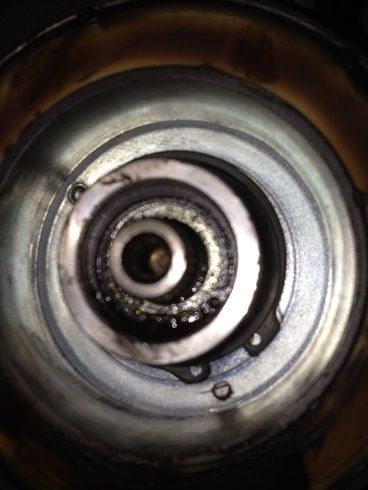
22) Remove the snap ring that secures the electromagnet to the compressor body. Sounds so simple, doesn't it? You'll notice first off that you can't actually see it because it is about an inch inside of the electromagnet body and you have no straight-on shot of the compressor because of the radiator. You could remove the radiator, but then you still have the condenser in the way, which you don't want to remove because the whole point of this is to not break into the A/C system. Put the largest tongs in your snap-ring pliers (the gold ones.) I duct-taped a small mirror to the radiator, but that didn't really help because once you get the pliers in there, the pliers get in the way of your sight, anyway. I'm not going to lie to you. I did this completely by feel. I had to walk away a couple of times. It took me 3 hours to get that damn snap ring out of there. When it finally came out, I almost cried.............and I'm a 44 year-old man. Do what you can and be careful not to puncture the radiator with the pliers, or your fist. I drank some beer.
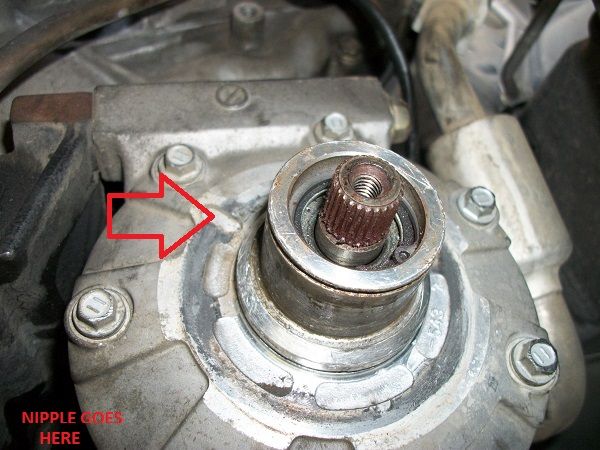
23) The electromagnet falls off at this point and this is what you see. Notice where the red arrow is. There is a dimple on the electromagnet body that goes in that relief.
Once you get the snap-ring back on there to hold on the new magnet, that dimple and a little metal tab are all that keep the electromagnet from spinning with the pulley.
24) Drink two beers.
25) Put the new electromagnet on the compressor. Be sure to put the dimple from the new part in the relief shown above. I realize that the snap-ring is not all the way on in this picture. The picture is actually what made me realize this. I got it in there after I realized the magnet had some wiggle to it, which is BAD. See #24.
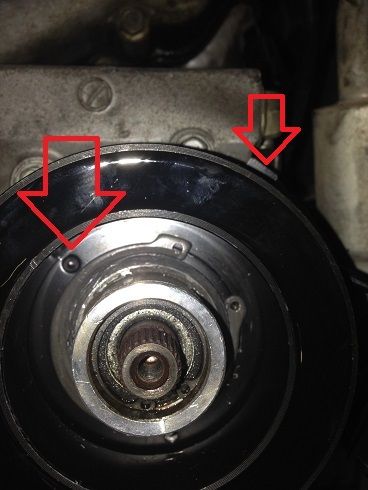
24) Once you get the snap-ring back on there (Not as much of a pain as removal) to hold on the new magnet, that dimple and a little metal tab are all that keep the electromagnet from spinning with the pulley. See both red arrows. The one on the right is the metal tab. That tab sits against the body of the compressor to keep the magnet from spinning. If you get the snap-ring on there and the electromagnet feel loose on the compressor, bend that metal tab toward the body of the compressor with a punch and hammer. If the electromagnet is loose, the pulley will contact it all the time and make a rattling noise. Worse than that, the pulley could technically grab the electromagnet hard enough to spin it around completely with it, which would break the power wire and possibly cause some serious damage to the A/C compressor and serpentine belt system. I don't know why Infiniti has the A/C on the main serpentine belt system. It should have it's own belt. Make sure the electromagnet does not wiggle very much at all after installation. That's the thing to remember.
25) Plug the electromagnet in. If you order this exact part, the wire will be about an inch too short to connect it in the stock location, so you can either extend the wire before installation or you can pull the stock plug on the harness-side from the holder on the compressor and just secure it somewhere else with a ty-rap, like I did.
26) Put the pulley back on with the snap-ring.
27) Put the clutch plate back on with the 10mm bolt. You might need the strap wrench or a very large set of pliers to hold the clutch while torqueing the bolt. I don't know what the torque spec is, but it's not much more than 5 ft/lbs, judging by how easy it was to remove.
28) Spin the pulley and make sure that spinning the pulley does not spin the clutch plate. If it does, you lost a gap washer, or you need to go source some. You keep putting in washers until the clutch plate has a gap between it and the pulley (flywheel.) It's called an "air gap." If the clutch plate spins with the pulley, it would basically mean your compressor was compressing Freon all the time, which would be bad if your A/C wasn't actually turned on. That would damage all kinds of stuff.
29) Put your fan assembly back in the re-attach the hose at the bottom in the holder on the fan assembly. Run your fan power wire back over to the ballast and plug it in. You just have to put regular ty-raps where you can until you source some of those stupid ones from Infiniti. Don't forget to plug in that little plug at the top of the fan assembly, too.
30) Re-attach the radiator hose.
31) Put the air-box, cold-air plenum, and under-motor plastic plate back on.
32) Plug in the MAF and tighten the intake tube hose clamp.
33) Turn on A/C and enjoy cold air, again.
34) Drink the rest of your beer, if you have any left.


