
Replacement of 2000 Infiniti Q45 AE Knock Sensors
Required tools:
8-14mm sockets, 3/8" and 1/4"
8-14mm open ends, and a large open end (not sure on size, 24mm maybe?) for EGR hard line (I used a STRONG STEEL crescent wrench and it came clean off.)
Hose removal tool (homemade here, heated and bent screwdriver)
Nice set of hose clamp pliers
Pick set
Small hammer to tap wrenches (if necessary)
Torque Wrench, 10-100 ft/lb
Above all, Patience and Attention. You are exposing the internals of your engine to the outside, so you need to pay careful attention and have dry hands.
-----------------------------------------------------------------------------------------------
Here's the scanned receipts for part #'s and pricing. Something may be missing or on another order so don't take this for certain, but I'm sure 95% of the parts are there.

------------------------------------------------------------------------------------------------
1) FSM suggested method: Remove Intake manifold and plenum.
*This took me about 3 hours to get to, and replace only, the knock sensors. The FSM is vague about procedure, and it was my first time. I would say I could have the plenum off again in 1 - 1.5 hours.
OR
2) NICO Member "FarFetched" method: remove crankshaft fan, shroud, and alternator to access under plenum area.
This was pioneered by FarFetched, and I have to give him a round of applause for managing to do it. It is clever, but with my mammoth hands, I could only remove them, replace them, thread them, but didn't have the patience to get the small metal clip around the connector once connected. Burned about 3 hours including removal of fan shroud, fan, alternator, and that B***H of a large coolant hose. This method could be accomplished by someone with a good back, lots of patience, a long and very short 12mm open end GEAR GEAR GEAR (did I say GEAR) wrench, and tiny hands...
...I quickly gave up method #2 and went with the traditional plenum removal. I am VERY happy that I did, as I am very anal with my car, and furthermore was astounded (as tech and max always say) with the filth inside. Also, the asymmetry of the build-up was remarkable and sickening with 180k on it.
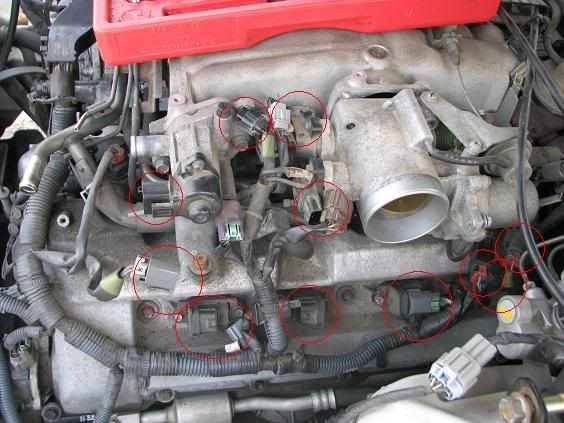
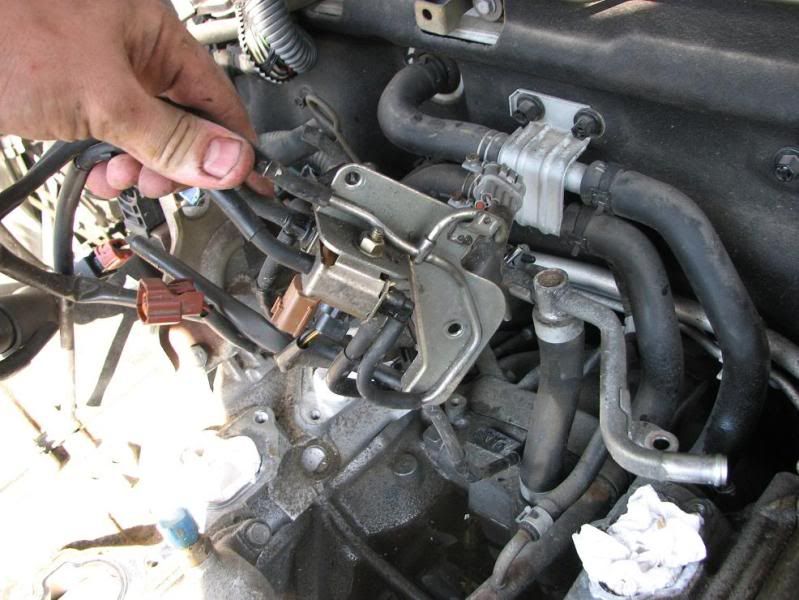
Here a few shots from my frontal attempt with removing alternator. Pretty tough to get the clips on the connectors from that angle, and no intake path cleaning benefits noted. I'm scratched up. Knock sensors are circled. The nasty part is the driver's bank, which is behind the hard coolant line that feeds the heater core. If you live in a country with lax child labor laws you may be in luck, but my hands were too big for this method.


Not happening for me - check your local child labor laws.
Traditional Factory Method - Removal of Intake Manifold and Plenum
1) Remove Airbox, and tubing.
Several bolts, a few electrical connections. Be especially careful with these connections. Throughout this process you NEED to have a few different colored sharpies, baggies, and wire ties to greatly simplify reassembly.
2) Remove the IACV valve.
You could just probably just remove the rubber line and 2 connectors, I don't think you have to take it off the manifold. I wanted to clean it out with compressed air.
3) Remove Throttle Body and harness connections.
4 bolts, several connectors, and 2 coolant lines. Those lines aren't fun and are buried on the bottom, on opposite ends. Be careful with the clips: many of them make a "click" sound when they are "engaged" for removal. Be sure to wiggle them and work the sides if you have to with a small screwdriver twisting motion to separate them...don't just pull. Don't break them and take your time. Pics are of harness clip locations, one side of two difficult water lines, inside of filthy Throttle Body, and 3 shots into filthy intake manifold.


4) Remove main wire harness from the engine.
This is optional but recommended for ease of the whole project. This includes 4 injectors, a bunch of other connectors, and those bothersome plastic ties that mount to the engine block. Try not to break them, use needle nose pliers on the reverse side to get them out. There are also 2 sensors on a bracket on the firewall end of the harness that will require attention.
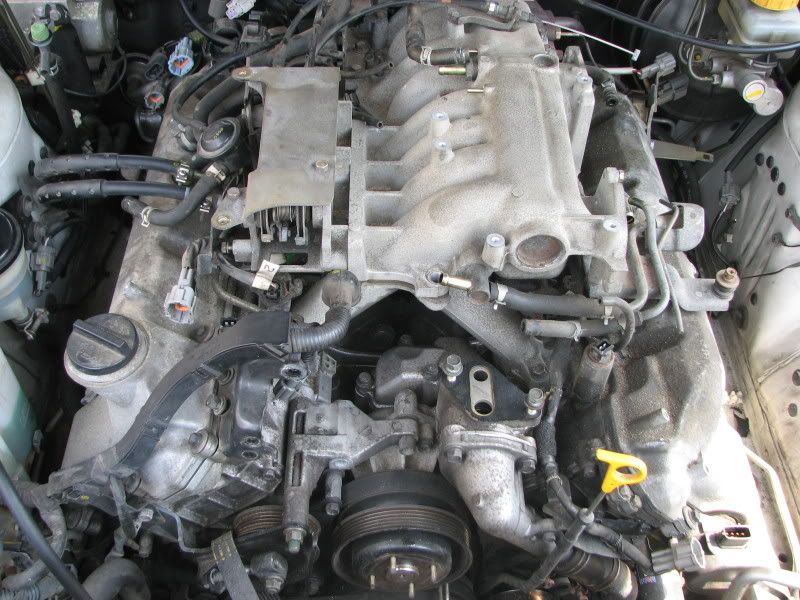
Harness installed with circled connections for removal:


Harness removed:

5) Remove breather tubing from top of engine.
There's tons of vacuum lines. Use pictures or be gifted...your choice.

6) Remove EGR connections from rear of engine.
If you don't have a large enough wrench to fit PROPERLY, go get one. DO NOT attempt to remove this without the proper fit. Damage this and you're in for a world of hurt. Lube it with rustbreaker first if you have to, but be careful. There is also a 14mm hard line connection in the rear. It's in nasty need of cleaning!

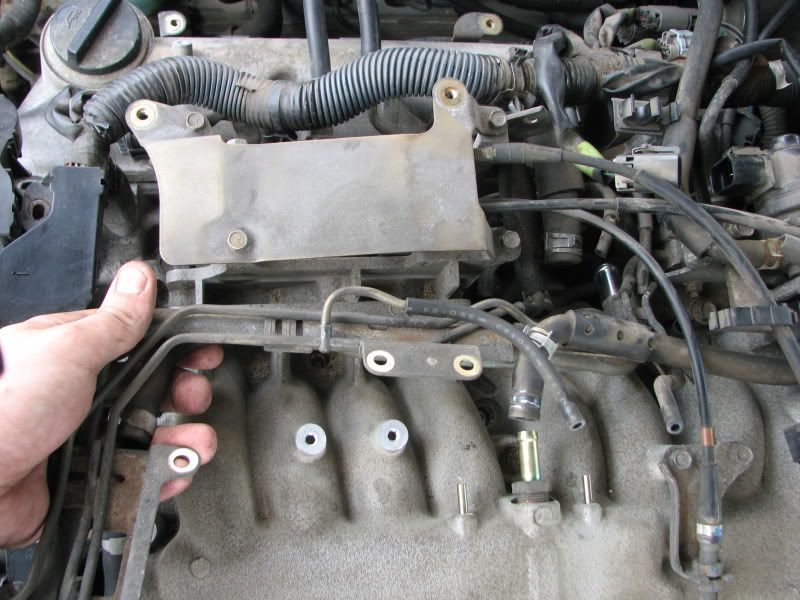
7) Remove plate covering throttle cables.
8) Remove throttle cables from intake manifold.
9) Remove Intake Manifold.
There are five bolts holding the manifold onto the lower plenum, and many vaccum lines and coolant lines. Take note of their location (or use the pics in this walkthrough).
Remember the small vacuum lines, one exiting passenger side, and one rear, and 2 large vacuum lines on rear. Also, there is a 12mm or 14mm bolt that connects a bracket from the intake manifold to the head. Remove one of those bolts. I also stuffed the lower runners and blew everything out with air...I'd suggest you do the same, although you'll be plugging them again when you remove the lower runners, since you're so careful, RIGHT?

10) Disconnect fuel lines.
Be sure to depressurize the system by opening the gas cap, or you'll have some spillage. Be ready with plugs anyway. You can see my fine choice of plugs below. Be prepared, as these bastards are REALLY on there - you'll have to use a adequate tool to avoid damaging the lines. DO NOT grip with vice grips/pliers and twist as you pull.....you'll bend/break something.

NOTE: The lower runner gaskets are a whopping $33 each, so if you don't want to spend the $60, you can attempt to clean the runners while on the car. I hate the thought of bits of rag and chemical getting in there, so for $60 and such a rare service I opted to remove everything.
11) Remove fuel rails, with injectors attached.
DO NOT disassemble fuel rails! Remove them with injectors mounted. Undo each electrical connector, and I chose to cut the fuel line joining the two as it was a PITA and I didn't have patience for it (new one from http://www.everythinginfiniti.com). There are (I think) 2 12mm bolts each fuel rail on, among a bunch of vacuum lines and other stuff.
12) Remove plenum bolts.
On either side of each runner, and a few others as well. At this point you'll probably find a few other vacuum lines etc. you hadn't detached yet, you'll get to those quickly. You'll need to remove a fuel bracket close to the firewall to gain access to a few bolts. I've circled some of them below. The last shot displays the O-rings for the fuel injectors.


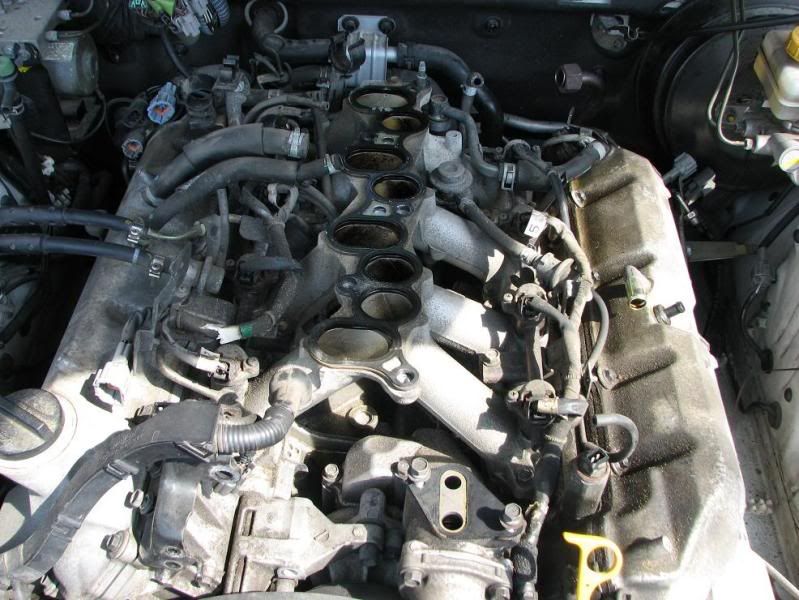
13) Remove plenum and PLUG HOLES IMMEDIATELY.
If you're anything like me, by this time your back hurts, you can't get comfortable, and you're prone to drop something. The FIRST THING you need to do when you remove any portion of the intake manifold is to ensure you won't accidentally introduce a foreign object into the engine. Plug immediately with rags. You really don't want to go through all this, to drop a nut or socket into your engine. Be smart, resist the urge to be brave, and plug them first. And no, I didn't drop anything in there! This is your opportunity to take a break, have a drink, and get 8 of something soft.
There is a steel bracket housing vacuum connections mounted to the underside of the lower runners. Lift the front of the plenum to access two 10mm bolts to remove the bracket, and allowing full removal of the plenum and disconnection of the MAP/BARO solenoid.
One or both of these bolts WILL fall between your fingers INTO YOUR ENGINE if you ignore my above advice regarding rags. **NOTE** The first time I reassembled, I neglected to connect the MAP/BARO solenoid...make sure to connect all vacuum lines and sensors before bolting in lower runners and intake manifold!
14) [optional] Remove coolant "T" over knock sensors.
Allows better access to torque knock sensors. I chose to remove it so that I could ensure they were torqued to spec. If you are brave, poor, or stupid, torque them by hand and leave it on. I figured it was worth it to replace two small gaskets to ensure I wasn't doing this again next weekend.

Removed:

Incidentally, that sadly became reality and I had to redo this project the next weekend! The 4" long fat coolant hose leaked into the valley and I elected not to replace it the first time. It failed after reinstallation and I wasted 4 hours the next week redoing this, so if you are over 100k, replace every coolant hose in this project!!!
Here's 3 shots of all my parts removed, getting ready for cleaning and rehabbing.


Assembly reverse of installation. Take great care to torque everything EXACTLY as spec'd in the FSM, which is available at http://www.nicoclub.com/FSM . Especially the injectors!!! They require a twice over, meaning you must torque them all to 8ish-12ish, and then again to 22ish (check FSM for proper torque settings!)
I am proud to say I didn't break, or even damage, one sensor or connector. A testament to Infiniti quality. I did cut one fuel hose that passed under the plenum...ok, two. Anything I can't replace from a "functioning" perspective within an hour, that costs less than $50, I replace when I'm doing other jobs. With few exceptions this rule has served me well.
If you are not mechanically inclined whotsoever, or have bad organization skills, this is not a job for you. For anyone competent with some experience, this guide should serve to bring you to your faithful end. Feel free to PM me any suggestions and I will modify the thread.
Email me with any questions at p a r a n o i d d o t j a c k [at] g m a i l . c o m
Credit for this walkthrough goes to the fantastic NICO community and the knowledge I have soaked up over the last 5 years here. I hope this is helpful to others.