YOU WILL NEED:
1 can Plasti-Dip in the color you choose
newspaper or plastic to cover area around the headlamp
blue painter's tape
electrical tape
sharpy marker - black
If you haven't already bought your plasti-dip ... allow me to recommend my mate Fonzie from 'dip your car'. Get the pre-dip spray for cleaning the surface, get one can of black plasti-dip, and also I HIGHLY recommend getting the "dip nozzle" ($2 I believe). It makes all the difference in applying smooth, even coats with better focus than the reg spray nozzle on the can. He ships same day via UPS ground. He also carries a ton of other plasti-dip products nobody else has, exclusive to his shop.
PLASTI-DIP Vs PRE-MADE EYELIDS:
Buying eyelids can cost as much as $350 and you have no choice of size or design. My eyelids cost less than $20 and if you don't like it or want to modify it - just peel it off and start over! No paint thinners, no sanding, no surface prep needed. If you have never used plasti-dip watch this short video from Fonzie - it gives you a basic understanding of techniques for spraying, how to mask, etc.
.
http://youtu.be/u8Gfd46AxLw
.
PREPARATION:
You need to determine how much of the headlamp you can cover without interfering with the low-beam light spread. The night before you do this project, park you car facing a flat, white wall, or vertical surface with the lowbeams ON. Position the car so you can see the upper edge of the lowbeam light spread on the wall. Lay a piece of flexible cardboard or similar on the headlamp lens and slowly slide it from the top of the lens downward until it starts to cut into the upper edge of the light-border on the wall. Use a sharpy marker and trace the BOTTOM edge of the cardboard onto the lens ONLY over the lowbeam section. This is the max amount of headlamp lens you can cover without affecting night driving.
DESIGN:
I recommend using electrical tape - it can stretch and adhere to curved surfaces and it can be peeled back and re-positioned multiple times and still stick to the surface.
Place one end of the tape at the turn signal side of the lens where it meets the grille - this can be low as you like - just make sure you don't block the view of the turn signal. I decided I wanted the eyelid to end on the fender side just above the top of the amber parking lens, so the other end of the tape was attached there. Once you decide where the tape will start and end, it's just a matter of peeling and re-taping until you make a smooth, curved transition from the turn signal - gradually upward across the lens to the stop point you chose on your fender. *** Do this to BOTH headlamp lenses and then step back and view the tape on each side to be sure they end and begin at the same point, and have matching curves along the way so both eyelids will match when you're finished. (I have no pics of this step [Sorry!] so I am using photoshop below and my mouse can't make a smooth line (not while my hand is attached, anyway).
.

.
Your first taping will look hinky, so don't worry. This is where your design begins - peel the tape back and re-apply along the entire lens while changing angles along the way until you find a shape you like that stays above the mark you drew over the lowbeam area. When finished creating the border, make sure the tape is secue against the entire lens and use a sharpy marker and trace the BOTTOM edge along the entire length of the tape, marking the lens from the turn signal to the fender. Remove the tape. This will be your guide line when masking the lens.
MASKING:
***The eyelid border is the LAST thing you want to mask because it must be the FIRST tape you remove.***
Open the hood and mask the rest of the area FIRST as seen below. You will see that our headlamp lenses have a thin rubber strip running along the top edge of the lens. You will need to cover this rubber strip with masking or painter's tape (see below) Next you will need to mask around sides of the lens area where it meets the car as shown below, leaving about an inch of body exposed.
.

.

.
Lastly, use painter's tape and newspaper (or plastic) for the first step in making your eyelid bottom border. Stay away from the black guide line you traced on the lense - leave a small open space (less than the width of your electric tape)and curve the newspaper as best you can - it doesn't have to be neat - just make a small open space between the painter's tape and your guide line. Then get fresh electric tape and lay it directly against the guide line, following the curves of the line you traced. Make sure you match each curve smoothly by bending the electric tape as you did originally. Use a plastic squeegie or flat surface to make sure the electric tape is 100% secure and flat against the lens along the guide line. (my pic shows a gap cuz my eyelid is done and didn't want to apply tape to it - yours should show NO gap at all with the electric tape joining to the paper you placed on previously.
.

.
APPLICATION:
Finally the easy part.
This project is different than other Plasti-Dip applications. Usually, we spray the area with a few coats, wait for it to dry, then peel the borders. We cannot do this project that way because we have 'created' a border on the surface of the lens itself. We can't simply rub that egde off and we need it to remain a smooth, clean edge after spraying. Follow the guide below exactly!
I recommend at least 4 coats of plasti-dip, waiting only 2-3 minutes between coats (you do NOT want the coats to dry completely between applications) - be careful to just lightly coat the lens on the first pass. On subsequent passes, be careful NOT to apply it too closely or pass over too slowly as it it could cause a run. Likewise, don't pass over too quickly or you won't get full coverage - follow Fonzie's technique in the video above. I did one light pass to coat the lens, followed by an addtional 4 coats with regular passes. The surface will look rough, but it smooths itself as it dries, so don't worry.
*** IMPORTANT *** After applying the final coat, you must IMMEDIATELY remove the strip of electrical tape used to make the bottom edge of your eyelid! That's why we applied the electric tape last - pull it backward on itself and downward SLOWLY with a smooth motion until it is removed. (see below)
.

.
After about 30 minutes, remove the remaining masking slowly and completely. Go to each area of the car body that has overspray and rub your finger along the outer edge until it comes up. Then work a finger under it, and slowly peel it off - the dip will automatically 'cut' itself between the car body and the lens. (see video above) You may see some black marker on the lens. This can be carefully removed after the eyelid dries. Make sure you wipe ONLY the marker and stay OFF of the actual eyelid with the cleaner.
CURE:
Plasti-dip will dry in your driveway or in your garage in less than an hour. After 2-3 hours, the outer surface is safe from rain and ambient dust or dirt can't stick to the surface. It will take a full day to cure and bond strongly enough to be safe from people rubbing their fingers on it, etc. I usually wait at least 2 days before hand-washing the car and NEVER use the car washes at the fuel station - no telling how strong a chemical they use as soap or wax treatment or how damaging their cheap brushes are to the finish of your car or your dip. Per Fonzie at Dip Your Car, pressure washing and automatic car washes are safe after a week.
OPTIONS:
I left my eyelids as flat black - right out of the can. You can, if you like, add additional coats of metalizer, glossifier, or pearlizer immediately after the last pass with plasti-dip before any of the coats dry ... or wait until later after the dip cures (1 weeek).
** Remember - if you're doing these coats after the the original eyelid has cured, mask the bottom of the eyelid border LAST because this tape gets removed FIRST and immediately after the new coats are applied.
.
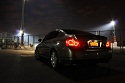
my car on the date of purchase:
.

.
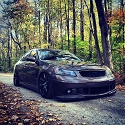
my car today with dipped grille and eyelids, Phillips LEDs, and 'energy' license plate:
.

.
I always liked the design of the headlamps on the Acura TSX and I wanted to do a design based on that shape, but also angled to produce a more agressive look to my front end (well, my CAR's front end). This shape covers more of the headlamp than pre-made eyelids I have seen, and has a slight curve upward near the fender like the eyes of The Grinch to make the front more sinister. OK, so maybe I had too much sugar with my Earl Grey that day, but you get what I'm saying.