skiski329 Pathfinder Restore/Build
I flipped it so you don't have to scroll all the way down to see the new stuff anymore!
So all the new updates are at the top, and as you scroll you see the older updates.
be sure to give it time to load, there are a lot of pictures and you may need to press refresh if they aren't all loading.
11/10/13
Nothing major, but getting ready for winter. Changed the fluid in the differentials with mobil 1 75-90. the old fluid looked good when it was coming out (but I didn't have a clear record of when it was changed last), the rear was darker but i could have driven on it for quite a while longer. also did the transfer case fluid, and picked up some Nissan Matic D fluid from the dealership. looked good coming out slightly deeper red, but the worrier was the drain plug had quite a bit of metal shavings on it the inner circle was filled with fine metal shavings and the outer part of the magnet was also starting to get some. Also greased the drive shaft. I used Mobil 1 grease and pushed out all the old grease that was there (which wasn't much, i was kinda surprised. must have not been greased in a long time). overall, all of these were an easy job, the hardest part was getting the filler and drain plugs off, the last person that did it really deformed one of them. and i ended up breaking a drain socket (never thought it was even possible to do that). so it took a bit to get a new one. it was however the messiest job i've ever done and there is oil every where, and the gear oil really smells bad. Otherwise, I'm going to try to get in that break bleed soon but since my breaks aren't too bad i haven't worried about it. Not sure if i'll get it before this winter, but i would like to drain some trans fluid and re-fill then repeat a few times over the course of a few weeks since it would be too risky to drain it all and refill at this milage.
8/8/13
DId the exhaust and CV boot
Doing this exhaust was challenging. trying to get the pipe from 1.75in to 2.5in and i don't have a welder, so i wanted to do this without welding. Then figuring out what degree bends i would need from the exit of the muffler.
so my first thought was to put a 1.75in to 2.0in converter together with a 2.0in to 2.5in converter. after doing some calculations i was scared that the velocity drop would have been too much in that short distance so i spread it out as far as i could. I put in the 1.75in to 2.0in converter then as much 2.0 pipe as i could fit, then finally the 2.0in to 2.5in converter right into the muffler. from there i removed the resonator and piped it out the back.
Overall it's amazing! the sound is incredibly better. Before it sounded like a tractor or a lawn mower. now it sounds like a corvette! BIg thanks to Borla! It's not too loud and has a nice deep grumble. It's exactly what i was looking for, something not to loud at low rpm's and a solid deeper sound at higher rpm's. Not like those annoying civic's.
only issue i have, is it's a bit close to the spare tire. I drove around for a while and put my hand on the spare and it didn't feel too hot or melty, and i didn't smell any burning rubber. For now i'm going to leave it, but i may later move my spare into the trunk or build a roof rack holder (i'm just not set of the look of that). in the future.
here's the old muffler, and the reason why i changed it out.

here's when i remove all the old stuff.

close up on how bad the muffler was

here's the new parts coming in

test fitting the clamps

mocking up and figuring out how to hang it all up

Finished up! in the air

how the muffler looks under there

leading from the muffler exit is a 60 degree bend pipe.

then that 60 degree pipe is connected to a 90 degree pipe.

from there the 90 degree bend was connected to a 45 degree bend pipe.

here's how it looks out the back


I got all the parts from summit racing (first time ordering from them) they had really good prices and free shipping (that was fast). Let me know if you want to do something similar i can give you more information and a list of the parts i bought.
CV Boot.
I decided to go with a zip up CV Boot, because i thought it would be faster then a regular boot. wow, was i wrong. i spent over 20 hours (spread over 3 days) working on this thing, and that's a conservative estimate.
I would not recommend doing thing at all. I got the CV Boot from 4x4parts.com and thought it would be an easy fast fix.
I pulled off the old boot, then i started to put the new one on and i could see that it was not going to fit on there. I e-mailed them (with pictures) and they said it looked like i put it on right (it's pretty self explanatory, and it didn't come with any special instructions. but it is possible that i made a mistake somewhere) and they don't have any larger sizes. if this boot was slightly larger then it would have worked fine. They said to put some superglue on it and hold the gap together till it holds the ends together. rather i used some 60 second epoxy from my local auto parts store that came with a syringe, so it was easy to put on.
I plan on using this as long as i don't see grease coming out of it, then i will replace it with a regular one.
here's when i got the new boot (still excited here)

here's when i was buttoning up the boot, and realized it wasn't going to fit (not so happy here)

all buttoned up and i slowly crimped the bands while pushing the rubber together, and even then there is still a large gap.

added the epoxy and held it for 60 seconds to set. even then i did not drive it for a few hours just to make sure it had a solid set.

5/16/13
Finally got to doing the wheel bearings. First time iv'e ever done a project like this. didn't take many pictures because there is a guide in the how to section in this forum. I found the Exploded diagram the most helpful and as you can see in the picture, i printed it out and taped it above. and yea that's kite string, it really helped tying the break caliper to the spring to keep it out of the way.

Also i had time, so i decided to black out the badges.
I like the gold but it was starting to rub off and peel off. so i plasti dipped them.
here it is before all taped off.

here it is after, I should have sanded down the peeling parts because it bubbled up around that area. i'll fix it some other day.

This came out much better, here's the first coat

finished up.


5/13/13
Since last update, my SES light came back on so i changed out the 2 downstream Oxygen sensors. It was easier then the upstream ones, but it was colder outside so i couldn't feel my hands.
After That, a day later the SES light came on again..... so i went to get the code read by a mechanic cuz i can't get the pathy into diagnostic mode for the life of me. and it pulled up code P0440 evap system (he also cleared it for me). i was at the junk yard getting a full size OEM rim for my spare. The guy gave me a gas cap off a pathy for free! i got back and tried to wipe it clean, but the old gas on it smelled sooo bad that i couldn't even finish cleaning it. i went to Nissan and picked up a new gas cap cuz that's the cheapest gamble at fixing this code. AND IT WORKED!!!!! it's been weeks and no code yet. and Ohhhh my, i've been shocked at the end of the week how much gas is left in my tank. the gas was evaporating into the air because the old gas cap seal was not keeping it in.
NEW Head Unit. Got it off E-bay, It's not amazing quality but it's got everything.
CD, DVD, AUX, Back up camera, Ipod hook up, 4g off my hot spot, GPS, Bluetooth, MP3, MP4, USB, SD Card reader, Photos, Digital TV, and idk if there's more, here's the link if your interested.
http://www.ebay.com/itm/181124236219?ss ... 1497.l2649
there are more if your interested they are the same unit just different picture on the front screen and different prices. i went through e-bay just because i didn't want to risk looking all of the money. i did find the unit on another website that looked decent and took paypal but i just decided not to risk it. let me know if you want that site.
So it said 2002 pathy compatible, so i expected a plug and play install. well it was misleading. it was for a 2009 pathy. so i had to take the wire harness form the unit and what should have plugged into the stock cables to an audio guy and he cut the wires and attached the 2 white plugs for my stock stereo he also got me an adaptor for the antenna, because in's a 2 prong antenna he got me a converter that you plut in the 2 prong connector to 1 connecter to the head unit. overall it cost $40, quite a good deal, he did it on the spot in like 3 min and i looked on line the white adaptor goes for $19.99 (per one, so i would have needed 2) and the antenna adaptor goes for $9.99. and the fact that i would have had no idea which wire would have gone were is priceless. And all of this is plug and play so i can disconnect and go back to the factory radio if i want or need to.
here's the before, i got anxious and poped off the wood trim before i thought of taking a before pic

With the wood trim off, i only disconnected the top 2 plugs to save time and the trim wasn't getting in the way so i left the other cables plugged in.

Back of the trim piece if your interested, i'm liking those blanks for buttons, i may used those if i put in some flood lights.

This is the OEM head unit, i had to take those fins to screw into the new head unit because it was set for a 2009 not a 2000 pathy. And yes, i striped that one screw that was left in there. i enved up drilling 2-3 mm to get a tip and then got a sharp screwdriver to get a good grip and got it out.

here's the fins on the new unit, if you use the shifter as your 3ed hand make sure to put a rag on it as i did later, i put in 3 or 4 small cuts into the leather. i fixed the cuts with some armorall, not amazing but make the small cuts less noticeable to myself.

Here it is installed. i like how the nissan logo comes on at start up. stil have to button up some of the cables, but there is an amazing gap (hole) from the back of the unit space and near the glove box where the passengers feet go. so i've been pulling the wires, and gps antenna through there.

Overall, really happy, it's got lot's of features for the price, and makes the pathy look less like it's 13 years old. complaints, wiring issue i said above and i notice that the radio was loud even on VOL level 1!, but aux, cd's, dvd's vol was good so i think it may have been the frequency i was on. like i said, still figuring this thing out.
Ohh and it came with a free back up camera and even a drill bit that is sized for the camera so i'll think about putting that in soon.
3/30/13
Changed out my upstream Oxygen Sensors to fix the Service engine soon light
Wrote up how i did it here
how-to-replace-oxygen-sensors-t573400.html
03/27/13
A lot of updates!
changed the fuel filter. I cut open the old one and sure enough it was pitch black, i didn't think of taking a photo, sry.
also had coolant and oil leaking! had a mechanic replace all the valve spring gaskets. and he put in a few new coolant lines that were leaking.
Yesterday i got new pads done on lifetime warrantee (still had to pay $100 for instillation, so kinda a rip off but saved me from freezing my hands off)
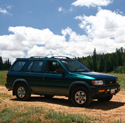
Today I got new tires!!! it was unexpected because i thought the old tires would only need a balance and it would end the vibrations... well they were too far gone. So it was an unexpected cost but you can't plan everything. now the ride is incredibly smooth and the pathy is so much more responsive then before. I can't take any credit for these amazing looking tires they were found by a forum member "ipath" so major thanks for the info and letting me know about rubbing issues. It definitely looks amazing.
Still to come---> i've bought the things needed to do the wheel bearings and that's on my top priority list (thanks to "Towncivilian" and the diy guide on the main page). After that i need to get the o2 sensor replaced because it's throwing a check engine light. I also started on working on a light bar bracket and would like to get some lights on the roof and possibly two more near the mirrors. but going to have to do some serious saving to get all those lights. Otherwise, summer is around the corner and i would like to get some good waxes in, and fix rust spots.


03/27/13
A lot of updates!
changed the fuel filter. I cut open the old one and sure enough it was pitch black, i didn't think of taking a photo, sry.
also had coolant and oil leaking! had a mechanic replace all the valve spring gaskets. and he put in a few new coolant lines that were leaking.
Yesterday i got new pads done on lifetime warrantee (still had to pay $100 for instillation, so kinda a rip off but saved me from freezing my hands off)
Today I got new tires!!! it was unexpected because i thought the old tires would only need a balance and it would end the vibrations... well they were too far gone. So it was an unexpected cost but you can't plan everything. now the ride is incredibly smooth and the pathy is so much more responsive then before. I can't take any credit for these amazing looking tires they were found by a forum member "ipath" so major thanks for the info and letting me know about rubbing issues. It definitely looks amazing.
Still to come---> i've bought the things needed to do the wheel bearings and that's on my top priority list (thanks to "Towncivilian" and the diy guide on the main page). After that i need to get the o2 sensor replaced because it's throwing a check engine light. I also started on working on a light bar bracket and would like to get some lights on the roof and possibly two more near the mirrors. but going to have to do some serious saving to get all those lights. Otherwise, summer is around the corner and i would like to get some good waxes in, and fix rust spots.
11/24/12
Finished the lights!!!
It took longer than i thought (thanks to shipping) but finally have the projectors in and hid's and hid's in the fogs.
I finished at 1:30 am last night so i still have to aim the headlights tonight (the left one is a bit lower, and overall i want to try to point both of them higher. so well see how that goes.)
here is a shot with the lights in, no lenses, just checking to see if it all works and if i need to adjust anything before throwing them in the oven.


Here is the next morning, with the lenses on, like i said only need to align them now.


Here's a night shot.

11/17/12
Changed the spark plugs, wires, distributer, and the rotor cap.
spark plug #6 was well

I got Bosch because i've known them to have really good quality products and they were on sale!! after rebate the plugs were $1.60 per plug.
and i thought they were cool with the air gap technology.


Here is the old stuff
it was really bad!!


Finished the skid plate. it was easy to make, only problem is that a lot of those bolts holding up that plastic bit had rusted threads so i taped a few of the holes.
here's the metal plate i picked up at the hardware store.

After a few bends, cuts, and some holes for the bolts

I still have to make one hole in the front for another bolt.
11/14/12
Got my headlamps and projectors yesterday, so i started to work on the retrofit.
Here's the first one in the oven

Here's both of them with their lenses off.

Here's one with me holding the projector in to see how it looks.

11/5/12
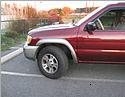
It was nice and warm yesterday so i got to dipping the wheels flat black.
here is the before picture

it was really dirty behind the wheels

And here is the after.
Note: they are still drying, but i wanted to get this one on so that i can start working on the next one.

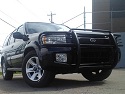
i like how it goes with the bull bar

it's a week later now, but i've gotten some daylight and no rain (washed it yesterday. but of course it rained in the night)

7/9/12
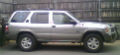
hey! i'm new to this side of the forum, i've been on the Altima Coupe side. A few months ago I got my sisters 2000 Pathfinder, and well.. it hasen't been taken care of that well. so i've started with the basics, been armor all-ing the seats, and they are not that bad, there are a few spots where the leather has been rubbed off. I started to repair the sun spot on the hood and have been getting out the rust spots, touching up the paint, and gave it a good wash and a solid wax (which i don't think it has been in 12 years). Since the front brush guard was really beat up from rocks and the paint was chipping in a few spots from an off road trip. Here's the pic's after I finished, and parked next to the A/C. on a side note, i've been having some problems with the window rolling up. they take a really long time to get up and if i'm driving at night the lights very noticeably dim. and when i let go of the window up button then the lights go back to normal. i'm thinking maybe a grounding issue? recently i had to replace the battery and alternator those are the only things that have needed to be replaced on the car. I'm going to take a closer look into this window issue soon, but definitely open to ideas. Thanks!